almirvuk / Master Detail_navigation_xamarin.forms
Programming Languages
Labels
Projects that are alternatives of or similar to Master Detail navigation xamarin.forms
How to make "custom" Master-Detail Navigation Page in Xamarin.Forms
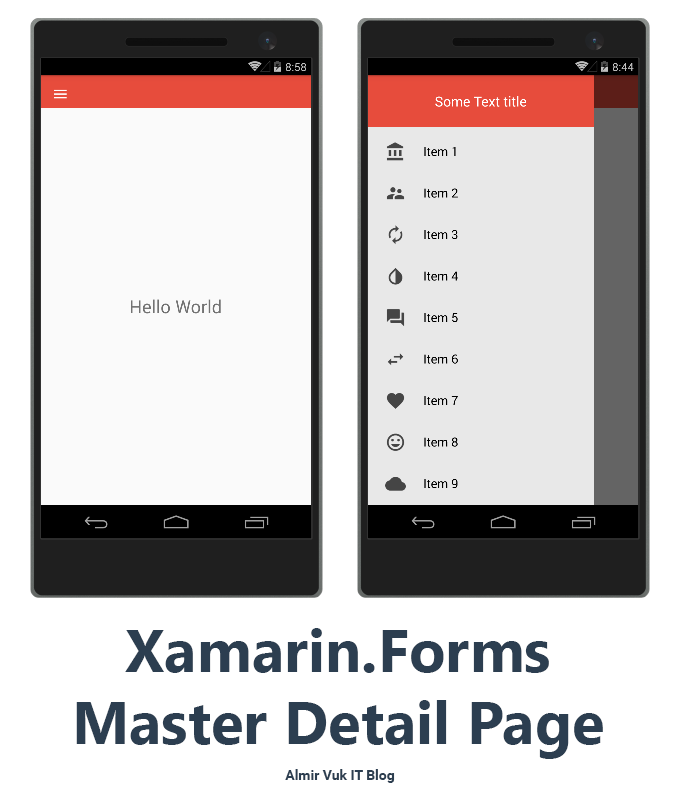
This is a final look at our app, this is how our navigation drawer (master-detail page menu) will look like on Android. Follow tutorial to get this kind of result:
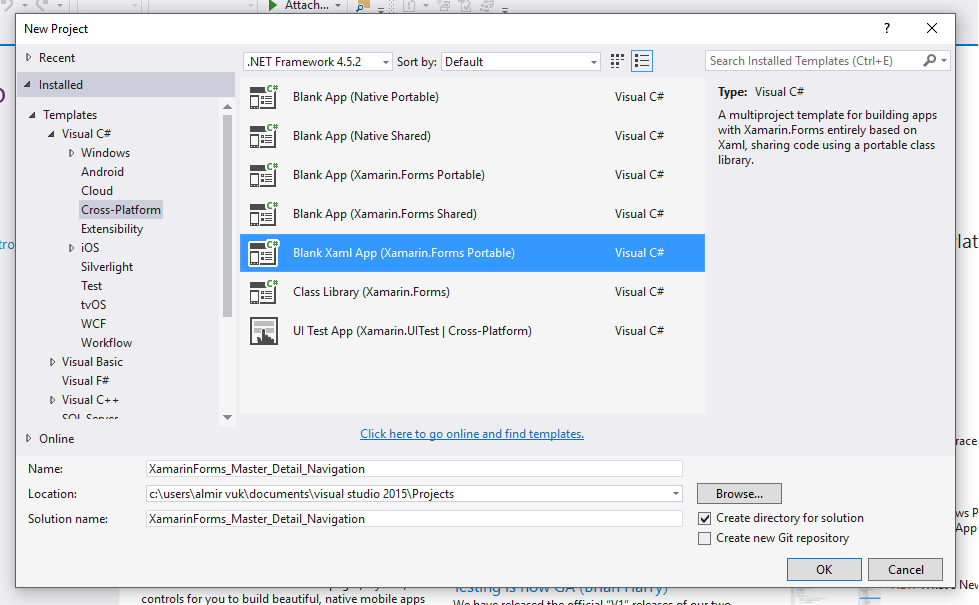
First of all we need to create new project, for this tutorial I will make new Xamarin.Forms app like this;
After couple of second when our solution is ready we will go to the Portable project which holds and share main code for our Apps.
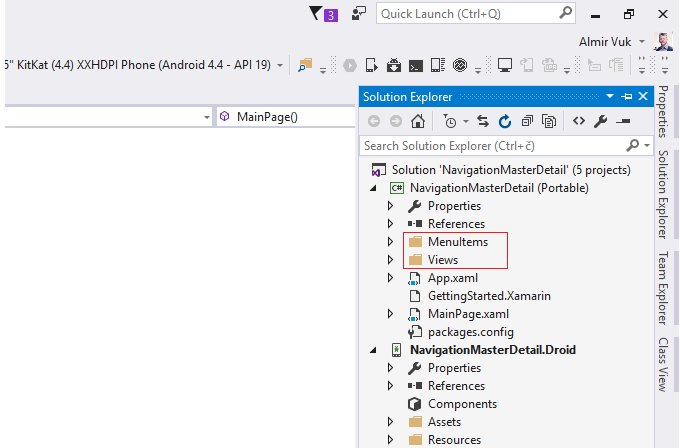
I love to make do project code separation with folders, so I will make two folders one called Views for our Pages and one called MenuItems for our classes which relate to our menu navigation. For now we will have just one class but in the future if we want to upgrade this solution we can store our classes in that folder and anyway project it looks nicer with folders. Like this:
And inside of some basic three pages with Label just to show that that page is open, xaml of page is this code:
<?xml version="1.0" encoding="utf-8" ?>
<ContentPage xmlns="http://xamarin.com/schemas/2014/forms"
             xmlns:x="http://schemas.microsoft.com/winfx/2009/xaml"
             x:Class="NavigationMasterDetail.Views.TestPage1">
  <Label Text="Test Page 1" VerticalOptions="Center" HorizontalOptions="Center" />
</ContentPage>
In side of folder called MenuItem I have one class: MasterPageItem.cs, and it looks like this:
using System;
using System.Collections.Generic;
using System.Linq;
using System.Text;
using System.Threading.Tasks;

namespace NavigationMasterDetail.MenuItems {

    public class MasterPageItem {

        public string Title { get; set; }
        public string Icon { get; set; }
        public Type TargetType { get; set; }
    }
}
Class MasterPageItem will be useful to hold data and info about our menu items, as you can see we have three properties for title, icon (path) and type property to hold info about page that we want to open, this is very important class for next steps in navigation menu implementation.
After we have those classes we can go to the main part in our MainPage.xaml and MainPage.xaml.cs.
Main reason why I had go to tweak this and make my own design of navigation drawer (menu) is to look modern and clean with nice symmetry of elements in menu items. So to get final result from image that you could see at beginning of blog post you need to have MainPage.xaml and ListView setup like this:
<?xml version="1.0" encoding="utf-8" ?>
<MasterDetailPage xmlns="http://xamarin.com/schemas/2014/forms"
             xmlns:x="http://schemas.microsoft.com/winfx/2009/xaml"
             xmlns:local="clr-namespace:MSCommunity_Xamarin"
             x:Class="NavigationMasterDetail.MainPage">

  <MasterDetailPage.Master>
    <ContentPage Title="Menu"
                 BackgroundColor="#e8e8e8">

      <StackLayout Orientation="Vertical">

        <!--
             This StackLayout you can use for other
             data that you want to have in your menu drawer
        -->
        <StackLayout BackgroundColor="#e74c3c"
                     HeightRequest="75">

          <Label Text="Some Text title"
                 FontSize="20"
                 VerticalOptions="CenterAndExpand"
                 TextColor="White"
                 HorizontalOptions="Center"/>
        </StackLayout>

        <ListView x:Name="navigationDrawerList"
                  RowHeight="60"
                  SeparatorVisibility="None"
                  BackgroundColor="#e8e8e8"
                  ItemSelected="OnMenuItemSelected">

          <ListView.ItemTemplate>
            <DataTemplate>
              <ViewCell>

                <!-- Main design for our menu items -->
                <StackLayout VerticalOptions="FillAndExpand"
                             Orientation="Horizontal"
                             Padding="20,10,0,10"
                             Spacing="20">

                  <Image Source="{Binding Icon}"
                         WidthRequest="40"
                         HeightRequest="40"
                         VerticalOptions="Center" />

                  <Label Text="{Binding Title}"
                         FontSize="Medium"
                         VerticalOptions="Center"
                         TextColor="Black"/>
                </StackLayout>
              </ViewCell>
            </DataTemplate>
          </ListView.ItemTemplate>
        </ListView>
      </StackLayout>

    </ContentPage>
  </MasterDetailPage.Master>

  <MasterDetailPage.Detail>
    <NavigationPage>

    </NavigationPage>
  </MasterDetailPage.Detail>
</MasterDetailPage>
The parent element is of course MasterDetailPage and inside of it we can two child elements MasterDetailPage.Master and MasterDetailPage.Detail if you are not sure what for what is master and for what is detail part you will get it in the next steps.
As you can see inside of MasterDetailPage.Master we have ContentPage with one main StackLayout as a parent for two more StackLayouts. First one is for some info at the menu which will be presented above ListView menu. In this part you can put all kind of elements which you need to have such as like profile image for user, email or any other info, for my example I have only one Label just to show some data.
At second StackLayout our main part is located, we have ListView of menu items to show inside of navigation drawer (menu). There is a ListView with some properties which you can tweak if you want to get better or some other style, this is best for me so I included it in this tutorial. Inside of ListView we have ListView.ItemTemplate and DataTemplate for standard binding, and main design for menu items is in the StackLayout where I have Image and Label elements with those properties and sizes in order to make nice design.
Background of ListView and this Master part is some kind of gray with this hex code:** #e8e8e8**
And the color of menu items is: #4c4c4c.
Now when we have this XAML part done we need to insert some data in ListView of menu items. Logic and code for that we will have in code-behind file called MainPage.xaml.cs and it looks like this:
using NavigationMasterDetail.MenuItems;
using NavigationMasterDetail.Views;
using System;
using System.Collections.Generic;
using System.Linq;
using System.Text;
using System.Threading.Tasks;
using Xamarin.Forms;

namespace NavigationMasterDetail {

    public partial class MainPage : MasterDetailPage {

        public List<MasterPageItem> menuList { get; set; }

        public MainPage() {

            InitializeComponent();

            menuList = new List<MasterPageItem>();

            // Creating our pages for menu navigation
            // Here you can define title for item,
            // icon on the left side, and page that you want to open after selection
            var page1 = new MasterPageItem() { Title = "Item 1", Icon = "itemIcon1.png", TargetType = typeof(TestPage1) };
            var page2 = new MasterPageItem() { Title = "Item 2", Icon = "itemIcon2.png", TargetType = typeof(TestPage2) };
            var page3 = new MasterPageItem() { Title = "Item 3", Icon = "itemIcon3.png", TargetType = typeof(TestPage3) };
            var page4 = new MasterPageItem() { Title = "Item 4", Icon = "itemIcon4.png", TargetType = typeof(TestPage1) };
            var page5 = new MasterPageItem() { Title = "Item 5", Icon = "itemIcon5.png", TargetType = typeof(TestPage2) };
            var page6 = new MasterPageItem() { Title = "Item 6", Icon = "itemIcon6.png", TargetType = typeof(TestPage3) };
            var page7 = new MasterPageItem() { Title = "Item 7", Icon = "itemIcon7.png", TargetType = typeof(TestPage1) };
            var page8 = new MasterPageItem() { Title = "Item 8", Icon = "itemIcon8.png", TargetType = typeof(TestPage2) };
            var page9 = new MasterPageItem() { Title = "Item 9", Icon = "itemIcon9.png", TargetType = typeof(TestPage3) };

            // Adding menu items to menuList
            menuList.Add(page1);
            menuList.Add(page2);
            menuList.Add(page3);
            menuList.Add(page4);
            menuList.Add(page5);
            menuList.Add(page6);
            menuList.Add(page7);
            menuList.Add(page8);
            menuList.Add(page9);

            // Setting our list to be ItemSource for ListView in MainPage.xaml
            navigationDrawerList.ItemsSource = menuList;

            // Initial navigation, this can be used for our home page
            Detail = new NavigationPage((Page)Activator.CreateInstance(typeof(TestPage1)));
        }

        // Event for Menu Item selection, here we are going to handle navigation based
        // on user selection in menu ListView
        private void OnMenuItemSelected(object sender, SelectedItemChangedEventArgs e) {

            var item = (MasterPageItem)e.SelectedItem;
            Type page = item.TargetType;

            Detail = new NavigationPage((Page)Activator.CreateInstance(page));
            IsPresented = false;
        }
    }
}
Our MainPage.xaml.cs is inheriting from MasterDetailPage, we have one public property which is List of MenuPageItem type. Inside of constructor after some initialization we are creating some new items. As you can see I named in format page1, page2... just to be clear of course in real project we will use some more logical names for our pages. When I do initialization of objects I set title to be Item 1, Item 2... in very similar way as object names, for Icon I use some random icons that I generated on Assets Studio it has a lot of great cliparts for modern icons but you can use your own if you like your way or you have another style for icons, and for TargetType I set those three pages that I have in my Views folder.
Now I need to put those objects inside of menuList and the main step is to set ItemsSource of our ListView in XAML to be our List of MenuPageItem called menuList.
At the end of constructor we are defining what first page will be "loaded" into the Detail property which represents the Detail side of screen, while Master is for menu or other navigation items.
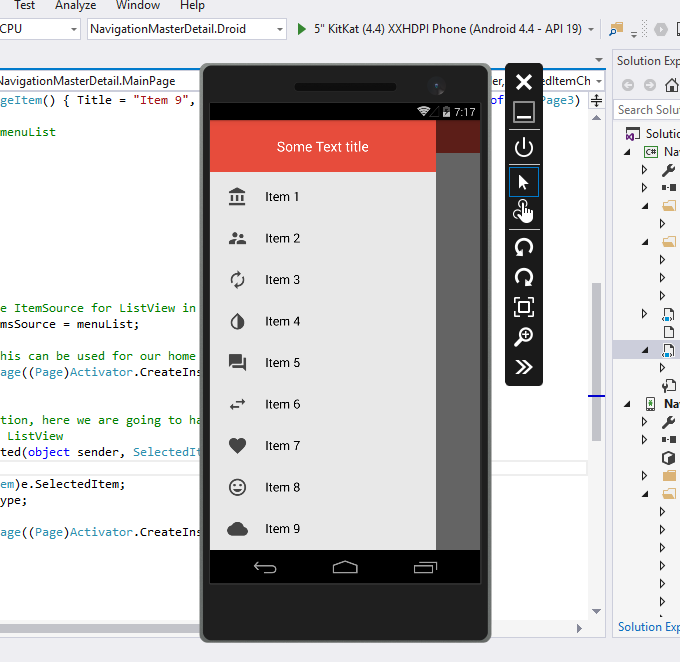
If we run our app we will get this result:
If you were reading code from code-behind file you seen the event which is triggered when user select one of the list items. You just for some explanation I will paste that event code here:
// Event for Menu Item selection, here we are going to handle navigation based
// on user selection in menu ListView
private void OnMenuItemSelected(object sender, SelectedItemChangedEventArgs e) {

    var item = (MasterPageItem)e.SelectedItem;
    Type page = item.TargetType;

    Detail = new NavigationPage((Page)Activator.CreateInstance(page));
    IsPresented = false;
}
This event will make sure to open a new page, depending on what we choose to ListView. After we open new page we can specify the title of new page or you can do that from this event. It depends on you and you needs.
And we need to specify this event at ListView in XAML:
<ListView x:Name="navigationDrawerList"
                  RowHeight="60"
                  SeparatorVisibility="None"
                  BackgroundColor="#e8e8e8"
                  ItemSelected="OnMenuItemSelected">
I hope that you like this kind of style of navigation drawer (master-detail page) in your Xamarin.Forms App. Menu items looks like modern design app style and you have top area for your other informations about user or app. I tried to simplfy this tutorial more as I could so I think that this tutorial can follow all kind of developers beginner or advanced ones. Source code is available on GitHub
Hope this tutorial was helpful for you and that this will be nice part of your new App.
Best regards! Almir Vuk