Quantum Tetris
https://medium.com/@tglasgow31/quantum-tetris-6452a0c96227
Quantum Tetris is your traditional tetris game which has several twists based on the concepts of quantum computing. Additionally, to implement this quantum functionality it uses IBM's qiskit library found here which runs in the cloud on IBM's quantum computers.
To play our game you can go here: http://quantumtetris.com
To view our GoDot project you can go here: https://github.com/dartmouth-cs98/GoDot-Quantum-Tetris
Backend can accessed via https://q-tetris-backend.herokuapp.com/
Link to mockups.
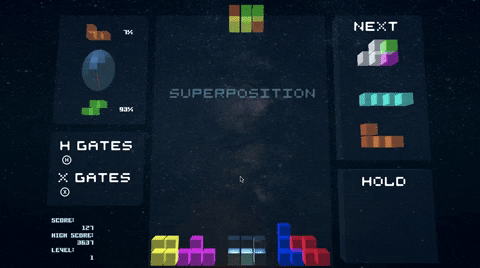
Game in Action!
For more gameplay examples click here.
Installation of Game on your computer
- Go to our web page to find the download links for both Mac and Windows
- If you are having issues opening the application due to an untrusted publisher, go to here for windows and here for Mac users.
Architecture
The architecture of our project consists of a backend flask server that uses a PostgreSQL database to hold our player info. Our frontend is a simple html webpage that uses various graphics libraries to implement changes. We use GoDot to run our game in browser.
Setup
Git setup
- Navigate to desired directory
git init
git clone https://github.com/dartmouth-cs98/Quantum-Tetris.git
cd Quantum-Tetris/
Dev Environmental Setup Notes
Conda
- The easiest way to manage all of our packages that we will need is with a Conda environment.
- If you don't have one yet, you can set one up here
- Once you set up your conda environment run the following commandsm using your chosen name in place of %NAMEOFENV%.
conda create -n %NAMEOFENV% python=3
conda activate %NAMEOFENV%
conda update --name base conda
conda install python==3.7
python3 -m pip install --user qiskit
Note:
If you get an error regarding an "ssl" error run the following commands
brew uninstall openssl
brew install openssl
If you get an error trying to run the server in Pycharm like "ModuleNotFoundError: No module named 'app'" ensure than the folder "server" is marked as a source root
PyCharm
- If you wish to dev this project in PyCharm, follow the following instructions if not ignore.
- Within PyCharm go to
Pycharm -> Preferences -> Project:[ProjectName] -> Project Interpreter - Then click on the
gear iconon the top right and clickAdd Local. Navigate to the file/anaconda3/envs/[ProjectName]/bin/python3.7 - Click on this file and click add
- Additionally to set the environmental variable that you will need. go to
Pycharm -> Click on file name next to the green run button -> Edit configurations -> Click the ... to the left of the environmental variables dropdown -> add the following 2 environemntal variables DATABASE_URL=postgresql://localhost/quantum_tetris and APP_SETTINGS= config.DevelopmentConfig
How to Set Up Front End
- Navigate to the
webappdirectory - Run the following commands
- Yarn will continue to run in the terminal, so start a new terminal or window to run additional commands.
yarn
yarn start
How to Set Up Backend
- Navigate to the
serverdirectory - Make sure you have python3 installed if not install it here
- Also for local devving you will need to run a postgresql database in the background. The easiest way to set this up would be to follow the instructions found here
- For the Postgress the server make sure the server is running on port 5432 (the default) and is named
quantum_tetris - Run the following command in the
serverdirectory
./setup.sh
Deployment
Front end
- To deploy any local changes to surge, you can type
yarn deploywhile in thewebappdirectory
Back end
- To deploy any local changes to heroku, you can type
yarn herokuwhile in the project's root directory. - Since the heroku URL is used in the GoDot game export, it is impossible to have full integration locally. Test all changes to the backend via Postman and use the above command to deploy to heroku
Authors
Trevor Glasgow, Oliver Levy, Henry Hilton and Rafael Brantley
Acknowledgments
Tim Tregubov and Charles Palmer