REALM-PG-SYNC
This microservice syncs data between Realm cloud and Postgres on Hasura (via HasuraDB).
Pre-requisites
- A realm cloud instance or a self hosted realm. You can find instructions to set one up here
- A hasura project running on a Hasura cluster. You can fine instructions to set one up here
Setup
-
Enable logical replication on Postgres
- Run the following inside the project directory
$ hasura microservice exec postgres -n hasura -- /bin/bash- Open
var/lib/postgresql/data/postgresql.confand make the following changes to the respective keys
wal_level = logical max_wal_senders = 8 wal_keep_segments = 4 max_replication_slots = 4 port = 5432- Restart the postgres service
$ hasura microservice restart postgres -n hasura
-
This microservice relies on a table called
tracked_tablesto keep track of the tables that need to be synced between Postgres and Realm. -
Add the following secrets to your hasura cluster
realm.url: The base realm url. For eg:realms://test1234567.us1.cloud.realm.io(no/at the end)realm.auth.url: The auth url for the realm. For eg:https://test1234567.us1.cloud.realm.io(no/at the end)realm.user: Username of the admin user (Create a new user using Realm studio and give it an administrator role. You can find instructions to do this here).realm.password: Password of the admin user.
You can add secrets to your cluster by running the following command inside your hasura project directory
$ hasura secret update <key> <value> -c <cluster-alias>
# Eg: Adding realm user to a cluster with alias hasura
$ hasura secret update realm.user admin -c hasura
-
Add this as a microservice to your hasura project.
- Run
hasura microservice create sync. This will create a new directory calledsyncinside themicroservicesdirectory. - Copy the contents of this repo (
Dockerfile,k8s.yamlandapp) intomicroservice/sync - Run the following commands in your command shell
$ hasura conf generate-route sync >> conf/routes.yaml
$ hasura conf generate-remote sync >> conf/ci.yaml
- Run
-
Deploy
$ git add . && git commit -m "Added sync microservice and migration(tracked_tables)"
# Assuming your remote is called hasura
$ git push hasura master
UI
This microservice also comes with a simple UI that runs on your web browser, you can use the UI to sync new tables and also hard reset the service.
To open the UI
$ hasura microservice open sync
Logs
To view logs
$ hasura microservice logs sync -fArchitecture
This service assumes that you will ultimately have two major types of tables.
- Tables that store public or common data.
- Tables that store private data for each user.
Private Data
Multiple realm users will have private data that they keep storing in Realm. This private data should be stored at /~/tables in the realm object server.
This way, no user (non admin) can access another users data.
A Realm object typically maps to a Postgres table - with each user’s realm entries mapping to rows in the appropriate table. Hence it is important to have a column in your table which stores an identifier for the user. In this case it needs to be a column named realm_id which stores the realmId of the user (You can get this from the User object that is returned after authenticating a user with the realm server)
In summary,
- Ensure that each user uses a realm at path
/~/tablesto store private data. - Ensure that every table stored inside of these paths has a column
realm_id. - Everytime new data is inserted into any of the tables, ensure that you provide the
realm_idof the user as well. - A table is identified to be storing private data if it consists of a
realm_idcolumn.
Public/Common Data
All tables with public data (tables which do not have a realm_id column) are stored at /common in the realm object server.
All users (non admin) are only given read access to this realm. Therefore any change to the tables inside of /common must be made from Postgres.
Explanation with an example
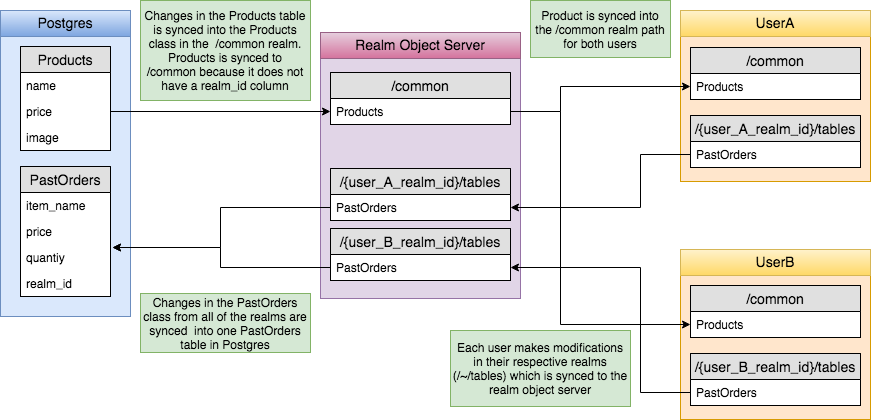
The best way to understand this architecture would be through a real world example. Let's assume a simple scenario of an e-commerce application. Here are the features we want:
- Show the users a list of products (name, price and image).
- Every user has their own list of past orders (item name, price, quantity)
In this case, we would create two tables on Postgres
- Products (name: text, price: text, image: text)
- PastOrders (item_name: text, price: text, quantity: int, realm_id: text)
As you may have guessed, Products is a table which stores public or common data accessible to all users. This table will reside inside the realm /common.
PastOrders stores a list of all past orders made by each user and will reside inside every users personal realm path (identified by /~/tables).
Note: You have to initialise the realm in your client application with the PastOrders table (same schema as Postgres) inside the /~/tables path.
On your client application, you would connect to two realms
- realm1:
/common(owned by admin and read-only) - realm2:
/~/tables(owned by each user and all permissions)
You would fetch and listen to updates on the Products table using realm1. Each user can then choose a product from this listing and place an order. You can then enter this order into the PastOrders table using realm2.
Adding authentication
You can leverage Hasura's authentication system to restrict access to the service to users with certain roles.
Here is an example of how you can restrict access to the UI to users with admin roles.
-
Open the
conf/routes.yamlfile -
Find the entry with
subdomain: syncand add anauthorizationPolicyto it- paths: - corsPolicy: allow_all path: / upstreamService: name: api namespace: '{{ cluster.metadata.namespaces.user }}' path: / port: 80 authorizationPolicy: restrictToRoles: ["admin"] noSessionRedirectUrl: https://auth.{{ cluster.name }}.hasura-app.io/ui/ noAccessRedirectUrl: https://auth.{{ cluster.name }}.hasura-app.io/ui/restricted subdomain: api
An anonymous user is redirected to an authentication page where they can sign in. You can access the authentication page directly by opening https://auth.<cluster-name>.hasura-app.io/ui (replace with the name of your cluster) in your browser.
Edge cases
-
Handling schema changes for a particular table
Head to the UI by running
hasura microservice open syncon your command shell. Hit theSavebutton. This will restart the sync adapter after fetching the schema for all tables that are being tracked. -
Syncing a table with pre-existing data
Syncing a table with pre-existing data will only sync data that is inserted AFTER the table is added to the tracked table list. To ensure that all data is synced, hit the
Hard resetbutton on the UI.