gabriel-dev / Rune Breaker
Programming Languages
Projects that are alternatives of or similar to Rune Breaker
Rune Breaker
This project aims to test the effectiveness of one of MapleStory's anti-botting mechanisms: the rune system. In the process, a model that can solve up to 99.15%* of the runes was created.
The project provides an end-to-end pipeline that encompasses every step necessary to replicate this model. Additionally, the article below goes over all the details involved during the development of the model. Toward the end, it also considers possible improvements and alternatives to the current rune system. Make sure to read it.
This project was created solely for research and learning purposes. The usage of this project for malicious purposes in-game is against Nexon's terms of service and, thus, discouraged.
Summary
Introduction
MapleStory is a massively multiplayer online role-playing game published by Nexon and available in many countries around the world.
What are runes?
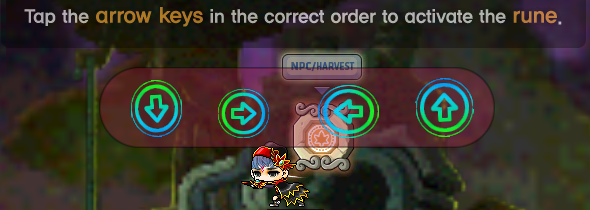
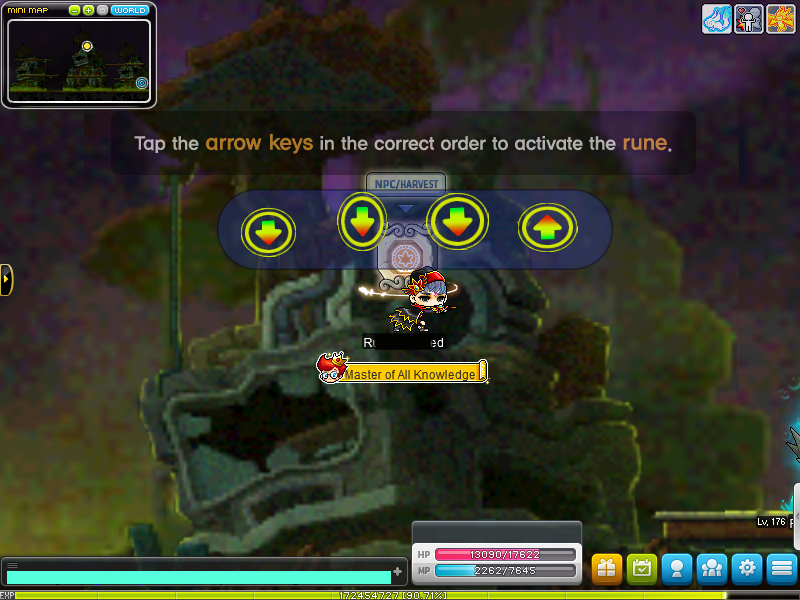
In an attempt to protect the game from botting, MapleStory employs a kind of CAPTCHA system. From time to time, a rune is spawned somewhere on the player's map. When the user walks into it and presses the activation button, the game displays a panel containing four arrows. See an example below.
The player is then asked to type the direction of the four arrows. If the directions are correct, the rune disappears and the player receives a buff. However, if the user does not activate it within a certain amount of time, they will stop receiving any rewards for hunting monsters, hampering the performance of bots that cannot handle runes.
That said, our goal is to create a computer program capable of determining the direction of the arrows when given a screenshot from the game.
What is the challenge?
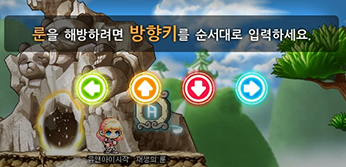
If arrows were static textures, it would be possible to apply a template matching algorithm and reliably determine the arrow directions. Interestingly, that is how runes were initially implemented.
Nevertheless, the game was later updated to add randomness to the arrows. For instance, both the position of the panel and the position of the arrows within it are randomized. Moreover, every color is randomized and often mixed in a semi-transparent gradient. Finally, there are four different arrow shapes, which then suffer rotation and scaling transformations.
As shown in the picture above, these obfuscation mechanisms can make it hard to determine the arrow directions, even for humans. Together, these techniques make it more difficult for machines to define the location, the shape, and the orientation of the arrows.
Is it possible to overcome these challenges?
How can it be solved?
As we have just discussed, there are several layers of difficulty that must be dealt with to enable a computer program to determine the arrow directions. With that in mind, splitting the problem into different steps is a good idea.
First, the program should be able to determine the location of each arrow on the screen. After that, the software should classify them as down, left, right, or up.
Locating the arrows
Some investigation reveals that it is possible to determine the location of the arrows using less sophisticated techniques. Even though this task can be performed by an artificial neural network, the simplest option is to explore solutions within traditional computer vision.
Classifying the arrow directions
On the other hand, classifying arrow directions is a great candidate for machine learning solutions. First of all, each arrow could fit inside a grayscale 60×60×1 image, which is a relatively small input size. Moreover, it is very convenient to gather data, since it is possible to generate 32 different sample images for each screenshot. The only requirement is to rotate and flip each of the four arrows in the screenshot.
The Pipeline
In this section, we will see how to put these steps together to create a program that classifies rune arrows.
Overview
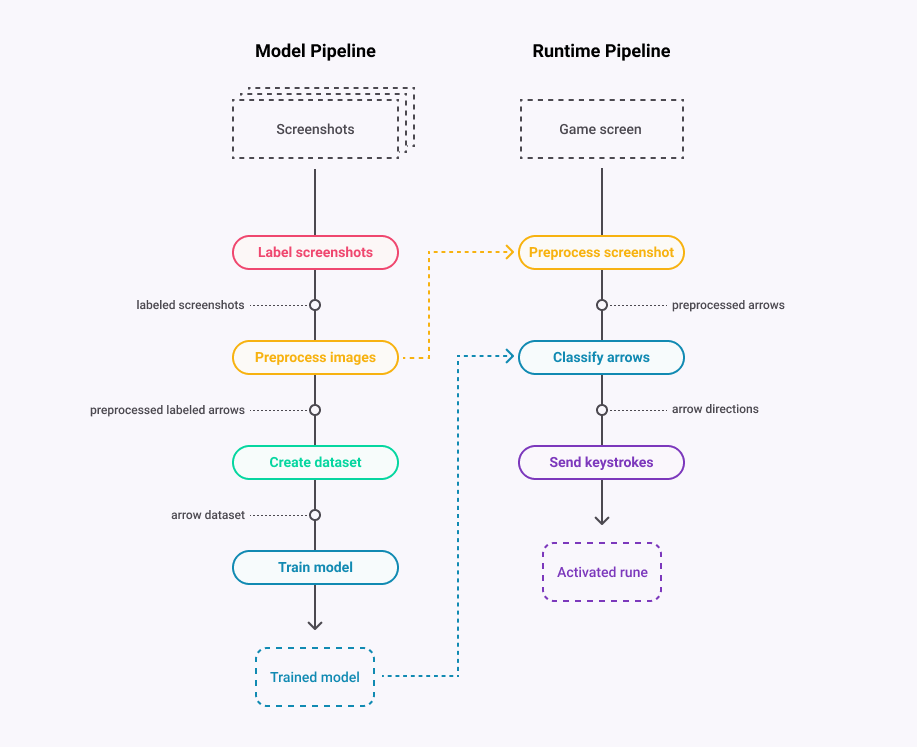
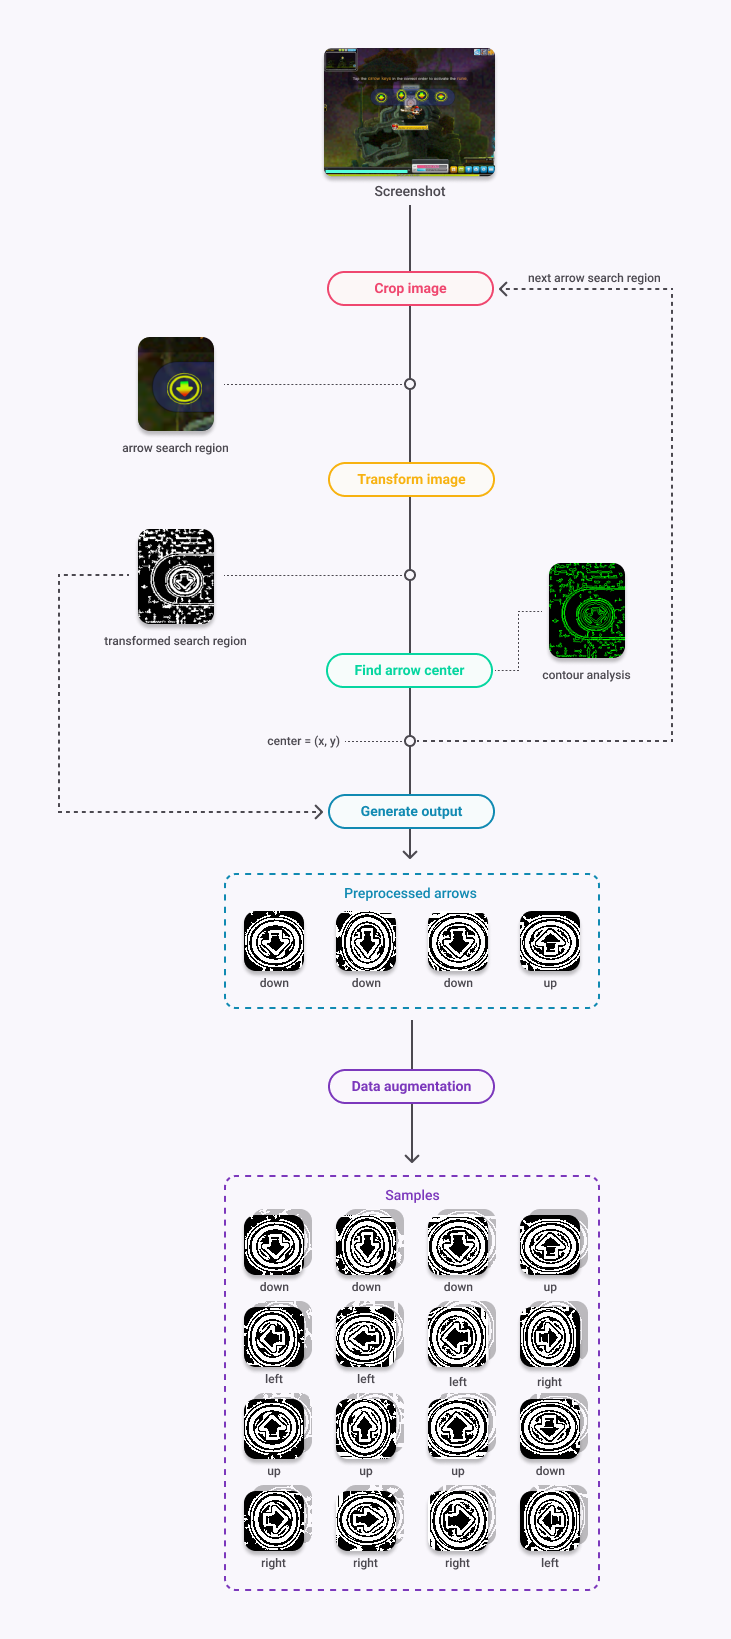
First, we should define two pipelines: the model pipeline and the runtime pipeline. See the diagram next.
The model pipeline is responsible for taking a set of screenshots as input and performing a sequence of steps to create an arrow classification model. On the other hand, the runtime model represents a hypothetical botting software. This software would use parts of the model pipeline in addition to the trained classifier to activate runes during the game runtime.
Considering the purposes of this project, only the model pipeline will be discussed.
Each step of this pipeline will be thoroughly explained in the sections below. Also, the experimental results obtained during the development of this project will be presented.
Labeling
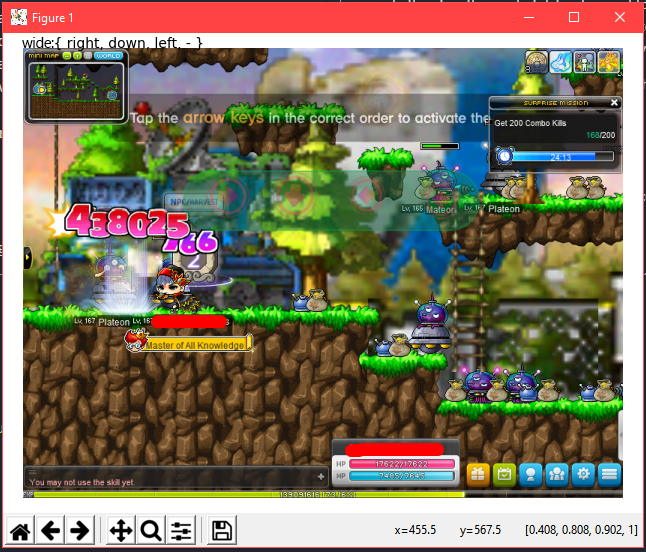
First, we should collect game screenshots and label them according to the direction and shape of the arrows. To make this process easier, the label.py script was created. The next figure shows the application screen when running the command below.
$ python preprocessing/label.py
When run, the program iterates over all images inside the ./data/screenshots/ directory. For each screenshot, the user should press the arrow keys in the correct order to label the directions and 1, 2, or 3 to label the arrow shape.
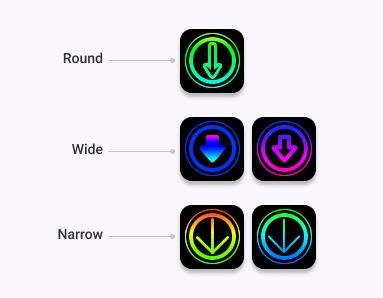
There are five different types of arrows, which can be arranged within three groups, as shown below.
This distinction is made to avoid problems related to data imbalance. This topic will be better explained later on in the dataset section.
After a screenshot is labeled, the application moves it to the ./data/labeled/ folder. Finally, the file is renamed with a name that contains its labels and a unique id (e.g. wide_rdlu_123.png, where each letter in rdlu represents a direction).
Note: instead of manually collecting and labeling game screenshots, it is also possible to automatically generate artificial samples by directly using the game assets.
Preprocessing
With our screenshots correctly labeled, we can move to the preprocessing stage.
Simply put, this step is responsible for locating the arrows within the labeled screenshots and producing preprocessed output images. These images are the arrow samples that will feed the classification model later on.
This process is handled by the preprocess.py script. Its internals can be visualized through the following diagram.
Each screenshot undergoes a sequence of transformations that simplify the image in several aspects. Next, the transformed image is analyzed and the position of each arrow is determined. Lastly, the script generates the output samples.
Let's examine each one of these operations individually.
Cropping
Our first objective is to make it easier to find the location of the arrows within a screenshot. Consider the following input image.
The input has a width of 800 pixels, a height of 600 pixels, and 3 RGB color channels (800×600×3 = 1,400,000), which is a considerable amount of data to be processed. This makes detecting objects difficult and may ultimately harm the accuracy of our model. What can be done to overcome this obstacle?
One alternative relies on processing each arrow separately. We can accomplish this by first restricting the search to a small portion of the screen. Next, the coordinates of the leftmost arrow are determined. After that, these coordinates are used to define the next search region. Then, the process repeats until all arrows have been found. This is possible because, although the positions of the arrows are random, they still fall within a predictable zone.
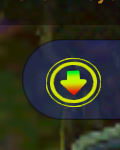
This is the first search region for our input image:
As can be seen, the search problem has been reduced to an image much smaller than the original one (120×150×3 = 54,000). However, the resulting picture still has three color channels. This issue will be addressed next.
Transforming the input
The key to identifying the arrows is edge detection. Nevertheless, the obfuscation and the complexity of the input image make the process more difficult.
To make things simpler, we can compress the information of the image from three color channels into a single grayscale channel. However, we should not directly combine the R, G, and B channels. Since the arrows may be of almost any color, we cannot define a single formula that works well for any image. Instead, we will combine the HSV representation of the image, which separates color and intensity information into three different components.
After some experimentation, the following linear transformation yielded the best results.
Grayscale = (0.0445 * H) + (0.6568 * S) + (0.2987 * V)
Additionally, we can apply Gaussian Blur to the image to eliminate small noise. The result of these transformations is shown below.
Although the new image has only one channel instead of three (120×150×1 = 18,000), the outlines of the arrow can still be identified. We have roughly the same information with fewer data. This same result is observed in several other examples, even if at different degrees.
However, we can still do more. Each pixel in the current image now ranges from 0 to 255, since it is a grayscale image. In a binarized image, on the other hand, each pixel is either 0 (black) or 255 (white). In this case, the contours are objectively clear and can be easily processed by an algorithm (or a neural network).
Since the image has many variations of shading and lighting, the most appropriate way to binarize it is to use adaptive thresholding. Fortunately, OpenCV provides this functionality out-of-the-box, which can be configured with several parameters. Applying this algorithm to the grayscale image produces the following result.
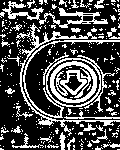
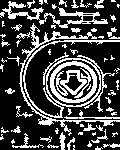
The current result is already considerably positive. Yet, notice that there are some small "patches" scattered throughout the image. To make it easier for the detection algorithm and for the arrow classifier, we can use the morphology operations provided by the skimage library to mitigate this noise. The next figure shows the resulting image.
The image is now ready to be analyzed. Next, we will discuss the details of the algorithm that determines the position of the arrow.
Locating the arrow
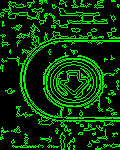
The first step of the process consists in computing the contours of the image. To do this, an algorithm is used to transform the edges in the image into sets of points, forming many polygons. See the figure below.
Each polygon constitutes a different contour. But then, how to determine which contours belong to the arrow? It turns out that directly identifying the arrow is not the best alternative. Frequently, the obfuscation heavily distorts the outline of the arrow, which makes identifying it very difficult.
Fortunately, some outlines are much simpler to identify: the circles that surround the arrow. There are two reasons for this. First, these contours tend to keep their shape intact despite the obfuscation. Second, circumferences have much clearer morphological characteristics.
Still, another question remains. How to identify these circles then? There are several ways to solve this problem. One of the first alternatives that may come to mind is the Circle Hough Transform. Unfortunately, this method is known to be unstable when applied to noisy images. Preliminary tests confirmed that this method produces unreliable results for our input images. Because of this, I decided to use morphological analysis instead.
Algorithm
Our goal is to determine which contours correspond to the surrounding circles and then calculate the position of the arrows, which sit in the middle of the circumferences. To do this, we can use the following algorithm.
-
First, the program removes all contours whose area is too small or too large compared to a real surrounding circle.
-
Then, a score is calculated for each remaining contour. This score is based on the similarity between the contour, a perfect ellipse, and a perfect circle.
-
Next, the contour with the best score is selected.
-
Finally, if the score of the selected contour exceeds a certain threshold, the algorithm outputs its center. Otherwise, it outputs the center of the search area as a fallback, which makes the algorithm more robust.
The code snippet below illustrates the process.
candidates = [c for c in contours if area(c) > MIN and area(c) < MAX]

best_candidate = max(candidates, key=lambda c: score(c))

if score(best_candidate) > THRESHOLD:
    return center(best_candidate)

return center(search_region)
Similarity score
The key to the accuracy of the operation above is the quality of the score. Its principle is simple: the surrounding circles tend to resemble a perfect circumference more than other objects do. With that in mind, it is possible to measure the likeliness that a contour is a surrounding circle using the following metrics.
- The difference between the convex hull of the contour and its minimum enclosing ellipse. Considering that the area of the ellipse is larger:
s1 = (area(ellipse) - area(hull)) / area(ellipse)
- The difference between the minimum enclosing ellipse and its minimum enclosing circle. Considering that the area of the circle is larger:
s2 = (area(circle) - area(ellipse)) / area(circle)
The resulting score is one minus the arithmetic mean of these two metrics.
score = 1 - (s1 + s2) / 2
By doing so, the closer a contour is to a perfect circle, the closer the score will be to one. The more distinct, the closer it will get to zero.
Iteration output
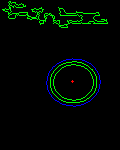
The figure below shows the filtered candidates (green), the best contour among them (blue), and the coordinate returned by one iteration of the algorithm (red).
Of course, there are errors associated with this algorithm. Sometimes, the operation yields false positives due to the obfuscation, causing the center of the arrow to be defined incorrectly. In some cases, these errors are significant enough to prevent the arrow from being in the output image, as we will see next. Nevertheless, these cases are rather uncommon and have a relatively small impact on the accuracy of the model.
Finally, the coordinate returned by the algorithm is then used to define the next search region, as shown below. After that, the algorithm repeats until it processes all four arrows.
(xsearch, ysearch) = (xcenter + d, ycenter)
Generating the output
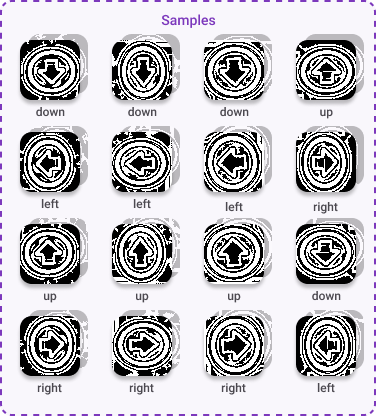
After finding the positions of the arrows, the program should generate an output. To do so, it first crops a region around the center of each arrow. The dimension of the cropped area is 60×60, which is just enough to fit an arrow. See the results in the next figure.
But, as mentioned earlier, we can augment the output by rotating and flipping the arrows. By doing this, we both multiply the sample size by eight and eliminate class imbalance, which is extremely helpful. The next figure shows the 32 generated samples.
Application interface
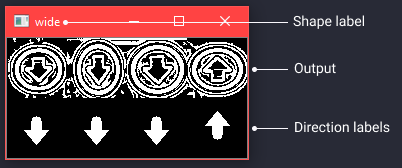
Before discussing the experimental results, let's talk about the preprocessing application interface. When the user runs the script, it displays the following window for each screenshot in the ./data/labeled/ folder.
$ python preprocessing/preprocess.py
For each one of them, the user is given the option to either process or skip the screenshot. If the user chooses to process it, the script produces output samples and places them inside the ./data/samples/ folder.
The user should skip a screenshot when it is impossible to determine the direction of an arrow. In other words, the screenshot should be skipped when the arrow is completely corrupted, or when the algorithm misses its location. See a couple of examples.
Results
Using 800 labeled screenshots as input and following the guidelines mentioned in the previous section, the following results were obtained.
Approved 798 out of 800 images (99%).
Samples summary | | Down | Left | Right | Up | Total | |------------|------:|------:|-------:|------:|------:| | Round | 1872 | 1872 | 1872 | 1872 | 7488 | | Wide | 2632 | 2632 | 2632 | 2632 | 10528 | | Narrow | 1880 | 1880 | 1880 | 1880 | 7520 | | Total | 6384 | 6384 | 6384 | 6384 | 25536 |
In other words, the preprocessing stage had an accuracy of 99.75%. Plus, there are now 25,536 arrow samples that we can use to create the dataset that will be used by the classification model. Great!
Dataset
In this step of the pipeline, the objective is to split the generated samples into training, validation, and testing sets. Each set has its own folder inside the ./data/ directory. The produced dataset will then be used to train the arrow classification model. Note that the quality of the dataset has a direct impact on the performance of the model. Thus, it is essential to perform this step correctly.
Let's start by defining and understanding the purpose of each set.
Training set
As the name suggests, this is the dataset that will be directly used to fit the model in the training process.
Validation set
This is the dataset used to evaluate the generalization of the model and to optimize any hyperparameters the classifier may use.
Testing set
This is the set used to determine the final performance of the model.
With these definitions in place, let's address some issues. One of the main obstacles that classification models may face is data imbalance. When the training set is asymmetric, the model may not generalize well, which causes it to perform poorly for the underrepresented samples. Therefore, the training set should have an (approximately) equal number of samples from each shape and direction. Additionally, it is necessary to define the proportion of samples in each set. An (80%, 10%, 10%) division is usually a good starting point.
The make_dataset.py script is responsible for creating a dataset that meets all the criteria above.
Note: to avoid data leakage, the script also ensures that each sample and its flipped counterpart are always in the same set.
Running the script with the ratio set to 0.9 produces the following results.
$ python operations/make_dataset.py -r 0.9
Training set | | Down | Left | Right | Up | Total | |------------|-----:|-----:|------:|-----:|------:| | Round | 1684 | 1684 | 1684 | 1684 | 6736 | | Wide | 1684 | 1684 | 1684 | 1684 | 6736 | | Narrow | 1684 | 1684 | 1684 | 1684 | 6736 | | Total | 5052 | 5052 | 5052 | 5052 | 20208 |
Validation set | | Down | Left | Right | Up | Total | |------------|-----:|-----:|------:|----:|------:| | Round | 94 | 94 | 94 | 94 | 376 | | Wide | 474 | 474 | 474 | 474 | 1896 | | Narrow | 98 | 98 | 98 | 98 | 392 | | Total | 666 | 666 | 666 | 666 | 2664 |
Testing set | | Down | Left | Right | Up | Total | |------------|-----:|-----:|------:|----:|------:| | Round | 94 | 94 | 94 | 94 | 376 | | Wide | 474 | 474 | 474 | 474 | 1896 | | Narrow | 98 | 98 | 98 | 98 | 392 | | Total | 666 | 666 | 666 | 666 | 2664 |
Notice that the training set is perfectly balanced on both axes. You can also see that the split between sets follows approximately (80%, 10%, 10%).
Now that the dataset is ready, we can move on to the main stage: the construction of the classification model.
Classification model
In this stage, the dataset created in the previous step is used to adjust and train a machine learning model that classifies arrows into four directions when given an input image. The trained classifier can be applied in the runtime pipeline to determine the arrow directions within the game.
To quickly validate the viability of the idea, we can use Google's Teachable Machine, which allows any user to train a neural network image classifier. An experiment using only 1200 arrow samples results in a model with an overall accuracy of 90%. It is quite clear that a classification model based on a neural network is feasible.
In fact, we could export the model trained by Google's tool and call it a day. However, since each rune has four arrows, the total accuracy is 66%.
Fortunately, there is plenty of room for improvement. For instance, this model transforms our 60×60×1 input into 224×224×3, making the process much more complex than it needs to be. Additionally, Google's tool lack many configuration options.
With this in mind, the best alternative is to create a model from scratch.
Building the model
Our model will use a convolutional neural network (CNN), which is a type of neural network widely used for image classification.
We will use Keras to create and train the model. Take a look at the code that generates the structure of the neural network.
def make_model():
    model = Sequential()

    # Convolution block 1
    model.add(Conv2D(32, (3, 3), padding='same', input_shape=(60, 60, 1)))
    model.add(Activation('relu'))
    model.add(MaxPooling2D(pool_size=(2, 2)))

    # Convolution block 2
    model.add(Conv2D(48, (3, 3), padding='same'))
    model.add(Activation('relu'))
    model.add(MaxPooling2D(pool_size=(2, 2)))

    # Convolution block 3
    model.add(Conv2D(64, (3, 3), padding='same'))
    model.add(Activation('relu'))
    model.add(MaxPooling2D(pool_size=(2, 2)))

    model.add(Flatten())

    model.add(Dense(64, activation='relu'))
    model.add(Dropout(0.2))

    # Output layer
    model.add(Dense(4, activation='softmax'))

    model.compile(optimizer='adam',
                  loss='categorical_crossentropy',
                  metrics=['accuracy'])

    return model
The architecture was inspired by one of the best performing MNIST classification models on Kaggle. While simple, it should be more than enough for our purposes.
More data augmentation
In addition to rotation and flipping, as we saw earlier, we can apply other transformations to the arrow samples. We should do this to help reducing overfitting, especially regarding the position and size of the arrows.
Keras provides this and many other functionalities out-of-the-box. Using an image data generator, we can automatically augment the data from both training and validation sets during the fitting process. See the code snippet below, which was taken from the training script.
aug = ImageDataGenerator(width_shift_range=0.125, height_shift_range=0.125, zoom_range=0.2)
Training the model
With that set, we can fit the model to the data with the train.py script. Based on a few input parameters, the script creates the neural network, performs data augmentation, fits the model to the data, and saves the trained model to a file. Moreover, to improve the performance of the training process, the program applies mini-batch gradient descent and early stopping.
Let's train a model named binarized_model128.h5 with the batch size set to 128.
$ python model/train.py -m binarized_model128.h5 -b 128

...

Settings
           value
max_epochs   240
patience      80
batch_size   128

Creating model...

Creating generators...
Found 20208 images belonging to 4 classes.
Found 2664 images belonging to 4 classes.

Fitting model...

...

Epoch 228/240
 - 28s - loss: 0.0095 - accuracy: 0.9974 - val_loss: 0.0000e+00 - val_accuracy: 0.9945

...

Best epoch: 228

Saving model...
Model saved to ./model/binarized_model128.h5

Finished!
As we can see, the model had a 99.45% accuracy in the best epoch for the validation set. The next figure shows the accuracy and loss charts for this training session.
Results and Observations
Now that our model has been trained and validated, it is time to evaluate its performance using the testing set. In the sections below, we will show some metrics calculated for the classifier and make some considerations upon them.
Note: you can access the complete results here.
Performance
To calculate the performance of the model on the testing set, we can run the classify.py script with the following parameters.
$ python model/classify.py -m binarized_model128.h5 -d testing
Confusion matrix | | Down | Left | Right | Up | |-----------|-----:|-----:|------:|----:| | Down | 664 | 0 | 2 | 0 | | Left | 0 | 665 | 0 | 1 | | Right | 0 | 0 | 666 | 0 | | Up | 0 | 0 | 1 | 665 |
Classification summary | | Precision | Recall | F1 | |-----------|----------:|-------:|-------:| | Down | 1.0000 | 0.9970 | 0.9985 | | Left | 1.0000 | 0.9985 | 0.9992 | | Right | 0.9955 | 1.0000 | 0.9977 | | Up | 0.9985 | 0.9985 | 0.9985 |
Classification summary | | Correct | Incorrect | Accuracy | |------------|--------:|----------:|---------:| | Round | 376 | 0 | 1.0000 | | Wide | 1892 | 4 | 0.9979 | | Narrow | 392 | 0 | 1.0000 | | Total | 2660 | 4 | 0.9985 |
Notice the F1 scores and the accuracy per arrow type. Both of them are balanced, which means that the model is not biased toward any shape or direction.
The results are remarkable. The model was able to correctly classify 99.85% of the arrows! Now, let's calculate the overall accuracy of the pipeline.
| Preprocessing | Four arrows | Total |
|---|---|---|
| 0.9975 | 0.9985⁴ = 0.9940 | 0.9915 |
In other words, the pipeline is expected to solve a rune 99.15% of the time. That is roughly equivalent to only a single mistake for every hundred runes. Amazing!
Note: similar results may be accomplished with much less than 800 screenshots
Observations
Before we wrap-up, it is critical to make some observations about the development process and get some insight into the results.
The bottleneck
We can see which arrows the model was unable to classify by applying the -v flag to the classification script. Analyzing the results, we see that most of them were almost off-screen and few of them were heavily distorted. Thus, we conclude that the main bottleneck of the pipeline lies in the preprocessing stage.
If improvements are made, then they should focus on the algorithms responsible for transforming and locating the arrows. As we have mentioned earlier, one alternative to the algorithm that finds the position of the arrows is to use machine learning. This could increase the accuracy of the pipeline, especially when dealing with 'hard-to-see' images. Another possible improvement may be to optimize the parameters in the preprocessing stage for runes that are very hard to solve.
It is also possible to improve the performance of the model in the runtime pipeline. For instance, the software may take three screenshots from the rune at different moments and classify all of them. After that, the directions of the arrows can be determined by combining the three classifications. This may reduce the error rate caused by specific frames, such as when damage numbers stay behind the arrows.
Errors and biases
For the sake of integrity, we must understand some of the underlying errors and biases behind the result we just saw. The real performance of the model can only be measured in practice.
For instance, the input screenshots are biased toward the maps and situations in which they were taken, even though the images are significantly diverse. Moreover, remember that some of the screenshots were filtered during the preprocessing stage. The human interpretation of whether or not an arrow is corrupted may influence the resulting metrics. Also, when a screenshot is skipped, it is assumed that the model would not be able to solve the rune, which is not always the case. There is still a probability that the model correctly classifies an arrow 'by chance' (25% if you consider it a random event).
Further testing
In a small test with 20 new screenshots, the model was able to solve all the runes. However, in another experiment using exclusively screenshots with lots of action, especially ones with damage numbers flying around, the model was able to solve 16 out of 20 runes (80% of the runes and 95% of the arrows).
In reality, the performance of the model varies according to many factors, such as the player's class, the spawn location of the rune, and the monsters nearby. Nonetheless, the overall performance is very good for the purposes of the model. Additionally, we can still apply the improvements discussed in the bottleneck section.
Final Considerations
With a moderate amount of work, we created a model capable of solving runes up to 99.15% of the time. We have also seen some ways to improve this result even further. But what do these results tell us?
Conclusion
First of all, we proved that current artificial intelligence technology can easily bypass the employed visual obfuscation, reaching human-level performance. We also know that these obfuscation methods bring significant usability drawbacks since there have been multiple complaints from the player base, including colorblind people.
Moreover, while the current system forced us to develop a new model from scratch, one would expect it to be more elaborate and expensive. Also, even if a perfect model existed, bot developers would still have to create an algorithm or a hack to control the character and move it to the rune. This is not only a whole different problem but possibly a more difficult one, which already provides a notable level of protection. This makes us wonder whether the part of the rune system update that introduced the visual obfuscation had a significant impact on the botting ecosystem.
Additionally, "commercial-level" botting tools have been immune to visual tricks since runes first appeared. As we will see, they do not need to process any image.
Therefore, we are left with two issues. First, the current rune system hurts user interaction without providing meaningful security benefits. Second, it is somewhat ineffective toward some of the botting software available out there.
How to improve it?
The solution to the first problem is straightforward: reduce or remove the semi-transparency effects and use colorblind-friendly colors only.
The second issue, on the other hand, is trickier. First, there is software capable of bypassing the anti-botting system internally. Second, recent advancements in AI technology have been closing the gap between humans and machines. Even though it is simple to patch the game visuals and prevent this project from functioning, it is just as easy to make it work again. It is no coincidence that traditional CAPTCHAs have disappeared from the web in the last years. The best alternative seems to be to move away from this type of CAPTCHA.
Despite that, there are still some opportunities that can be explored within this type of anti-botting system. Let's see some of them.
Overall improvements
The changes proposed next may enhance both the quality and security of the game, regardless of the CAPTCHA system used.
Dynamic difficulty
An anti-botting system should keep a healthy balance between user-friendliness and protection against malicious software. To do so, the system could reward successes while penalizing failures. For example, if a user correctly answers many runes, the next ones could contain fewer arrows. On the other hand, the game could propose a harder challenge if someone (or some program) makes many mistakes in a row.
In addition to this, the delays between attempts could be adjusted. Currently, no matter how many times a user fails to solve a rune, the delay between activations is only five seconds. A better alternative is to increase the amount of time exponentially after a certain amount of errors. This measure impairs the performance of inaccurate models that need several attempts to solve a rune. As a side-effect, it is also harder for an attacker to collect data from the game.
Better robustness
Currently, the game client is responsible for both generating and validating rune challenges, which allows hackers to perform code/packet injection and forge rune validation. Because of this, botting tools can bypass this protection system without processing the game screen, as we have mentioned previously.
While it is considerably difficult to accomplish such a feat, which involves bypassing the protection mechanisms of the game, this vulnerability is enough to defeat the purpose of the runes to a significant extent.
One way to solve this issue is to move both generation and validation processes to the server. The game server would send the generated image to the client and validate the response of the client. The client, on the other hand, would simply display the received image and forward the user's input. By doing so, the only possible way to bypass this mechanism would be through image processing. Although it was reasonably simple to circumvent the current rune system through image processing, it is not nearly as trivial with other CAPTCHAs.
Alternative systems
While the changes above could improve the overall quality of the rune system, they alone are not capable of solving its main vulnerabilities. For this reason, the following alternatives were proposed based on the resources readily available within the game and the capabilities of modern image classifiers.
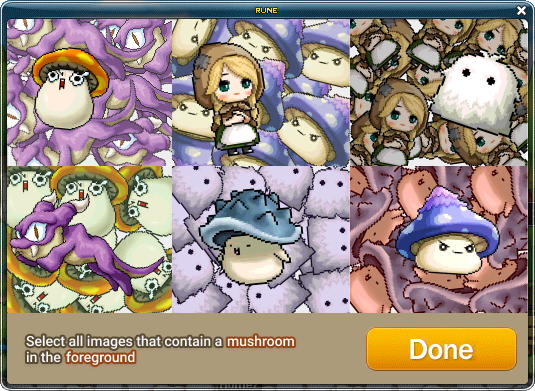
Finding image matches
In this system, the user is asked to find all the monsters, NPCs, or characters that match the specified labels.
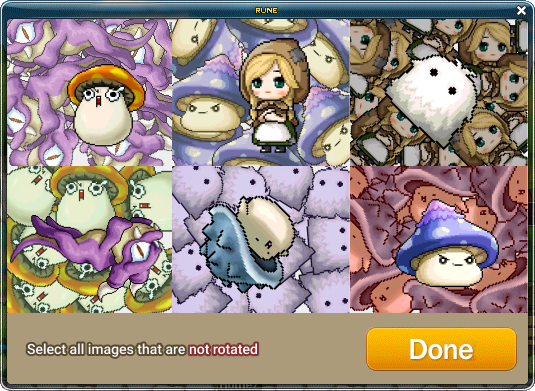
Finding non-rotated images
In this system, the user is asked to find all the monsters, NPCs, or characters that are not rotated.
Both systems have their advantages and disadvantages compared to the current one. Let's examine them more closely.
Advantages
MapleStory promptly features thousands of different sprites, which may be rotated, scaled, flipped, and put in an obfuscated background, resulting in hundreds of thousands of different combinations. Thus, when coupled with better robustness improvements, the proposed systems could force botting software to be extremely expensive, inaccurate, and possibly impractical.
Besides, the first system has an extra advantage since attackers would also have to find out all of the labels that may be specified by the rune system, increasing the cost of developing an automated tool even more.
Disadvantages
Although they may provide benefits, the proposed systems do not come without caveats. Both mechanisms are considerably more expensive to implement, especially the first one. Also, they are not as universal as the current runes, which only require the user to identify arrow directions. Despite this, it is possible to mitigate the latter issue by employing dynamic difficulty.
That concludes the article. I hope you have learned something new. Feel free to open an issue if you have any questions, I will be more than happy to help.

