Version 3.0
现在: 2022-08-30
3.0版本进入排期开发,开发进度将同步更新。具体说明请查看 V3_CN.md
now: 2022-08-30
The version 3.0 has been start coding,The development progress is updated synchronously. more info refer V3_EN.md
STNodeEditor
STNodeEditor 是一个轻量且功能强大的节点编辑器 纯GDI实现无任何依赖库仅仅100+Kb 使用方式非常简洁 提供了丰富的属性以及事件可以非常方便的完成节点之间数据的交互及通知 大量的虚函数可供开发者重写具有很高的自由性
Environment: VS2010(.NET 3.5)
项目主页 (Project home): DebugST.github.io/STNodeEditor (简体中文, English)
教程文档: DebugST.github.io/STNodeEditor/doc_cn.html
Tutorials and API: DebugST.github.io/STNodeEditor/doc_en.html
Mail: ([email protected])
NuGet: https://www.nuget.org/packages/ST.Library.UI/
PM> Install-Package ST.Library.UI -Version 2.0.0
简介
那是一个冬季 在研究无线电安全的作者接触到了GNURadio 那是作者第一次接触到节点编辑器
-> What? Excuse me... What"s this?.. 这是什么鬼东西?...
那是一个春季 不知道为什么 过完年整个世界都变了 大家被迫窝在家里 无聊至极的作者学起了Blender那是作者第二次接触到节点编辑器
-> Wo...原来这东西可以这么玩...真方便
于是一些想法在作者脑中逐渐诞生 让作者有了想做一个这样的东西的想法
那是一个夏季 不知道为什么 作者又玩起了Davinci那是作者第三次接触到节点编辑器 这一次的接触让作者对节点编辑器的好感倍增 作者瞬间觉得 只要是可以模块化流程化的功能 万物皆可节点化
像流程图一样使用你的功能
你是否有设想过流程图不再是流程图 而是直接可以执行的?
在一些开发过程中我们可能会为整个程序设计一个流程图 上面包含了我们存在的功能模块以及执行流程 然后由开发者逐一实现
但是这样会带来一些问题 程序的执行流程可能会被硬编码到程序中去 如果突然有一天可能需要改变执行顺序或者添加删除一个执行模块 可能需要开发者对代码重新编辑然后编译 而且各个功能模块之间的调用也需要开发者进行编码调度 增加开发成本 等一系列的问题
而 STNodeEditor 就是为此诞生
STNodeEditor 包含3部分 TreeView PropertyGrid NodeEditor 这三部分组成了一套完整的可使用框架
- TreeView
- 可以把执行功能编码到一个节点中 而
TreeView则负责展示以及检索节点 在TreeView中的节点可直接拖拽添加到NodeEditor中
- 可以把执行功能编码到一个节点中 而
- PropertyGrid
- 类似与
WinForm开发使用的属性窗口 作为一个节点 它也是可以有属性的 而作者在编辑器进行设计的过程中也把一个节点视作一个Form让开发者几乎没有什么学习成本直接上手一个节点的开发 *NodeEditor *NodeEditor是用户组合自己执行流程的地方 使得功能模块执行流程可视化
- 类似与
如何使用它?
STNodeEditor的使用非常简单 你几乎可以没有任何学习成本的去使用的 当然最重要的一点就是 你需要知道如何去创建一个节点
你可以像创建一个Form一样去创建一个Node
using ST.Library.UI.NodeEditor;

public class MyNode : STNode
{
    public MyNode() { //等同于 [override void Oncreate(){}]
        this.Title = "MyNode";
        this.TitleColor = Color.FromArgb(200, Color.Goldenrod);
        this.AutoSize = false;
        this.Size = new Size(100, 100);

        var ctrl = new STNodeControl();
        ctrl.Text = "Button";
        ctrl.Location = new Point(10, 10);
        this.Controls.Add(ctrl);
        ctrl.MouseClick += new MouseEventHandler(ctrl_MouseClick);
    }

    void ctrl_MouseClick(object sender, MouseEventArgs e) {
        MessageBox.Show("MouseClick");
    }
}
//添加到编辑器中
stNodeEditor.Nodes.Add(new MyNode());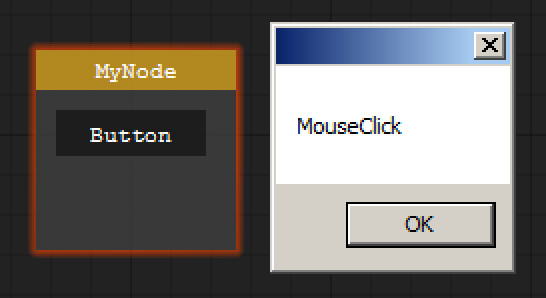
可以看到它的使用方式和 Form 确实很像 其实目前还暂时没有提供所见即所得的UI设计器 而且一个 STNode 它同样有它的控件集合且数据类型为 STNodeControl
STNodeControl 作为 STNode 控件的基类 它拥有着和 System.Windows.Forms.Control 许多同名的属性和事件 一切的初衷都只为与 WinForm 靠近
注意:在目前的版本中(2.0) STNodeEditor仅仅提供了STNodeControl基类 并未提供任何一个可用控件 当然在附随的Demo工程中包含了部分示例演示如何自定义一个控件 由于这属于自定义控件的范畴 所以演示并未太多 若需了解关于自定义控件如何开发可参考作者:自定义控件开发 系列文章 当然在后续的版本中 作者将提供部分常用控件 虽说作者想把使用方式往WinForm上靠 单仅仅是把它当作WinForm使用并不是作者的初衷
上面的演示仅仅是为了让大家感到亲切感 毕竟 WinForm 可能是大家熟悉的一个东西 但是如果仅仅是把它当作 WinForm 使用毫无意义 对于一个节点来说 最重要的属性当然是数据的输入和输出
public class MyNode : STNode
{
    protected override void OnCreate() {//等同 [public MyNode(){}]
        base.OnCreate();
        this.Title = "TestNode";
        //可以得到添加的索引位置
        int nIndex = this.InputOptions.Add(new STNodeOption("IN_1", typeof(string), false));
        //可以得到添加的 STNodeOption
        STNodeOption op = this.InputOptions.Add("IN_2", typeof(int), true);
        this.OutputOptions.Add("OUT", typeof(string), false);
    }
    //当所有者发生改变(即:在NodeEditor中被添加或移除)
    //应当像容器提交自己拥有数据类型的连接点 所期望显示的颜色
    //颜色主要用于区分不同的数据类型
    protected override void OnOwnerChanged() {
        base.OnOwnerChanged();
        if (this.Owner == null) return;
        this.Owner.SetTypeColor(typeof(string), Color.Yellow);
        //当前容器中已有的颜色会被替换
        this.Owner.SetTypeColor(typeof(int), Color.DodgerBlue, true);
        //下面的代码将忽略容器中已有的颜色
        //this.SetOptionDotColor(op, Color.Red); //无需在OnOwnerChanged()中设置
    }
}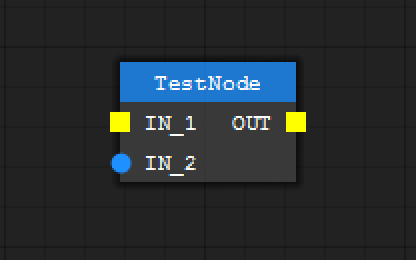
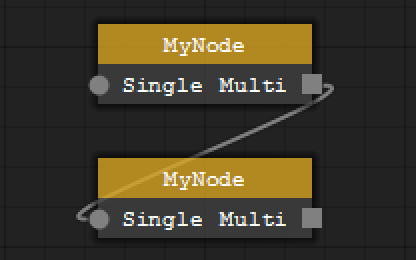
通过上面的案例你可以看到 STNode 有两个重要的属性 InputOptions 和 OutputOptions 其数据类型为 STNodeOption 而 STNodeOption 有两种连接模式 single-connection 和 multi-connection
- single-connection
- 单连接模式 在单连接模式下一个连接点同时 只能被一个 同数据类型点的连接
- multi-connection
- 多连接模式 在多连接模式下一个连接点同时 可以被多个 同数据类型点连接
public class MyNode : STNode {
    protected override void OnCreate() {
        base.OnCreate();
        this.Title = "MyNode";
        this.TitleColor = Color.FromArgb(200, Color.Goldenrod);
        //multi-connection
        this.InputOptions.Add("Single", typeof(string), true);
        //single-connection
        this.OutputOptions.Add("Multi", typeof(string), false);
    }
}
如何进行数据交互?
在上面的案例中仅仅是做了一个可以被连接的选项点 并不包含任何的功能
- STNodeOption可以通过绑定DataTransfer事件获取到传入该选项的所有数据
- STNodeOption可以通过TransferData(object obj)向该选项上所有连接的选项进行数据投递
下面通过一个案例进行演示 创建两个节点 一个节点用于每秒输出一次当前系统事件 另一个节点用于接收一个事件并显示
public class ClockNode : STNode
{
    private Thread m_thread;
    private STNodeOption m_op_out_time;

    protected override void OnCreate() {
        base.OnCreate();
        this.Title = "ClockNode";
        m_op_out_time = this.OutputOptions.Add("Time", typeof(DateTime), false);
    }
    //当被添加或者移除
    protected override void OnOwnerChanged() {
        base.OnOwnerChanged();
        if (this.Owner == null) {   //如果是被移除 停止线程
            if (m_thread != null) m_thread.Abort();
            return;
        }
        this.Owner.SetTypeColor(typeof(DateTime), Color.DarkCyan);
        m_thread = new Thread(() => {
            while (true) {
                Thread.Sleep(1000);
                //STNodeOption.TransferData(object)会自动设置STNodeOption.Data
                //然后自动向所有连接的选项进行数据传递
                m_op_out_time.TransferData(DateTime.Now);
                //如果你需要一些耗时操作STNode同样提供了Begin/Invoke()操作
                //this.BeginInvoke(new MethodInvoker(() => {
                //    m_op_out_time.TransferData(DateTime.Now);
                //}));
            }
        }) { IsBackground = true };
        m_thread.Start();
    }
}
当然上面可以直线将时间显示出来 不过这里为了演示数据的传递 所以还需要一个接收节点
public class ShowClockNode : STNode {
    private STNodeOption m_op_time_in;
    protected override void OnCreate() {
        base.OnCreate();
        this.Title = "ShowTime";
        //采用 "single-connection" 模式
        m_op_time_in = this.InputOptions.Add("--", typeof(DateTime), true);
        //当有数据时会自动触发此事件
        m_op_time_in.DataTransfer += new STNodeOptionEventHandler(op_DataTransfer);
    }

    void op_DataTransfer(object sender, STNodeOptionEventArgs e) {
        //当连接的建立与断开都会触发此事件 所以需要判断连接状态
        if (e.Status != ConnectionStatus.Connected || e.TargetOption.Data == null) {
            //当 STNode.AutoSize=true 并不建议使用STNode.SetOptionText
            //因为当文本发生改变时候会重新计算布局 正确的做法是自定义一个如Lable控件
            //作为时间的显示 当然这里为了演示方式采用此方案
            this.SetOptionText(m_op_time_in, "--");
        } else {
            this.SetOptionText(m_op_time_in, ((DateTime)e.TargetOption.Data).ToString());
        }
    }
}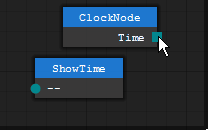
可以看到当连接被建立时 ShowTime 节点每秒都在刷新 下面是一个更加复杂一点的案例 但是这里并没有给出代码请参考附随工程的 Demo
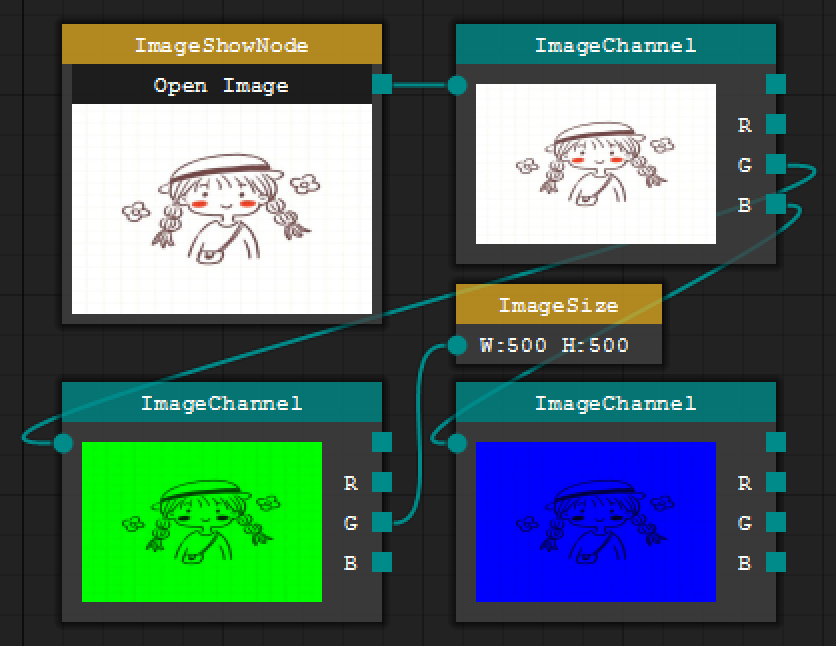
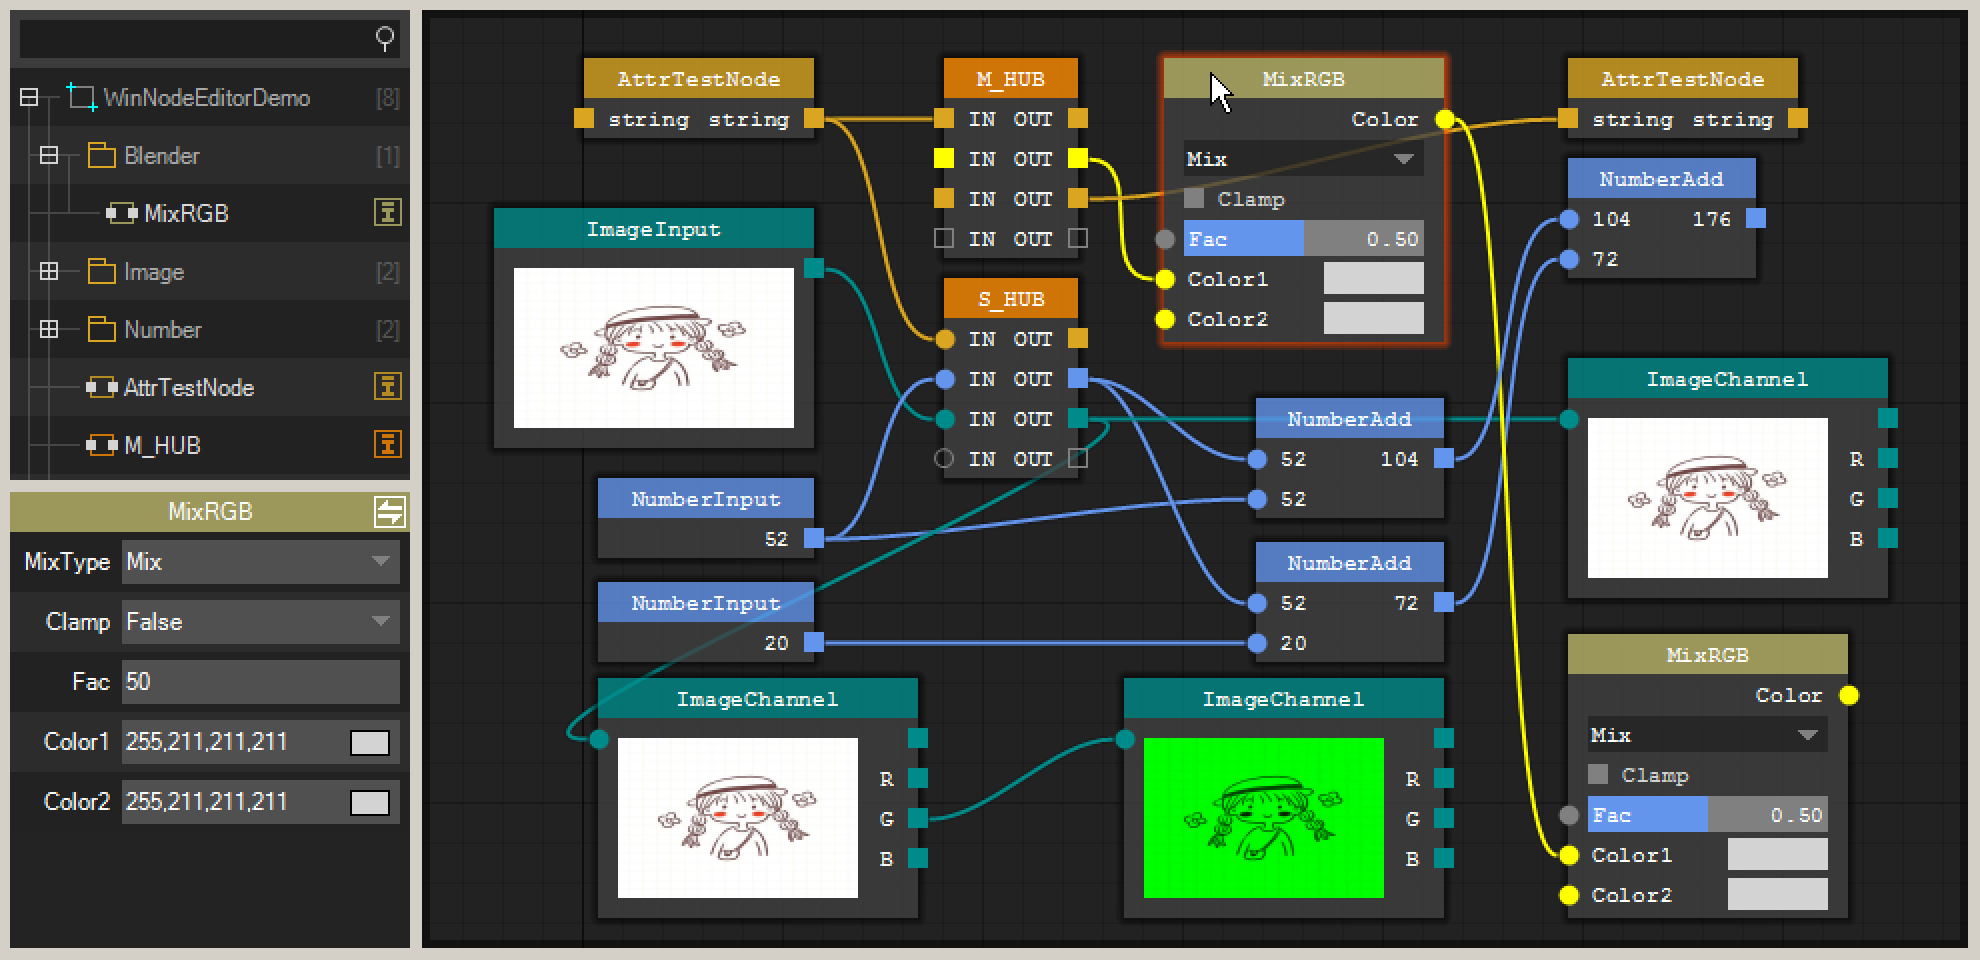
点击 Open Image 按钮可打开并显示一张图片在 ImageShowNode 中并将图片作为输出数据 ImageChanel 则负责接收一张图像并处理输出图像的RGB图像及原图 ImageSize 则负责接收并显示一张图像的尺寸信息
对于上面的节点在开发期间它们并不知道会被什么样的节点连接 也并不知道会被连接到什么节点上 开发者仅仅是完成了自己的功能处理接收到的数据并将结果打包给 STNodeOption 无需关系最终会被谁把结果拿走并处理 使得节点之间与节点之间的耦合关系大大降低 唯一将它们联系在一起的是一个 Image 数据类型 最终执行的逻辑交给用户自己拖拽节点组合他们自己想要的流程 使得功能的执行流程变得可视化 这也是作者的初衷
关于更多的教程和文档请参考:https://debugst.github.io/STNodeEditor/doc_cn.html 在下载的调用库压缩包里面同样包含离线版文档
关于下个版本
其实目前这个版本还有很多需要完善的代码 如上面提到的提供一些基础控件 而且目前提供的东西还很原始 一些应用场景目前需要开发者自己写代码完成
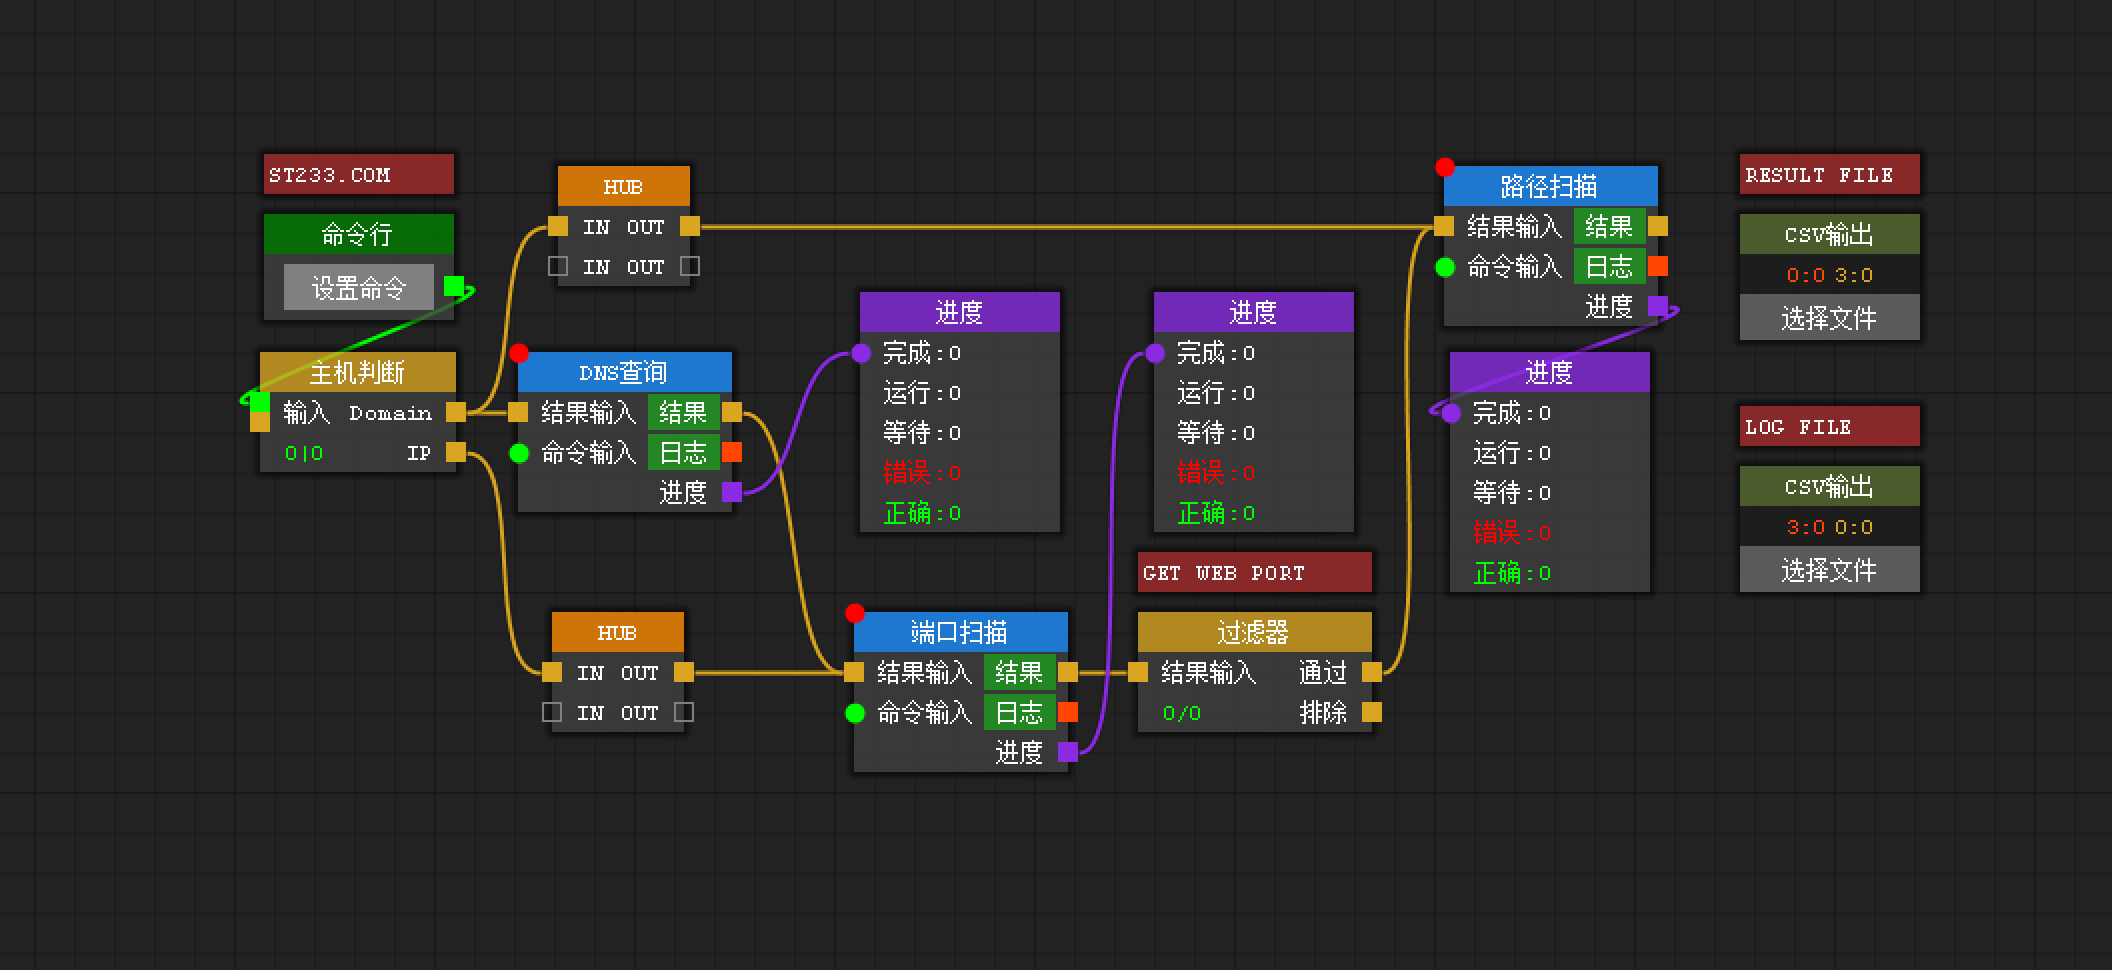
上图为作者的最初构思以及第一个 Demo 演示版本 在上图中可以看到有 启动 按钮 某些应用场景下可能需要用户点击执行按钮以后才开始执行用户所部署的逻辑 而之前上面的案例数据交互都是更具用户的布线实时的 当然在目前的版本中想实现也是可以的 只是需要开发者自己写部分代码 由于这部分的代码作者暂时还没有构思好很多细节处理 所以还有下一个版本的话很多功能都将出现
上图的构想是 开发者无需关系架构执行逻辑什么的 而开发者只需要关系功能点本省只需要开发出包含 STNode 的 DLL 文件 而程序启动 TreeView 会自动加载目录下的 DLL 文件并装载 STNode 到 TreeView 中 然后让用户拖拽执行 对于上一段话中作者提到的需要通过 启动 按钮执行如何在当前版本的实现 作者这里给出一些思路
//首先定义一个基类 包含Start和Stop方法
public abstract class BaseNode : STNode
{
    public abstract void Start();
    public abstract void Stop();
}
//===================================================================
//然后再基于基类在定义3个类型
//InputNode 将作为开始节点 作为数据执行的入口节点 类似与Main函数一样
public abstract class InputNode : BaseNode { }
//OutputNode 将作为最终数据的处理节点 如文件保存 数据库保存等
public abstract class OutputNode : BaseNode { }
//更具自己需求定义一些其他执行功能的节点
public abstract class ExecNode : BaseNode { }
//===================================================================
//创建一个 TestInputNode 提供一个字符串输入 并作为开始节点
public class TestInputNode : InputNode
{
    //使用"STNodeProperty"特性则此属性会在"STNodePropertyGrid"中显示
    [STNodeProperty("希望显示的属性名字", "属性秒速")]
    public string TestText { get; set; }

    private STNodeOption m_op_out;

    protected override void OnCreate() {
        base.OnCreate();
        this.Title = "StringInput";
        m_op_out = this.OutputOptions.Add("OutputString", typeof(string), false);
    }

    public override void Start() {
        //当执行开始的时候才向连接的选项进行数据的传递
        m_op_out.TransferData(this.TestText);
        this.LockOption = true;//开始后锁定选项
    }

    public override void Stop() {
        this.LockOption = false;//结束后解锁选项
    }
}
//===================================================================
//创建一个 TextFileOutputNode 用于文本文件保存收到的字符串
public class TextFileOutputNode : OutputNode
{
    [STNodeProperty("属性显示名称", "属性描述")]
    public string FileName { get; set; }

    private StreamWriter m_writer;

    protected override void OnCreate() {
        base.OnCreate();
        this.InputOptions.Add("Text", typeof(string), false)
            .DataTransfer += new STNodeOptionEventHandler(op_DataTransfer);
    }

    void op_DataTransfer(object sender, STNodeOptionEventArgs e) {
        if (e.Status != ConnectionStatus.Connected) return;
        if (e.TargetOption.Data == null) return;
        if (m_writer == null) return;
        //当收到一个数据时候 写入文本
        lock (m_writer) m_writer.WriteLine(e.TargetOption.Data.ToString());
    }

    public override void Start() {
        //开始的时候初始化文件
        m_writer = new StreamWriter(this.FileName, false, Encoding.UTF8);
        this.LockOption = true;
    }

    public override void Stop() {
        this.LockOption = false;
        if (m_writer == null) return;
        m_writer.Close();
        m_writer = null;
    }
}
上面的代码演示了一个 输入 和 输出 类型的节点 至于其他需求自行举一反三 当用户点下 启动 按钮时候
public void OnClickStart() {
    List<InputNode> lst_input = new List<InputNode>();
    List<OutputNode> lst_output = new List<OutputNode>();
    List<BaseNode> lst_other = new List<BaseNode>();
    foreach (var v in stNodeEditor.Nodes) {
        if ((v is BaseNode)) continue;
        if (v is InputNode) {
            lst_input.Add((InputNode)v);
        } else if (v is OutputNode) {
            lst_output.Add((OutputNode)v);
        } else {
            lst_other.Add((BaseNode)v);
        }
    }
    //在真正的开始之前 应当处理一些事情
    if (lst_output.Count == 0)
        throw new Exception("没有找到 [OutputNode] 类型的节点 请添加.");
    if (lst_input.Count == 0)
        throw new Exception("没有找到 [InputNode] 类型的节点 请添加.");
    foreach (var v in lst_other) v.Start();
    foreach (var v in lst_output) v.Start();
    //最起码 InputNode 类型的节点至少得又一个吧 不然怎么开始.
    //而且 InputNode 类型的节点应当是最后启动
    foreach (var v in lst_input) v.Start();
    stNodePropertyGrid1.ReadOnlyModel = true;//不要忘记设置属性窗口只读
}
如果你希望只能有一个 InputNode 类型的节点被添加
stNodeEditor.NodeAdded += new STNodeEditorEventHandler(stNodeEditor_NodeAdded);
void stNodeEditor_NodeAdded(object sender, STNodeEditorEventArgs e) {
    int nCounter = 0;
    foreach (var v in stNodeEditor.Nodes) {
        if (v is InputNode) nCounter++;
    }
    if (nCounter > 1) {
        System.Windows.Forms.MessageBox.Show("只能有一个 InputNode 被添加");
        stNodeEditor.Nodes.Remove(e.Node);
    }
}
当然 这个需求估计很少有吧
当然这里就并没有给出上述代码片段的执行效果了 因为上面仅仅是提供思路 让读者可以举一反三 而且上面的代码均没有任何的异常处理 要真正做好其实还有很多细节需要处理很多代码需要写 所以暂定目前版本不提供这样的功能
关于作者
- Github: DebugST
- Blog: Crystal_lz
- Mail: ([email protected])