SUYEgit / Surgery Robot Detection Segmentation
Labels
Projects that are alternatives of or similar to Surgery Robot Detection Segmentation
Mask R-CNN for Surgery Robot
This is a project of NUS Control & Mechatronics Lab for surgical robot target detection and segmentation under guidance of Prof. Chui Chee Kong. Information on the research group can be found in http://blog.nus.edu.sg/mpecck/.
The codes are based on implementation of Mask R-CNN by (https://github.com/matterport/Mask_RCNN) on Python 3, Keras, and TensorFlow. The model generates bounding boxes and segmentation masks for each instance of an object in the image. It's based on Feature Pyramid Network (FPN) and a ResNet101 backbone.
The repository includes:
- Source code of Mask R-CNN built on FPN and ResNet101.
- Instruction and training code for the surgery robot dataset.
- Pre-trained weights on MS COCO and ImageNet.
- Example of training on your own dataset, with emphasize on how to build and adapt codes to dataset with multiple classes.
- Jupyter notebooks to visualize the detection result.
Training on Your own Dataset
Pre-trained weights from MS COCO and ImageNet are provided for you to fine-tune over new dataset. Start by reading this blog post about the balloon color splash sample. It covers the process starting from annotating images to training to using the results in a sample application.
In summary, to train the model you need to modify two classes in surgery.py:
-
SurgeryConfigThis class contains the default configurations. Modify the attributes for your training, most importantly theNUM_CLASSES. -
SurgeryDatasetThis class inherits fromutils.Datasetwhich provides capability to train on new dataset without modifying the model. In this project I will demonstrate with a dataset labeled by VGG Image Annotation(VIA). If you are also trying to label a dataset for your own images, start by reading this blog post about the balloon color splash sample. First of all, for training you need to add class in functionload_VIA
self.add_class("SourceName", ClassID, "ClassName")
#For example:
self.add_class("surgery", 1, "arm")  #means add a class named "arm" with class_id "1" from source "surgery"
......
Then extend function load_mask for reading different class names from annotations
For example, if you assign name "a" to class "arm" when you are labelling, according to its class_id defined in load_VIA
class_ids = np.zeros([len(info["polygons"])])
for i, p in enumerate(class_names):
   if p['name'] == 'a':
      class_ids[i] = 1
      ......
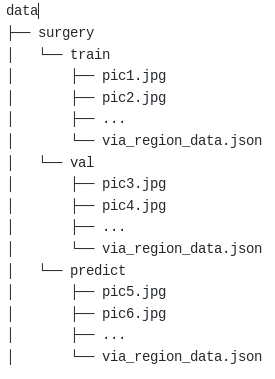
- The data directories for this project are as following. Make sure you include corresponding annotations(.json) in correct directory.
Now you should be able to start training on your own dataset! Training parapeters are mainly included in function train in surgery.py.
#Train a new model starting from pre-trained COCO weights
python surgery.py train --dataset=/home/.../mask_rcnn/data/surgery/ --weights=coco

#Train a new model starting from pre-trained ImageNet weights
python surgery.py train --dataset=/home/.../mask_rcnn/data/surgery/ --weights=imagenet

# Continue training the last model you trained. This will find
# the last trained weights in the model directory.
python surgery.py train --dataset=/home/.../mask_rcnn/data/surgery/ --weights=last
Prediction, Visualization, Evaluation
Functiondetect_and_color_splash in surgery.py are provided in this project.
To use detect_and_color_splash, you need to add class_names according to your dataset
class_names = ['BG', 'arm', 'ring']
You can make prediction on a specific image, images in a specific directory or even a video, by
#Detect and color splash on a image with the last model you trained.
#This will find the last trained weights in the model directory.
python surgery.py splash --weights=last --image=/home/...../*.jpg

#Detect and color splash on a video with a specific pre-trained weights of yours.
python sugery.py splash --weights=/home/.../logs/mask_rcnn_surgery_0030.h5  --video=/home/simon/Videos/Center.wmv
- prediction.ipynb provides step-by-step prediction and visualization on your own dataset. You can also roughly evaluate the model with metrics of overall accuracy and precision.
Instance Segmentation Samples on Robot Dataset
The model is trained based on pre-trained weights for MS COCO.


Configurations
Anaconda + Python 3.6.4, TensorFlow 1.7.0, Keras 2.1.5, CUDA 9.0, cudnn 7 and other common packages listed in requirements.txt.
Installation
- Install dependencies
pip install -r requirements.txt
- Clone this repository
- Run setup from the repository root directory
python setup.py install - The code will automatically download pretrained COCO weights when you select training with COCO weights. But in case it somehow doesn't work, download pre-trained COCO weights (mask_rcnn_coco.h5) from the releases page.


