Amir-Arsalan / Synthesize3dviadepthorsil
Programming Languages
Projects that are alternatives of or similar to Synthesize3dviadepthorsil
Synthesizing 3D Shapes via Modeling Multi-View Depth Maps and Silhouettes with Deep Generative Networks
This repository provides a Torch implementation of the framework proposed in CVPR 2017 paper Synthesizing 3D Shapes via Modeling Multi-View Depth Maps and Silhouettes with Deep Generative Networks by Amir A. Soltani, Haibin Huang, Jiajun Wu, Tejas Kulkarni and Joshua Tenenbaum
Slides used for two invited talks at CVPR 2017 Vision Meets Cognition Workshop and MIT Vision Seminar (contains new results): Here
CVPR 2017 Poster: Here
Requirements
- Torch
- nn
- nngraph
- cutorch
- cunn
- paths
- image
- optim
- gnuplot
-
xlua -- Needed only when processing/preparing your own data set throught
1_dataLoader.lua - OpenCV -- for final 3D-model reconstruction and visualization
Optional Requirements
- tSNE -- For running the tSNE experiment
-
cudnn v6 or higher --
git clone https://github.com/soumith/cudnn.torch.git -b R7 && cd cudnn.torch && luarocks make cudnn-scm-1.rockspec
Installing Torch
1- Install LuaJIT and LuaRocks
The following installs luaJIT and luarocks locally in $HOME/usr. If you
want a system-wide installation, remove the
-DCMAKE_INSTALL_PREFIX=$HOME/usr option.
git clone https://github.com/torch/luajit-rocks.git
cd luajit-rocks
mkdir build; cd build
cmake .. -DCMAKE_INSTALL_PREFIX=$HOME/usr -DWITH_LUAJIT21=OFF
make -j 4
make install
cd ../..
We assume luarocks and luajit are in $PATH. If
they are not - and assuming you installed them locally in $HOME/usr - you
can instead run ~/usr/bin/luarocks and ~/usr/bin/luajit.
If you run into compilation issues or you are willing to use CUDA version 9.1 and higher, you may try using this Git repo to compile Torch7 as follow:
git clone https://github.com/nagadomi/distro.git ~/torch --recursive
cd ~/torch
./install-deps
./install.sh
2- Installing Torch and other Torch packages
luarocks install torch
luarocks install cudnn # for GPU support
luarocks install cunn # for GPU support
Hardware Requirements
We recommend using a machine with ~200GBs of free storage (~60GBs if you're using ModelNet40), ~10GBs of memory and a GPU with ~5GBs of memory with the default arguments. You will need less than 2GBs of free GPU memory when using the model for running experiments (4_0_runExps.lua). GPU memory and RAM requirement could be reduced by setting nCh and maxMemory arguments to a smaller values respectively.
Running
Parameters
Use main.lua to train new models or run experiments for a pre-trained model. Before running the code make sure you specify a directory name for your model-to-be-trained by setting the input arguments:
-
benchmark: Set to1if you want to use a benchmark data set (E.g. ModelNet40 here) -
fromScratch: If set to1the code will load the 2D images to Torch tensors and save them onto disk. Make sure you have unzipped the contents of the.zipfiles either manually or via running the code with thezipargument set to1 -
modelDirName: Name of the directory to save model and results of each run of the code -
dropoutNet: Set to1to train or use a pre-trainedDropOutNetmodel -
singleVPNet: Set to1to trainor or use a pre-trainedSingleVPNetmodel -
conditional: Set to1for conditional models -
silhouetteInput: Set to1to use silhouettes for training/testing -
KLD: The KLD term's gradient coefficient (smaller values like 10 delivers better reconstructions after training) -
experiment: Set to0when you want to train a model and to1when you want to use a pre-trained model -
fromEpoch: Set to the epoch number from which you want to load a model and use it for testing (use whenexperimentis set to1). Set to0to use one of the pre-trained models (download from here)
Setting both dropoutNet and singleVPNet to 0 means that you are working with a AllVPNet model.
Data
Using the pre-rendered data
You can download the pre-rendered data sets for ShapNet Core and ModelNet 40 from here. You will need about ~30GBs and ~8GBs for the .zip files for ShapeNet Core and ModelNet40 data sets respectively. The data sets only contain raw depth map rendering results in float or int (stored in png files). To process the data sets and store the viewpoint depth maps into Torch tensors you would need an additional ~160GBs and ~55GBs for each ShapeNet Core or ModelNet40 respectively. Set the benchmark argument to 0 or 1 to use the ShapeNet core or ModelNet40 data sets respectively.
Run the following command to store the rendered 2D images of depth maps into Torch tensors:
th main.lua -zip 1 -fromScratch 1 -maxMemory 3000 -train 0
Rendering Viewpoints
If you want to create your own data set you can use the rendering code provided in /depth_render_reconstruction/code/renderDepth/. The obj/ply files names should be in model_x format where x could be any integer. You need to have install Microsoft Visual C++ 2013 Redistributable. After rendering view points to create your data set make sure you follow the following pattern for creating your .zip files:
CategoryName.zip
└── CategoryName_depth_[rgb/float]
    ├── model_x_Cam_0.jpg
    ├── model_x_Cam_0.jpg
    ├── ...
    └── model_x_Cam_19.jpg
Note that the file camPosList.txt contains the x, y and z coordinates for 20 camera positions that we used. In case you want to compile the rendering pipeline and not use the provided .exe file for rendering views, you may compile this code . You may also compile a newer version of the same code provided .
Training:
Here are a few examples on how to train different models. The models will be trained on the ShapeNet core data set unless you set benchmark to 1:
Train an unconditional AllVPNet model using depth maps:
th main.lua  -modelDirName "AllVPNet" -dropoutNet 0 -singleVPNet 0 -silhouetteInput 0 -conditional 0 -benchmark 0

Train a conditional `DropoutNet` model using depth maps:
th main.lua  -modelDirName "DropoutNet-Conditional" -dropoutNet 1 -singleVPNet 0 -silhouetteInput 0 -conditional 1 -benchmark 0

Train a conditional SingleVPNet using silhouettes:
th main.lua  -modelDirName "SingleVPNet-Cond" -dropoutNet 0 -singleVPNet 1 -silhouetteInput 1 -conditional 1 -benchmark 0

Train an unconditional AllVPNet model for `ModelNet40` data set with silhouettes:
th main.lua  -modelDirName "AllVPNet" -dropoutNet 0 -singleVPNet 0 -silhouetteInput 0 -conditional 0 -benchmark 1
Make sure you set the testPhase argument to 0 when training or running experiments
Testing:
To load a model and use it for testing (reconstruction, sampling etc) download a pre-trained model from here and do the followings:
Make sure you have stored the depth maps into tensors (th main.lua -zip 1 -fromScratch 1 -maxMemory 3000 -train 0)
Set the optional arguments in accordance to the model downloaded
Copy model.t7 and mean_logvar.t7 to modelDirName/model/
th main.lua -modelDirName 'someModelDirName' -experiment 1 -expType 'randomSampling' -conditional 1 -sampleCategory 'chair, car, sofa, laptop, guitar, airplane'
expType could be either randomSampling, interpolation, forwardPass, NNs or tSNE
Optional:
Set the testPhase argument to 1 to only use the test set for quick runs/tests
Visualization in 3D (Point Cloud)
To generate the final 3D shape do the followings:
Unzip `depth_render_reconstruction.zip`
Compile the code in /depth_render_reconstruction/code/depthReconstruction_Ubuntu/depthReconstruction (Make sure OpenCV is installed)
Copy the built executable file `depthReconstruction` and into the results directory; camPosList.txt must be present in the same directory.
Run the 4_1_visualization.lua -inputDir 'anywhereOnDisk' -outputDir 'anywhereOnDisk' -experiment 'sampling'
The valid inputs for experiment are reconstruction, sampling, interpolation and `NN`. Use reconstruction for nyud and userData experiments.
Results
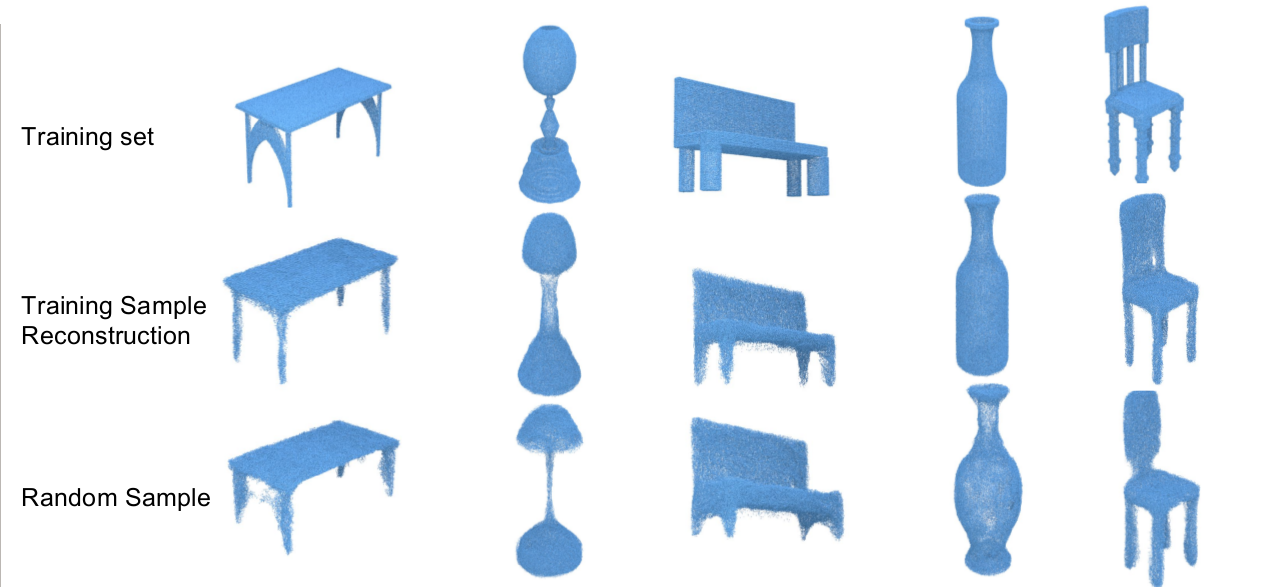
Random Sampling
th main.lua -modelDirName 'someModelDirName' -experiment 1 -expType 'randomSampling' -conditional 1 -sampleCategory 'chair, car, sofa, laptop, guitar, airplane'
For conditional models you can specify which categories to get samples for by having comma-separated category names in the sampleCategory argument. Simply remove sampleCategory argument if you want to get samples for all categories.
Here are some random samples obtained from unconditionally-trained models:

And here are some conditional samples. The models are able to quickly learn the generative distribution for a new category through hierarchical priors and using the learned representations for other categories. For instance, we only had about 50 samples of headphones in the training set but the model generates good-looking samples of headphones after training:

Nearest Neighbors
We show that our models do not memorize the training samples by showing the nearest neighbor examples (on the Z layer embeddings) from the test set. You can run the nearest neighbor experiment for both unconditional and conditional samples. You can download the samples selected manually (manual selection is done via viz.txt) from here. To get the nearest neighbor samples:
Make sure you have your selected samples here `/modelDirName/experiments/[conditionalSamples/randomSamples]-empirical/`
`th main.lua  -modelDirName "AllVPNet-Conditional-Sil"  -silhouetteInput 1 -conditional 1 -benchmark 0 -experiment 1 -fromEpoch 0 -expType 'NNs'`
If you want to use the model trained on yoru machine, make sure you set the fromEpoch argument and create a viz.txt file in each sample set directory(e.g .../randomSamples-empirical/sample1/ or .../conditionalSamples-empirical/airplane/sample1/)
Reconstruction
th main.lua -modelDirName 'someModelDirName' -experiment 1 -conditional 0 -expType 'forwardPass' -forwardPassType 'randomReconstruction' -nReconstructions 80
Run the following to reconstruct all samples in the test data set:
th main.lua -modelDirName 'someModelDirName' -experiment 1 -conditional 1 -expType 'forwardPass' -forwardPassType 'reconstructAllSamples'
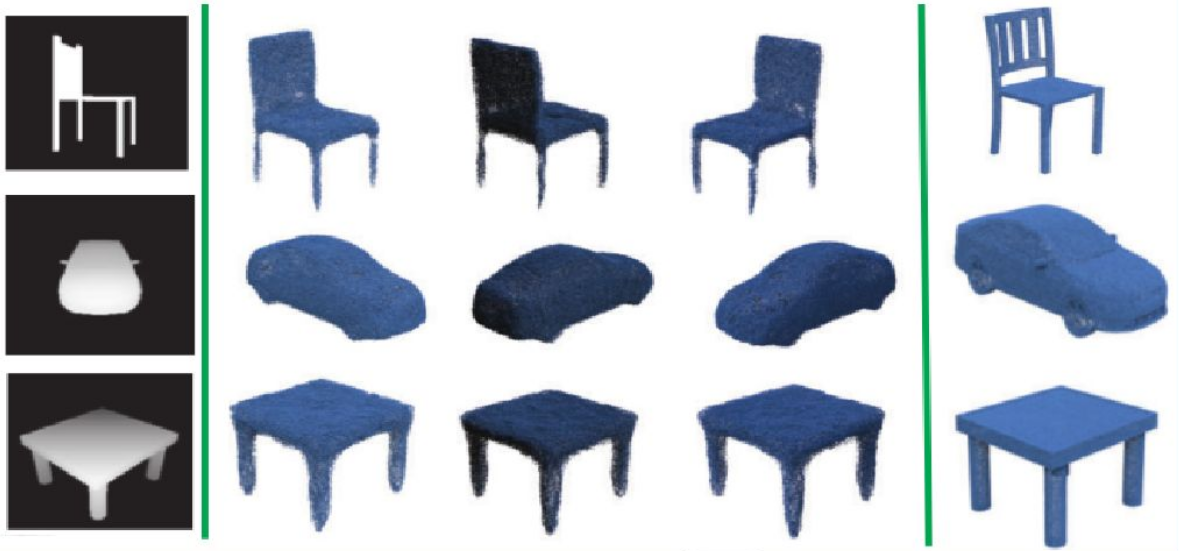
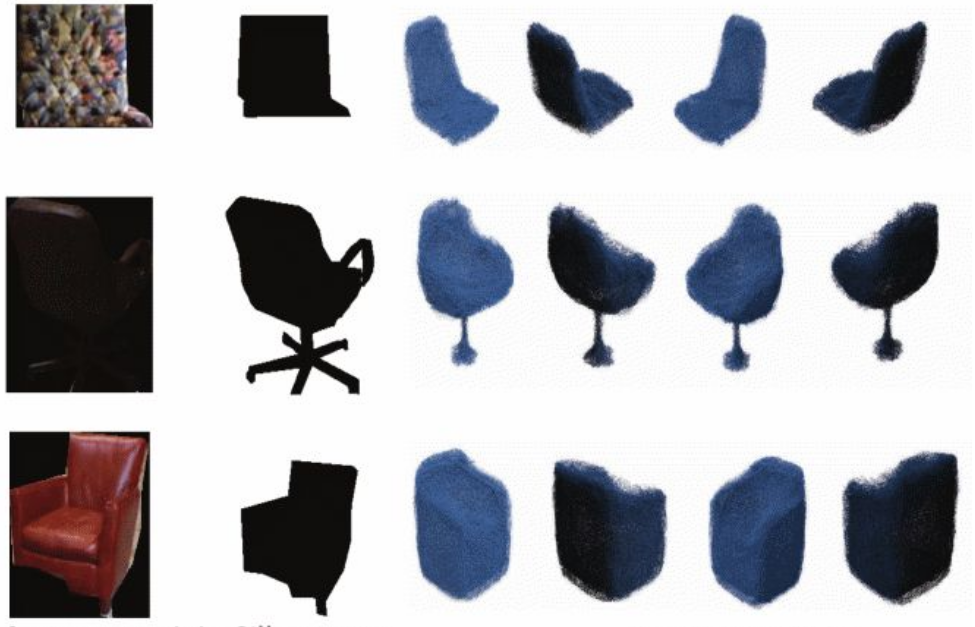
Out-of-sample generalization
Make sure you extract the zip-ExtraData.zip into the repository directory before running the following commands. For userData the code will convert rgb images into silhouettes ifsilhouetteInput is set to 1. If you set it to 0 the code will assume you only have depth maps in /ExtraData/userData/ and are working with a model trained on depth maps.
NYUD
th main.lua -modelDirName 'someModelDirName' -experiment 1 -conditional 0 -expType 'forwardPass' -forwardPassType 'nyud'
Random silhouettes/depth maps from user
th main.lua -modelDirName 'someModelDirName' -experiment 1 -conditional 0 -silhouetteInput 0 -expType 'forwardPass' -forwardPassType 'userData'
Interpolation
th main.lua -modelDirName 'someModelDirName' -conditional 0 -experiment 1 -expType 'interpolation' -nSamples 3 -sampleCategory 'chair, car, sofa, laptop, guitar, airplane'
Remove -sampleCategory 'chair, car, sofa, laptop, guitar, airplane' if you want to get interpolation results for all categories
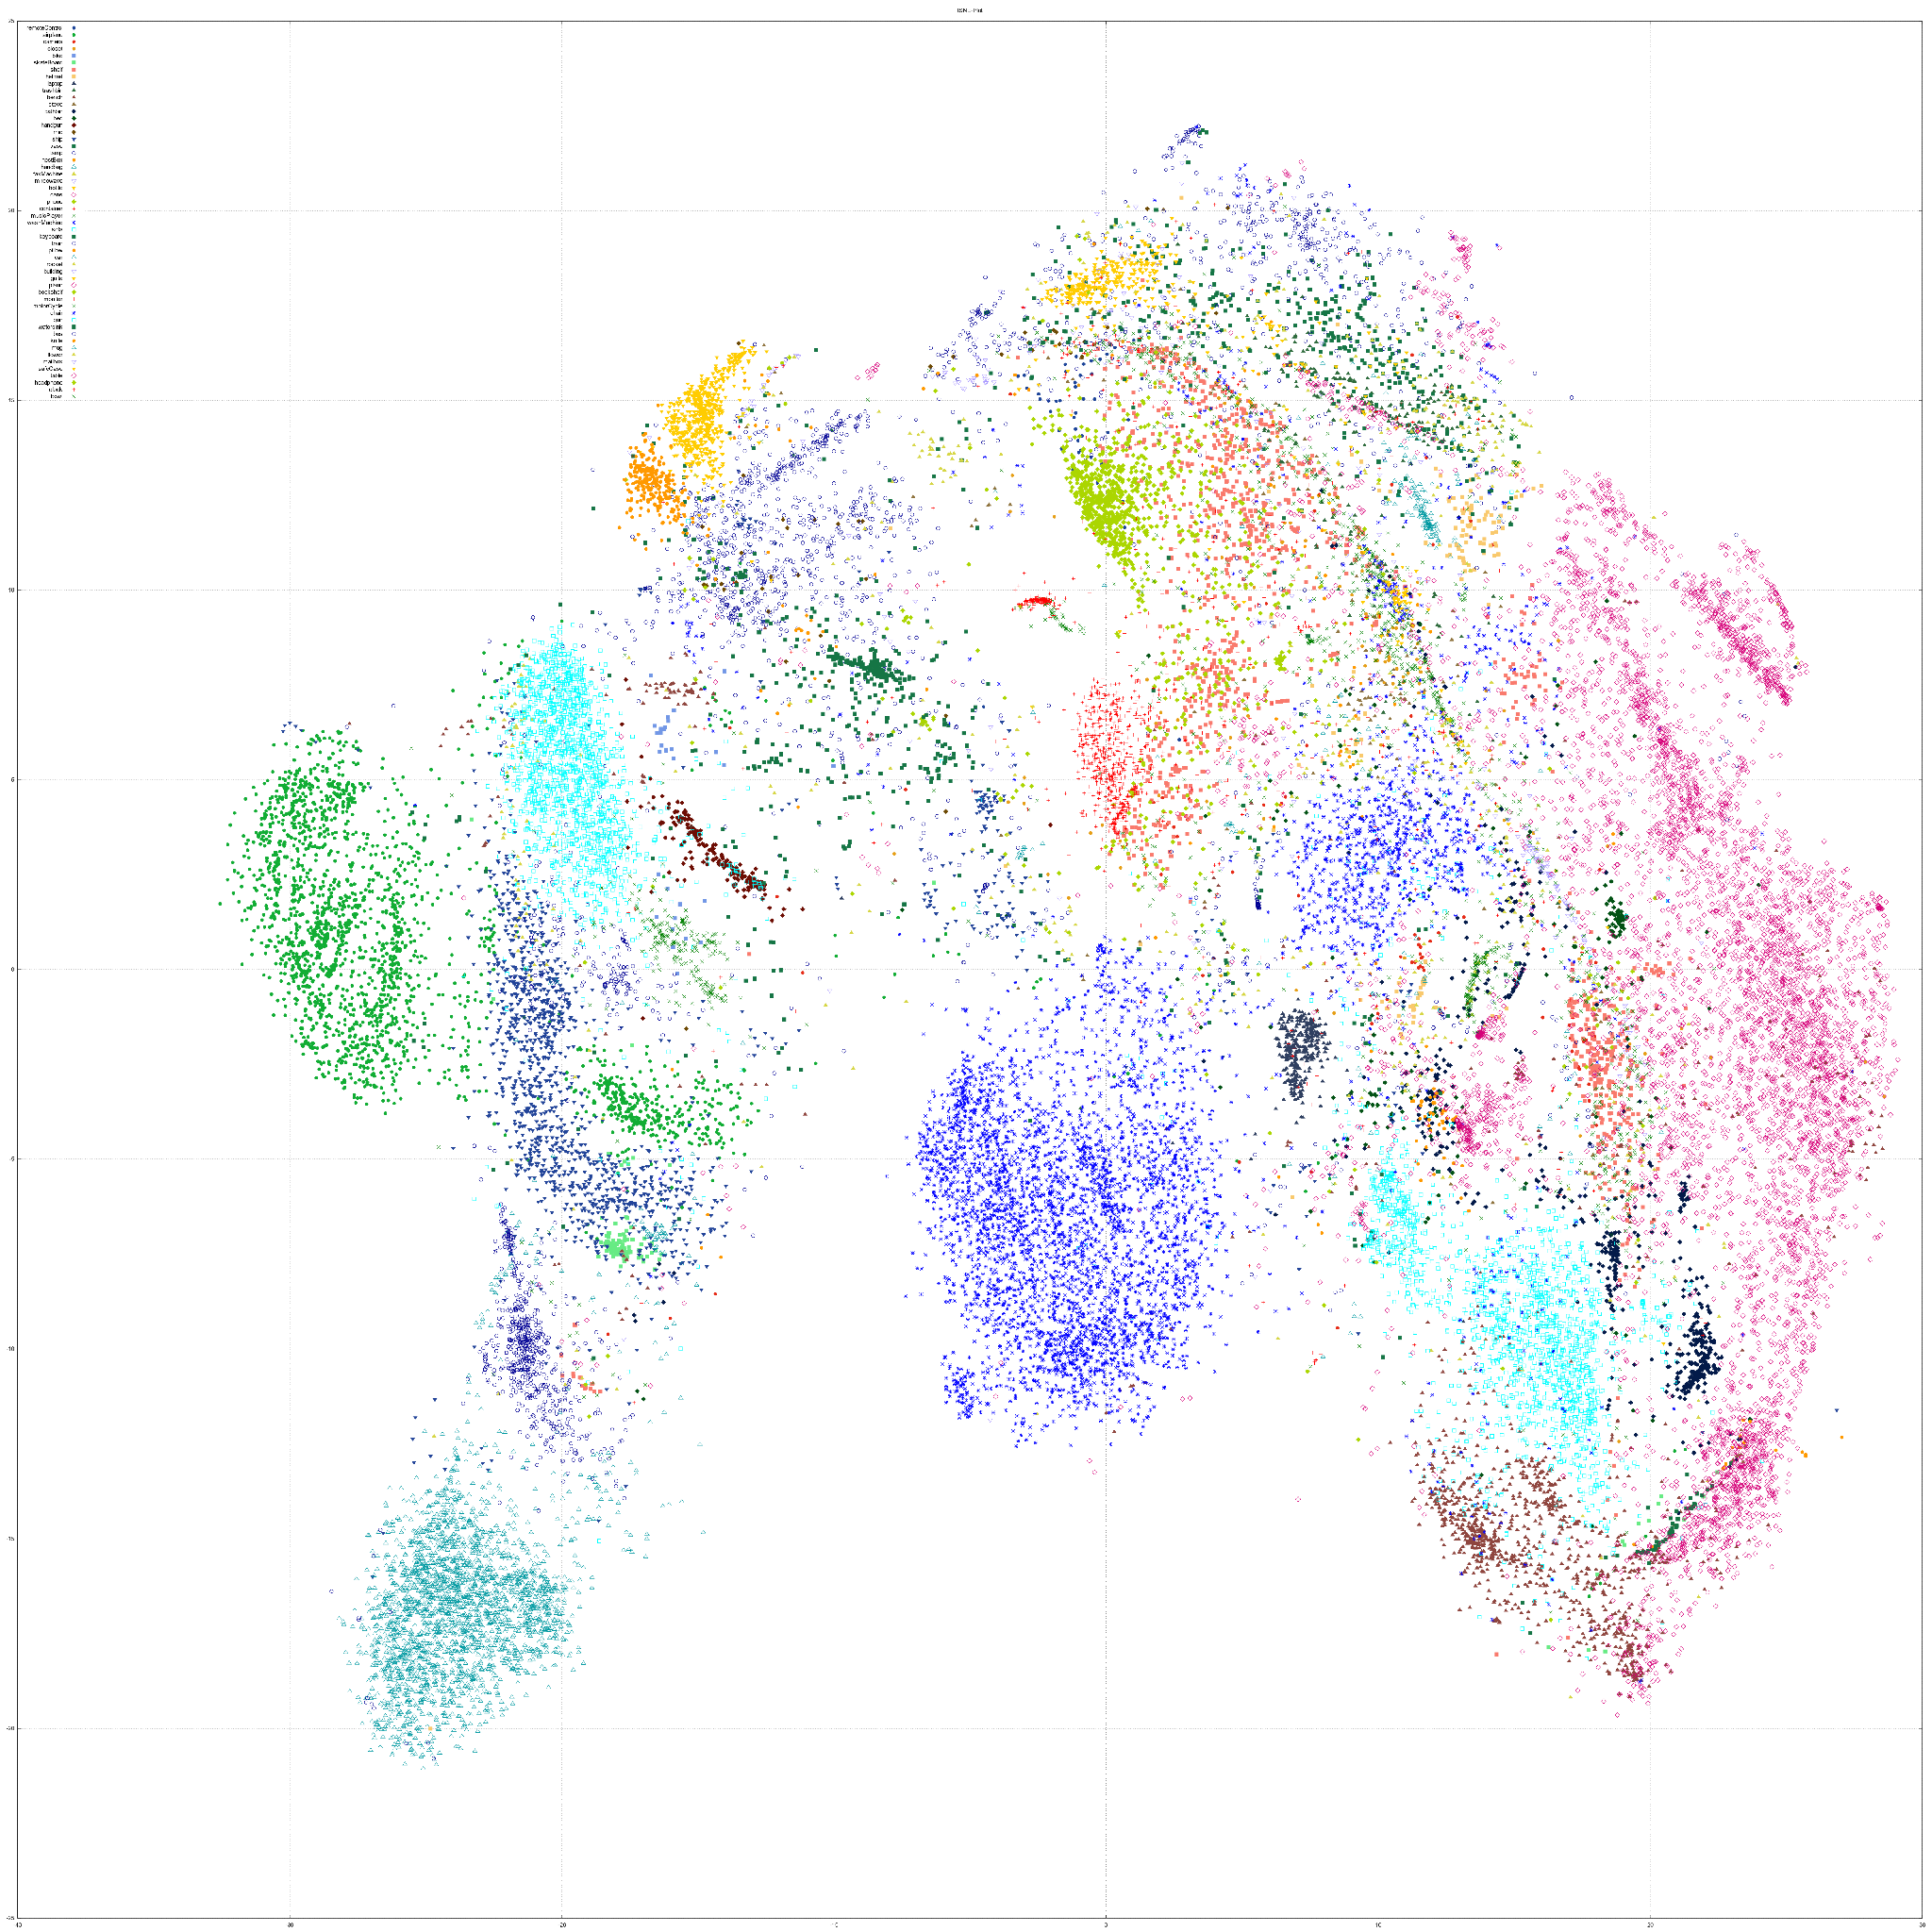
tSNE Visualization
Run the following command for applying the tSNE algorithm on the Z layer embeddings.
th main.lua -modelDirName 'someModelDirName' -experiment 1 -conditional 0 -silhouetteInput 0 -expType 'tSNE''
Here is the tSNE visualization for all of the ShapeNet Core training samples:

Click here to view it with the original resolution.
Representation Consistency
SingleVPNet models give similar reconstructions/IoU/classification accuracy for most viewpoints, meaning that they obtain some consistent representations. You can run the representation consistency experiment on our ShapeNet Core test set by running the following command:
th main.lua  -modelDirName "SingleVPNet-Conditional-Depth"  -silhouetteInput 0 -singleVPNet 1 -conditional 1 -benchmark 0 -experiment 1 -fromEpoch 0 -expType 'forwardPass' -forwardPassType 'reconstructAllSamples' -allViewsExp 1
th main.lua  -modelDirName "SingleVPNet-Conditional-Silhouette"  -silhouetteInput 1 -singleVPNet 1 -conditional 1 -benchmark 0 -experiment 1 -fromEpoch 0 -expType 'forwardPass' -forwardPassType 'reconstructAllSamples' -allViewsExp 1
IoU Computation
Execute the following to get the reconstructions for all test samples:
th main.lua -modelDirName 'someModelDirName' -experiment 1 -expType 'forwardPass' -forwardPassType 'reconstructAllSamples'`
For a SingleVPNet model execute the following to get reconstructions for each views separately:
th main.lua -experiment 1 -expType 'forwardPass' -forwardPassType 'reconstructAllSamples' -allViewsExp 1`
To get the IoU numbers, in a Windows machine open the README.txt in zip-IoU.zip and install the requirements. Then Run run.bat
Citation
Please cite our work if you found our paper helpful and/or use our code for your research:
@inproceedings{{3DVAE,
  title={Synthesizing 3D Shapes via Modeling Multi-View Depth Maps and Silhouettes with Deep Generative Networks},
  author={Soltani, Amir Arsalan and Huang, Haibin and Wu, Jiajun and Kulkarni, Tejas D and Tenenbaum, Joshua B}
  booktitle={Proceedings of the IEEE Conference on Computer Vision and Pattern Recognition},
  pages={1511-1519},
  year={2017}
}


