TrackAssembly
Copyright 2015 ME !
IF YOU HAPPEN TO FIND REUPLOADS WITH DIFFERENT ORIGIN REPORT THEM TO ME IMMIDEATELY !!!
Description
This script can give you the ability to connect prop-segmented track pieces fast. It is optimized and brings the track building time consuming to a minimum. It uses pre-defined active points to snap the segments the best way there is in Garry's Mod.
General FAQ:
Donations
I am supporting this tool in my free time mostly and it was quite a ride since I already first created it. But since my lack of time for playing gmod has been drastically increased some people asked me if I accept donations, here is the link to my PayPal.
How can I install this?
You can subscribe to it in the workshop here
or download the latest stable release from here.
After downloading the release extracting it in ../GarrysMod/garrysmod/addons and you are practically done.
Why did you consider making this thing ?
I was always annoyed when building a railroad track in-game, spending a lot of time
just to align the pieces together, so I thought Here is a bright idea! and there you have it :)
Also, another great achievement progress is in place, so 10x guys for
helping me, help you, help us all !
What kind of features does this script have?
- Convar factory reset can be easily triggered by the server admins
- Convar tweaks is accessible via dedicated in-game manipulation panel
- Context menu for direct track entity value export and manipulation
- Optional flip-over mode called from spawning/snapping for quickly flip the anchor across
- Track segment flip over mode for mirroring already created loops and curves
- Track segment curve node interpolation for building custom track layouts
- Track curve fitting alignment based on ray intersection for precise piece layout
- Track tangent turn interpolation for renerating curves with variable radius
- Extendible database via text file or a lua script
- Extendible database via load list and list prefixes type categories
- Switching database storage between Lua table and SQLite
- Spawning pieces on the map
- Snapping pieces on the map surface ( if checked )
- Snapping the first piece angle to user defined value
- Snapping already spawned pieces by using only the physgun
- Snapping/spawning with custom user offsets
- Snapping/spawning with zero pitch and roll. Good for track leveling
- Snapping/spawning at the mass-center or the active point ( if checked )
- Fast changing the active track ends (
ALT+ mouse scroll ). Good switching turns direction - Custom user defined active radius based snapping
- Custom active point and radius location assistant
- Custom active point position angle and orientation adviser
- Advanced duplicator can be used on the track created
- Custom entity properties ( weld, freeze, no-collide )
- User can disable phys-gun grabbing on a piece. Good for turntables
- Ability to list the frequent pieces on the server (
MRIGHT). Close shortcut (ALT + E) - Ability to search among the most server popular pieces by Lua patterns
- Ability to export server and client database as a file
- Tool-tips for every button are available and can be translated easily
- Ability to spawn scripted track switches of other dedicated class ( Ron's 2ft )
- Ability to modify the bodygroups and skins of a track piece ( with duping )
- Ability to modify track piece surface behavior ( wood, metal, slime, tire )
- Ability to extend a track piece spawn with additional entities
- Includes integrated wiremod extension for processing and reading the database
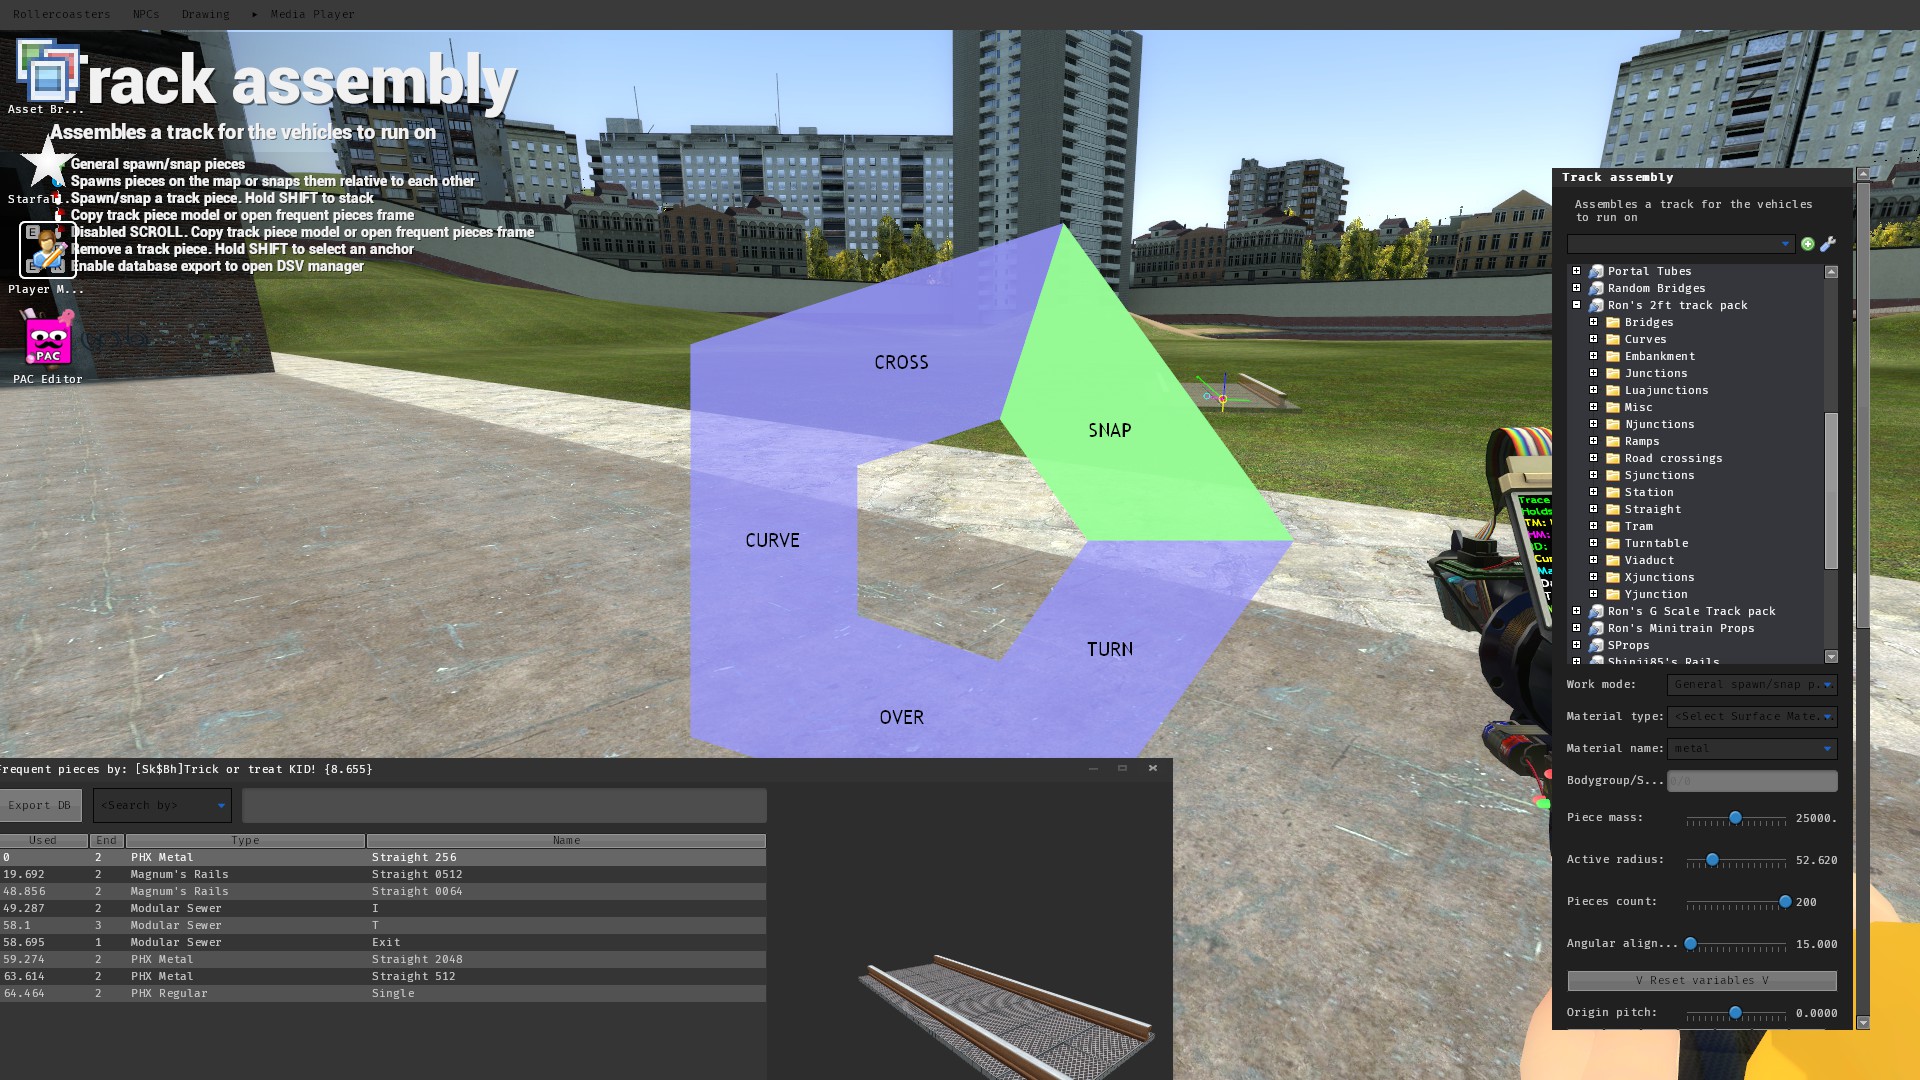
Where can I find the tool in-game ?
You can find the tool in the Constriction section of Garry's mod
spawn menu under the name of Track assembly.
The name of the tool depends on what language are you using when playing Garry's mod.
On the right in the tool's menu, you can locate the track pieces tree.
Expand the desired piece type to use for building your track by clicking on a node, then select the desired piece.
How can I chose and select a desired track end ?
Just hold KEY_LALT ( Def: LALT ) and turn the mouse scroll around.
This will make the script chose the track active point you want.
When You hold SPEED ( Def: SHIFT ) the script will switch to
adjusting the next active point for the track stacking option.
This will affect what point is chosen when you continue the track you build.
The current and next active points will not be the same.
I am scrolling and the point mouse scroll is enabled. Why is the track end not switched?
Sometimes selecting last weapon is bind to the KEY_LALT ( Def: LALT )
button by default. If that condition is present for you, the mouse scroll track piece
selection will not work. If you insist of using the mouse scroll and I don't blame you,
because it's faster and much convenient, just unbind the KEY_LALT ( Def: LALT ) button
via unbind alt ( unbind <key_binded> ). That way the game will no longer process
alt with priority to last weapon switch.
How do I use the old way for switching between the active points ?
There is this variable trackassembly_enpntmscr and as its name suggests
it controls the enable end-point mouse scroll. Set it to 1 if you want
to switch the track ends via the mouse scroll or set it to 0 if you want
to use the old-school for the way of changing and selecting track ends.
Hey, I cannot align my track curves properly. Can you help ?
Yep sure. In the right panel, there is a drop-down menu which has a bunch of tool modes listed.
Go ahead and select the Active point intersection. After you change the mode, an intersection
relation entity is needed to complete the process. Hitting SPEED + RELOAD
( Def: SHIFT + R ) just like the anchor, will select the relation active point of the
entity in question, which is closest to the player hit position. Now trace a track
piece and the ghost of the curve will be drawn. You can clamp the spawn position in a box using
the primary position flag applinfst ( Apply linear first ) or switch
the origin angle with the ray direction angle by using primary angle flag
appangfst ( Apply angular first ). In this working mode the angular and linear offsets adjust the
piece offsets relative to the ray intersection position where the trace and relation rays
meet. Press ATTACK1 ( Def: Left Mouse Button ) if you are happy with where
the ghost is located and where the spawn piece will go at.
The tool has too few track varieties. Can you make the pieces resizable ?
In sorta yes, however, there is no way to add this feature natively and so far I did not found a decent method,
which will not potentially break the entire game. While resizing props client-side is quite easy, in the server,
this task is very hard, close to impossible. The gmod API does not provide an elegant solution to this,
which meets the real-time performance requirements. Resizing track curves is by far the most complex task of this
sort as far as every single piece is concerned. If you take the track width in consideration, the resizing method
must not just select X, Y or Z axes, because the piece will get distortions along the curve ( ex. For 90
degree curves stretching by X will increase first point length, however, it will also adjust the second point width )
In Gmod there is this PhysicsInitConvex API that does
just that, but the spawning will take a very long time considering the amount it takes to resize every polygon on the
server. When the track is spawned outside the map bounds it will immediately crash the game.
Thus, I believe that stacking two or more tracks is always better than resizing a prop !
How can I use switchers ? I can't seem to make them work.
Every addon has its own way for dealing with the switchers. Others that are not listed here do not
have dedicated track switchers, so to switch them you must use two track pieces inside each other.
Swap their solidness around using the fading door tool,
so when one is solid a.k.a. CLOSED and you can't pass through it, the other must be no-collided
to all OPENED. Therefore, the wheels of the train will follow only the track that is currently
set being solid with fading door CLOSED function state:
- Dedicated entity addition like a lever you must press with your
USEkey - Dedicated switcher entity class you must press
with your
USEkey. You must press the entity custom switcher class itself:Sligwolf's mini trainsSligWolf's White RailsRon's 2ft track pack
- Dedicated switched/unswitched model. You have to swap the two models around
to switch the track by using a script ( gLua, E2, EAdv,
Starfall )
Robster's packAlexCookie's 2ft track pack
- Dedicated switcher model and a switcher moving needle that you must assemble to get track switching functionality
Mr.Train's M-GaugeMr.Train's G-GaugeBattleship's abandoned rails
How to use the tool control options when building a track ?
- Pressing
ATTACK1( Def:Left Mouse Button)
CURVEandTURN: Spawns server task to handle segmented curve interpolation on condition:- The holder piece must be valid database entry.
- Two or more vertices must be present on the curve stack.
- The holder piece must have more than one active points.
- The holder piece start point data must persist in the cache
- The holder piece end point data must persist in the cache
- The holder piece active points distance must be positive
- The holder piece must not be a curving track.
- The holder piece must not be a U-turn track.
- The holder piece must not be a ramp track.
OVER: Flips over every entity that is a track present in the flip-over list where forflip normaluses trace normal and forflip origintraceOBB.- When you are looking at the world the piece will be spawned on the map.
- When you are looking at one of track piece's predefined active points
- Will snap the piece that you're holding to the trace one.
- If the traced piece's type is different from the holder piece's type,
please check
Ignore track typecheck-box to snap it. - If
Enable advisoris checked, a coordinate system will appear, marking the origin position on the traced piece visible. - If
Ghosts countis larger than zero ghosted track pieces will be rendered to assist you with the building.
- When not looking at trace entity piece predefined active point
will update the bodygroup/skin according to
trackassembly_bgskids.
- Pressing
ATTACK1( Def:Left Mouse Button) +USE( Def:E)
- When not looking at trace entity piece predefined active point will update the trace entity physical settings and constraints ( Based on anchor ).
- Pressing
ATTACK1( Def:Left Mouse Button) +SPEED( Def:SHIFT)
SNAP: Stack pieces according totrackassembly_stackcnt(Pieces count):- The value in
trackassembly_stackcntmust be positive. - The database record of the holder model must have at least two active points.
- The value in
OVER: Flips over every entity that is a track present in the flip-over list whereflip normalandflip originare extracted from active point. Ray intersection position between the two selected points can be utilized forflip originand the closest active point normal is utilized forflip normalwhen the trace entity model is equal to the holder model.- When you are not looking at one of track piece's predefined active points
will flip over the anchor entity relative to the trace normal vector as
flip normaland trace entityOBBcenter asflip origin.
- Pressing
ATTACK2( Def:Right Mouse Button)
CURVEandTURN: Inserts a curve node on the stack.OVER: Inserts the trace entity ID to the flip over stack.- When pointing to the world will open the
Frequent pieces by <PLAYER_NAME>frame, from where you can select your routine pieces to use again in the track building process as well as searching in the table either byMODEL,TYPE,NAME,LAST_USEDto obtain the piece you want to continue your track with.
- Pressing
ATTACK2( Def:Right Mouse Button) +USE( Def:E)
- When
trackassembly_enpntmscris disabled, you have to press this, for changing the active track points using the old method of selection.
- Pressing
ATTACK2( Def:Right Mouse Button) +SPEED( Def:SHIFT)
CURVEandTURN: Updates the hit closest curve node on the stack.- When pointing to a prop will select the trace model to use as a piece for building a track.
- Pressing
ATTACK2( Def:Right Mouse Button) +DUCK( Def:CTRL)
- When
trackassembly_enpntmscris disabled, you have to press this, for changing the next active point by using the old method of selection.
- Pressing
ATTACK2( Def:Right Mouse Button) +SPEED( Def:SHIFT) +USE( Def:E)
CURVEandTURN: Updates selected curve node in condition:- When trace is a track piece, utilizes the trace entity active point as a curve node.
- Otherwise will check various conditions and pick the most suitable curve node location vector:
- When both neighbour (
startandfinal) nodes are track active points will intersect their rays - When only one (
startorfinal) node is an active point will project the hit node on its ray - When none of the neighbors are active points will project the hit node on their line bisector
- When both neighbour (
- Pressing
RELOAD( Def:R)
- When trace entity is a valid piece will just remove it.
- When
trackassembly_devmodeis enabled, will update the log control options.
- Pressing
RELOAD( Def:R) +USE( Def:E)
- When pressing on the world and
trackassembly_exportdbis enabled, the external database manager menu will be opened to configure database prefixes, otherwise will export the server databasesv_as a file in DSV format.
- Pressing
RELOAD( Def:R) +SPEED( Def:SHIFT)
- When pressing it on the world will clear the tool's selected operational track
pieces which are used for various things. Works differently based on the mode selected.
SNAP: Clears theanchorentity which all new pieces will be automatically constrained to.CROSS: Clears therelationray defined for using active point intersection between two pieces.CURVEandTURN: Clears all nodes defined for using the curving algorithm. Otherwise clears the last point on the stack.OVER: Clears the stack variable holder for all the flipped over entity base IDs
- When pressing it on the trace prop will set it as the tool's selected operational track
SNAP: Selects the trace entity for using it as an anchor.CROSS: Selects the closest trace active point origin to use it as relation ray.CURVEandTURN: Clears all nodes defined for using the curving algorithm. Otherwise clears the last point on the stack.OVER: Clears the stack variable holder for all the flipped over entity base IDs
Context menu pieces manipulation
The context menu options are used to manipulate the selected track pieces directly or as an interface to export various entity values to the tool console variables. Explanation of each control option is given in the summary below.
Piece modeloption exports the selected track model to the tool console variables. This is the same as copying the model via right click.Bodygroup/Skinoption transfers the generated bodygroup/skin selection to the tool console variables and populates the dedicated value display in the tool panel. The textbox is only a display and cannot be modified manually.Surface material nameoption will export the surface material name to the tool console variables. This option will also update the properties name combo box to display the new value that is used.Piece massoption exports the selected track mass to the tool console variables. The tool panel mass slider is updated accordinglyIgnore physics gunoption toggles the physics gun grabbing function on the track piece selected. When the grabbing is disabled, the player cannot interact with the track piece in any way, including grab, shake or unfreeze. This is good when you make turntables or attach moving tracks or needles, which must not be affected by any player's physics gun. If the option is enabled, click it again to disable it or the other way around.Freeze pieceoption will put the track piece in a frozen state and it will disable its motion. The piece stays in the same position until external fore is applied on it. This is good when you want your track bridge to have fake non-welded pieces. If the option is enabled, click it again to disable it or the other way around.Apply piece gravityoption controls the gravity affecting the selected track piece. If the option is enabled, click it again to disable it or the other way around.Weldoption controls the created welds on a piece. You must select an anchor to weld the right clicked piece to, when you are in regularSNAPmode displayed on the tool screen. when the anchor is not selected or it is invalid, a message will be displayed to warn you. You can also remove welds by holdingSPEED( Def:SHIFT) and clicking the option. The amount of welds will be displayed next to the option control.NoCollideoption controls the created collides on a piece. You must select an anchor to nocollide the right clicked piece to, when you are in regularSNAPmode displayed on the tool screen. When the anchor is not selected or it is invalid, a message will be displayed to warn you. You can also remove nocollides by holdingSPEED( Def:SHIFT) and clicking the option. The amount of nocollides will be displayed next to the option control.NoCollide worldoption controls the created world collides on a piece. The constraint anchor in this case is the world itself. Click on the option to create no collide world constraint or by holdingSPEED( Def:SHIFT) and click to remove it. The flag of the constraint will be displayed in the menu control option. The value will betrueif there is a still a no-collide world andphys_ragdollconstraintbetween the piece and the world. If it stays intrueafter you remove it, that means there are more constraints remaining connected to the trace.
How to use the tool control panel and what function does each item have ?
-
Track surface grip modifiercombo box is used if you want to obtain different grip behavior for a wheel-powered/sliding train, you must use the surface material drop-down menu combo boxes as you select firstTYPEfrom the top one to chose the group of properties you want to apply and thenNAME, to select the actual surface material you want applied. -
Piece bodygroups and skin selectionis used when you want desired bodygroups and/or skins on a piece. The textbox is a display showing theBodygroup/Skinselection code (ex.1,2,3,4/5) generated using the context menu. You cannot change the textbox value manually by typing. Currently,Bodygroup/Skin(ex. English) option name will vary based on the language used. When you click if it will populate the text display in the tool menu. -
Piece masssetup control slider is used to set the mass of the next track piece to be spawned. The larger the number the heavier spawned track piece gets. Larger values are recommended. -
Active radiuscontrol slider is used to set the minimum distance needed to select an active point when pointing at a piece. Keep this maxed out if you don't want to bother with track end selection. -
Stack countcontrol value shows the maximum number of pieces to be snapped inStackingmode. Change this to something larger than one if you want to extend your track by stacking. -
Angular alignmentcontrol The slider is used to snap the first piece ( Requested by Magnum ) to a user-defined angle ( Usually45) so that the track building process becomes easier. The whole track build will be snapped also because you are building it relative to the first piece. -
Force limitcontrol ( Requested byThe Arbitor 90) defines the maximum force to be applied on the weld joint between two pieces connected before it breaks. You can use this to build collapsible track bridges. Set the option to zero if you want it to be unbreakable ( by default ). -
Options
weld,no-collide,no-collide world( Requested byFrosty),freeze,phys-gun grabandgravityare considered basic Gmod knowledge, because they are defined by their own and not going to be explained further. -
Option
Ignore track typeif checked, will enable snapping between pieces of a different type. -
Option
Spawn horizontally( as the name suggests ) if checked, will spawn the next pieces horizontally relative to the map ground if the additional angle offsets are zeros, if not, they will be added to the resulting angle. -
Option
Origin from mass-centerif checked, will align the piece spawned to its mass-center. -
Option
Snap to trace surfaceif checked, will snap the chosen track directly to the trace surface.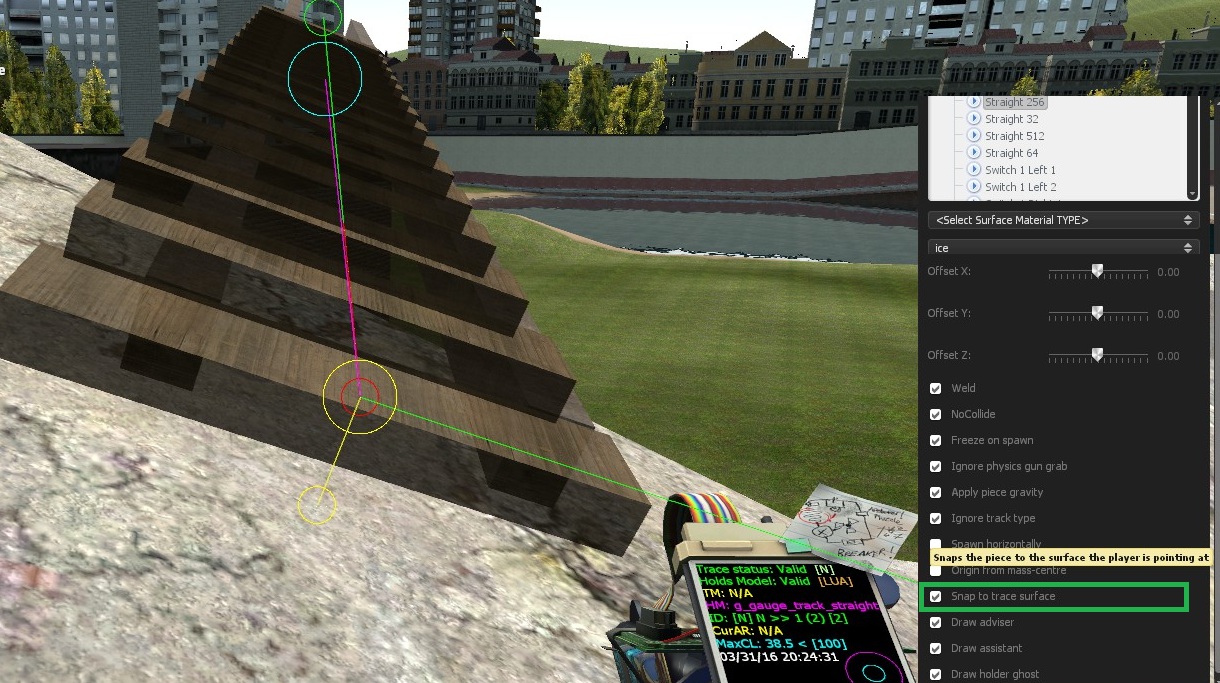
-
Option
Draw adviserif checked, will draw a composition of lines and circles to assist you with the building.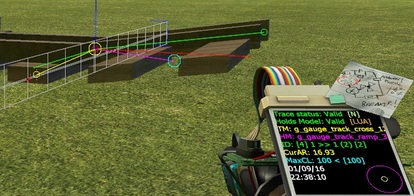
-
Option
Draw assistantif checked, will draw circles to assist you where the active points are.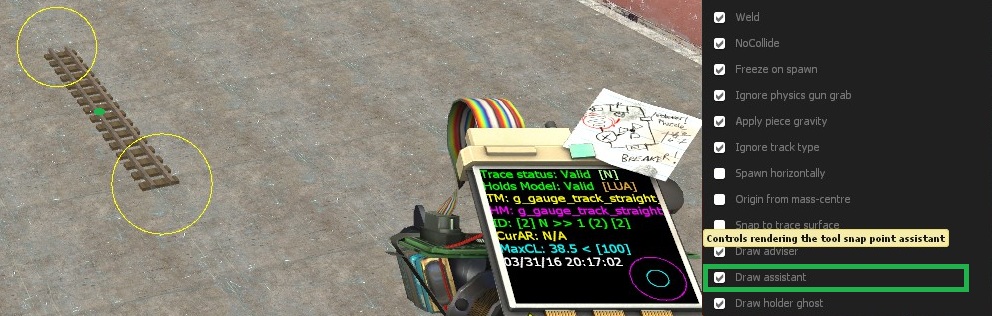
-
Option
Ghosts countif greater than zero, will create a ghosts stack client-side to assist you with the track building process. If you set this option to zero, ghosting will be disabled. -
When building a track using a different than the default way is needed you may use:
Origin <ang_comp>, where<ang_comp>can be eitherpitch,yaworrollare the angle offsets used for orientating the base coordinate system in order to snap the piece as the user desires.Offset <vec_comp>, where<vec_comp>can be eitherX,YorZare linear offsets used for additional user offset regarding the next track piece to be spawned.
- The button
V Reset variables Vas the name suggests clears the offsets mentioned in (16).
What will happen if something gets updated?
First of all this FAQ will be UPDATED AS THE TOOL GOES. So everything that the tool supports will be represented here as a manual or something. More information I publish you can also find in the wiki page here. That's what is this FAQ for anyway ( Though most people don't bother to read it before asking )...
Which addons did you work on?
Here they are, with available status, why I did not do some of them ( at the time of developing ). The ones that are INCLUDED in Garry's mod do not have links and are marked below. Others are actually not meant to be used with TA at all, but instead in HAMMER by mappers. Some are supported by their own AUTHOR ( this is always better and easier to add stuff in a list ) so you should check with them. Another way of availability will be present only when the user MOUNT-s certain games that will include the content in question. In some rare cases, the author is to busy, not bothered or not interested anymore to maintain cetain track packs leading in NO SUPPORT, which is also OK and you need to value their time and effort:
- PHX Monorails (INCLUDED)
- PHX Regular Tracks ( Piece
switcher_2[X]misses collision meshes ) (INCLUDED) - SligWolf's Rerailers old and new(1,2,3)
- SProps
- PHX XQM Coaster tracks (INCLUDED)
- SligWolf's Mini train tracks and switches
- PHX Road Pieces ( including ramps big and small ) (INCLUDED)
- PHX Monorail Iron Beams (INCLUDED)
- PHX XQM BallRails (INCLUDED)
- Magnum's gauge rails (NO SUPPORT)
- Metrostroi rails (HAMMER)
- Shinji85's BodybroupRail pieces
- gm_trainset map props (HAMMER)
- SligWolf's Railcar
- Bridges pack
- gm_sunsetgulch map props (HAMMER)
- StevenTechno's Buildings pack
- Mr. Train's M-Gauge rails
- Bobsters's two gauge rails
- Mr. Train's G-Gauge rails
- Ron's 56 gauge rails (NO SUPPORT)
- Ron's 2ft track pack (AUTHOR)
- PHX Tubes (INCLUDED)
- Magnum's second track pack (HAMMER)
- Qwertyaaa's G Scale Track Pack
- SligWolf's ModelPack (Mini hover tracks)(White rails)
- Ron's Minitrain Props
- Battleship's abandoned rails
- Ron's G-Scale track pack (AUTHOR)
- Ron's Plarail Advance (AUTHOR)
- AlexCookie's 2ft track pack
- SligWolf's Tiny hover racer
- Joe's track pack
- StevenTechno's Buildings pack 2.0
- Modular canal props (Interior only)
- Anyone's Horrible Trackpack (AUTHOR)
- Qwertyaaa's GSTP (HAMMER)
- Magnum's third track pack (HAMMER)
- Modular Sewer System
- Portal 2 Walkway UG (MOUNT) (Requested by mr.bones)
- CAP Walkway
- Portal 2 High Walkway (MOUNT)
Where are the trains/vehicles, are there any of these?
Dude seriously, make them yourself, what's the point of playing Gmod then ... xD
Dude the rails are not showing in the menu, what should I do ?
SUBSCRIBE TO THE OWNER OF THE ADDON !!!!
Are there going to be more of these?
Yes, I developed my dynamic database, so I can insert any model I want. When I have free time I will make more, because it's a lot of data I insert in the DB
Will you create more models in the future?
Well, It depends on what you mean by create.
If it is for the making of the 3D models, then NO ( big one ) I've got no experience in
that stuff neither am I a 3D artist. Other than that if the models are created by the 3D artists,
I will be more then happy to add them into the Track assembly tool if their collision model meets
the minimum requirements.
( Made a model once, but it turned out quite nasty xD, so better leave the job to the right people.)
Hey, do you remember that roller coaster assistant addon ?
Yes, it was snapping pieces when you got them too close to each other and they magically connect.
When looking at the panel in the right, there is a check-box labeled
Enable physgun snap that you must check. This makes the server to perform some
traces relative to the active points of the piece and search for other pieces to snap to.
If the snapping conditions are present, it will snap the trace piece on physgun release at
that end, which the server trace hits. Check the wiki page for more information.
Can you tell me how to read the physgun snap legend drawn on the screen ?
Easy. Here are some things to know for never getting confused with this:
- If the line with the middle circle is green, that means a valid prop entity is traced The green circle shows where the trace hits and the yellow what part of trace is inside the prop If in this case the trace is a valid piece, the origin and radius to the point selected are drawn using a yellow circle line, always shorter than the active radius. After that the spawn position and distance are drawn by using cyan circle and magenta line respectively. The forward and the up direction vectors of the origin are drawn using red and blue lines respectively.
- If the line is yellow, that means the trace has hit something else ( For example the world ) The yellow circle shows again where the trace hits and the red line the part inside the non-prop
- If there is a red line with yellow circle, then there is an active point there, which is searching
for props to snap to when you drop ( release the left click ) the piece with the physgun.
You can also disable the drawing by unchecking the
Draw advisercheck-box or unchecking the option forEnable physgun snap, making it pointless to be drawn without the base option enabled. To enable the drawing, both must be enabled ( Adviser and snapping ).
What is this green line/circle into the base advisor, what is it for ?
Remember when I got suggestions to do the switchers. This is an easy way of indicating which next active position ( of some ) is chosen when stacking is in place. The end of the line with the green circle points to the next active position that is chosen.
Does the script have manipulation panels of some sort like in precision alignment?
Yes, it does. You can find the manipulation panels description in the additional features list in the wiki page.
May I put this thing in another third party website ?
No I will not give you my permission to do that... Why ...
That way you will upload some half-baked malicious tool, waste your time with stupid
things and confuse everybody with this so-called unofficial version of the Track assembly tool.
Not to mention that the stunned people will NOT GET ANY updates !
The best you can do is just point to the original GIT repository
avoiding any version mismatches and confusions. So please don't upload the script to any other sites. I mean it!