Develop a well-architected and well-documented REST API, built on a tightly integrated collection of Java EE-based microservices.
PROJECT CODE UPDATED 11-09-2016 to v3.0.0

Note: All code available on GitHub. For the version of code that matches the details in this blog post, checkout v1.0 tag (after running git clone ..., run a 'git checkout tags/v1.0' command).
Previous Post
In Part One of this series, we introduced the microservices-based Virtual-Vehicles REST API example. The vehicle-themed Virtual-Vehicles microservices offers a comprehensive set of functionality, through a REST API, to application developers. The developers in turn, will use the Virtual-Vehicles REST API's functionality to build applications and games for their end-users.In Part One, we decided on the proper amount and responsibility of each microservice. We also determined the functionality of each microservice to meet the hypothetical functional and nonfunctional requirements of Virtual-Vehicles. To review, the four microservices we are building, are as follows:
Virtual-Vehicles REST API Resources |
||
| Microservice | Purpose (Business Capability) | Functions |
| Authentication | Manage API clients and JWT authentication |
|
| Vehicle | Manage virtual vehicles |
|
| Maintenance | Manage maintenance on vehicles |
|
| Valet Parking | Manage a valet service to park for vehicles |
|
create (POST), read (GET), readAll (GET), update (PUT), delete (DELETE). The readAll function also has find, count, and pagination functionality using query parameters. Unfortunately, RestExpress does not support PATCH for updates. However, I have updated RestExpress' PUT HTTP methods to return the modified object in the response body instead of the nothing (status of 201 Created vs. 200 OK). See StackOverflow for explanation.
All services also have an internal authenticateJwt function, to authenticate the JWT, passed in the HTTP request header, before performing any operation. Additionally, all services have a basic health-check function, ping (GET). There are only a few other functions required for our Virtual-Vehicles example, such as for creating JWTs.
Part Two Introduction
In Part Two, we will build our four Virtual-Vehicles microservices. Recall from our first post, we will be using RestExpress. RestExpress composes best-of-breed open-source tools to enable quickly creating RESTful microservices that embrace industry best practices. Those best-of-breed tools include Java EE, Maven, MongoDB, and Netty, among others.In this post, we will accomplish the following:
- Create a default microservice project in NetBeans using RestExpress MongoDB Maven Archetype
- Understand the basic structure of a default RestExpress microservice project
- Review the changes made to the default RestExpress microservice project to create the Virtual-Vehicles example
- Compile and run the individual microservices directly from NetBeans
Using the RestExpress MongoDB Maven Archetype
All the code for this project is available on GitHub. However, to really understand RestExpress, you should go through the exercise of scaffolding a new microservice using the RestExpress MongoDB Maven Archetype. You will also be able to use this default microservice project to compare and contrast to the modified versions, used in the Virtual-Vehicles example. The screen grabs below demonstrate how to create a new microservice project using the RestExpress MongoDB Maven Archetype. At the time of this post, the archetype version was restexpress-mongodb version 1.15.


Default Project Architecture
Reviewing the two screen grabs below (Project tab), note the key components of the RestExpress MongoDB Maven project, which we just created:- Base Package (com.example.vehicle)
- Configuration class reads in environment properties (see Files tab) and instantiates controllers
- Constants class contains project constants
- Relationships class defines linking resource which aids service discoverability (HATEOAS)
- Main executable class
- Routes class defines the routes (endpoints) exposed by the service and the corresponding controller class
- Model/Controllers Packages (com.example.vehicle.objectid and .uuid)
- Entity class defines the data entity – a Vehicle in this case
- Controller class contains the methods executed when the route (endpoint) is called
- Repository class defines the connection details to MongoDB
- Service class contains the calls to the persistence layer, validation, and business logic
- Serialization Package (com.example.vehicle.serialization)
- XML and JSON serialization classes
- Object ID and UUID serialization and deserialization classes


Again, I strongly recommend reviewing each of these package's classes. To understand the core functionality of RestExpress, you must understand the relationships between RestExpress microservice's Route, Controller, Service, Repository, Relationships, and Entity classes. In addition reviewing the default Maven project, there are limited materials available on the Internet. I would recommend the RestExpress Website on GitHub, RestExpress Google Group Forum, and the YouTube 3-part video series, Instant REST Services with RESTExpress.
Unit Tests? Disappointingly, the current RestExpress MongoDB Maven Archetype sample project does not come with sample JUnit unit tests. I am temped to start writing my own unit tests, if I decided to continue to use the RestExpress microservices framework for future projects.
Properties Files
Also included in the default RestExpress MongoDB Maven project is a Java properties file (environment.properties). This is displayed in the Files tab, as shown below. The default properties file is located in the 'dev' environment config folder. Later, we will create an additional properties file for our production environment.

Ports
Within the 'dev' environment, each microservice is configured to start on separate ports (i.e. port = 8581). Feel free to change the service's port mappings if they conflict with previously configured components running on your system. Be careful when changing the Authentication service's port, 8587, since this port is also mapped in all other microservices using the authentication.port property (authentication.port = 8587). Make sure you change both properties, if you change Authentication service's port mapping.
Base URL
Also, in the properties files is the base.url property. This property defines the URL the microservice's endpoints will be expecting calls from, and making internal calls between services. In our post's example, this property in the 'dev' environment is set to localhost (base.url = http://localhost). You could map an alternate hostname from your hosts file (/etc/hosts). We will do this in a later post, in our 'prod' environment, mapping the base.url property to Virtual-Vehicles (base.url = http://virtual-vehicles.com). In the 'dev' environment properties file, MongoDB is also mapped to localhost (i.e. mongodb.uri = mongodb://virtual-vehicles.com:27017/virtual_vehicle).
Metrics Plugin and Graphite
RestExpress also uses the properties file to hold configuration properties for Metrics Plugin and Graphite. The Metrics Plugin and Graphite are both first class citizens of RestExpress. Below is the copy of the Vehicles service environment.properties file for the 'dev' environment. Note, the Metrics Plugin and Graphite are both disabled in the 'dev' environment.
# Default is 8081
port = 8581

# Port used to call Authentication service endpoints
authentication.port = 8587

# The size of the executor thread pool
# (that can handle blocking back-end processing).
executor.threadPool.size = 20

# A MongoDB URI/Connection string
# see: http://docs.mongodb.org/manual/reference/connection-string/
mongodb.uri = mongodb://localhost:27017/virtual_vehicle

# The base URL, used as a prefix for links returned in data
base.url = http://localhost

#Configuration for the MetricsPlugin/Graphite
metrics.isEnabled = false
#metrics.machineName =
metrics.prefix = web1.example.com
metrics.graphite.isEnabled = false
metrics.graphite.host = graphite.example.com
metrics.graphite.port = 2003
metrics.graphite.publishSeconds = 60
Choosing a Data Identification Method
RestExpress offers two identification models for managing data, the MongoDB ObjectId and a Universally Unique Identifier (UUID). MongoDB uses an ObjectId to uniquely identify a document within a collection. The ObjectId is a special 12-byte BSON type that guarantees uniqueness of the document within the collection. Alternately, you can use the UUID identification model. The UUID identification model in RestExpress uses a UUID, instead of a MongoDB ObjectId. The UUID also containscreatedAt and updatedAt properties that are automatically maintained by the persistence layer. You may stick with ObjectId, as we will in the Virtual-Vehicles example, or choose the UUID. If you will use multiple database engines for your own projects, using UUID will give you a universal identification method.
Project Modifications
There are many small code changes that differentiate our Virtual-Vehicles microservices from the default RestExpress Maven Archetype project. Most changes are superficial, nothing was changed about how RestExpress functions. The following are the more obvious changes you will note between the screen grabs, above, showing the default project versus the screen grabs, below, showing the final Virtual-Vehicles microservices from GitHub:- Remove all packages, classes, and code references to the UUID identification methods (example uses ObjectId)
- Rename several classes for convenience (dropped use of word 'Entity')
- Add the Utilities (com.example.utilities) and Authentication (com.example.authenticate) packages


MongoDB
Following one of the key principles of microservices, which was mentioned in the first post, Decentralized Data Management, each microservice will have its own instance of a MongoDB database associated with it. The below diagram shows each service and its corresponding database, collection, and fields.

In the case of the Vehicle microservice, the associated MongoDB database is virtual_vehicle. This database contains a single collection, vehicles. While the properties file defines the database name, the Vehicles entity class defines the collection name, using the org.mongodb.morphia.annotations classes annotation functionality.
@Entity("vehicles")
public class Vehicle
        extends AbstractMongodbEntity
        implements Linkable {

    private int year;
    private String make;
    private String model;
    private String color;
    private String type;
    private int mileage;
...
Looking at the virtual_vehicle database in the MongoDB shell, we see that the sample document's fields corresponds to the Vehicle entity classes properties.

environments.properties file, using the mongodb.uri property. In the 'dev' environment we use localhost as our host URL (i.e. mongodb.uri = mongodb://localhost:27017/virtual_vehicle).
Authentication and JSON Web Tokens
The three microservices, Vehicle, Valet, and Maintenance, are almost identical. However, the Authentication microservice is unique. This service is called by each of the other three services, as well as also being called directly. The Authentication service provides a very basic level of authentication using JSON Web Tokens (JWT), pronounced 'jot'.Why do we want authentication? We want to confirm that the requester using the Virtual-Vehicles REST API is the actual registered API client they are who they claim to be. JWT allows us to achieve this requirement with minimal effort.
According to jwt.io, 'a JSON Web Token is a compact URL-safe means of representing claims to be transferred between two parties. The claims in a JWT are encoded as a JSON object that is digitally signed using JSON Web Signature (JWS).' I recommend reviewing the JWT draft standard to fully understand the structure, creation, and use of JWTs.
Virtual-Vehicles Authentication Process There are different approaches to implementing JWT. In our Virtual-Vehicles REST API example, we use the following process for JWT authentication:
- Register the new API client by supplying the application name and a shared secret (one time only)
- Receive an API key in response (one time only)
- Obtain a JWT using the API key and the shared secret (each user session or renew when the previous JWT expires)
- Include the JWT in each API call
environment.properties file (jwt.expire.length and jwt.issuer).
Expiration and Issued date/time use the JWT standard recommended "Seconds Since the Epoch". The default expiration for a Virtual-Vehicles JWT is set to an arbitrary 10 hours from time the JWT was issued (jwt.expire.length = 36000). That amount, 36,000, is equivalent to 10 hours x 60 minutes/hour x 60 seconds/minute.
Decoding a JWT Using the jwt.io site's JT Debugger tool, I have decoded a sample JWT issued by the Virtual-Vehicles REST API, generated by the Authentication service. Observe the three parts of the JWT, the JOSE Header, Claims Set, and the JSON Web Signature (JWS).

The JWT's header indicates that our JWT is a JWS that is MACed using the HMAC SHA-256 algorithm. The shared secret, passed by the API client, represents the HMAC secret cryptographic key. The secret is used in combination with the cryptographic hash function to calculate the message authentication code (MAC). In the example below, note how the API client's shared secret is used to validate our JWT's JWS.
Sequence Diagrams of Authentication Process Below are three sequence diagrams, which detail the following processes: API client registration process, obtaining a new JWT, and a REST call being authenticated using the JWT. The end-user of the API self-registers their application using the Authentication service, and receives back an API key. The API key is unique to that client.
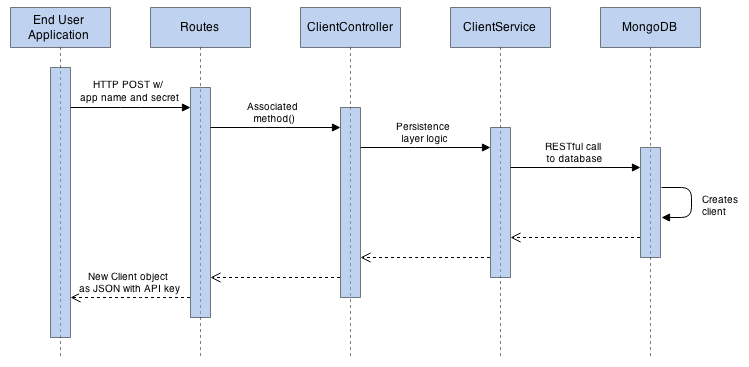
The end-user application then uses the API key and the shared secret to receive a JWT from the Authentication service.


- API Key - Retrieve API client's shared secret from MongoDB, using API key contained in JWT's claims set (secret is returned, therefore API key is valid)
- Algorithm - confirm the algorithm ('alg'), found in the JWT Header, which used to encode JWT, was 'HS256' (HMAC SHA-256)
- Valid JWS - Use the client's shared secret from #1 above, decode HMAC SHA-256 encrypted JWS
- Expiration - confirm JWT is not expired ('exp')
Inter-Service Communications
By default, the RestExpress Archetype project does not offer an example of communications between microservices. Service-to-service communications for microservices is most often done using the same HTTP-based REST calls used to by our Virtual-Vehicles REST API. Alternately, a message broker, such as RabbitMQ, Kafka, ActiveMQ, or Kestrel, is often used. Both methods of communicating between microservices, referred to as 'inter-service communication mechanisms' by InfoQ, have their pros and cons. The InfoQ website has an excellent microservices post, which discusses the topic of service-to-service communication.For the Virtual-Vehicles microservices example, we will use HTTP-based REST calls for inter-service communications. The primary service-to-service communications in our example, is between the three microservices, Vehicle, Valet, and Maintenance, and the Authentication microservice. The three services validate the JWT passed in each request to a CRUD operation, by calling the Authentication service and passing the JWT, as shown in the sequence diagram, above. This is done using an HTTP GET request to the Authentication service's .../jwts/{jwt} endpoint. The Authentication service's method, called by this endpoint, minus some logging and error handling, looks like the following:
public boolean authenticateJwt(Request request, String baseUrlAndAuthPort) {
    String jwt, output, valid = "";

    try {
        jwt = (request.getHeader("Authorization").split(" "))[1];
    } catch (NullPointerException | ArrayIndexOutOfBoundsException e) {
        return false;
    }

    try {
        URL url = new URL(baseUrlAndAuthPort + "/jwts/" + jwt);
        HttpURLConnection conn = (HttpURLConnection) url.openConnection();
        conn.setRequestMethod("GET");
        conn.setRequestProperty("Accept", "application/json");

        if (conn.getResponseCode() != 200) {
            return false;
        }

        BufferedReader br = new BufferedReader(new InputStreamReader(
                (conn.getInputStream())));

        while ((output = br.readLine()) != null) {
            valid = output;
        }

        conn.disconnect();
    } catch (IOException e) {
        return false;
    }

    return Boolean.parseBoolean(valid);
}
Primarily, we are using the java.net and java.io packages, along with the org.restexpress.Request class to build and send our HTTP request to the Authentication service. Alternately, you could use just the org.restexpress package to construct request and handle the response. This same basic method structure shown above can be used to create unit tests for your service's endpoints.
Health Ping
Each of the Virtual-Vehicles microservices contain aDiagnosticController in the .utilities package. In our example, we have created a ping() method. This simple method, called through the .../utils/ping endpoint, should return a 200 OK status and a boolean value of 'true', indicating the microservice is running and reachable. This route's associated method could not be simpler:
public void ping(Request request, Response response) {
    response.setResponseStatus(HttpResponseStatus.OK);
    response.setResponseCode(200);
    response.setBody(true);
}
The ping health check can even be accessed with a simple curl command, curl localhost:8581/vehicles/utils/ping.
In a real-world application, we would add additional health checks to all services, providing additional insight into the health and performance of each microservice, as well as the service's dependencies.
API Documentation
A well written RESTful API will not require extensive documentation to understand the API's operations. Endpoints will be discoverable through linking (see Response Body links section in below example). API documentation should provide HTTP method, required headers and URL parameters, expected response body and response status, and so forth.An API should be documented before any code is written, similar to TDD. The API documentation is the result of a clear understanding of requirements. The API documentation should make the coding even easier, since the documentation serves as a further refinement of the requirements. The requirements are an architectural plan for the microservice's code structure.
Sample Documentation Below, is a sample of the Virtual-Vehicles REST API documentation. It details the function responsible for creating a new API client. The documentation provides a brief description of the function, the operation's endpoint (URI), HTTP method, request parameters, expected response body, expected response status, and even a view of the MongoDB collection's document for a new API client.

You can download a PDF version of the Virtual-Vehicles RESTful API documentation on GitHub or review the source document on Google Docs. It contains general notes about the API, and details about every one of the API's operations.
Running the Individual Microservices
For development and testing purposes, the easiest way to start the microservices is in NetBeans using theRun command. The Run command executes the Maven exec goal. Based on the DEFAULT_ENVIRONMENT constant in the org.restexpress.util Environment class, RestExpress will use the 'dev' environment's environment.properties file, in the project's /config/dev directory.
Alternately, you can use the RestExpress project's recommended command from a terminal prompt to start each microservice from its root directory (mvn exec:java -Dexec.mainClass=test.Main -Dexec.args="dev"). You can also use this command to switch from the 'dev' to 'prod' environment properties (-Dexec.args="prod").
You may use a variety of commands to confirm all the microservices are running. I prefer something basic like sudo netstat -tulpn | grep 858[0-9]. This will find all the ports within the 'dev' port range. For more in-depth info, you can use a command like ps -aux | grep com.example | grep -v grep

