ESPhome for BENTEL KYO Units
Serial Bridge for Bentel Kyo32G Alarm Central, based on ESP8266 Board and ESPHome Open Source Firmware. Thanks to @dario81 for initial porting to ESPHome and to @lcavalli for code refactor inspiration ;)
If you like this project you can support me with

Warning
⚠️ This software was developed by analyzing serial messages from/to central, it was not sponsored or officially supported by Bentel If someone from Bentel would like to contribute or collaborate please contact me at [email protected]
Tested on Kyo Unit
- Bentel Kyo 32G
- Bentel Kyo 8
- Bentel Kyo 8W
- If you have another Bentel Kyo unit test and let me know :)
Contents
- Hardware Connections
- ESPHome Preparation
- Build and Upload Firmware
- Home Assistant Integration
- Troubleshooting - FAQ
Hardware Connections
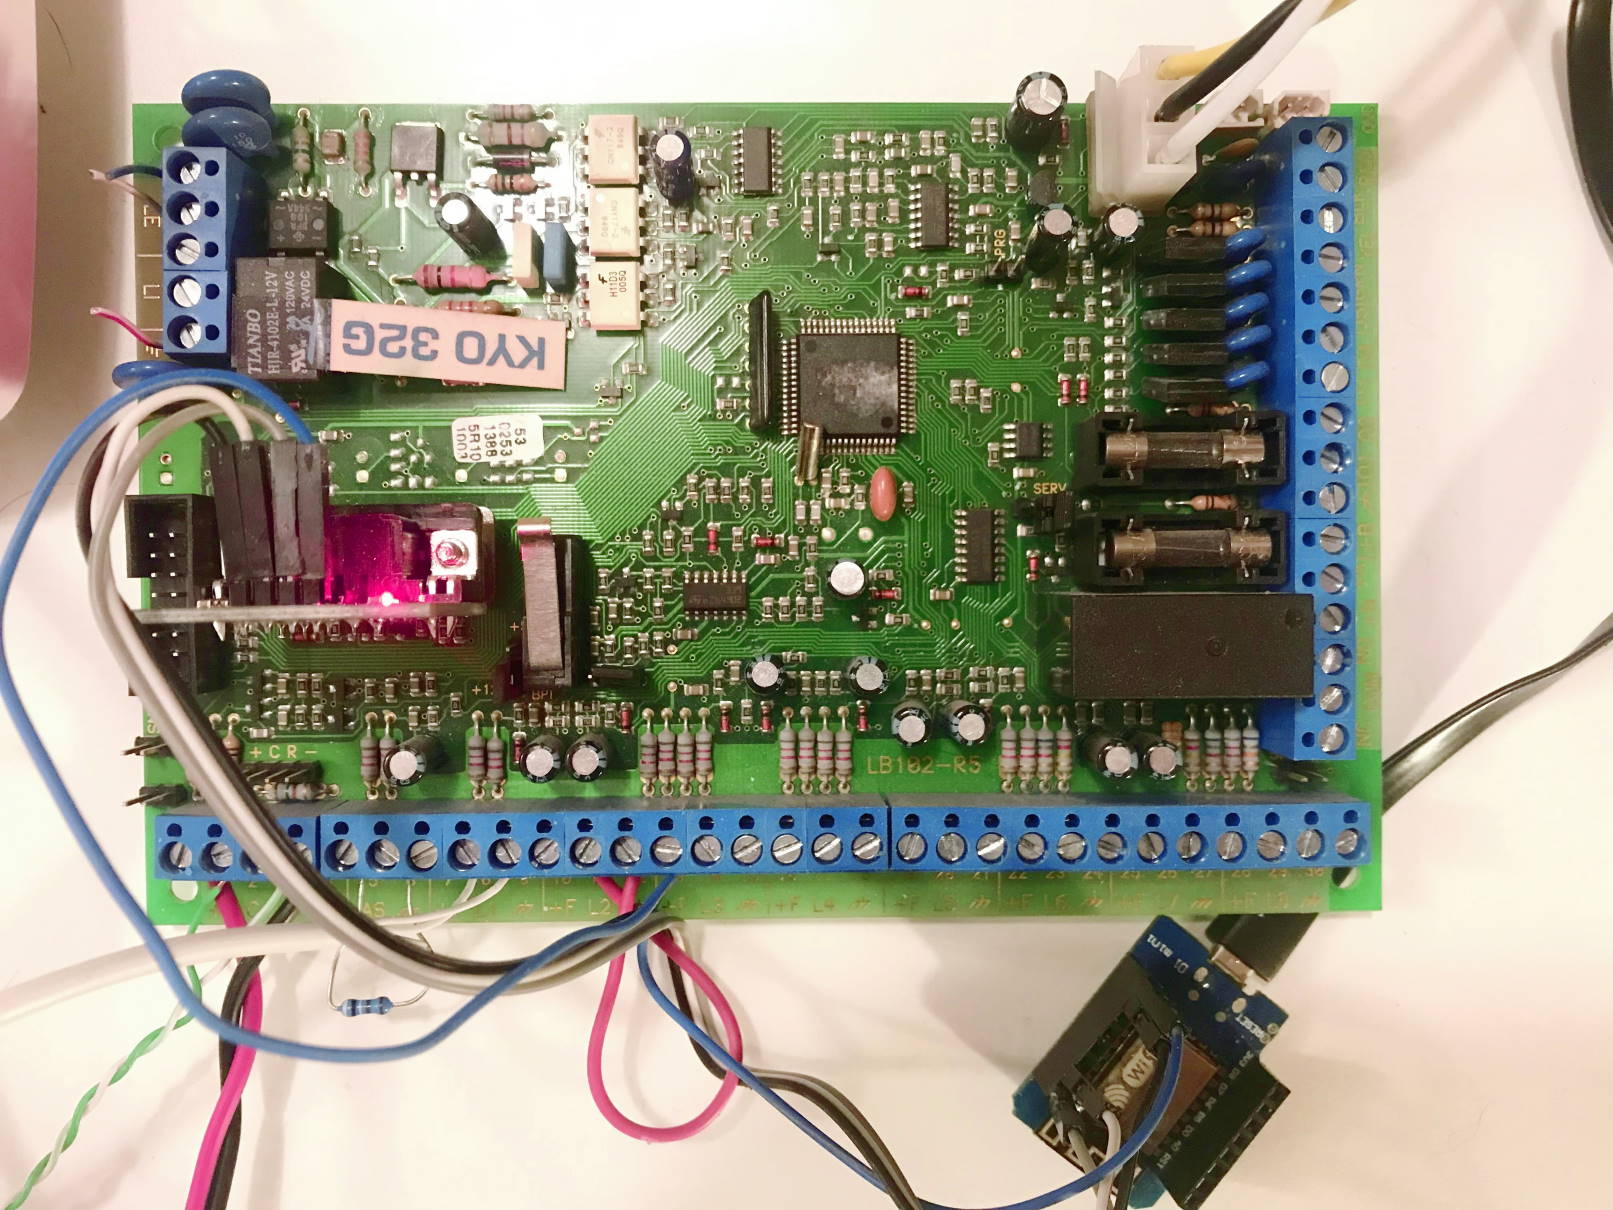
As board I used a WeMos D1 Mini (https://it.aliexpress.com/item/32651747570.html) but any board based on ESP8266 should be fine.
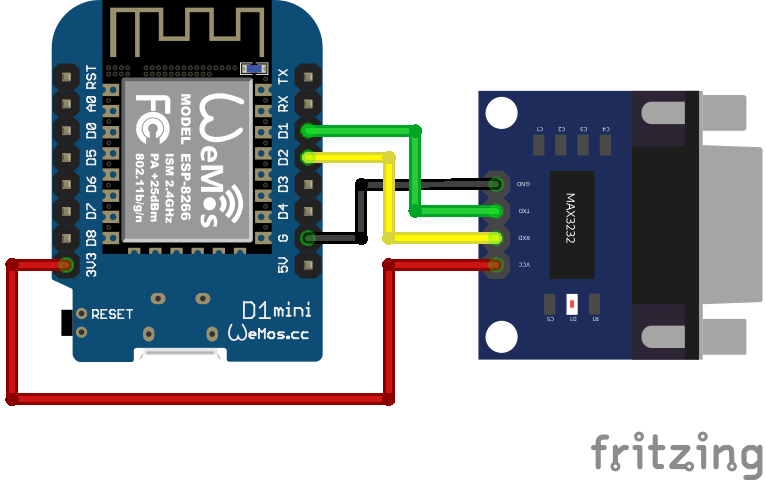
In order to connect to the serial port of the Kyo32 Unit I recommend a connector based on MAX3232 chip, like this https://it.aliexpress.com/item/32722395554.html This connector should be connected to the classic TX/RX of the ESP board and to the power supply (GND, 5V) on WeMos.
The WeMos can be powered with USB directly from the 12V output of the control unit by connecting any 12V->USB converter. Like this one: https://www.amazon.it/FTVOGUE-Regolatore-Trasformatore-Caricabatterie-smartphone/dp/B07NQKBRG1/
Which I recommend because in this way, even in case of power failure, the ESP is powered by the battery of the control unit.
ESPHome Preparation
The file espkyogate_configuration.yaml is already present in this repo.
I suggest you start from this.
Set your WiFi ssid and password in wifi section.
Set uart settings in base depending on the board you use, example file is for Wemos D1 mini.
Finally edit binary_sensors you want to see on your Home Assistant as configured in the example file.
Map the available zones in your alarm, adding proper device_class.
esphome:
  name: espkyogatebox
  platform: ESP8266
  board: d1_mini
  includes:
    - bentel-kyo/bentel_kyo32.h

uart:
  id: uart_bus
  tx_pin: GPIO5
  rx_pin: GPIO4
  baud_rate: 9600
  data_bits: 8
  parity: EVEN

switch:
  - platform: safe_mode
    name: "ESPKyoGate (Safe Mode)"

binary_sensor:
  # Zones status
  - platform: custom
    lambda: |-
      auto kyo32 = new Bentel_Kyo32(id(uart_bus));
      App.register_component(kyo32);
      return {
        kyo32->kyo_comunication, &kyo32->zona[0], &kyo32->zona[1],&kyo32->zona[2], &kyo32->zona[3]};
    binary_sensors:
      - id: kyo_comunication
        name: "Comunicazione Centrale"
      - id: kyo_zone1
        name: "Zone 1"
        device_class: "motion"
      - id: kyo_zone2
        name: "Zone 2"
        device_class: "window"
      - id: kyo_zone3
        name: "Zone 3"
        device_class: "door"
      - id: kyo_zone4
        name: "Zone 4"
        device_class: "garage_door"
Appropriate device classes are (among all device classes supportedf by Home Assistant):
| Device class | Home Assistant icons |
|---|---|
| motion | |
| window | |
| door | |
| garage_door |
A secrets.yaml file is required with the following keys:
wifi_ssid: "<your-wifi-ssid>"
wifi_password: "<your-wifi-password>"
ota_password: "<your-ota-password>"
api_encryption_key: "<your-encryption-key>"
Build and Upload Firmware
With ESPHome
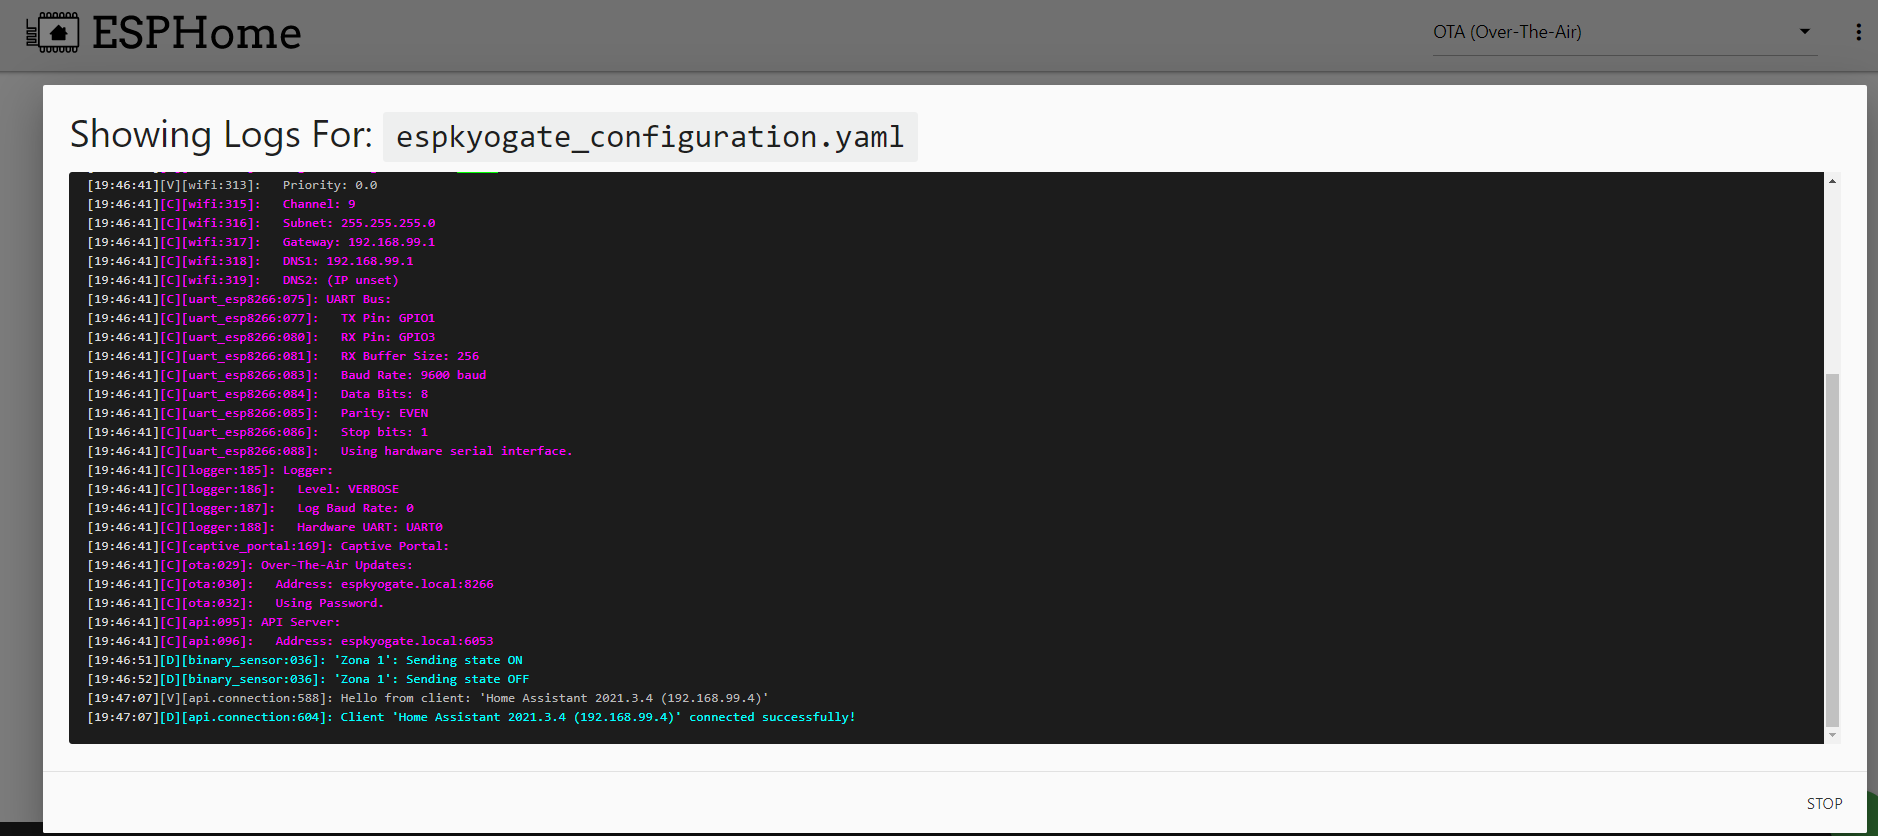
This way is the easiest, just copy the files from this repository to the esphome folder, edit the espkyogate_configuration.yaml file as above, upload and see if everything works from the logs.
You should see something similar.
From esphome command line
python3 -m esphome compile espkyogate_configuration.yaml
python3 -m esphome run espkyogate_configuration.yaml
Check logs
See logs with this command
python3 -m esphome logs espkyogate_configuration.yaml
Output should be the same as above.
Home Assistant Integration
If everything went well now you should find a new device in Home Assistant, called espkyogate.
Previously configured sensors will be automatically created and associated to the device.
Avaiable Services
These methods will be available in the services
Area Arm
service: esphome.espkyogate_arm_area
data:
  arm_type: 1 (total arm) - 2 (partially arm)
  area: <area_number>
  specific_area: 1 (arm only <area_number> without changing the others) - 0 (arm only <area_number> and disarm others)
Area Disarm
service: esphome.espkyogate_disarm_area
data:
  area: <area_number>
  specific_area: 0 (disarm all areas) - 1 (disarm only <area_number> without changing the others)
Reset Alarm Memory
service: esphome.espkyogate_reset_alarms
data: {}
Activate Output
If an output is configured as 'Remote Command' (Comando Remoto) you can Activate or Deactivate
service: esphome.espkyogate_activate_output
data:
  output_number: <output_number>
Deactivate Output
If an output is configured as 'Remote Command' (Comando Remoto) you can Activate or Deactivate
service: esphome.espkyogate_deactivate_output
data:
  output_number: <output_number>
Update Unit Date and Time
You can update the Kyo Date and Time internal Clock
service: esphome.espkyogate_update_datetime
data:
  day: 22
  month: 12
  year: 2022
  hours: 18
  minutes: 15
  seconds: 00
Arm more than one area
If you want to arm several areas at the same time you have to call the same service several times, introducing a delay between one call and the next. Below is an example of a script that arms two areas.
alias: Bentel Arma Fuori Casa
sequence:
- service: esphome.espkyogate_arm_area
data:
area: 1
arm_type: 1
specific_area: 1
- wait_template: ''
timeout: '00:00:05'
- service: esphome.espkyogate_arm_area
data:
area: 2
arm_type: 1
specific_area: 1
- wait_template: ''
timeout: '00:00:05'
- service: esphome.espkyogate_arm_area
data:
area: 3
arm_type: 1
specific_area: 1
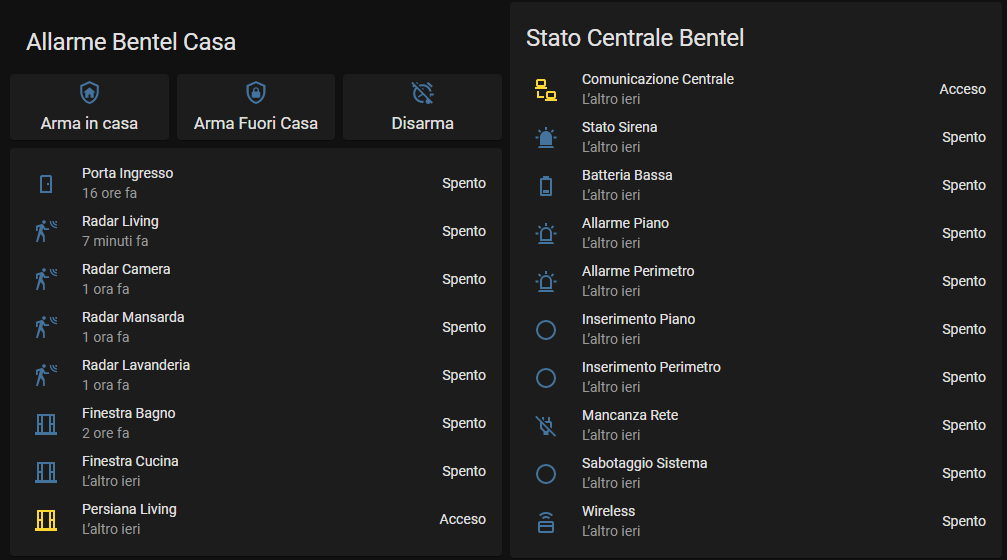
mode: singleCreate Lovelace Panel
Here the code to build Panel show above
type: vertical-stack
title: Allarme Bentel Casa
cards:
  - type: horizontal-stack
    cards:
      - type: button
        name: Arma in casa
        tap_action:
          action: call-service
          service: esphome.espkyogate_arm_area
          service_data:
            arm_type: 1
            area: 3
            specific_area: 1
        show_state: true
        show_icon: true
        show_name: true
        icon: mdi:shield-home-outline
        icon_height: 25px
      - type: button
        name: Arma Fuori Casa
        tap_action:
          action: call-service
          service: script.bentel_arma_fuori_casa
          service_data: {}
          target: {}
        show_icon: true
        show_state: true
        icon: mdi:shield-lock-outline
        icon_height: 25px
      - type: button
        name: Disarma
        tap_action:
          action: call-service
          service: esphome.espkyogate_disarm_area
          service_data:
            area: 1
            specific_area: 0
        show_state: true
        show_icon: true
        icon_height: 25px
        icon: mdi:alarm-note-off
  - type: entities
    entities:
      - entity: binary_sensor.porta_ingresso
        secondary_info: last-updated
      - entity: binary_sensor.radar_living
        secondary_info: last-updated
      - entity: binary_sensor.radar_camera
        secondary_info: last-updated
      - entity: binary_sensor.radar_mansarda
        secondary_info: last-updated
      - entity: binary_sensor.radar_lavanderia
        secondary_info: last-updated
      - entity: binary_sensor.persiana_bagno
        secondary_info: last-updated
      - entity: binary_sensor.persiana_cucina
        secondary_info: last-updated
      - entity: binary_sensor.persiana_living
        secondary_info: last-updated
    state_color: true
    show_header_toggle: false
Troubleshooting - FAQ
If you have any problems, make the following checks:
- Check that the cables are connected correctly
- Check the 232 converter is properly powered
- Try to reverse TX and RX
- (Only for Kyo32G) Verify that the central unit has firmware 2.13, if it isn't you've to update central unit firmware to this version.
Diagnostics Service
For diagnostics you can enable additional software logs through this service. If necessary, contact me with an extract of the logs so that I can help you better.
service: esphome.espkyogate_debug_command
data:
  serial_trace: 1
  log_trace: 1
polling_kyo: 1- serial_trace Enable or Disable Serial Log communication to central unit
- log_trace Enable or Disable Application Log
- polling_kyo Enable or Disable continuative polling to central unit (default always Enable)
License
GNU AGPLv3 © [Lorenzo De Luca][https://lorenzodeluca.dev]