msnh2012 / Msnhnet
Projects that are alternatives of or similar to Msnhnet
🔥 Msnhnet(V2.0 Focusing on Robot Vision)🔥
A mini pytorch inference framework which inspired from darknet.
 OS supported (you can check other OS by yourself)
| windows | linux | mac | |
|---|---|---|---|
| checked | |||
| gpu |
CPU checked
| |Intel i7|raspberry 3B|raspberry 4B|Jeston NX|
|:---:|:---:|:---:|:---:|:---:|
|checked|![]() |
|![]() |
|![]() |
|![]() |
|
Features
- C++ Only. 3rdparty blas lib is optional, also you can use OpenBlas.
- OS supported: Windows, Linux(Ubuntu checked) and Mac os(unchecked).
- CPU supported: Intel X86, AMD(unchecked) and ARM(checked: armv7 armv8 arrch64).
- x86 avx2 supported.(Working....)
- arm neon supported.(Working....)
- A cv lib like opencv is supported for msnhnet.(MsnhCV)
- conv2d 3x3s1 3x3s2 winograd3x3s1 is supported(Arm)
- Keras to Msnhnet is supported. (Keras 2 and tensorflow 1.x)
- GPU cuda supported.(Checked GTX1080Ti, Jetson NX)
- GPU cudnn supported.(Checked GTX1080Ti, Jetson NX)
- GPU fp16 mode supported.(Checked GTX1080Ti, Jetson NX.)
- ps. Please check your card wheather fp16 full speed is supported.
- c_api supported.
- keras 2 msnhnet supported.(Keras 2 and tensorflow 1.x, part of op)
- pytorch 2 msnhnet supported.(Part of op, working on it)
-
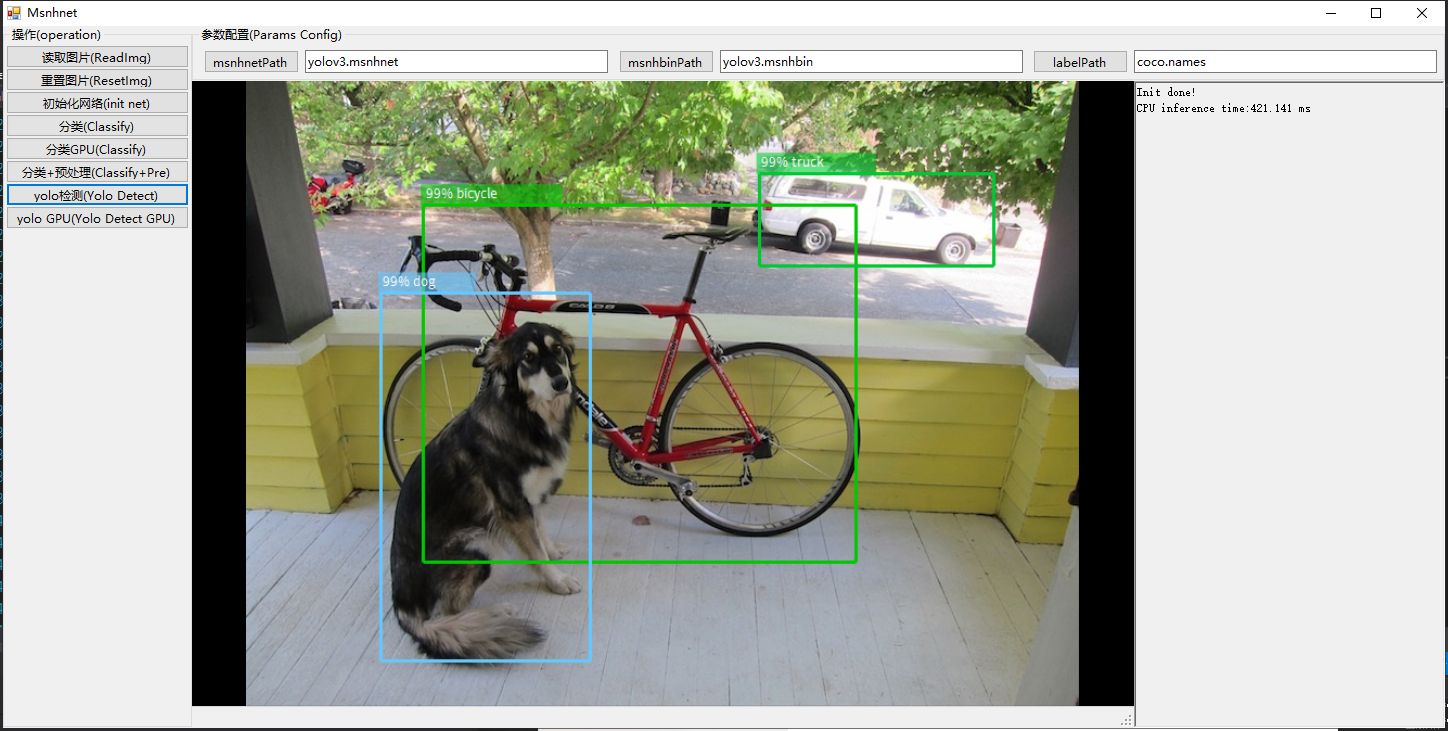
MsnhnetSharp supported.
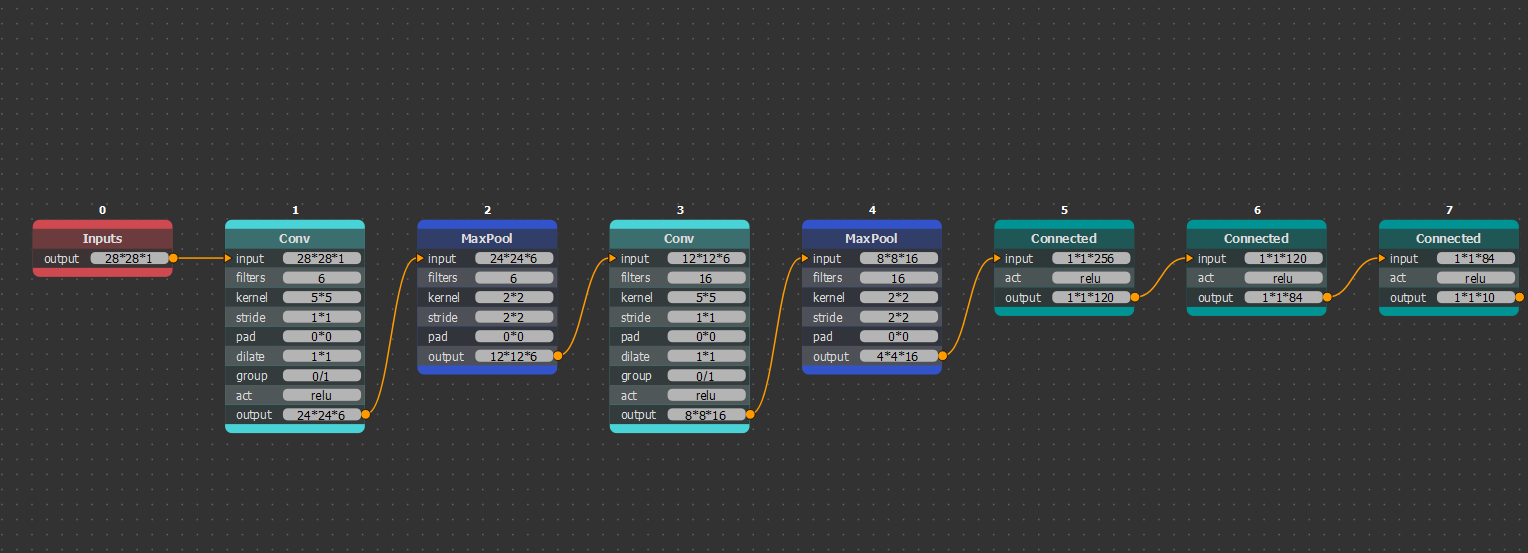
- A viewer for msnhnet is supported.(netron like)
- Working on it...(Weekend Only (╮(╯_╰)╭))


Tested networks
- lenet5
- lenet5_bn
- alexnet(torchvision)
- vgg16(torchvision)
- vgg16_bn(torchvision)
- resnet18(torchvision)
- resnet34(torchvision)
- resnet50(torchvision)
- resnet101(torchvision)
- resnet152(torchvision)
- darknet53(Pytorch_Darknet53)
- googLenet(torchvision)
- mobilenetv2(torchvision)
- yolov3(u版yolov3)
- yolov3_spp(u版yolov3)
- yolov3_tiny(u版yolov3)
- yolov4(u版yolov3)
- fcns(pytorch-FCN-easiest-demo)
- unet(bbuf keras)
- deeplabv3(torchvision)
- yolov5s🔥(U版yolov5, for params)
- yolov5m🔥(U版yolov5,for params) ==============================================================
- mobilenetv2_yolov3_lite (cudnn does not work with GTX10** Pascal Card, please use GPU model only)
- mobilenetv2_yolov3_nano (cudnn does not work with GTX10** Pascal Card, please use GPU model only)
- yoloface100k (cudnn does not work with GTX10** Pascal Card, please use GPU model only)
- yoloface500k (cudnn does not work with GTX10** Pascal Card, please use GPU model only)
- Thanks: https://github.com/dog-qiuqiu/MobileNetv2-YOLOV3 ==============================================================
- pretrained models. 链接:https://pan.baidu.com/s/1mBaJvGx7tp2ZsLKzT5ifOg 提取码:x53z
- pretrained models. Link : Google Drive
- Examples here.
Yolo Test
-
Win10 MSVC 2017 I7-10700F
net yolov3 yolov3_tiny yolov4 time 380ms 50ms 432ms -
ARM(Yolov3Tiny cpu) |cpu|raspberry 3B|raspberry 4B|Jeston NX| |:---:|:---:|:---:|:---:| |with neon asm|?|0.432s|?|
Yolo GPU Test
-
Ubuntu16.04 GCC Cuda10.1 GTX1080Ti |net|yolov3|yolov3_tiny|yolov4| |:---:|:---:|:---:|:---:| |time|30ms|8ms|30ms|
-
Jetson NX |net|yolov3|yolov3_tiny|yolov4| |:---:|:---:|:---:|:---:| |time|200ms|20ms|210ms|
Yolo GPU cuDnn FP16 Test
- Jetson NX |net|yolov3|yolov4| |:---:|:---:|:---:| |time|115ms|120ms|
Yolov5s GPU Test
- Ubuntu18.04 GCC Cuda10.1 GTX2080Ti |net|yolov5s| yolov5s_fp16| |:---:|:---:|:---:| |time|9.57ms| 8.57ms|
Mobilenet Yolo GPU cuDnn Test
- Jetson NX |net|yoloface100k|yoloface500k|mobilenetv2_yolov3_nano|mobilenetv2_yolov3_lite| |:---:|:---:|:---:|:---:|:---:| |time|7ms|20ms|20ms|30ms|
DeepLabv3 GPU Test
- Ubuntu18.04 GCC Cuda10.1 GTX2080Ti |net|deeplabv3_resnet101|deeplabv3_resnet50| |:---:|:---:|:---:| |time|22.51ms|16.46ms|
Requirements
- OpenCV4 (optional) https://github.com/opencv/opencv
- Qt5 (optional. for Msnhnet viewer) http://download.qt.io/archive/qt/
- opengl(optional. for MsnhCV GUI) .
- glew(optional. for MsnhCV GUI) http://glew.sourceforge.net/ .
- glfw3(optional. for MsnhCV GUI) https://www.glfw.org/.
- cuda10+ cudnn 7.0+.(optional. for GPU)
Video tutorials(bilibili)
How to build
-
With CMake 3.15+
-
Viewer can not build with GPU.
-
Options
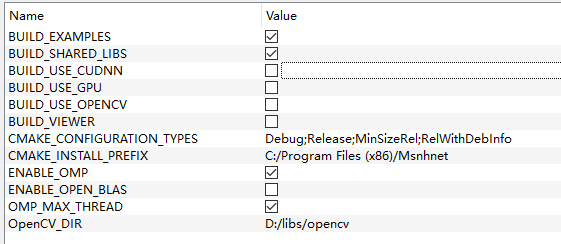 ps. You can change omp threads by unchecking OMP_MAX_THREAD and modifying "num" val at CMakeLists.txt:52
 -
Windows

- Compile opencv4 (optional)
- Config environment. Add "OpenCV_DIR" (optional)
- Get qt5 and install. http://download.qt.io/ (optional)
- Add qt5 bin path to environment (optional).
- Get glew for MsnhCV Gui.http://glew.sourceforge.net/ (optional).
- Get glfw3 for MsnhCV Gui.https://www.glfw.org/ (optional).
- Extract glew, add glew path to "CMAKE_PREFIX_PATH" (optional).
- Compile gflw3 with cmake, add gflw3 cmake dir to "GLFW_DIR" (optional).
- Then use cmake-gui tool and visual studio to make or use vcpkg.
- Linux(Ubuntu)
ps. If you want to build with Jetson, please uncheck NNPACK, OPENBLAS, NEON.
sudo apt-get install build-essential
sudo apt-get install qt5-default      #optional
sudo apt-get install libqt5svg5-dev   #optional
sudo apt-get install libopencv-dev    #optional
sudo apt-get install libgl1-mesa-dev libglfw3-dev libglfw3 libglew-dev #optional


#config
sudo echo /usr/local/lib > /etc/ld.so.conf.d/usrlib.conf
sudo ldconfig

# build Msnhnet
git clone https://github.com/msnh2012/Msnhnet.git
mkdir build

cd Msnhnet/build
cmake -DCMAKE_BUILD_TYPE=Release ..
make -j4
sudo make install

vim ~/.bashrc # Last line add: export PATH=/usr/local/bin:$PATH
sudo ldconfig
- MacOS(MacOS Catalina) Without viewer
PS: XCode should be pre-installed.
Please download cmake from official website with gui support and the source code of yaml and opencv.
# install cmake

vim .bash_profile
export CMAKE_ROOT=/Applications/CMake.app/Contents/bin/
export PATH=$CMAKE_ROOT:$PATH
source .bash_profile

# install brew to install necessary libraries

/bin/bash -c "$(curl -fsSL https://raw.githubusercontent.com/Homebrew/install/master/install.sh)"

brew install wget
brew install openjpeg
brew install hdf5
brew install gflags
brew install glog
brew install eigen
brew install libomp

# build yaml-cpp
git clone https://github.com/jbeder/yaml-cpp.git
cd yaml-cpp
mkdir build
source .bash_profile
cmake-gui
Set the source code path: ./yaml-cpp
Set the build binary path: ./yaml-cpp/build
configure
CMAKE_BUILD_TYPE = Release
uncheck YAML_CPP_BUILD_TESTS
configure (and continue to debug)
generate
cd ./yaml-cpp/build
sudo make install -j8

# build opencv
# download opencv.zip from official website(Remember to download opencv-contrib together)
cd opencv-4.4.0
mkdir build
source .bash_profile
cmake-gui


Set the source code path: ./opencv-4.4.0
Set the build binary path: ./opencv-4.4.0/build
configure (use default)
search for OPENCV_ENABLE_NONFREE and enable it
seach for OPENCV_EXTRA_MODULES_PATH to the path of opencv-contrib
configure (and continue to debug)
generate
cd ./opencv-4.4.0/build/
sudo make install -j8


# build Msnhnet
git clone https://github.com/msnh2012/Msnhnet.git
mkdir build

cd Msnhnet/build
cmake -DCMAKE_BUILD_TYPE=Release ..
make -j4
sudo make install
Test Msnhnet
-
- Download pretrained model and extract. eg.D:/models.
-
- Open terminal and cd "Msnhnet install bin". eg. D:/Msnhnet/bin
-
- Test yolov3 "yolov3 D:/models".
-
- Test yolov3tiny_video "yolov3tiny_video D:/models".
-
- Test classify "classify D:/models".

View Msnhnet
-
- Open terminal and cd "Msnhnet install bin" eg. D:/Msnhnet/bin
-
- run "MsnhnetViewer"

PS. You can double click "ResBlock Res2Block AddBlock ConcatBlock" node to view more detail
ResBlock

Res2Block

AddBlock

ConcatBlock

How to convert your own pytorch network
- pytorch2msnhnet
- ps:
- 1 . Please check out OPs which supported by pytorch2msnhnet before trans.
- 2 . Maybe some model can not be translated.
- 3 . If your model contains preprocessors and postprocessors which are quite complicated, please trans backbone first and then add some OPs manually.
- 4 . As for yolov3 & yolov4, just follow this video. You can find "pytorch2msnhbin" tool here.
About Train
- Just use pytorch to train your model, and export as msnhbin.
- eg. yolov3/v4 https://github.com/ultralytics/yolov3
Enjoy it! :D
Acknowledgement
Msnhnet got ideas and developed based on these projects:
3rdparty Libs
加群交流
