Ugness / Picanet Implementation
Licence: mit
Pytorch Implementation of PiCANet: Learning Pixel-wise Contextual Attention for Saliency Detection
Stars: ✭ 157
Programming Languages
python
139335 projects - #7 most used programming language
Projects that are alternatives of or similar to Picanet Implementation
Yolov3 Point
从零开始学习YOLOv3教程解读代码+注意力模块(SE,SPP,RFB etc)
Stars: ✭ 119 (-24.2%)
Mutual labels: attention-mechanism
Adnet
Attention-guided CNN for image denoising(Neural Networks,2020)
Stars: ✭ 135 (-14.01%)
Mutual labels: attention-mechanism
Awesome Speech Recognition Speech Synthesis Papers
Automatic Speech Recognition (ASR), Speaker Verification, Speech Synthesis, Text-to-Speech (TTS), Language Modelling, Singing Voice Synthesis (SVS), Voice Conversion (VC)
Stars: ✭ 2,085 (+1228.03%)
Mutual labels: attention-mechanism
Transformer In Generating Dialogue
An Implementation of 'Attention is all you need' with Chinese Corpus
Stars: ✭ 121 (-22.93%)
Mutual labels: attention-mechanism
Perceiver Pytorch
Implementation of Perceiver, General Perception with Iterative Attention, in Pytorch
Stars: ✭ 130 (-17.2%)
Mutual labels: attention-mechanism
Document Classifier Lstm
A bidirectional LSTM with attention for multiclass/multilabel text classification.
Stars: ✭ 136 (-13.38%)
Mutual labels: attention-mechanism
A Pytorch Tutorial To Image Captioning
Show, Attend, and Tell | a PyTorch Tutorial to Image Captioning
Stars: ✭ 1,867 (+1089.17%)
Mutual labels: attention-mechanism
Pytorch Question Answering
Important paper implementations for Question Answering using PyTorch
Stars: ✭ 154 (-1.91%)
Mutual labels: attention-mechanism
Hierarchical Multi Label Text Classification
The code of CIKM'19 paper《Hierarchical Multi-label Text Classification: An Attention-based Recurrent Network Approach》
Stars: ✭ 133 (-15.29%)
Mutual labels: attention-mechanism
Routing Transformer
Fully featured implementation of Routing Transformer
Stars: ✭ 149 (-5.1%)
Mutual labels: attention-mechanism
Absa keras
Keras Implementation of Aspect based Sentiment Analysis
Stars: ✭ 126 (-19.75%)
Mutual labels: attention-mechanism
Abstractive Summarization
Implementation of abstractive summarization using LSTM in the encoder-decoder architecture with local attention.
Stars: ✭ 128 (-18.47%)
Mutual labels: attention-mechanism
Attribute Aware Attention
[ACM MM 2018] Attribute-Aware Attention Model for Fine-grained Representation Learning
Stars: ✭ 143 (-8.92%)
Mutual labels: attention-mechanism
Drln
Densely Residual Laplacian Super-resolution, IEEE Pattern Analysis and Machine Intelligence (TPAMI), 2020
Stars: ✭ 120 (-23.57%)
Mutual labels: attention-mechanism
Hart
Hierarchical Attentive Recurrent Tracking
Stars: ✭ 149 (-5.1%)
Mutual labels: attention-mechanism
Linear Attention Recurrent Neural Network
A recurrent attention module consisting of an LSTM cell which can query its own past cell states by the means of windowed multi-head attention. The formulas are derived from the BN-LSTM and the Transformer Network. The LARNN cell with attention can be easily used inside a loop on the cell state, just like any other RNN. (LARNN)
Stars: ✭ 119 (-24.2%)
Mutual labels: attention-mechanism
Prediction Flow
Deep-Learning based CTR models implemented by PyTorch
Stars: ✭ 138 (-12.1%)
Mutual labels: attention-mechanism
Sinkhorn Transformer
Sinkhorn Transformer - Practical implementation of Sparse Sinkhorn Attention
Stars: ✭ 156 (-0.64%)
Mutual labels: attention-mechanism
Pan
[Params: Only 272K!!!] Efficient Image Super-Resolution Using Pixel Attention, in ECCV Workshop, 2020.
Stars: ✭ 151 (-3.82%)
Mutual labels: attention-mechanism
Seq2seq chatbot new
基于seq2seq模型的简单对话系统的tf实现,具有embedding、attention、beam_search等功能,数据集是Cornell Movie Dialogs
Stars: ✭ 144 (-8.28%)
Mutual labels: attention-mechanism
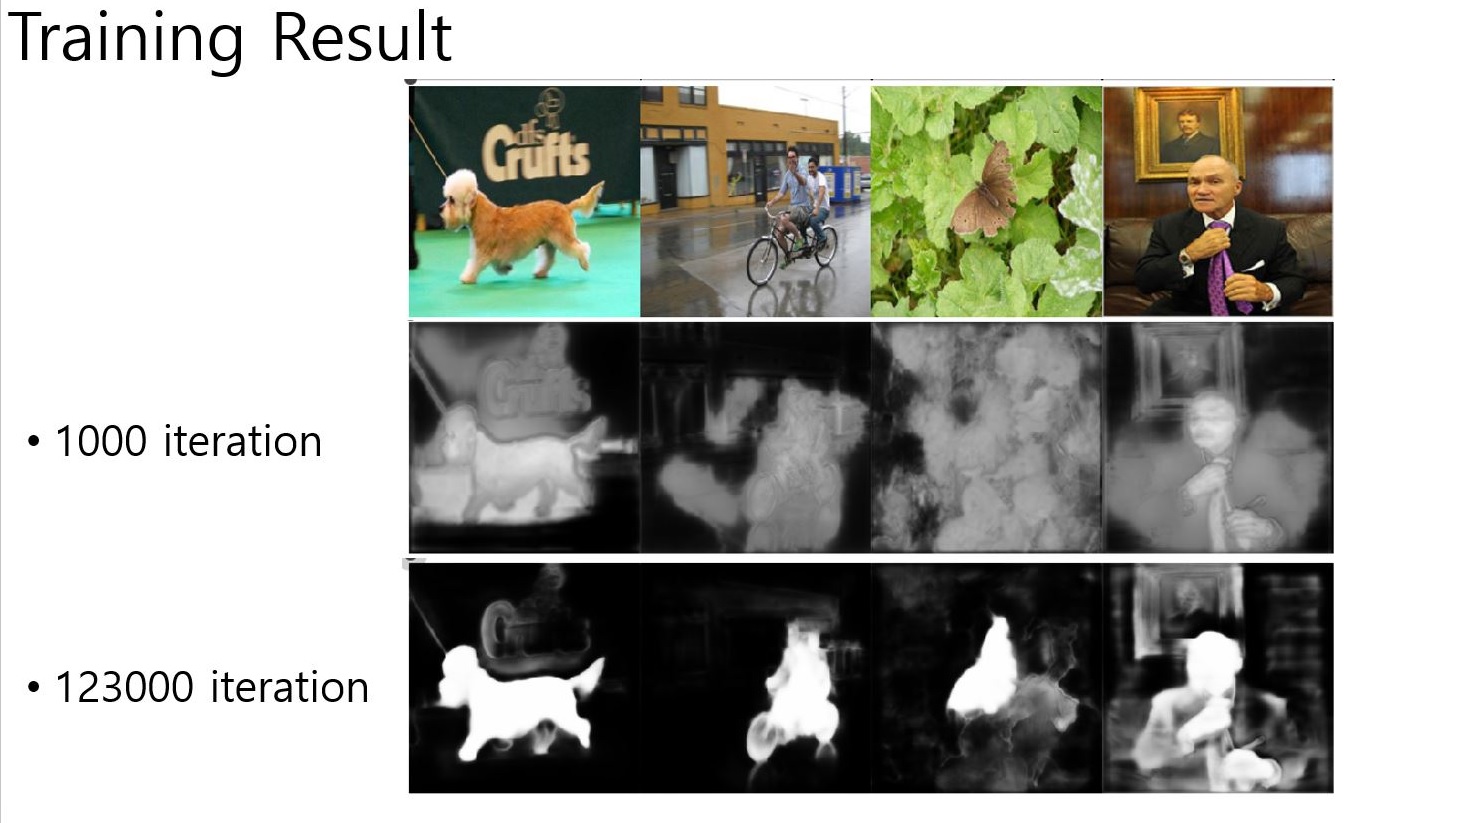
PiCANet-Implementation
Pytorch Implementation of PiCANet: Learning Pixel-wise Contextual Attention for Saliency Detection
New method on implementing PiCANet
- Issue#9
- Conv3d version is deleted.


- batchsize 1
- batchsize 4


(DUTS) Top 10 Performance Test with F-score (beta-square = 0.3)
batchsize:4
| Step | Value | Threshold | MAE |
|---|---|---|---|
| 214000 | 0.8520 | 0.6980 | 0.0504 |
| 259000 | 0.8518 | 0.6510 | 0.0512 |
| 275000 | 0.8533 | 0.6627 | 0.0536 |
| 281000 | 0.8540 | 0.7451 | 0.0515 |
| 307000 | 0.8518 | 0.8078 | 0.0523 |
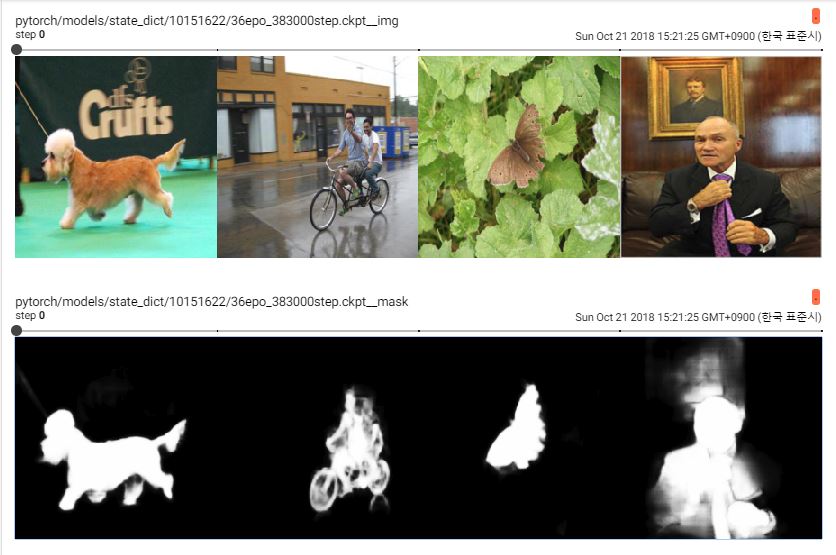
| 383000 | 0.8546 | 0.6627 | 0.0532 |
| 399000 | 0.8561 | 0.7882 | 0.0523 |
| 400000 | 0.8544 | 0.7804 | 0.0512 |
| 408000 | 0.8535 | 0.5922 | 0.0550 |
| 410000 | 0.8518 | 0.7882 | 0.0507 |
Execution Guideline
Requirements
Pillow==4.3.0
pytorch==0.4.1
tensorboardX==1.1
torchvision==0.2.1
numpy==1.14.2
My Environment
S/W
Windows 10
CUDA 9.0
cudnn 7.0
python 3.5
H/W
AMD Ryzen 1700
Nvidia gtx 1080ti
32GB RAM
Execution Guide
- For training,
- Please check the Detailed Guideline if you want to know the dataset structure.
    usage: train.py [-h] [--load LOAD] --dataset DATASET [--cuda CUDA]
                    [--batch_size BATCH_SIZE] [--epoch EPOCH] [-lr LEARNING_RATE]
                    [--lr_decay LR_DECAY] [--decay_step DECAY_STEP]
                    [--display_freq DISPLAY_FREQ]
    optional arguments:
      -h, --help            show this help message and exit
      --load LOAD           Directory of pre-trained model, you can download at
                            https://drive.google.com/file/d/109a0hLftRZ5at5hwpteRfO1A6xLzf8Na/view?usp=sharing
                            None --> Do not use pre-trained model. Training will start from random initialized model
      --dataset DATASET     Directory of your Dataset
      --cuda CUDA           'cuda' for cuda, 'cpu' for cpu, default = cuda
      --batch_size BATCH_SIZE
                            batchsize, default = 1
      --epoch EPOCH         # of epochs. default = 20
      -lr LEARNING_RATE, --learning_rate LEARNING_RATE
                            learning_rate. default = 0.001
      --lr_decay LR_DECAY   Learning rate decrease by lr_decay time per decay_step, default = 0.1
      --decay_step DECAY_STEP
                            Learning rate decrease by lr_decay time per decay_step,  default = 7000
      --display_freq DISPLAY_FREQ
                            display_freq to display result image on Tensorboard
- For inference,
- dataset should contain image files only.
- You do not need
masksorimagesfolder. If you want to run with PairDataset structure, use argument like
--dataset [DATAROOT]/images - You should specify either logdir (for TensorBoard output) or save_dir (for Image file output).
- If you use logdir, you can see the whole images by run tensorboard with
--samples_per_plugin images=0option
    usage: image_test.py [-h] [--model_dir MODEL_DIR] --dataset DATASET
                     [--cuda CUDA] [--batch_size BATCH_SIZE] [--logdir LOGDIR]
                     [--save_dir SAVE_DIR]

    optional arguments:
      -h, --help            show this help message and exit
      --model_dir MODEL_DIR
                            Directory of pre-trained model, you can download at
                            https://drive.google.com/drive/folders/1s4M-_SnCPMj_2rsMkSy3pLnLQcgRakAe?usp=sharing
      --dataset DATASET     Directory of your test_image ""folder""
      --cuda CUDA           cuda for cuda, cpu for cpu, default = cuda
      --batch_size BATCH_SIZE
                            batchsize, default = 4
      --logdir LOGDIR       logdir, log on tensorboard
      --save_dir SAVE_DIR   save result images as .jpg file. If None -> Not save
- To report score,
- dataset should contain
masksandimagesfolder. - You should specify logdir to get PR-Curve.
- The Scores will be printed out on your stdout.
- You should have model files below the model_dir.
- Only supports model files named like "[N]epo_[M]step.ckpt" format.
    usage: measure_test.py [-h] --model_dir MODEL_DIR --dataset DATASET
                       [--cuda CUDA] [--batch_size BATCH_SIZE]
                       [--logdir LOGDIR] [--which_iter WHICH_ITER]
                       [--cont CONT] [--step STEP]

    optional arguments:
      -h, --help            show this help message and exit
      --model_dir MODEL_DIR
                            Directory of folder which contains pre-trained models, you can download at
                            https://drive.google.com/drive/folders/1s4M-_SnCPMj_2rsMkSy3pLnLQcgRakAe?usp=sharing
      --dataset DATASET     Directory of your test_image ""folder""
      --cuda CUDA           cuda for cuda, cpu for cpu, default = cuda
      --batch_size BATCH_SIZE
                            batchsize, default = 4
      --logdir LOGDIR       logdir, log on tensorboard
      --which_iter WHICH_ITER
                            Specific Iter to measure
      --cont CONT           Measure scores from this iter
      --step STEP           Measure scores per this iter step
Detailed Guideline
Pretrained Model
You can download pre-trained models from https://drive.google.com/drive/folders/1s4M-_SnCPMj_2rsMkSy3pLnLQcgRakAe?usp=sharing
Dataset
PairDataset Class
- You can use CustomDataset.
- Your custom dataset should contain
images,masksfolder.- In each folder, the filenames should be matched.
- eg.
images/a.jpg masks/a.jpg
DUTS
You can download dataset from http://saliencydetection.net/duts/#outline-container-orgab269ec.
- Caution: You should check the dataset's Image and GT are matched or not. (ex. # of images, name, ...)
- You can match the file names and automatically remove un-matched datas by using
DUTSDataset.arrange(self)method - Please rename the folders to
imagesandmasks.
Directory & Name Format of .ckpt files
"models/state_dict//.ckpt"
- The step is accumulated step from epoch 0.
Note that the project description data, including the texts, logos, images, and/or trademarks,
for each open source project belongs to its rightful owner.
If you wish to add or remove any projects, please contact us at [email protected].