
- Showcase
- Status
- Cowz n' Bullz background
- High Level Overview
- Setup
- Hosting Modes
- Deploying to Kubernetes
- GraphQL
- GitOps (Azure)
- Disclaimer
Showcase
This is my fullstack journey for this year with the challenge to build a comprehensive system consisting out of modern (web)technologies. The fictitious business model of Cowz `n Bullz challenges this system and what it needs to comprise of. Though my intention is not to build a full system that meets all the business needs of the fictitious business model, it should hit some interesting design challenges along the way.
I hope this journey can be helpful to others in the open source community, that it aspires others to become full-stack engineers or deepening their knowledge about full-stack development in general.
Status
Very much under construction. Started with the back end and setting up the project backstory, IDE in VSCode, docker containers, npm scripts and the micro services for an integrated development experience. The services are tested with integration tests. Beware this document is mainly a brain dump and still needs some editorial work.
Cowz n' Bullz background
In 1872, the Cowz n' Bullz cooperative was formed. Farmers began to recognize that if they stood together, they would be stronger. Today, almost 150 years later, many dairy farmers are in the cooperative, doing everything they can for their cows, their land, and the good nutrition they produce every day for the world. As of today, the cooperative caters to Wholesalers. Besides that the company offers supporting services for point of sales (POS) in the region to the local consumer and the dairy farmer.
Business Requirements
Provide digital services
Provide services to the stakeholders in the business model.
Dairy farmers
As part of the ERP, provide a dashboard that can monitor the daily local production process for the dairy farmers.
Wholesalers
Provide a digital services gateway to place bulk orders.
POS
Provide an e-commerce shop, where consumers can order quality dairy products produced by local businesses.
High Level Overview
High level overview of what I am building.

The full stack consisting out of:
- Micro Services
- Micro (modular) Front End
- Simulation Driven Development (Discrete Event Simulationr, or DES)
Production Pipeline
Cowz n' Bullz has an open communication in its culture. The company current has 3 scrum teams, but is not expected to grow beyond 4 teams in the forseeable future. After looking at various Scaled Agile models, they decide to adopt the Nexus framework.
Nexus' objective is to scale up the value that can be delivered by a group of Scrum Teams (3-8 teams) working on a single product. It does this by reducing the complexity faced by those teams as they work together to deliver at least one integrated, valuable, helpful product increment every Sprint.
Product teams
Each feature is build by a team of experts. Each feature slice in the product increments are a daily end-to-end exercise for the team. The team consists out of experts in:
- User Experience
- Web & Graphic Design
- Analytics translation / Data Science
- Solution Architecture / Full Stack Software Engineering
- Operations
As the primary link to the stakeholders, the product owner of Cowz n' Bullz acts as the liaison. While the product owner defines the vision, manages the backlog, prioritizes and anticipates the needs of the customers. He also monitors the development stages and evaluates the quality of the product at each iteration.
The team itself has direct communication from the perspective of users experience design and the analytics translator (business information needs) with the stakeholders when working on the product features.
You won’t understand until you experience it
The user experience expert tests visual prototypes with the customer before they are built technically as a feature in the software. In that sense, the Analytics translator and User Experience designer are front-runners in the team and challenge the Spikes the team would be facing so they mitigate the risk in their technical approach.
Simulation Driven Development
| The system of Cowz 'n Bullz integrates with various dairy production plants. Supervisory control and data acquisition (SCADA) sensory data from the production plant is streamed live over the cloud. In order to test event messaging with our micro services, we mimic the production data using discrete event simulation locally.
In the simulation code, we currently use averaging |
 |
Discrete Event Simulation
The production plant data can be generated as follows:
cd to ~/src/simulation/production-plant/discrete-event-simulation
Issue:
dotnet run

Building...
== Dairy Production Plant ==
Dairy Production Plant results after 365 days.

Processed 29060 events in 0.0434367 seconds (669019.5157551103 events/s).
Milked: 7260 animals.
Total Milking Timed: 25.05:01:15.7306465.
a production-data.json will be generated containing events for a year of production data. This data can be loaded on a streaming server, replaying the data so our micro services can response to the events. The model is kept simple but can be extended with more complex production processes.
Micro services/front ends
As per business requirements, catering to the stakeholders, the functionality of the system is split up in micro services and micro (modular) front ends. This allows the company to more easily rollout parts that make up the system consisting out of features. The DevOps teams are specialized in GitOps and rollout each future in the infrastructure as code (IAC).
Stack used
Micro services
In Microsoft technologies there are mainly three promising technologies. The main reason why I choose dapr over other technologies are as follows:
- Orleans only supports Actors
- More official SDK integrations for multiple languages
- Excellent documentation
- Fastest growing community
- Fast release train
Popularity
As per January 29th 2020

Runtime language services

dapr Release Train

Micro Service Orchestration
For micro service orchestration we use 3 building blocks from camunda:latest
- Zeebe orchestration engine
- Elastic Search (for storing workflow data)
- Operate for monitoring and troubleshooting workflow instances
- Monitor a simple monitoring application where you can test workflow manually
- Modeler visual workflow for zeebe using BPMN.
Micro Frontend
For micro front ends we rely on the following:
- React Components
- Module Federation (through WebPack 5)
- CSS Isolation for micro front ends
- NGINX for serving the components, portal
- NGINX for hosting shared static content delivery as a CDN
- Docker Containerization
High Level overview for Micro front ends.

Each react component is grouped in a logical problem domain. For example This could be per feature team or split up logically (DDD) for performance or increase maintenance and delivery. As each Remote Entry is hosted in a separate web server and are meant to be stateless, each container can be scaled by increasing the number of replicas when put on kubernetes. Each component has the option to either use CSS Isolation or reuse styles from the CDN.
Webpack deployment
Since Webpack v5, Module federation is supported. Each react app can import react components easily over remote endpoints, called remote entries. Federation is the defacto underlying technology to enable distributed micro front ends. The following schematic shows how the micro front ends are build up.

Each front end project (except the CDN, as it only serves static content), has 3 webpack files for its configuration.
- webpack.common.js
contains commonly used configuration that can be shared - webpack.dev.js
contains development specific settings, such as localhost deployment - webpack.prod.js
contains production specific settings, such as minify build to./distdirectory, ready to be wrapped in a container.
A Micro Frontend typically exports its remote entry through a webpack build i.e. a product card component that is maintained by the product feature team:
  ...
  plugins: [
    ...
    new ModuleFederationPlugin({
        name: 'product_card',
        filename: 'remoteEntry.js',
        exposes: {
            './ProductCard': './src/ProductCard',
        },
        shared: ['react', 'react-dom'],
    })
    ...
  ],
  ...
The portal (feature team) imports the remote entry during the webpack build. i.e:
  ...
  plugins: [
    ...
    new ModuleFederationPlugin({
        name: 'container',
        remotes: {
            product_card:
                'product_card@http://localhost:3003/remoteEntry.js',
        },
        shared: ['react', 'react-dom'],
    })
    ...
  ],
  ...
Docker Compose
Startup ~/src/launch-docker-compose.ps1. And select consumer micro frontend
Cowz n' Bullz Docker-Compose Areas

   [X] consumer micro frontend
   [ ] zeebe orchestration (with operator)
This will build the docker containers and compose 3 services:
- CDN, content delivery network on http://localhost:3000
- Portal on http://localhost:3001
- Product Micro Front End on http://localhost:3003
Using docker-compose-viz from pmsipilot we can visualize the composition of the docker containers for documentation.
docker run --rm -it --name dcv -v ${pwd}:/input pmsipilot/docker-compose-viz render -m image docker-compose.yml
This will generate the following image:

Docker Compose Viz can be found at: https://hub.docker.com/r/pmsipilot/docker-compose-viz/
GitOps Overview
Within Scrum Nexus, the teams organize themselves around GitOps. The following high level infographic depicts the continuous integration and delivery and technologies used within the Cowz n' Bulls cooperative.

Setup
The VSCODE project consists out of Tasks/Launch json configuration. On top of this some utilities are installed as NPM packages. The scripts that are shipped in package.json with the solution are installed as dev dependencies and these node modules are executed with npx.
Install Dapr CLI
The dapr runtime can be installed by following this documentation: https://v1-rc1.docs.dapr.io/getting-started/install-dapr-cli/
To debug dapr micro services, install dapr in local mode on your dev machine.
dapr init --runtime-version v1.0.0-rc.4
Clone repo
git clone https://github.com/sjefvanleeuwen/showcase.git
To get up and running with dapr solution. cd to the ./showcase/src/dapr folder from the root of the cloned repo and install the node modules.
cd ./showcase/src/dapr
npm install
Setting up secrets (important)
dapr stores its secrets in the ./src/dapr/secrets.json file. The secrets component configuration itself can be found in: ./src/dapr/components/localSecretStore.yaml. This configuration is used for standalone mode during your debug sessions. You will need to replace the full path to match the location of the file on your dev workstation (replace %Your Path%).
apiVersion: dapr.io/v1alpha1
kind: Component
metadata:
  name: my-secret-store
  namespace: default
spec:
  type: secretstores.local.file
  version: v1
  metadata:
  - name: secretsFile
    value: %Your Path%/showcase/src/dapr/secrets.json
  - name: nestedSeparator
    value: ":"
Launch Dev Areas
The project is divided in multiple vscode development areas. cd to ~/src and issue:
./launch-dev-areas.ps1
You can select multiple areas, each one starts up a VSCODE editor for that area.
  Cowz n' Bullz Dev Areas

   [X] dapr
   [ ] documentation
   [X] micro front ends (consumer)
   [ ] simulation
vscode debug launch
When starting up a new VSCode editor, in ./src/dapr/, the project contains several launch options. The most important one you will be working with is debug all microservices
Debug all micro services
This will startup the entire environment as depicted in the high level overview. At the time of this writing the micro orchestrator is not yet integrated in the debugging experience.
The debug options can be found in the left pane.

Service registry and ports
The following URL's will be available as GraphQL service endpoints (and RESTful for that matter) when debugging in standalone mode.
Swagger endpoints
| Micro Service | Native | Dapr |
|---|---|---|
| dapr.gql.basket | localhost:10001/swagger | localhost:20001/v1.0/invoke/dapr-gql-basket/method |
| dapr.gql.customer | localhost:10002/swagger | localhost:20002/v1.0/invoke/dapr-gql-customer/method |
| dapr.gql.inventory | localhost:10003/swagger | localhost:20003/v1.0/invoke/dapr-gql-inventory/method |
| dapr.gql.payment | localhost:10004/swagger | localhost:20004/v1.0/invoke/dapr-gql-payment/method |
| dapr.gql.product | localhost:10005/swagger | localhost:20005/v1.0/invoke/dapr-gql-product/method |
GraphQL endpoints
| Micro Service | Native | Dapr |
|---|---|---|
| dapr.gql.basket | localhost:10001/graphql | localhost:20001/v1.0/invoke/dapr-gql-basket/method/graphql |
| dapr.gql.customer | localhost:10002/graphql | localhost:20002/v1.0/invoke/dapr-gql-customer/method/graphql |
| dapr.gql.inventory | localhost:10003/graphql | localhost:20003/v1.0/invoke/dapr-gql-inventory/method/graphql |
| dapr.gql.payment | localhost:10004/graphql | localhost:20004/v1.0/invoke/dapr-gql-payment/method/graphql |
| dapr.gql.product | localhost:10005/graphql | localhost:20005/v1.0/invoke/dapr-gql-product/method/graphql |
GraphQL Gateway
The GraphQL gateway federates all services. The stitching gateway can be opened in your web browser at: http://localhost:9999/graphql when debugging.
Next to federation it also stitches schemas such as my basket, to join several graphs from several micro services (basket, product and inventory) into one query endpoint. As with all micro services, The graphql gateway is a dapr service with injected sidecar and served from a dapr endpoint. Queries called from the micro frontend can therefore be traced with tools such as Zipkin.
Here is the stitching example:
# Stitching sub graphs for UX Design of the Basket View
extend type Query {
    "This is an extended query which shows a basket for the current logged in customer along with the products. This view is in accordance with the UX design and contains delegated fields from the inventory and product database"
    mybasket: [BasketItem!]! @delegate(schema: "basket", path: "basketForCustomer(id: 1)")
}

extend type BasketItem {
    "delegates the name of the product in the basket from product"
    name: String
        @delegate(
            schema: "product",
            path: "product(id: $fields:productId).name"
        )
    "delegates the description of the product in the basket from product"
    description: String
        @delegate(
            schema: "product",
            path: "product(id: $fields:productId).description"
        )
    "delegates the unit price of the product"
    unitPrice: Float
        @delegate(
            schema: "product",
            path: "product(id: $fields:productId).unitPrice"
        )
    "delegates the available stock of the product in the basket from the inventory"
    inStock: Int
        @delegate(
            schema: "inventory",
            path: "inventory(id: $fields:productId).quantity"
        )
}
Install additional tools.
Here is a list of tools that will enhance your (debugging) experience with VSCODE for this project:
dotnet core test explorer
Unit Test Explorer for .NET Core
https://marketplace.visualstudio.com/items?itemName=formulahendry.dotnet-test-explorer
dapr extensions
This Dapr extension makes it easy to setup debugging of applications within the Dapr environment as well as interact with applications via the Dapr runtime.
https://marketplace.visualstudio.com/items?itemName=ms-azuretools.vscode-dapr
C# for Visual Studio Code (powered by OmniSharp)
Lightweight development tools for .NET Core. Great C# editing support, including Syntax Highlighting, IntelliSense, Go to Definition, Find All References, etc. Debugging support for .NET Core
https://marketplace.visualstudio.com/items?itemName=ms-dotnettools.csharp
Docker
The Docker extension makes it easy to build, manage, and deploy containerized applications from Visual Studio Code. It also provides one-click debugging of Node.js, Python, and .NET Core inside a container.
https://marketplace.visualstudio.com/items?itemName=ms-azuretools.vscode-docker
GraphQL
GraphQL extension VSCode built with the aim to tightly integrate the GraphQL Ecosystem with VSCode for an awesome developer experience.
https://marketplace.visualstudio.com/items?itemName=GraphQL.vscode-graphql
Live Server
Launch a local development server with live reload feature for static & dynamic pages.
https://marketplace.visualstudio.com/items?itemName=ritwickdey.LiveServer
Nuget Package Manager
An extension for Visual Studio Code that lets you easily add or remove .NET Core 1.1+ package references to/from your project's .csproj or .fsproj files using Code's Command Palette.
https://marketplace.visualstudio.com/items?itemName=jmrog.vscode-nuget-package-manager
npm Scripts
The following section describes the available scripts:
gql-doc
Documents the graphql schema from the stitching/federated graphql gateway endpoint. Output example here.
npm run gql-doc
gql-schemas
Fetches the schema from the stitching/federated graphql gateway endpoint via curl and places it in the ./generated folder.
npm run gql-schema
gqlg
Generates a javascript server-side (nodejs) graphql client for the gateway. This command is dependent on gql-schema.
note this generator can not interpret the @source directive containing a repeatable ENUM. Please remove it from the fetched schema.graphql file in the ./generated-folder
This command is going to be replaced by a better client/server code generator. Such as the one available at: https://graphql-code-generator.com/
npm run gqlg
test / test-dashboard
Executes newman integration tests from the ./tests directory, which contains postman configurations. It exports the test results using a html reporter newman-reporter-html-extra
This command generates a new test report per run, with date/time stamp in the filename and puts it in the ./tests/ folder.
npm run test
This command overwrites a test file in the ../docs/tests/newman folder. Putting the live webserver on that file will result in the dashboard updated in the browser at each run. Good for dashboard's.
npm run test-dashboard
You can see an example of the dashboard here
Zeebe Micro Service Orchestration
Docker Compose
Startup ~/src/launch-docker-compose.ps1 and select Zeebe orchestration.
Cowz n' Bullz Docker-Compose Areas

   [ ] consumer micro frontend
   [X] zeebe orchestration (with operator)
This will fetch the docker containers from the public docker hub and compose the aforementioned services (except the desktop modeler application, which you will need to install yourself)
This schematic reflects the docker-compose.yml file visually:

docker-compose up
Camunda operate should now be available at: http://localhost:9998/
u/l: demo/demo

Payment / Order Flow
Mainly 3 workers handle an order placement. As the order process is a long running process it is a candidate for the BPMN engine. Orders can be tracked and managed from the operate console anywhere from the payment till the actual shipment. This long running process can be easily extended with other micro orchestrations, such as return policies, which for simplicity we leave out of scope for this journey.

Hosting Modes
Micro services
At this time the micro services run in self hosted mode. The eventual "production" mode is targeted towards kubernetes.

Deploying to Kubernetes
Time to shift our focus on the Kubernetes hosting mode. This is also known as Dapr First. Dapr is a world class citizen when it comes to deployment to kubernetes. We will be deploying the dapr solution to the Azure cloud using azure cli.
Setup dapr on Azure AKS kubernetes
Please follow the guide here
Setup your container registry (Azure)
Please follow the guide here
Deploying Dapr services (from vscode)
The ./src/dapr project comes with a .sln file, binding all services together. When developing larger services landscapes these can be separated out as you scale your application. For now however we can make use of one of the Tasks that will containerize our services in order to get ready for kubernetes deployment via the Azure service registry you have already set up by now.
Building your docker containers
In vscode, got to the task run list by pressing ctrl+ shift+p to open the command palette.
From the list pick Task: Run Task
Select the build all dockers: latest.
This will build the containers for the micro services, including the gateway
If you installed the visual studio extension for docker as indicated under Install additional tools in this document, you can easily check if the images are build for your docker installation.
The images list should contain the basket, customer, inventory and payment micro services. Also the gql.gateway should be in the list.

Pushing your docker Images
We will be pushing our images to the previously created Azure Container Registry in your resource group. In the docker pane in vscode you see a registry menu.
- Click on Connect Registry
- Choose Azure
- Open the Azure tree
- Click on
Install Azure Account Extension - Install the Extension
- Sign In to Azure
The created container registry should now appear in the view pane.

Now push all 6 images to the registry that are tagged :latest.

The Azure portal should show all images in its repositories menu for the resource group.

Managing Secrets
Secrets will be kept separate from our code to enforce secure software development. For this we use the built in kubernetes built-in secret store.
You can create a secret via the kubectl cli. For now we create the same test secret that we use in standalone dapr mode for integration testing.
kubectl create secret generic my-secret-store --from-literal='my-secret'='If you want to keep a secret, you must also hide it from yourself. -- George Orwell, 1984'
secret/my-secret-store created
!Note You should encrypt secrets in kubernetes as they are stored in plane text as base64. If you are on azure, take a look at Key Vault. Azure Key Vault is a secret management platform that provides a secure repository for keys, secrets, and certificates. It offers deep integration with other Azure services and provides a highly secure repository for your most sensitive data.
Attaching container Registry
You can attach the container registry to your AKS cluster that you created and pushed the images to. remember to replace the name of the acr to your own unique container registry name.
az aks update --name showcase --resource-group showcase --attach-acr sjefvanleeuwenshowcase
This wil take less than a minute usually.
Deploying dapr services (HELM)
You can find HELM files in the ./charts folder. You can change the values.yaml in the micro-services chart. Specifically change the localhost:9997 to your own registry on AKS. If you like to run a local registry and kubernetes on docker desktop, or micro k8s for example you can install a docker registry yourself.
docker run -d -p 9997:5000 --restart=always --name registry registry:2
range:
    - image: localhost:9997/dapr.gql.basket
      name: dapr-gql-basket
    - image: localhost:9997/dapr.gql.customer
      name: dapr-gql-customer
    - image: localhost:9997/dapr.gql.inventory
      name: dapr-gql-inventory
    - image: localhost:9997/dapr.gql.payment
      name: dapr-gql-payment
    - image: localhost:9997/dapr.gql.product
      name: dapr-gql-product
    - image: localhost:9997/gql.gateway
      name: gql-gateway
You can deploy the micro services to your kubernetes cluster using
helm install micro-services ./micro-services
To check if the basket container is running.
kubectl logs -l app=dapr-gql-basket -c dapr-gql-basket

info: Microsoft.Hosting.Lifetime[0]
      Now listening on: http://[::]:80
info: Microsoft.Hosting.Lifetime[0]
      Application started. Press Ctrl+C to shut down.
info: Microsoft.Hosting.Lifetime[0]
      Hosting environment: Production
info: Microsoft.Hosting.Lifetime[0]
      Content root path: /app
info: Microsoft.Hosting.Lifetime[0]
      Now listening on: http://[::]:80
info: Microsoft.Hosting.Lifetime[0]
      Application started. Press Ctrl+C to shut down.
info: Microsoft.Hosting.Lifetime[0]
      Hosting environment: Production
info: Microsoft.Hosting.Lifetime[0]
      Content root path: /app
You can also go to your previously installed dashboard to see the basket service running. If its not running issue:
dapr dashboard -k
browse to: http://localhost:8080/
You should see the basket micro service running.

Exposing Dapr services
First we are going to expose the basket service to our development workstation so we can perform a query to it using graphql. We could instead expose the gateway, but lets keep things simple as that needs more wiring. This will be a manual exercise, but eventually will be done using automated deployments using GitOps.
Ingress Controller
Dapr fully integrates with Azure API management. If you want to use this instead of setting up you own generic ingress controller check this link:
https://docs.microsoft.com/en-us/azure/api-management/api-management-dapr-policies
Our ingress controller will be NGINX. Instructions for this can be found on:
https://docs.microsoft.com/en-us/azure/aks/ingress-basic
For deployment of nginx you can go to the `~/src/dapr/k8s/deployment/ingresses folder.
Execute the following command from powershell
./nginx-ingress
Wait for a couple seconds, until the script executes the kubectl --namespace ingress-basic get services -o wide -w nginx-ingress-ingress-nginx-controller in order to view the status of the nginx ingress getting an external IP address assigned.
nginx-ingress-ingress-nginx-controller   LoadBalancer   10.0.96.37   <pending>     80:31982/TCP,443:31005/TCP   4s    app.kubernetes.io/component=controller,app.kubernetes.io/instance=nginx-ingress,app.kubernetes.io/name=ingress-nginx
nginx-ingress-ingress-nginx-controller   LoadBalancer   10.0.96.37   20.67.176.154   80:31982/TCP,443:31005/TCP   15s   app.kubernetes.io/component=controller,app.kubernetes.io/instance=nginx-ingress,app.kubernetes.io/name=ingress-nginx
After 15 seconds, our ingress controller is available on public load balancer IP: 20.67.176.154. Of course this IP address will differ from your setup.
When browsing to https://20.67.176.154 you will see the nginx server online it gives back a 404 error as nothing has been wired yet. Also note that the NGINX server still needs a trusted certificate.
More info about setting up TLS and DNS can be found here: https://docs.microsoft.com/en-US/azure/aks/ingress-tls in case you want to use different options available to you than set forth here.
DNS
Before issuing a SSL cert we need to setup DNS for 20.67.176.154. I choose to use my external DNS provider, as I have my FQDN's setup there already. Simply create an A-Record pointing to your NGINX IP-Address.
SSL Certs
Make sure you have the openssl tooling available. You can install this using chocolatey for example, see: https://chocolatey.org/packages/openssl
choco install openssl.light
Restart your command shell for the command the become available.
Please replace the FQDN under the Canonical Name (CN) with your own FQDN A record.
We will be creating a self signed certificate and key.
openssl req -x509 -nodes -days 365 -newkey rsa:2048 -out aks-ingress-tls.crt -keyout aks-ingress-tls.key -subj "/CN=dapr-ingress.morstead.nl/O=aks-ingress-tls"
This will create two files, being the request certificate and key. The
K8s Secret for cert
To allow Kubernetes to use the TLS certificate and private key for the ingress controller, you create and use a Secret. The secret is defined once, and uses the certificate and key file created in the previous step. You then reference this secret when you define ingress routes.
The following example creates a Secret name aks-ingress-tls:
kubectl create secret tls aks-ingress-tls --namespace ingress-basic --key aks-ingress-tls.key --cert aks-ingress-tls.crt
secret/aks-ingress-tls created
We can now reference the secret aks-ingress-tls when we create the ingress routes to our services using a spec file.
Ingress Routes
t.b.a.
Administering multi cluster environments
Now that the kubectl client is set to your azure environment, you can also switch between multiple environments. For example when using Kubernetes on Docker Desktop you can tell kubectl to point to that environment at any time.
To see which configs are available to kubectl, issue:
kubectl config view
...
apiVersion: v1
clusters:
- cluster:
    certificate-authority-data: DATA+OMITTED
    server: https://kubernetes.docker.internal:6443
  name: docker-desktop
- cluster:
    certificate-authority-data: DATA+OMITTED                          azmk8s.io:443
    server: https://xxxxxxxxxxxxxxxxxxxxxxxxxxxxxxxxxxxxx.azmk8s.io:443
  name: showcase
...
Listed on my machine are two environments, docker-desktop an internal kubernetes "cluster" and showcase which we created in our previous exercise.
To switch back to docker-desktop issue:
kubectl config use-context docker-desktop
And we're back.
GraphQL
Client generator
For service to service communication we can leverage graphql. The follow example shows how to create a client for the basket service, which needs to synchronously call the inventory to reserve product items. Consider the following activity diagram.
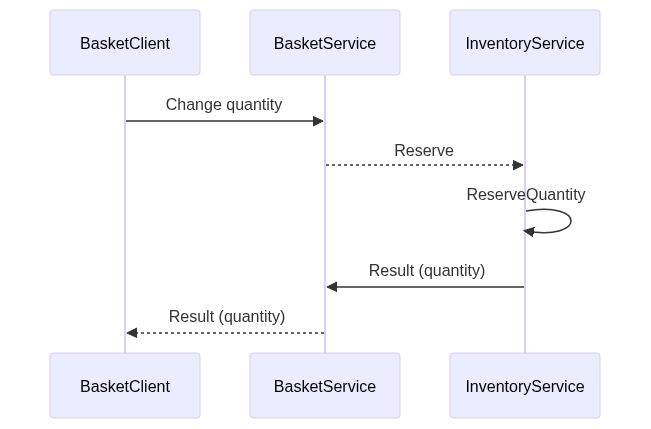
The basket services requests the reserve mutation service, for this it needs the mutation operation schema from the inventory service.
Setup client tools
In order to do so, run the inventory service from VSCODE. cd to src/dapr/dapr.gql.basket/Client
In this directory we have setup the client as follows:
dotnet new tool-manifest
dotnet tool install StrawberryShake.Tools --local --version 11.0.0-preview.137
Fetch the graphql schema
To generate a new client based on the operations from the inventory service, make sure the inventory service is running. Then generate a strongly typed client by executing:
dotnet graphql init http://localhost:10003/graphql -n Inventory
Download schema started.
Download schema completed in 978 ms
Client configuration started.
Client configuration completed in 12 ms
2 files will now be in the Client directory.
- berry.json
- Inventory.graphql
Furthermore, a .config directory, containing dotnet-tools.json contains the version of the tool used.
{
  "version": 1,
  "isRoot": true,
  "tools": {
    "strawberryshake.tools": {
      "version": "11.0.0-preview.137",
      "commands": [
        "dotnet-graphql"
      ]
    }
  }
}
Generate the client
Create the query or mutation you want to generate code for as a new file: ReserveMutation.graphql
mutation Reserve {
    reserve {
        productId
        quantity
    }
}
Now build the project, a ./Generated directory will be created containing the strongly typed client code.
dotnet build ../
The ReserveMutation client can now be used.
Available Tools
Playground
Each dapr micro service can be queried from a browser UI interface. The interface is based on the Microsoft Monaco Editor and supports intellisense.
For each micro service endpoint you can browse to http://localhost:{port-number}/graphql
The gateway that federates and stitches the micro services can be reached at:

You can download the full graphql schema by executing an SDL query: http://localhost:9999/graphql?sdl. This also works for each micro service separately.
Voyager
The graphql gateway has an extra service installed, being Voyager. Voyager allows you to visualize and navigate your documented graph for Queries / Mutations and individual entities.
For example navigating to our previous generated ReserveMutation graphql mutation at http://localhost:9999/voyager/

Tracing with Zipkin
From the graphql gateway you can trace the inter service communication that occurs to the micro services. When starting up the gateway all the micro services are queried for federating their schemes. This can also be inspected in Zipkin:

A Typical trace from a federated query execution, in this case the query mybasket might look like this.

Please note that, for speed optimization, the gateway queries the micro services in parallel and that sequencing maybe differ. In this case 3 spans were traced by Zipkin.
In local hosting mode, as described earlier, the Zipkin dashboard can be reached at: http://localhost:9411/
Dependencies with Zipkin
Zipkin allows for replay of micro service calls given a start and end date/time queries. This allows you to view (complex) communications between micro services. In this example only the graphql gateway emits events to the micro services, but the dependencies would also visualize inter communications between the micro services themselves, might they occur. This type of ontology gives you valuable insights in how your micro services landscape behaves in its communications.
Below you see a typical animation of what Zipkin offers in these kind of insights:

GitOps (Azure)
All the manual steps can be easily scripted using template generators on azure for the resources. These templates can then be used in GitHub Workflows.
Initial Setup.
To start with github workflows we first need to create deployment credentials, or rather service principal for a resource. We could reuse the existing showcase resource group, but to keep things separated, lets create a new resource.
az group create --location northeurope -n showcase-gitops
{
  "id": "/subscriptions/xxxxxxxx-xxxx-xxxx-xxxx-xxxxxxxxxxxx/resourceGroups/showcase-gitops",
  "location": "northeurope",
  "managedBy": null,
  "name": "showcase-gitops",
  "properties": {
    "provisioningState": "Succeeded"
  },
  "tags": null,
  "type": "Microsoft.Resources/resourceGroups"
}
We will now create the service principal. Replace xxxxxxxx-xxxx-xxxx-xxxx-xxxxxxxxxxxx with your subscription ID, as indicated in the Json above.
az ad sp create-for-rbac --name showcase-gitops --role contributor --scopes /subscriptions/xxxxxxxx-xxxx-xxxx-xxxx-xxxxxxxxxxxx/resourceGroups/showcase-gitops --sdk-auth
{
  "clientId": "xxxxxxxx-xxxx-xxxx-xxxx-xxxxxxxxxxxx",
  "clientSecret": "xxxxxxxx-xxxx-xxxx-xxxx-xxxxxxxxxxxx",
  "subscriptionId": "xxxxxxxx-xxxx-xxxx-xxxx-xxxxxxxxxxxx",
  "tenantId": "xxxxxxxx-xxxx-xxxx-xxxx-xxxxxxxxxxxx",
  "activeDirectoryEndpointUrl": "https://login.microsoftonline.com",
  "resourceManagerEndpointUrl": "https://management.azure.com/",
  "activeDirectoryGraphResourceId": "https://graph.windows.net/",
  "sqlManagementEndpointUrl": "https://management.core.windows.net:8443/",
  "galleryEndpointUrl": "https://gallery.azure.com/",
  "managementEndpointUrl": "https://management.core.windows.net/"
}
The following keys need to be stored as secrets in your github account.
- Go to the repository, where you forked this repo.
- Go into the project settings / secrets / new secret
- Paste the payload from above into
AZURE_SHOWCASE_CREDENTIALS - Add a secret for the resource group name it
AZURE_SHOWCASE_RESOURCE_GROUP_NAMEwith the value: showcase-gitops - Add a secret for your subscription ID name it
AZURE_SHOWCASE_SUBSCRIPTION_IDwith your subscription ID value i.e:c6e66c96-b1ec-48e8-84a7-33dafbd2b314 - Add a secret for your container registry name
AZURE_SHOWCASE_CONTAINER_REGISTRY_NAMEand add a azure wide unique container registry name i.e:yournameshowcasegitops - Add the region under secret
AZURE_SHOWCASE_REGIONi.e.:northeurope
ARM Deploy
In this repository, the resource management templates are included in ./src/git-ops we are going to deploy these using ARM Deploy using the GitHub workflow activity azure/arm-deploy@v1
Deploy Container Registry
This script setups the container registry so the containers of our solution that get published there can be used by our Kubernetes (AKS) Cluster.
For the container registry we will need to set up some more secrets
We can obtain the values (token based login) by logging in to the azure container registry.
az acr login --name {your-container-registry-name} --expose-token
You can perform manual login using the provided access token below, for example: 'docker login loginServer -u 00000000-0000-0000-0000-000000000000 -p accessToken'
{
  "accessToken": "base64tokenstring",
  "loginServer": "{your-acr-name}.azurecr.io"
}
Assign these to the following github secrets:
AZURE_SHOWCASE_CONTAINER_REGISTRY_LOGIN_SERVERvalue: loginServerAZURE_SHOWCASE_CONTAINER_REGISTRY_USERNAMEvalue: 00000000-0000-0000-0000-000000000000AZURE_SHOWCASE_CONTAINER_REGISTRY_PASSWORDvalue: accessToken
!NOTE
This token expires quickly. To create a permanent token you will have to update your ACR to Premium SKU. You can then create an access token with scope map. This is azure feature is in preview at the time of this writing.
az acr token create -n showcase -r {your_acr_registry} --repository {your_repository} content/write content/read metadata/read metadata/write content/delete
Command group 'acr token' is in preview and under development. Reference and support levels: https://aka.ms/CLI_refstatus
Please store your generated credentials safely. Meanwhile you can use it through "docker login {your_acr_name}.azurecr.io -u showcase -p xxxxxxxxxxxxxxxxxxxx".
If you want to login using user name and password, you can enable admin account under access keys in your ACR settings panel.
GitHub Workflows
Build & Push Micro Frontend
This is a manual workflow in which you can build and push a specific micro front end container to the ACR on demand. At the time of this writing this is either rolling out a new portal or product micro front end.

Build & Push Micro Service
The same goes for the dapr micro services.

Disclaimer
This is a fictional work. All the names, characters, companies, places, events and incidents in this exercise are either the product of the imagination of the author or used in a fictitious way, unless otherwise stated. It is purely coincidental to have any resemblance to actual individuals, living or dead, or actual events.
As per MIT license, The software is provided "AS IS" without any kind of warranty, express or guarantee. Please read the full license here.