simple-blog-engine-for-asp-net-core
I made a file-based, customisable and fast ASP.NET Core blog engine using razor views as the blog posts files. It looks like this out of the box :

You could knock this up yourself in an hour of course but the advantages of using this blog engine are the extra features you get for free :
- Contact page
- Tag system
- Recent posts sidebar
- Open graph meta tags
- Optional built-in third party support for :
- Disqus comments
- AddThis for sharing blog posts
- Google Analytics
- Google Recaptcha on the contact page
- View hook points for customisation
- Basic theme support
- Non-destructive updates to engine version
- Code syntax highlighting built in
- And the obvious ASP.NET Core benefits :
- SEO friendly URLs
- Responsive design
- Cross platform deployment
My blog uses it and it's much faster now I've switched from Wordpress.
Interested? How to get started
Grab the repo from Github and open it up in Visual Studio or VS Code. It'll run straight out of the box but you'll want to change some settings before you go live. It's a three step process :
Step 1 of 3 : siteSettings.json
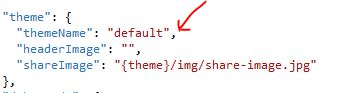
Copy \Settings\System\siteSettings.json into \Settings\Custom\siteSettings.json. In the copied file fill in the blanks so it looks something like this :
{
  "SiteSettings": {
    "owner": "Joe Blogs",
    "description": "Joe Blogs from Manchester UK talks about .NET, ASP.NET and whatever else tickles his fancy.",
    "siteName": "joeblogs.org",
    "siteURL": "www.joeblogs.org",
    "theme": {
      "themeName": "default",
      "headerImage": "",
      "shareImage": "{theme}/img/share-image.jpg"
    },
    "debugMode": {
      "showViewHooks": "false"
    },
    "metaData": {
      "locale":  "en_GB",
      "twitterUserName": "joe_blogs",
      "pageTitlePrefix": "",
      "pageTitleSuffix": " - www.joeblogs.org"
    }
  }
}
I'll explain what all the settings mean at the end of this readme.
Step 2 of 3 : Create a blog post
Create a cshtml file in \Views\_blogSource and write your blog post content in HTML. Don't include the blog post title here (see step 3 below). You can name the cshtml file however you wish and use directories to organise them to your liking.
Alternatively you can use an online HTML editor to write your post and then paste the HTML into the view. For example : https://html-online.com/editor/.
Any images you need can be added to the wwwroot\img folder. If you do add images make sure to use the bootstrap class img-fluid otherwise they won't resize and may also exceed the container boundary.
<img class="img-fluid" src="...
You may notice the default views in the view folder, you can delete these if you want (but don't delete _template-copy-me.cshtml it's handy) :

If you're writing about code and want to use the built-in code syntax highlighting then use HTML like this :
<div class="code-container">
  <pre><code class="javascript">{
  var message = "This is my javacsript";
}</code></pre>
</div>
See the highlight.js docs for different code clases eg; html, csharp etc...
Step 3 of 3 : Tell the engine about your blog post
Once you've written your blog post you need to tell the engine about it. We just edit a settings file for that.
Copy \Settings\System\blogPosts.json into \Settings\Custom\blogPosts.json and edit the file.
You'll notice a "blogs" array in the JSON. Each object in the array represents a blog post.
The array initially contains the default blog posts that demonstrate the engine. Delete those, leaving just an empty blogs array like this :
{
  "blogsPerPage":3,
  "NumberOfRecentBlogPostsToShowInSidebar": 5,
  "blogs":[]
}
Now add an object for your new blog post. Make sure that the "view" property is set to the name of the view you created for the blog post. You can add easily tags too :
{
"blogsPerPage":3,
"NumberOfRecentBlogPostsToShowInSidebar": 5,
"blogs":[{
"published":true,
"title":"My First Blog Post",
"description": "This description is displayed on the <a href="/blog/all">/blog/all</a> page.",
"date":{
"year":"2017",
"month":"11",
"day":"4",
"display":"Nov 4th, 2017"
},
"author":"Your Name",
"slug":"my-first-blog-post",
"view":"myFirstBlogPost.cshtml",
"tags":["test", "blog"]
}
/* ,{...} "blogs" is an array. Future blog posts go here too */
]
}In the future I may add an alternative method of adding blog post settings so that it's more manageable when there are lots of posts. For now it's fine.
You're done, that's a basic blog ready for deployment. Just repeat the process for each new blog post. There are lots of extra features though so let's go through them.
Customisation
If you look in \Views\Shared\EmptyCustomViews you'll see lots of empty views. These are all the hook points where you can insert your own HTML :

The best way to visualise where these hook points are is to edit \Settings\Custom\siteSettings.json and set debugMode.showViewHooks = "true". This triggers a box to display where each hook point sits in the layout.

You won't want to keep this debug mode active for very long as it looks like this :
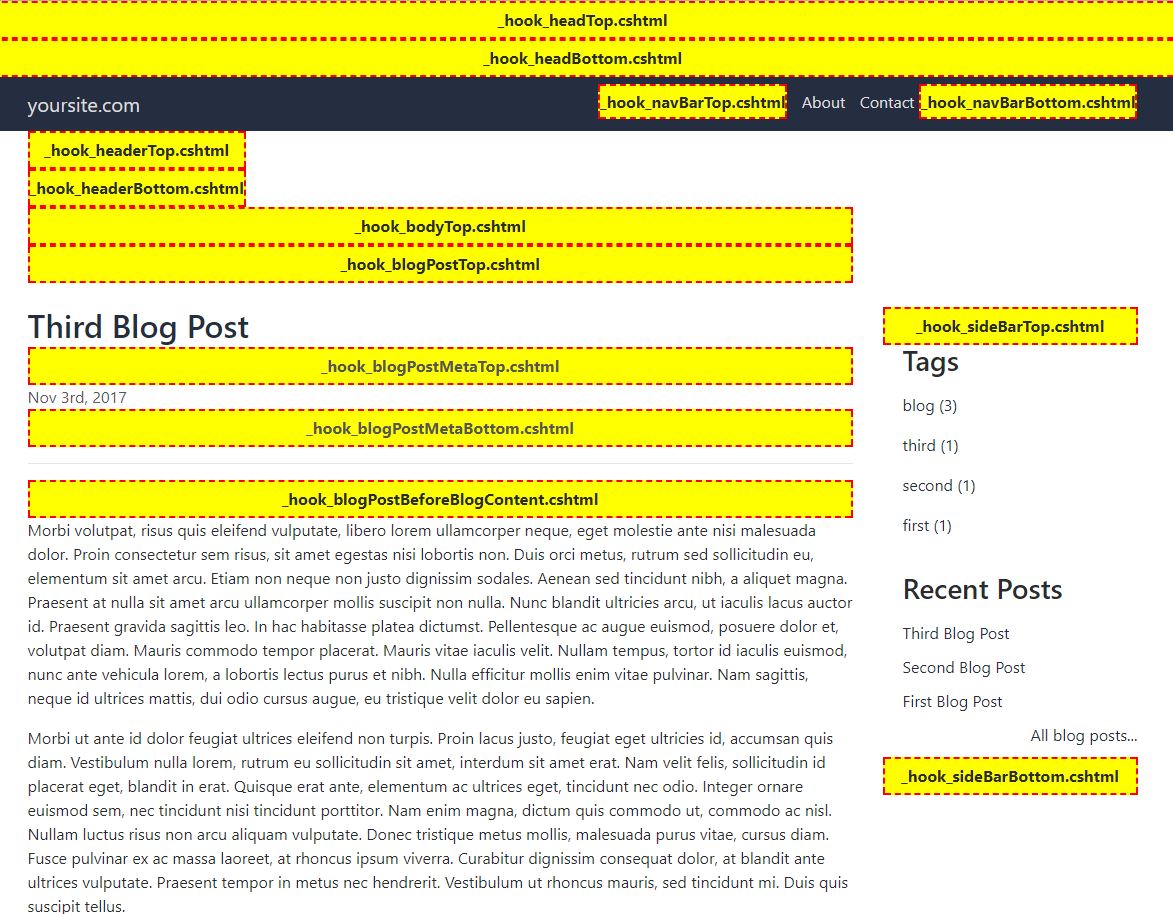
Find the view hook you need and copy it from \Views\Shared\EmptyCustomViews into \Views\Custom. Don't edit anything in \Views\Shared\EmptyCustomViews otherwise it'll be overwritten when you update the engine. Always copy custom views from \Views\Shared\EmptyCustomViews> in this way before you edit them. Tip: You can do this with any view by the way, not just hook points.
This view overriding behaviour is enabled via a simple view locator in \Utility\CustomViewLocationExpander.cs :
public class CustomViewLocationExpander : IViewLocationExpander
{
  public IEnumerable<string> ExpandViewLocations(ViewLocationExpanderContext context, IEnumerable<string> viewLocations)
  {
    // {1} is the controller and {0} is the name of the View
    var newViewLocations = new List<String>(viewLocations);
    newViewLocations.Insert(0, "/Views/Shared/EmptyCustomViews/{0}.cshtml"); // First. for a moment.
    newViewLocations.Insert(0, "/Views/Custom/{0}.cshtml"); // Not any more, this is first now.
    return newViewLocations;
  }
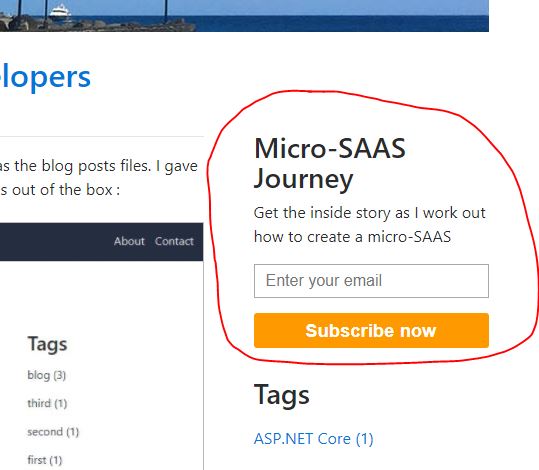
A good example of using a hook point is to add a mailing list signup form to your sidebar and at the bottom of blog posts. In my blog I used _hook_sideBarTop.cshtml and _hook_blogPostBeforeComments.cshtml to add some HTML from Tiny Letter.
Themes
The current theme is declared in siteSettings.json
The theme name just maps to \wwwroot\themes\{themName} so you can add your own resources in an organised folder. You don't have to use a theme, there's nothing stopping you putting your resources wherever you like, but be aware that if you edit the default theme's files you will lose your changes when you upgrade the engine. Make your own theme.
Settings files
siteSettings.json
| Property Name | Explanation |
|---|---|
| owner | This is your name. It's used in places such as the footer, the meta tags and the contact page |
| description | A short description of your site for the meta tags |
| siteName | Used in the meta tags and also used as the main home link text on the top left side of the header |
| theme.themeName | This is effectively the folder name in \wwwroot\themes where you put your custom resources |
| theme.headerImage | If you want a header image just below the navbar then enter the path here |
| theme.shareImage | If you want a custom share image enter the path here. So if someone shares your blog posts on Facebook or Twitter etc.. the share image wil be used there |
| debugMode.showViewHooks | If this is "true" then the blog will show you all the hook points you can use |
| metaData.locale | Used in the site meta data |
| metaData.twitterUserName | Enter your Twitter user name for the twitter link in the footer |
| metaData.pageTitleSuffix | This is important too, it appears in the meta tags such as page title. It's going to help your SEO |
addThisSettings.json
AddThis integration is built-in so you don't have to use view hooks. Just create your share panel on www.addthis.com and get your AddThis ID, which is the value that starts with "ra-" eg; "ra-123213213frf341f"
| Property Name | Explanation |
|---|---|
| isEnabled | Need to be "true" for the built-in AddThis integration to work |
| addThisID | Grab this from your AddThis backend |
If you prefer to paste the AddThis code yourself then ignore addThisSettings.json and use the _hook_blogPostBeforeShareButtons.cshtml hook.
blogPosts.json
This is how the blog engine knows about your blog posts
| Property Name | Explanation |
|---|---|
| blogsPerPage | The home page is a paginated list of all your blogs. How many blog posts do you want per page? |
| NumberOfRecentBlogPostsToShowInSidebar | In the sidebar there is a list of links to your most recent blog posts. How many do you want to display? |
| blogs[n].published | Set to "false" to remove all links to this blog post off your site |
| blogs[n].title | The blog post's title |
| blogs[n].description | The blog post description appears on the \blog\all page, which is linked to from the Recent Posts sidebar. Just copy the first sentence or two from your blog post |
| blogs[n].date.year | The year of the blog post. Used for sorting |
| blogs[n].date.month | The month of the blog post. Used for sorting |
| blogs[n].date.day | The day of month of the blog post. Used for sorting |
| blogs[n].date.display | This is how the blog post's date is displayed to the reader |
| blogs[n].author | The blog posts's author which appears under the title |
| blogs[n].slug | This is how the blog post appears in the URL. Don't change this after you've published it unless you don't mind resetting this blog post's SEO |
| blogs[n].view | This is path to your blog post's cshtml file you put in \Views_blogSource. You can create folders here, just include them in the path here eg; "2017\blogPost.cshtml" |
| blogs[n].tags | An array of string represeting this blog posts's tags |
disqusSettings.json
Disqus integration is built-in so you don't have to use view hooks. Just create a profile for your site on www.disqus.com and copy the short name here
| Property Name | Explanation |
|---|---|
| isEnabled | Needs to be "true" for the built-in AddThis integration to work |
| shortName | Grab this from your disqus backend |
emailSettings.json
For the contact page to work you'll need to enter your email settings here. It's easiest to show you a working example for Gmail :
{
  "EmailSettings": {
    "PrimaryDomain": "smtp.gmail.com",
    "PrimaryPort": "587",
    "SecondayDomain": "smtp.live.com",
    "SecondaryPort": "587",
    "UsernameEmail": "{your gmail email address goes here}",
    "UsernamePassword": "{your gmail password goes here}",
    "FromEmail": "{the email address of who you want the email to appear to be from}",
    "ToEmail": "{the email address that should receive the contact message}",
    "CcEmail": "",
	 "Subject":  "Contact from garethelms.org"
  }
}
googleAnalyticsSettings.json
Google Analytics integration is built-in so you don't have to use view hooks. Just create a profile for your site on https://analytics.google.com and copy the profile ID here
| Property Name | Explanation |
|---|---|
| isEnabled | Needs to be "true" for the built-in Google Analytics integration to work |
| trackingID | Grab this from your Google Analytics backend eg; UA-123456 |
googleRecaptchaSettings.json
Google Recaptcha integration is built in to the contact page to prevent spam. Just create a profile for your site on https://www.google.com/recaptcha/intro and copy the keys here
| Property Name | Explanation |
|---|---|
| isEnabled | Needs to be "true" for the built-in Google Recaptcha integration to work |
| siteKey | Grab this from your Google Recaptcha backend eg; 1234j2th54th34t54ji5rtGF |
| secretKey | Grab this from your Google Recaptcha backend eg; 1234j2th54th34t54ji5rtGF |
hosting.json
This is your standard ASP.NET Core hosting.json file. This is useful if you're deploying through a proxy server such as Apache on Ubuntu. Apache needs to know where your web site's service sits
Working with the settings
The settings files are parsed into POCO objects. If you want to use the settings in your own views you can inject them like this :
@@inject Microsoft.Extensions.Options.IOptionsMonitor<AddThisSettings> addThisConfigMonitor
@@inject Microsoft.Extensions.Options.IOptionsMonitor<BlogPostsSettings> blogPostConfigMonitor
@@inject Microsoft.Extensions.Options.IOptionsMonitor<DisqusSettings> disqusConfigMonitor
@@inject Microsoft.Extensions.Options.IOptionsMonitor<EmailSettings> emailConfigMonitor
@@inject Microsoft.Extensions.Options.IOptionsMonitor<GoogleAnalyticsSettings> googleAnalyticsSettings
@@inject Microsoft.Extensions.Options.IOptionsMonitor<GoogleRecaptchaSettings> googleRecatchaSettings
@@inject Microsoft.Extensions.Options.IOptionsMonitor<SiteSettings> siteSettingsJust inject the settings you need. Then to access the settings using do something like siteSettings.CurrentValue.
Startup.cs
Some magic happens in Startup.cs.
The array of blog posts configuration objects from blogPosts.settings are ordered by date and any unpublished blogs removed. The tags are also loaded into an array along with each tag's blog count.
Because the settings files are monitored for changes they are automatically mapped into POCOs when you edit them and there's no need to restart your web server. The settings files are only parsed at startup and when they are changed. The resulting POCOs are always in memory ready for action.
What's Next
It depends if people are interested but a vague list of possible future changes are :
- Plugins
- Markdown support
- Admin logon for easier editing of settings and blog posts
- Resource bundling
- Change where blog post settings are stored