prasunroy / Stefann
Programming Languages
Projects that are alternatives of or similar to Stefann
Getting Started • Training Networks • External Links • Citation • License

The official GitHub repository for the paper on STEFANN: Scene Text Editor using Font Adaptive Neural Network.
Getting Started
1. Installing Dependencies
| Package | Source | Version | Tested version (Updated on April 14, 2020) |
|---|---|---|---|
| Python | Conda | 3.7.7 | ✔️ |
| Pip | Conda | 20.0.2 | ✔️ |
| Numpy | Conda | 1.18.1 | ✔️ |
| Requests | Conda | 2.23.0 | ✔️ |
| TensorFlow | Conda | 2.1.0 | ✔️ |
| Keras | Conda | 2.3.1 | ✔️ |
| Pillow | Conda | 7.0.0 | ✔️ |
| Colorama | Conda | 0.4.3 | ✔️ |
| OpenCV | PyPI | 4.2.0 | ✔️ |
| PyQt5 | PyPI | 5.14.2 | ✔️ |
💥 Quick installation
Step 1: Install Git and Conda package manager (Miniconda / Anaconda)
Step 2: Update and configure Conda
conda update conda
conda config --set env_prompt "({name}) "
Step 3: Clone this repository and change directory to repository root
git clone https://github.com/prasunroy/stefann.git
cd stefann
Step 4: Create an environment and install depenpencies
On Linux and Windows
- To create CPU environment:
conda env create -f release/env_cpu.yml - To create GPU environment:
conda env create -f release/env_gpu.yml
On macOS
- To create CPU environment:
conda env create -f release/env_osx.yml
💥 Quick test
Step 1: Download models and pretrained checkpoints into release/models directory
Step 2: Download sample images and extract into release/sample_images directory
stefann/
├── ...
├── release/
│   ├── models/
│   │   ├── colornet.json
│   │   ├── colornet_weights.h5
│   │   ├── fannet.json
│   │   └── fannet_weights.h5
│   ├── sample_images/
│   │   ├── 01.jpg
│   │   ├── 02.jpg
│   │   └── ...
│   └── ...
└── ...
Step 3: Activate environment
To activate CPU environment: conda activate stefann-cpu
To activate GPU environment: conda activate stefann-gpu
Step 4: Change directory to release and run STEFANN
cd release
python stefann.py
2. Editing Results 😆
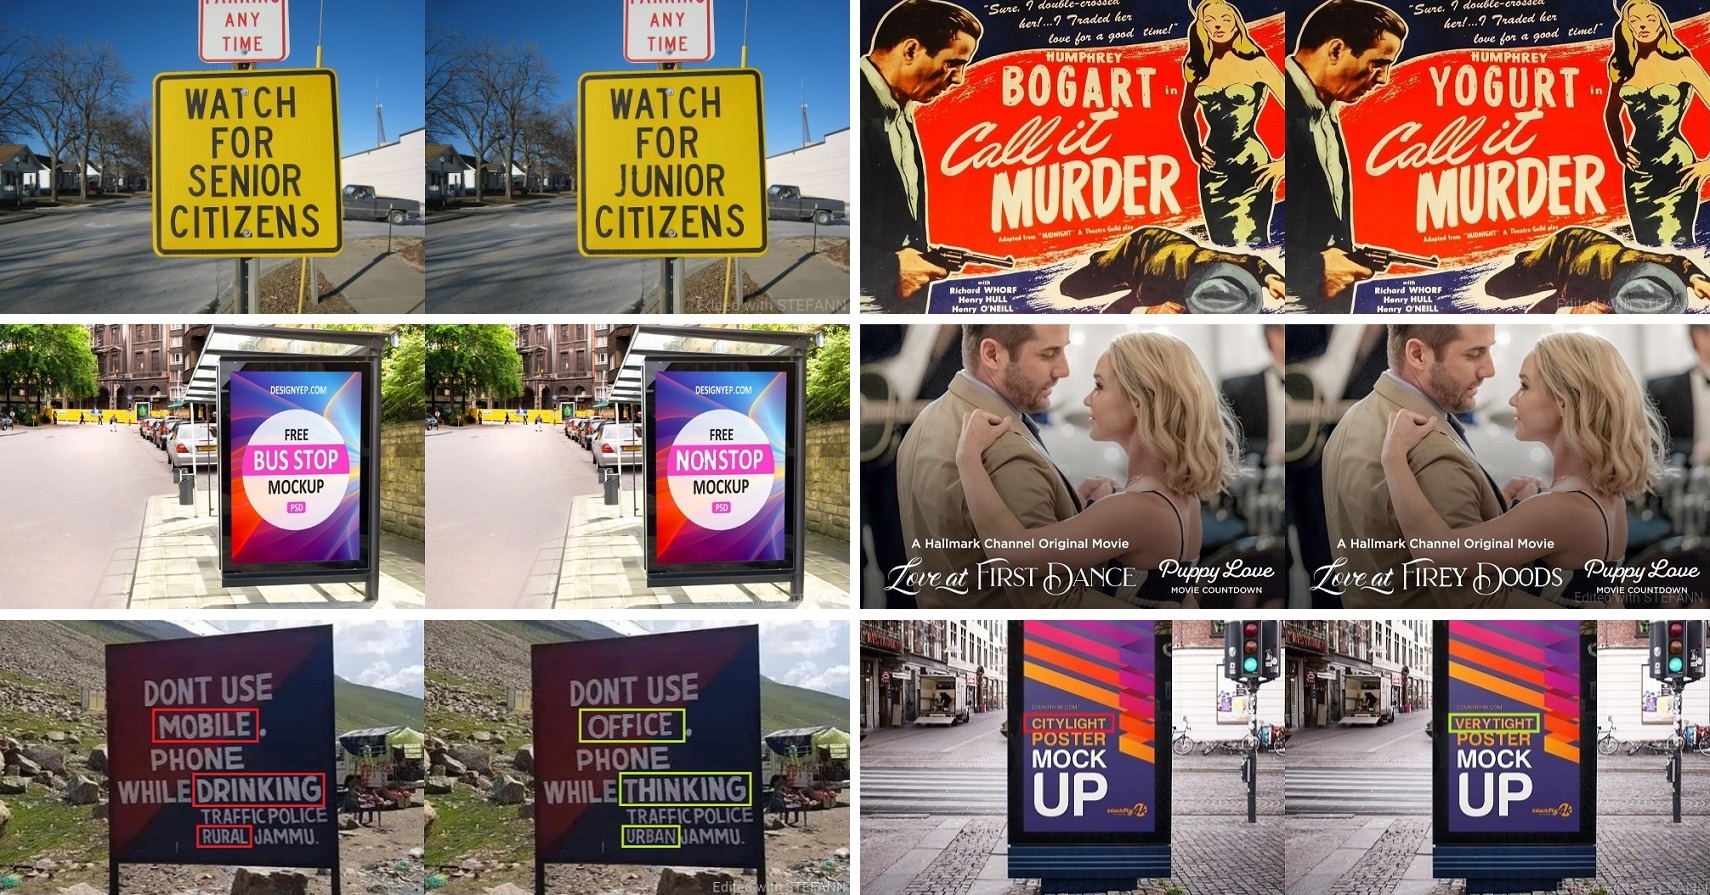
Each image pair consists of the original image (Left) and the edited image (Right).
Training Networks
1. Downloading Datasets
Download datasets and extract the archives into datasets directory under repository root.
stefann/
├── ...
├── datasets/
│   ├── fannet/
│   │   ├── pairs/
│   │   ├── train/
│   │   └── valid/
│   └── colornet/
│       ├── test/
│       ├── train/
│       └── valid/
└── ...
📌 Description of datasets/fannet
This dataset is used to train FANnet and it consists of 3 directories: fannet/pairs, fannet/train and fannet/valid. The directories fannet/train and fannet/valid consist of 1015 and 300 sub-directories respectively, each corresponding to one specific font. Each font directory contains 64x64 grayscale images of 62 English alphanumeric characters (10 numerals + 26 upper-case letters + 26 lower-case letters). The filename format is xx.jpg where xx is the ASCII value of the corresponding character (e.g. "48.jpg" implies an image of character "0"). The directory fannet/pairs contains 50 image pairs, each corresponding to a random font from fannet/valid. Each image pair is horizontally concatenated to a dimension of 128x64. The filename format is id_xx_yy.jpg where id is the image identifier, xx and yy are the ASCII values of source and target characters respectively (e.g. "00_65_66.jpg" implies a transformation from source character "A" to target character "B" for the image with identifier "00").
📌 Description of datasets/colornet
This dataset is used to train Colornet and it consists of 3 directories: colornet/test, colornet/train and colornet/valid. Each directory consists of 5 sub-directories: _color_filters, _mask_pairs, input_color, input_mask and output_color. The directory _color_filters contains synthetically generated color filters of dimension 64x64 including both solid and gradient colors. The directory _mask_pairs contains a set of 64x64 grayscale image pairs selected at random from 1315 available fonts in datasets/fannet. Each image pair is horizontally concatenated to a dimension of 128x64. For colornet/train and colornet/valid each color filter is applied on each mask pair. This results in 64x64 image triplets of color source image, binary target image and color target image in input_color, input_mask and output_color directories respectively. For colornet/test one color filter is applied only on one mask pair to generate similar image triplets. With a fixed set of 100 mask pairs, 80000 colornet/train and 20000 colornet/valid samples are generated from 800 and 200 color filters respectively. With another set of 50 mask pairs, 50 colornet/test samples are generated from 50 color filters.
2. Training FANnet and Colornet
Step 1: Activate environment
To activate CPU environment: conda activate stefann-cpu
To activate GPU environment: conda activate stefann-gpu
Step 2: Change directory to project root
cd stefann
Step 3: Configure and train FANnet
To configure training options edit configurations section (line 40-72) of fannet.py
To start training: python fannet.py
☁️ Check this notebook hosted at Kaggle for an interactive demonstration of FANnet.
Step 4: Configure and train Colornet
To configure training options edit configurations section (line 38-65) of colornet.py
To start training: python colornet.py
☁️ Check this notebook hosted at Kaggle for an interactive demonstration of Colornet.
External Links
Project • Paper • Supplementary Materials • Datasets • Models • Sample Images
Citation
@InProceedings{Roy_2020_CVPR,
  title     = {STEFANN: Scene Text Editor using Font Adaptive Neural Network},
  author    = {Roy, Prasun and Bhattacharya, Saumik and Ghosh, Subhankar and Pal, Umapada},
  booktitle = {The IEEE/CVF Conference on Computer Vision and Pattern Recognition (CVPR)},
  month     = {June},
  year      = {2020}
}
License
Copyright 2020 by the authors

Licensed under the Apache License, Version 2.0 (the "License");
you may not use this file except in compliance with the License.
You may obtain a copy of the License at

    http://www.apache.org/licenses/LICENSE-2.0

Unless required by applicable law or agreed to in writing, software
distributed under the License is distributed on an "AS IS" BASIS,
WITHOUT WARRANTIES OR CONDITIONS OF ANY KIND, either express or implied.
See the License for the specific language governing permissions and
limitations under the License.