Story Map Swipe and Spyglass
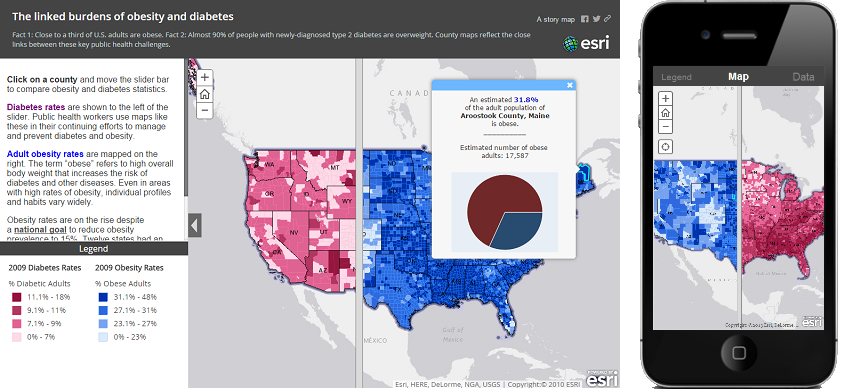
The Story Map Swipe and Spyglass app enables users to interact with two web maps or two layers of a single web map, depending on how you build your story. The app enables you to present a single view, or to develop a narrative showing a series of locations or views of the same maps.
This app can be an effective way to show before-and-after imagery, such as the aftermath of a storm or flood. A builder function in the app enables you to choose between the swipe or spyglass options. Although swipe provides a more efficient way for users to compare maps, the spyglass function is fun and engaging.
View it live | Swipe and Spyglass page on Esri Story Maps website | Download
Latest release is version version 1.19.0, if you want to be informed of new releases, we recommend you to watch this repository (see GitHub help). See the release page for release notes.
For more infomation about using and customizing Esri's Storytelling Apps follow the Story Maps Developers' Corner.
Help content:
- Introduction
- How to deploy a Swipe application
- FAQ
- Feedback
- Issues
- Contributing
- Customize the look and feel
- Developer guide
- Licensing
Introduction
The template is available in two versions:
- An hosted version in ArcGIS Online that provide hosting and an interactive builder tool to all ArcGIS Online account levels including the free Public account
- A downloadable version that you can deploy on your web server and enhance to fit your needs
So you don't have to download the template to use it! We freely host the template for you so you don't have to download the template and put it on your server. Using the hosted template is the easiest and fastest way to create a Swipe application and you will benefits from ArcGIS Online periodic updates that improve performance and fix issues without introducting breaking changes.
If you don't find the option you expect or you are a developer and want to enhance the application, you should use the downloadable version.
Main features are:
- Choose the swipe style between a vertical bar or a spy glass
- Reveal a layer of a webmap or a second web map
- Choose to include a legend and/or a description as a left side panel
- Pop-ups are displayed over the Map when using the vertical bar and on a right panel when using the spy glass
- Customize the appearance of the pop-ups header to help user associate pop-ups with maps layers
How to deploy a Swipe application
Note that a more complete documentation is included in the downloadable archive.
Install
The swipe application require to be deployed on a web server like Internet Information Services(IIS).
- Copy the contents of the zip file into your web server's root directory. In IIS, the default location for the web server's root folder is
c:\inetpub\wwwroot - Test the page using the following URL: http://localhost/[template name]/index.html, where [template name] is the name of the folder where you extracted the zip contents.
Configure
The minimal steps to configure the application are the following:
- Find your web map(s) id(s), navigate to ArcGIS Online, and find the map you want to display. If it is one of your maps, make sure it's shared with everyone (public). View the map details and copy the ID from the URL in the top of your browser. The section you need to copy is bolded in the following URL: arcgis.com/home/webmap/viewer.html?webmap= 5ae9e138a17842688b0b79283a4353f6.
- Open the index.html file in a text editor and edit the following parameters:
- layout: choose to use the vertical swipe bar or the spy glass
- webmaps: unique identifier(s) of the web map(s) you want to use
- layerIndex: if using one webmap, dictate the layer index of the layer to be revealed. The value is defined by the order of the layer the web map table of contents (0 is the top layer)
Personalize
More customization are accessible through three files :
- Index.html offers major settings:
- popup: web map popups can be disabled in the application by setting this property to false
- popupTitles: text that appears in pop-up header
- popupColors: popup header background colors
- legend: dictate if the legend panel is displayed in the side panel
- description: dictate if the description panel is displayed in the side panel
- sidePanelDescription: Text that appears in the description panel
- locationSearch: dictate if an address location search widget is displayed in application
- geolocator: dictate if a locate button is displayed (on supported browsers) that displays users location
- title: if not specified the ArcGIS.com map's title is used
- subtitle: if not specified the ArcGIS.com webmap's summary is used
- series: dictate if a series is used in the application. A series is a tabbed navigation tool to guide viewers through particular geographic extents with appropriate titles and descriptions.
- bookmarks: list of places with titles and descriptions (if series is enabled)
- app/swipe-config.js offers to customize the header, the application colors, and the optional Bing Maps key:
- HEADER_LOGO_URL: path to the header logo image (blank to disable)
- HEADER_LOGO_TARGET: logo click-through link
- HEADER_LINK_TEXT: header top-right link text
- HEADER_LINK_URL: header top-right link URL
- COLORS: header and panel background colors
- bingMapsKey: if the map uses data from Bing Maps, enter your Bing Maps Key
FAQ
Is the template compatible with previous version?
Yes, some configuration parameter changed name but they are all available. UI customization will require changes.
Is the template available in Portal for ArcGIS?
Yes, the template is available in Portal for ArcGIS starting at version 10.2.
Is there any customization needed to deploy this template on Portal for ArcGIS?
Not if you are deploying the template on a Portal instance. However, if you are deploying the template on a web server and your web map is deployed on a Portal for ArcGIS instance, you will need to make the appropriate changes to the swipe-config.js file in the app folder. Additional information on making these changes can be found in the swipe-config.js file around line 54.
Feedback
We would love to hear from you!
- StoryMaps Website
- Let us know about your application
- Story Maps forum on GeoNet
- @EsriStoryMaps
- ArcGIS Blog
Issues
Find a bug or want to request a new feature? Please let us know by submitting an issue.
Contributing
Esri welcomes contributions from anyone and everyone. Please see our guidelines for contributing
Customize the look and feel
Most of the look and feel customization can be done using the user download and including the css/html override directly into index.html. If you want to change the behavior of one functionality or want to add new one, you will need to read the developer guide below.
The easiest way to find the id or path to the DOM element that you want to customize is to use your browser developer tool, read documentation for for Chrome, Safari, Firefox.
Here are some customization examples that have to be included inside a <style> element after the <body> element like below :
  ...
  <body class="claro">
     <style>
        #element {
           /* changes */
        }
     </style>
  <div id="header">
  ...
Use an image as the background of the desktop header
  #headerDesktop {
     background: url('resources/my_background.jpg');
  }
To remove the bottom border:
  #header {
     background: none !important;
  }
Customizing the links in the top right of the header
The button can now be disabled through app/swipe-config.js file and many other property are available.
To hide the text, empty the HEADER_LINK_TEXT property.
To display multiple line text, empty the HEADER_LINK_URL and configure HEADER_LINK_TEXT with html markup like
<a href='http://myorganization.com' target='_blank'>My organization</a><br /><a href='http://myorganization.com/myproject' target='_blank'>My project</a>
Customizing the header logo
The logo image can be configured through app/swipe-config.js file. To hide the logo, empty the HEADER_LOGO_URL property.
The logo dimension is constrained to 250x50px. To use more horizontal or vertical space you need to remove this restriction using:
  #headerDesktop .logo img {
     max-width: none;
     max-height: 90px;
  }
You can save 10 more px by changing the top margin of the logo:
  #headerDesktop .rightArea {
     padding-top: 15px;
  }

  #headerDesktop .logo img {
     max-width: none;
     max-height: 100px;
  }
Developer guide
This developer guide is intended to developer that wants to modify behavior or add new functionalities to the Swipe application. If you only need to customize look and feel of the application, you should be able to do so using the User download. It requires basic knowledge of HTML, Javascript and CSS languages.
Developer archive
Download and unzip the Developer download or clone the repo.
| File | Contains |
|---|---|
| Swipe/ | Swipe source folder |
| Swipe/src/ | The application source code |
| Swipe/deploy/ | The ready to be deployed Swipe application |
| Swipe/tools/ | Developer tools to build deploy/ from src/ |
| Storytelling-Swipe-1.4.4.zip | User download archive |
| Readme.pdf | The detailed readme guide |
| Readme.md | This document |
| storytelling-swipe-map-template-js.png | The application screenshot |
| license.txt | The application license |
Introduction
To build a production version of the application from the source code, you first need to install Node.js.
Then initialize the environment by running the following commands in the Swipe folder:
npm installnpm install -g grunt-cli
This will create a new node-modules folder in your project root with all tools to build the project. If you have trouble running the second command, this may help you.
How to use the application from the source code
- Make accessible the src folder to your web server
- Configure the default credential to be used to authorize you against the webmap or web application item in
storymaps/core/Core.js(look for// Automatic login in development modearound line 150) - If using a Portal for ArcGIS instance configure the sharing url
app/swipe-config.js(last properties) - If you are not using a modern browser you have to set-up a proxy on your development computer and configure the url in
app/swipe-config.js(you can use a relative path) - Use or use the URL parameters
webmapandappidto specify the item to be loaded (all parameters from index.html are ignored in development mode)
How to build application from the source code
- Open a terminal and navigate to the Swipe folder
- Run the following command:
grunt
The deploy folder now contains the built application that you can deploy to your web server.
Design
Swipe relies on AMD and Dojo loader AMD for application structure.
The application is structured as this:
| Path | Contains |
|---|---|
| app/ | Package structured Javascript and CSS source code |
| app/swipe-config.js | Configuration file (loaded at execution time) |
| app/storymaps/builder/ | Builder modules common with other storymaps templates (main module is Builder.js) |
| app/storymaps/core/ | Core modules common with other storymaps templates (main module is Core.js) |
| app/storymaps/swipe/builder/ | UI components of the interactive builder (main module is BuilderView.js) |
| app/storymaps/swipe/core/ | Core modules (main module is MainView.js) |
| app/storymaps/swipe/ui/ | UI components of the viewer grouped by target device |
| app/storymaps/swipe/ui/Responsive.css | CSS Media queries rules |
| app/storymaps/swipe/BuildConfigBuilder.js | Require.js build configuration file for the interactive builder |
| app/storymaps/swipe/BuildConfigViewer.js | Require.js build configuration file for the viewer |
| app/storymaps/ui/ | UI components common with other storymaps templates |
| app/storymaps/utils/ | Utility modules common with other storymaps templates |
| lib/ | External dependencies |
| resources/nls/ | Externalized text strings of the application |
| resources/icons/ | Icons |
The main dependencies are:
How to use the application from the source code
- Make accessible the src folder to your web server
- Edit index.html to the web map you want to use
Licensing
Copyright 2013-2017 Esri
Licensed under the Apache License, Version 2.0 (the "License"); you may not use this file except in compliance with the License. You may obtain a copy of the License at
http://www.apache.org/licenses/LICENSE-2.0
Unless required by applicable law or agreed to in writing, software distributed under the License is distributed on an "AS IS" BASIS, WITHOUT WARRANTIES OR CONDITIONS OF ANY KIND, either express or implied. See the License for the specific language governing permissions and limitations under the License.
A copy of the license is available in the repository's license.txt file.