
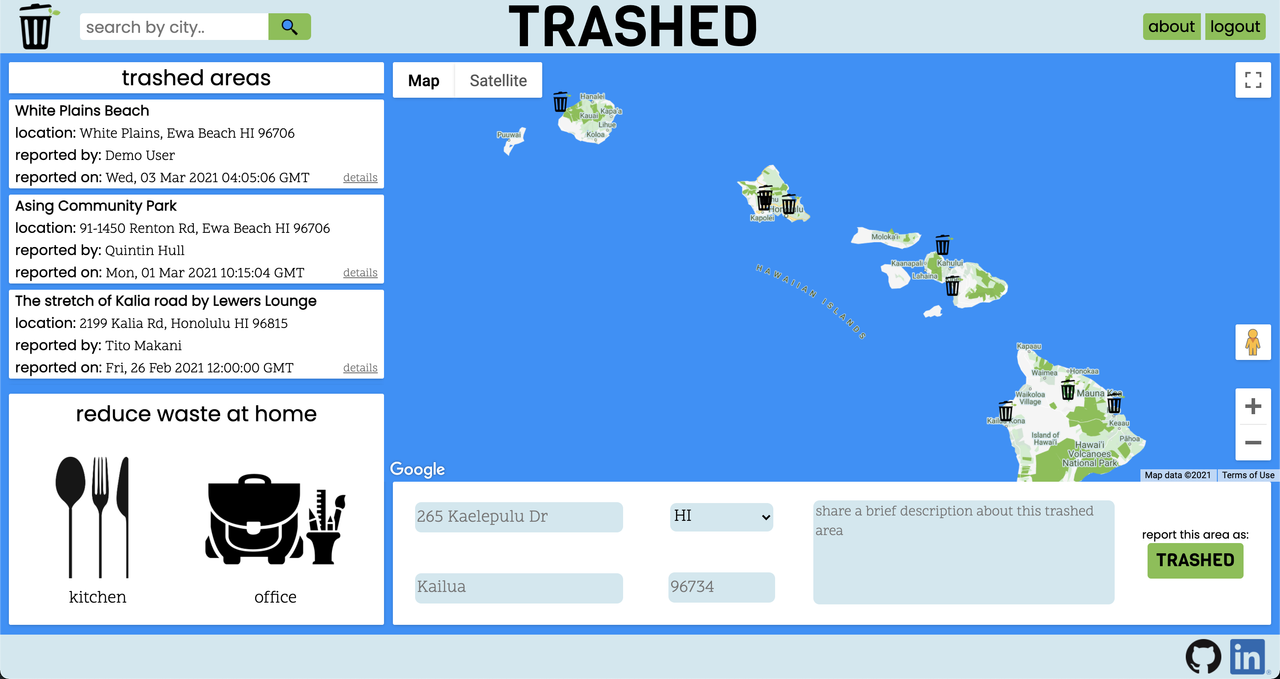
Trashed is an organizational tool for users who want to take ownership in keeping their communities clean.
Try the site live | Check out the Wiki | Visit the developers portfolio
Technologies used in Trashed
JavaScript | Python | SQLAlchemy | Flask | React | Redux
Google Maps API | Geocode API | HTML | CSS | Docker | Heroku
Features implemented
- Users can log in or sign up to access the site.
- A user has the ability to report a trashed area that displays on Google Map.
- A user has the ability to organize clean up events for a trashed area.
- The search bar can locate using a case insensitive search term and display results to the user.
- A user has the ability to post tips to share different ways to reduce waste at home.
- A user can only edit an area, event, or tip that they created.
- A user can only delete an event or tip that they created.
Challenges
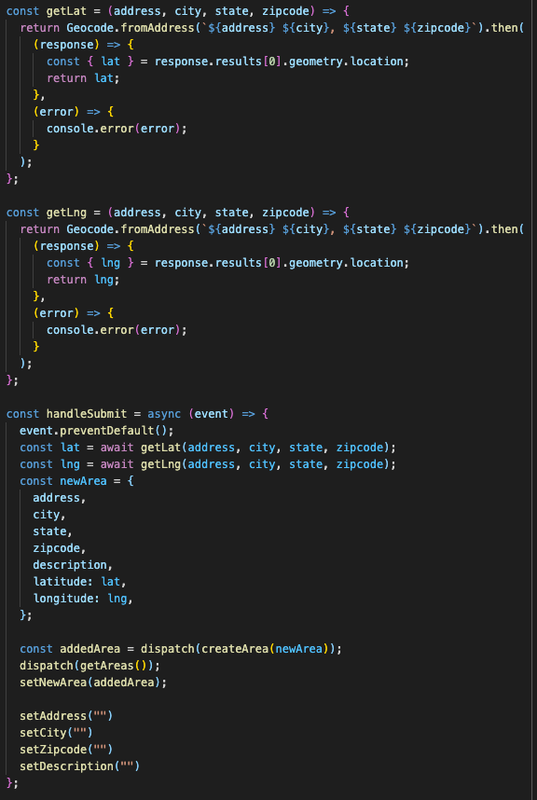
It was a challenge deciding how to allow users to interact with a map and add markers to the map that didn't require them to know the latitude and longitude of the location they wished to add. After research and looking at documentation, I decided to implement a Geocode API to obtain the latitude and longitude of each created area. Another challenging aspect of this feature was finding a way to use Geocode that would send back the latitude and longitude before the post request was sent to the back end. For my solution, I used two helper functions (one for latitude and one for longitude) that utilized Geocode.fromAddress() and passed in an interpolated string that made up the entire address provided by the user. From there I was able to call each helper function and await the results inside of an asynchronous handleSubmit() before it was sent to the appropriate thunk.
Getting started
-
Clone the repository
git clone https://github.com/QuintinHull/trashed.git
-
Install dependencies
pipenv install --dev -r dev-requirements.txt && pipenv install -r requirements.txt -
Create a .env file based on the example with proper settings for your development environment
-
Setup your PostgreSQL user, password and database and make sure it matches your .env file
-
Get into your pipenv, migrate your database, seed your database, and run your flask app
pipenv shell
flask db upgrade
flask seed all
flask run
-
To run the React App in development, checkout the README inside the
react-appdirectory.
IMPORTANT! If you add any python dependencies to your pipfiles, you'll need to regenerate your requirements.txt before deployment. You can do this by running:
pipenv lock -r > requirements.txtALSO IMPORTANT! psycopg2-binary MUST remain a dev dependency because you can't install it on apline-linux. There is a layer in the Dockerfile that will install psycopg2 (not binary) for you.
Deploy to Heroku
-
Create a new project on Heroku
-
Under Resources click "Find more add-ons" and add the add on called "Heroku Postgres"
-
Install the Heroku CLI
-
Run
heroku login
-
Login to the heroku container registry
heroku container:login
-
Update the
REACT_APP_BASE_URLvariable in the Dockerfile. This should be the full URL of your Heroku app: i.e. "https://flask-react-aa.herokuapp.com" -
Push your docker container to heroku from the root directory of your project. This will build the dockerfile and push the image to your heroku container registry
heroku container:push web -a {NAME_OF_HEROKU_APP} -
Release your docker container to heroku
heroku container:release web -a {NAME_OF_HEROKU_APP} -
set up your database:
heroku run -a {NAME_OF_HEROKU_APP} flask db upgrade heroku run -a {NAME_OF_HEROKU_APP} flask seed all -
Under Settings find "Config Vars" and add any additional/secret .env variables.