yasirkula / Unityionicintegration
Projects that are alternatives of or similar to Unityionicintegration
Unity Ionic Integration (with Vuforia support)
This tutorial will show you how to integrate your Unity app into an Ionic app and send messages between them (optional). It is tested on a medium-scale commercial Unity project with Vuforia plugin (optional).
Before we start, I'd like to give credits to these other guides that helped me overcome some challenges I've faced along the way:
- https://docs.google.com/document/d/1V8eh5Gh2O0fNc4gOvqdpLOwO9VvRrR0dP8EN2YAcb88/edit
- https://github.com/keyv/iOSUnityVuforiaGuide
- https://bitbucket.org/jack_loverde/unity-5-vuforia-6-and-ios-native-integration/src/418c4923eeac?at=master
- https://the-nerd.be/2014/08/07/call-methods-on-unity3d-straight-from-your-objective-c-code/
Also, a special thanks to all who contributed to the development of this plugin :)
System Requirements
- Android: Android Studio
- iOS: Xcode
- Ionic: tested on
ionic info:
Cordova CLI: 6.5.0
Ionic Framework Version: 3.3.0
Ionic CLI Version: 2.2.1
Ionic App Lib Version: 2.2.0
Ionic App Scripts Version: 1.3.7
ios-deploy version: 1.9.1
ios-sim version: 5.0.13
OS: macOS Sierra
Node Version: v6.9.5
Xcode version: Xcode 8.3.3 Build version 8E3004b
For future versions of Ionic, you may have to use ionic cordova platform add instead of ionic platform add, ionic cordova plugin add instead of ionic plugin add and so on.
If you are using Unity 2017.3.0+ and Vuforia, check out this topic for possible issues that you may encounter during the integration process: https://github.com/yasirkula/UnityIonicIntegration/issues/16
If you are using VideoPlayer component and it stops working after integration, check out this topic: https://github.com/yasirkula/UnityIonicIntegration/issues/18
Ionic-side Setup
- First things first, you should import the plugin into your Ionic app using the following command:
ionic plugin add https://github.com/yasirkula/UnityIonicIntegration.git - Now, you can launch Unity from your Ionic app using the following code snippet (TypeScript):
import ...

// Should put declare before any @Component's
declare let unityARCaller: any;

@Component({
  ...
})

export class ...
{
	constructor() {
		...
	}

	openUnity() {
		// It is possible to send a string message to Unity-side (optional)
		unityARCaller.launchAR( "my message for Unity-side", this.uReturnedFromUnity, this.uMessageReceivedFromUnity );
	}

	sendMessageToUnity() {
		// Send a message to Unity while Unity is still running
		unityARCaller.sendMessage( "Function name", "Optional parameter" );
	}

	uReturnedFromUnity = (param) => {
		// param:String is the (optional) message returned from Unity-side
		alert( param );
	};

	uMessageReceivedFromUnity = (message) => {
		// message:String is the message received from Unity-side
		// If you call a UI-blocking function here like 'alert', subsequent messages from Unity
		// will be queued by the OS and will only be received after returning to Ionic and
		// unblocking the UI
		console.log( "=========" + message + "=========" );
	};
}
NOTE: to access the plugin from Javascript, use window.unityARCaller.
-
All you have to do is call
launchAR( parameter, onReturnedToIonicCallback, onMessageReceivedCallback )function whenever you want to show Unity content. Here, parameter is the optional String parameter that is passed to Unity right after it is launched (see Unity-side Setup). Upon returning to Ionic from Unity, onReturnedToIonicCallback is triggered with an (optional) String parameter param that is returned from the Unity-side -
Unity and Ionic can keep communicating even while Unity view/activity is active. You can call a function on Unity-side from Ionic using the
unityARCaller.sendMessage( "Function name", "Optional parameter" );function and, if you want, send a message back to Ionic (see Unity-side Setup) that triggers onMessageReceivedCallback
NOTE: on Android platform, if device runs out of memory while running the Unity activity, the Ionic activity is stopped and then automatically restarted by Android OS upon returning to Ionic from Unity. In that case, unfortunately, onReturnedToIonicCallback can not be called.
Unity-side Setup
- Import IonicComms.cs script (available in files directory of this git repo) into your project. You don't have to attach this script to any GameObject but feel free to do it if you want to assign some references to it through Inspector. Just be aware that there can only be a single living instance of IonicComms component at a time and if you want to attach it manually to a GameObject, you must do it in the first scene of your project
- If you had passed a String message from Ionic to Unity in launchAR function, it will be available in the OnMessageReceivedFromIonic function in IonicComms.cs
- You can call functions that you define inside IonicComms.cs from Ionic with unityARCaller.sendMessage function. Although the parameter passed to sendMessage is optional, your C# function must have the following signature:
public void FunctionName( string message ); - You can send messages from Unity to Ionic runtime using
IonicComms.SendMessageToIonic( "my message" ) - When you want to return to Ionic from Unity-side, just call
IonicComms.FinishActivity()function (or, optionally,IonicComms.FinishActivity( "return value" )to send back a return value) - SO, DO NOT USE Application.Quit() ANYMORE!
- for Vuforia users: disable Auto Graphics API in Player Settings and remove everything but OpenGLES2
- for Android: open Build Settings and set Build System to Gradle (New). Then, select the Export Project option and click Export button to export your Unity project as a Gradle project to an empty folder
- for iOS: put uIonicComms.mm file found in files directory of this repo into Assets/Plugins/iOS folder of your Unity project (create the Plugins and iOS folders, if they do not exist)
- for iOS: in Player Settings, set Scripting Backend to IL2CPP and then simply build your project to an empty folder
Android Steps
NOTE: see the following topic if your Unity Android project has any gradle dependencies and the Android Studio steps below yield a Failed to resolve: error: https://github.com/yasirkula/UnityIonicIntegration/issues/21
- Build your Ionic project using
ionic build android(useionic platform add android, if Android platform is not added yet) - Open platforms/android folder inside your Ionic project's path with Android Studio
- Open settings.gradle and insert the following lines (don't forget to change the path in the second line!):
include ':UnityProject'
project(':UnityProject').projectDir = new File('C:\\absolute path\\to your\\unity export folder')
- Open build.gradle of android module and insert the following line into dependencies, where all the other compile command(s) are located at:
compile project(':UnityProject')

- Click Sync now (top-right) and wait until Android Studio yields an error
- In build.gradle of UnityProject module, change
apply plugin: 'com.android.application'toapply plugin: 'com.android.library' - Inside jniLibs folder of android module, delete unity-classes.jar, if exists
- Click Sync now again and wait for another error
- If you receive the message "Error: Library projects cannot set applicationId..." inside build.gradle of UnityProject module, delete the line
applicationId 'com.your_unity_bundle_identifier'and click Sync now again - Inside manifests folder of android module, open AndroidManifest.xml and switch to Merged Manifest tab
- Click on the "Suggestion: add 'tools:replace="android:icon"' to <application> element at AndroidManifest.xml to override" text
- Open AndroidManifest.xml of UnityProject module and switch to Text tab
- Remove the
<activity>...</activity>with the following intent:
<intent-filter>
	<action android:name="android.intent.action.MAIN" />
	<category android:name="android.intent.category.LAUNCHER" />
</intent-filter>
- Now you can Run the android module

- If you receive a "Could not find method compile()" error, see: https://github.com/yasirkula/UnityIonicIntegration/issues/52
NOTE: if you are able to build your Ionic project successfully the first time but not the second time, remove the Android platform using ionic platform remove android and add it again using ionic platform add android.
About 64-bit ARM, x86 and x64 Android Devices
As of now, Unity has a native library for 32-bit ARM and x86 architectures only. However, Unity applications do run on 64-bit ARM and x64 architectures as 64-bit ARM architecture natively supports 32-bit ARM applications and x64 architecture natively support x86 applications. This is valid as long as there are no 64-bit ARM or x64 plugins in your project and all your plugins have both 32-bit ARM and x86 libraries. Otherwise, you will receive a "Failure to initialize! Your hardware does not support this application, sorry!" error while launching Unity content. To avoid this issue, you must ensure the following criteria:
- If there are any arm64-v8a, armeabi or x86_64 folders in the jniLibs directory of your Android Studio project, simply delete these folders. Your application will not be affected by this change as long as plugins in these folders have libraries in armeabi-v7a and x86 folders, as well
- If there is any plugin in your project that has a library in armeabi-v7a folder but not in x86 folder (like Vuforia, unfortunately), you have to make the following decision:
- either don't touch anything and your Ionic application will run on all architectures but the Unity content will not launch on Intel architecture devices (x86 and x64)
- or delete the x86 folder and both your Ionic application and the Unity content will run on all ARM architectures as well as on Intel architectures that support emulating ARM applications (also note that Unity 2019.3+ no longer supports x86)
If you want consistency for your app, go with the second option.
Troubleshooting
Activity has leaked IntentReceiver org.apache.cordova.plugin.CordovaUnityLauncher$UnityToIonicBroadcastReceiver that was originally registered here. Are you missing a call to unregisterReceiver()?
See: https://github.com/yasirkula/UnityIonicIntegration/issues/61
Unity : Failed to load 'libmain.so', the application will terminate.
Disable Strip Engine Code in Player Settings (source).
iOS Steps
IMPORTANT NOTICE: make sure that the paths to your Ionic project and Unity build directory do not contain any space characters.
- Build your Ionic project using
sudo ionic build ios(usesudo ionic platform add ios, if iOS platform is not added yet). If you receive the following error at the end, it means the build was successful, no worries: Signing for "MyIonicProject" requires a development team. Select a development team in the project editor. - (optional) use command
sudo chmod -R 777 .to give full read/write access to the project folder in order to avoid any permission issues in Xcode - Open platforms/ios folder inside your Ionic project's path with Xcode (open wcworkspace, not xcodeproj)
- In Plugins/unityARCaller.m, uncomment the (void)launchAR and (void)sendMessage functions
- Rename Classes/AppDelegate.m to Classes/AppDelegate.mm (changed .m to .mm) and Other Sources/main.m to Other Sources/main.mm
- Change the contents of Classes/AppDelegate.h with the AppDelegate.h found in files directory of this repo
- Change the contents of Classes/AppDelegate.mm with the AppDelegate.mm found in files directory of this repo
-
for Vuforia users: in AppDelegate.mm, uncomment the lines marked with
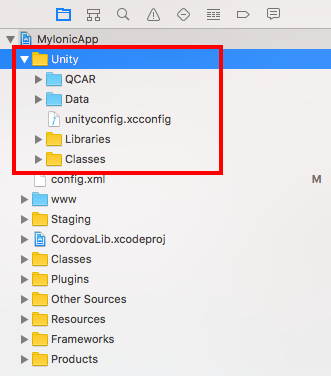
//for vuforia: - Create a group called Unity in your project

- Drag&drop the Classes and Libraries folders from the Unity build directory to the Unity group in Xcode; select Create groups and deselect Copy items if needed (importing Classes might take quite some time)
- Drag&drop the unityconfig.xcconfig config file found in files directory of this repo to the Unity group in Xcode; select Create groups and deselect Copy items if needed
- Drag&drop the Data folder from the Unity build directory to the Unity group in Xcode; select Create folder references and deselect Copy items if needed
- for Vuforia users: drag&drop the Data/Raw/QCAR folder from the Unity build directory to the Unity group in Xcode; select Create folder references and deselect Copy items if needed
- Remove the Libraries/libil2cpp folder in Unity group from your Xcode project using Remove References
- Remove the Libraries/Plugins/Android folder (if exists) in Unity group from your Xcode project using Remove References
- In Configurations of your project, set all the configurations as unityconfig

- In Build Settings, set the value of UNITY_IOS_EXPORTED_PATH to the path of your Unity iOS build directory (do this for PROJECT and the TARGETS)

- In Build Settings, select Prefix Header and press Delete to revert its value back to the default value (in case it is overridden)(do this for PROJECT and the TARGETS)(if Prefix Header becomes blank after this step, apply this fix: https://github.com/yasirkula/UnityIonicIntegration/issues/12#issuecomment-389437474)
- Open Classes/UnityAppController.h in Unity group and find the following function:
inline UnityAppController* GetAppController()
{
	return (UnityAppController*)[UIApplication sharedApplication].delegate;
}
- Then, replace it with this one:
NS_INLINE UnityAppController* GetAppController()
{
	NSObject<UIApplicationDelegate>* delegate = [UIApplication sharedApplication].delegate;
	UnityAppController* currentUnityController = (UnityAppController *)[delegate valueForKey:@"unityController"];
	return currentUnityController;
}
- Open Classes/UnityAppController.mm in Unity group, and replace
- (void)shouldAttachRenderDelegate {}with the following function:
- (void)shouldAttachRenderDelegate {
    AppDelegate *delegate = (AppDelegate *)[UIApplication sharedApplication].delegate;
    [delegate shouldAttachRenderDelegate];
}
- Add
#import "AppDelegate.h"to the top of Classes/UnityAppController.mm - Change the contents of Other Sources/main.mm with Classes/main.mm (located in Unity group) and replace
const char* AppControllerClassName = "UnityAppController";withconst char* AppControllerClassName = "AppDelegate";(in Other Sources/main.mm)

- Remove Classes/main.mm in Unity group from your Xcode project using Remove References
-
for Vuforia users: in Libraries/Plugins/iOS/VuforiaNativeRendererController.mm in Unity group, comment the line
IMPL_APP_CONTROLLER_SUBCLASS(VuforiaNativeRendererController) - Sign and build your project (it is advised to build to an actual iOS device rather than to emulator to possibly avoid some errors during the build phase)
NOTE: if you encounter an error like "cordova/cdvviewcontroller.h' file not found" while building, try adding "$(OBJROOT)/UninstalledProducts/$(PLATFORM_NAME)/include" to Header Search Paths in Build Settings (do this for PROJECT and the TARGETS)