sungchun12 / Airflow Toolkit
Programming Languages
Projects that are alternatives of or similar to Airflow Toolkit
![]()
SAME AIRFLOW DATA PIPELINES | WHEREVER YOU RUN THEM
airflow-toolkit 🚀
![]()
![]()
Any Airflow project day 1, you can spin up a local desktop Kubernetes Airflow environment AND a Google Cloud Composer Airflow environment with working example DAGs across both ✨
Motivations
It is a painful exercise to setup secure airflow environments with parity(local desktop, dev, qa, prod). Too often, I've done all this work in my local desktop airflow environment only to find out the DAGs don't work in a Kubernetes deployment or vice versa. As I got more hands-on with infrastructure/networking, I was performing two jobs: Data and DevOps engineer. Responsibilities overlap and both roles are traditionally ill-equipped to come to consensus. Either the networking specifics go over the Data engineer's head and/or the data pipeline IAM permissions and DAG idempotency go over the DevOps engineer's head. There's also the issue of security and DevOps saying that spinning up an airflow-dev-cloud-environment is too risky without several development cycles to setup bastion hosts, subnets, private IPs, etc. These conversations alone can lead to several-weeks delays before you can even START DRAFTING airflow pipelines! It doesn't have to be this way.
This toolkit is for BOTH Data and DevOps engineers to solve the problems above 😲
High-Level Success Criteria:
- Deploy airflow in 4 environments(local desktop, dev, qa, prod) in ONE day with this repo(save 4-5 weeks of development time)
- Confidence that base DAG integration components work based on successful example DAGs(save 1-2 weeks of development time)
- Simple setup and teardown for all toolkits and environments
- It FEELS less painful to iteratively develop airflow DAG code AND infrastructure as code
- Secure and private environments by default
- You are inspired to automate other painful parts of setting up airflow environments for others
Use Cases
In Scope
- Airflow works on local computer with docker desktop installed
- Run meaningful example DAGs with passing unit and integration tests
- Easily setup and teardown any environment
- Sync DAGs real-time with local git repo directory(local desktop)
- Reusable configs in another kubernetes cluster
- Same DAGs work in both local desktop computer and Google Cloud Composer
- Secure cloud infrastructure and network(least privliges access and minimal public internet touchpoints)
- Low cost/Free(assumes you have Google Cloud free-trial credits)
Out of Scope
- Written end to end DAG tests as the dry runs are sufficient for this repo's scope
-
terratestfor terraform unit testing - DAGs relying on external data sources outside this repo
- Hyper-specific IAM permission mechanics as it depends on your specific situation
Table of Contents
- Pre-requisites
- Toolkit #1: Local Desktop Kubernetes Airflow Deployment
- Toolkit #2: Terragrunt-Driven Terraform Deployment to Google Cloud
- Toolkit #3: Simple Terraform Deployment to Google Cloud
- Post-Deployment Instructions for Toolkits #2 & #3
- Git Repo Folder Structure
- Frequently Asked Questions(FAQ)
- Resources
Prerequisites
Time to Complete: 5-10 minutes
-
Sign up for a free trial OR use an existing GCP account
-
Manually FORK the repo through the github interface OR CLONE this repo:
git clone https://github.com/sungchun12/airflow-toolkit.git
-
Create a new Google Cloud project
-
Get into starting position for deployment:
cd airflow-toolkit/


One Time Setup for All Toolkits
Time to Complete: 10-15 minutes
-
Download docker desktop and start docker desktop
-
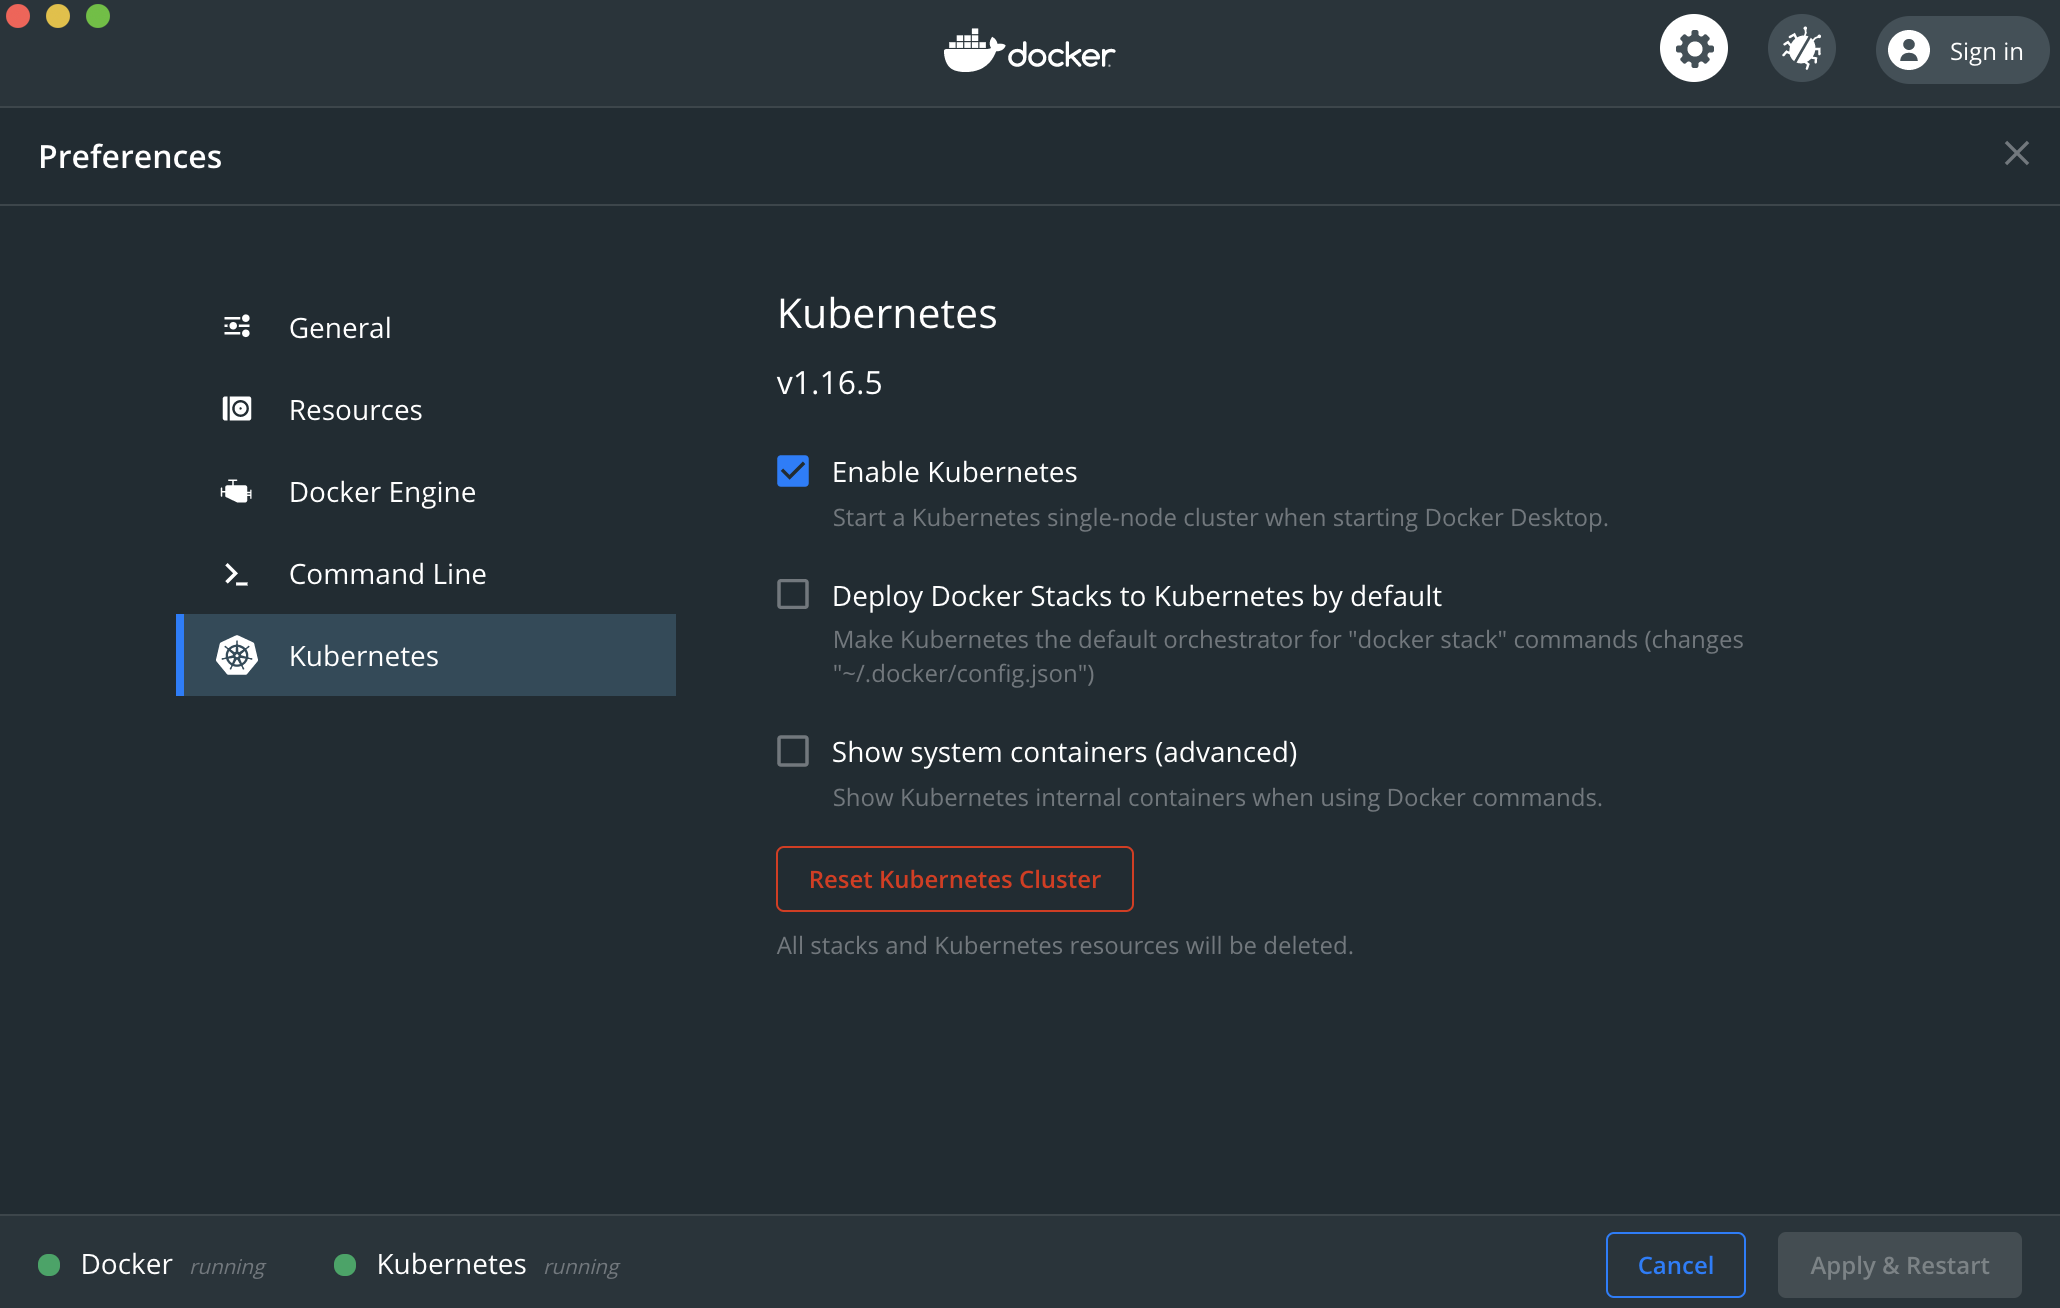
Customize Docker Desktop for the below settings
-
Click
Apply & Restartwhere appropriate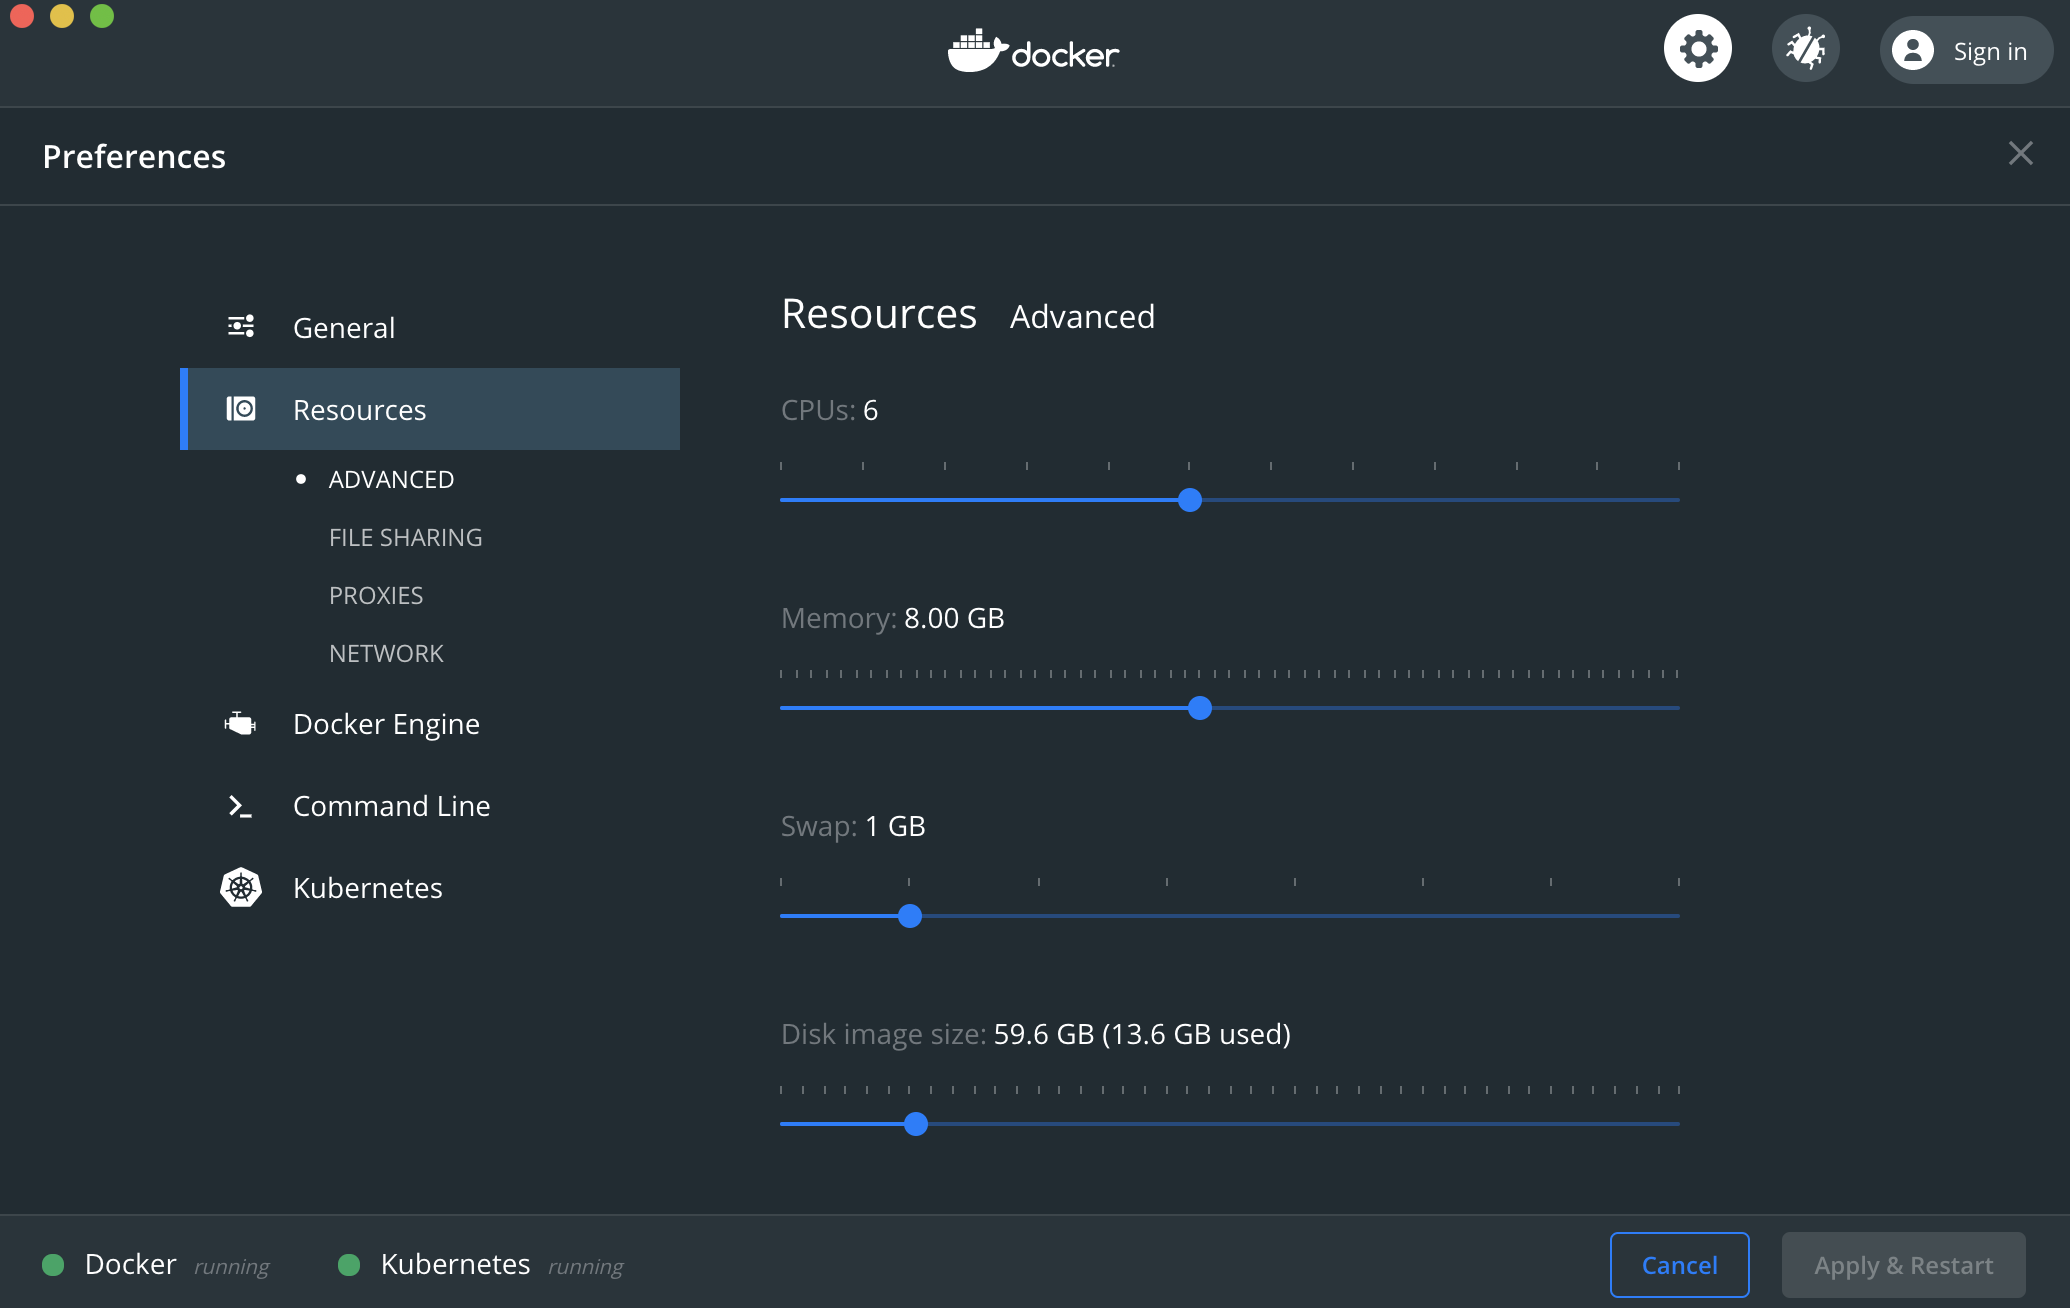
-
Run the below commands in your terminal


# install homebrew
/bin/bash -c "$(curl -fsSL https://raw.githubusercontent.com/Homebrew/install/master/install.sh)"

# install helm, terragrunt, terraform, kubectl to local desktop
brew install helm terragrunt terraform kubectl

# Install Google Cloud SDK and follow the prompts
# https://cloud.google.com/sdk/install
curl https://sdk.cloud.google.com | bash
-
Close the current terminal and start a new one for the above changes to take effect
-
Add the
Editor,Secret Manager Admin,Role Administrator, andSecurity AdminrolesNote: this provides wide permissions for the purposes of this demo, this will need to be updated based on your specific situation
-
Create a Service Account Key JSON File-should automatically download
-
Move private
JSONkey into the root directory of this git repo you just cloned and rename itaccount.json(don't worry it will be officiallygitignored) -
Run the below commands in your local desktop terminal
# Authenticate gcloud commands with service account key file
gcloud auth activate-service-account --key-file account.json

# Enable in scope Google Cloud APIs
gcloud services enable \
    compute.googleapis.com \
    iam.googleapis.com \
    cloudresourcemanager.googleapis.com \
    bigquery.googleapis.com \
    storage-component.googleapis.com \
    storage.googleapis.com \
    container.googleapis.com \
    containerregistry.googleapis.com \
    composer.googleapis.com \
    secretmanager.googleapis.com

# Store contents of private service account key in Secrets Manager to be used by airflow later within the `add_gcp_connections.py` DAG
# Create a secrets manager secret from the key
gcloud secrets create airflow-conn-secret \
    --replication-policy="automatic" \
    --data-file=account.json

# List the secret
gcloud secrets list

# verify secret contents ad hoc
gcloud secrets versions access latest --secret="airflow-conn-secret"

# if you run the below toolkits multiple times, there may be times where you'll have to delete and recreate the secret
gcloud secrets delete airflow-conn-secret

# Optional: install specific Google Cloud version of kubectl
# The homebrew installation earlier above will suffice
# ┌──────────────────────────────────────────────────────────────────┐
# │               These components will be installed.                │
# ├─────────────────────┬─────────────────────┬──────────────────────┤
# │         Name        │       Version       │         Size         │
# ├─────────────────────┼─────────────────────┼──────────────────────┤
# │ kubectl             │             1.15.11 │              < 1 MiB │
# │ kubectl             │             1.15.11 │             87.1 MiB │
# └─────────────────────┴─────────────────────┴──────────────────────┘
gcloud components install kubectl

# Configure Docker
gcloud auth configure-docker

# Create SSH key pair for secure git clones
ssh-keygen
- Copy and paste contents of command below to your git repo SSH keys section
cat ~/.ssh/id_rsa.pub
-
Manually create a
cloud source mirror repobased on the GitHub repoNote: documented to not be possible through the current state API-further reading
-
Replace all relevant variables within
dags/folder
# file location
# /airflow-toolkit/dags/add_gcp_connections.py
CONN_PARAMS_DICT = {
    "gcp_project": "wam-bam-258119", # replace with your specific project
    "gcp_conn_id": "my_gcp_connection",
    "gcr_conn_id": "gcr_docker_connection",
    "secret_name": "airflow-conn-secret",
}

# file location
# /airflow-toolkit/dags/bigquery_connection_check.py
TASK_PARAMS_DICT = {
    "dataset_id": "dbt_bq_example",
    "project_id": "wam-bam-258119", # replace with your specific project
    "gcp_conn_id": "my_gcp_connection",
}


# file location
# /airflow-toolkit/dags/airflow_utils.py
GIT_REPO = "github_sungchun12_airflow-toolkit" # replace with the cloud source mirror repo name
PROJECT_ID = "wam-bam-258119" # replace with your specific project
After doing the above ONCE, you can run the below toolkits multiple times with the same results(idempotent)
Toolkit #1: Local Desktop Kubernetes Airflow Deployment
Time to Complete: 5-8 minutes
Note: This was ONLY tested on a Mac desktop environment
System Design

Specific Use Cases
- Free local dev environment
- Customize local cluster resources as needed
- Rapid DAG development without waiting for an equivalent cloud environment to sync DAG changes
- Experiment with a wider array of customization and permissions
- Minimal knowledge of kubernetes and helm required
How to Deploy
General Mechanics
shell script logs will generate similar mechanics
- Set environment variables
- Build and push a custom dbt docker image
- Copy Docker for Desktop Kube Config into git repo
- Download stable helm repo
- Setup Kubernetes airflow namespace
- Create Kubernetes Secrets for the local cluster to download docker images from Google Container Registry based on Service Account
- Create Kubernetes Secrets for dbt operations based on Service Account and ssh-keygen, to be used later in KubernetesPodOperator
- Setup and Install Airflow Kubernetes Cluster with Helm
- Wait for the Kubernetes Cluster to settle
- Open airflow UI webserver from terminal
Note: I plan to automate this yaml setup in a future feature
- Manually update the extraVolumes section within
custom-setup.yaml, starting atline 174 - Run
pwdin your terminal from the rootairflow-toolkit/directory and replace all the<YOUR GIT REPO DIRECTORY HERE>placeholders
extraVolumes: # this will create the volume from the directory
  - name: dags
    hostPath:
      path: <YOUR GIT REPO DIRECTORY HERE>/dags/
  - name: dag-environment-configs
    hostPath:
      path: <YOUR GIT REPO DIRECTORY HERE>/dag_environment_configs/
  - name: kube-config
    hostPath:
      path: <YOUR GIT REPO DIRECTORY HERE>/.kube/
  - name: service-account
    hostPath:
      path: <YOUR GIT REPO DIRECTORY HERE>/account.json
  - name: tests
    hostPath:
      path: <YOUR GIT REPO DIRECTORY HERE>/tests/

# example below
extraVolumes: # this will create the volume from the directory
  - name: dags
    hostPath:
      path: /Users/sung/Desktop/airflow-toolkit/dags/
  - name: dag-environment-configs
    hostPath:
      path: /Users/sung/Desktop/airflow-toolkit/dag_environment_configs/
  - name: kube-config
    hostPath:
      path: /Users/sung/Desktop/airflow-toolkit/.kube/
  - name: service-account
    hostPath:
      path: /Users/sung/Desktop/airflow-toolkit/account.json
  - name: tests
    hostPath:
      path: /Users/sung/Desktop/airflow-toolkit/tests/
- Run the below commands in your terminal
#!/bin/bash
# follow terminal prompt after entering below command
# leave this terminal open to sustain airflow webserver
# Set of environment variables
export ENV="dev"
export PROJECT_ID="airflow-demo-build"
export DOCKER_DBT_IMG="gcr.io/$PROJECT_ID/dbt_docker:$ENV-latest"

source deploy_local_desktop_airflow.sh
- Turn on all the DAGs using the on/off button on the left side of the UI
- After waiting a couple minutes, all the DAGs should succeed
Note:
bigquery_connection_checkwill fail unlessadd_gcp_connectionssucceeds first

Note: the airflow webserver may freeze given resource limitations
press
ctrl + cwithin the terminal where you ran the deploy script
Run the below commands in your terminal(these already exist within the deploy script)
# view airflow UI
export POD_NAME=$(kubectl get pods --namespace airflow -l "component=web,app=airflow" -o jsonpath="{.items[0].metadata.name}")

echo "airflow UI webserver --> http://127.0.0.1:8080"

kubectl port-forward --namespace airflow $POD_NAME 8080:8080
- Open a SEPARATE terminal and run the below commands
# start a remote shell in the airflow worker for ad hoc operations or to run pytests
kubectl exec -it airflow-worker-0 -- /bin/bash
- Airflow worker remote shell examples
➜  airflow-toolkit git:(feature-docs) ✗ kubectl exec -it airflow-worker-0 -- /bin/bash

# list files in current working directory
[email protected]:/opt/airflow$ ls
airflow.cfg  dag_environment_configs  dags  logs  tests  unittests.cfg

# run all test scripts
[email protected]:/opt/airflow$ pytest -vv --disable-pytest-warnings
======================================== test session starts ========================================
platform linux -- Python 3.6.10, pytest-5.4.3, py-1.9.0, pluggy-0.13.1 -- /usr/local/bin/python
cachedir: .pytest_cache
rootdir: /opt/airflow
plugins: celery-4.4.2
collected 19 items

tests/test_add_gcp_connections.py::test_import_dags PASSED                                    [  5%]
tests/test_add_gcp_connections.py::test_contains_tasks PASSED                                 [ 10%]
tests/test_add_gcp_connections.py::test_task_dependencies PASSED                              [ 15%]
tests/test_add_gcp_connections.py::test_schedule PASSED                                       [ 21%]
tests/test_add_gcp_connections.py::test_task_count_test_dag PASSED                            [ 26%]
tests/test_add_gcp_connections.py::test_tasks[t1] PASSED                                      [ 31%]
tests/test_add_gcp_connections.py::test_tasks[t2] PASSED                                      [ 36%]
tests/test_add_gcp_connections.py::test_end_to_end_pipeline SKIPPED                           [ 42%]
tests/test_dbt_example.py::test_import_dags PASSED                                            [ 47%]
tests/test_dbt_example.py::test_contains_tasks PASSED                                         [ 52%]
tests/test_dbt_example.py::test_task_dependencies PASSED                                      [ 57%]
tests/test_dbt_example.py::test_schedule PASSED                                               [ 63%]
tests/test_dbt_example.py::test_task_count_test_dag PASSED                                    [ 68%]
tests/test_dbt_example.py::test_dbt_tasks[dbt_debug] PASSED                                   [ 73%]
tests/test_dbt_example.py::test_dbt_tasks[dbt_run] PASSED                                     [ 78%]
tests/test_dbt_example.py::test_dbt_tasks[dbt_test] PASSED                                    [ 84%]
tests/test_dbt_example.py::test_end_to_end_pipeline SKIPPED                                   [ 89%]
tests/test_sample.py::test_answer PASSED                                                      [ 94%]
tests/test_sample.py::test_f PASSED                                                           [100%]

============================= 17 passed, 2 skipped, 1 warning in 39.77s =============================

# list DAGs
[email protected]:/opt/airflow$ airflow list_dags
[2020-08-18 19:17:09,579] {__init__.py:51} INFO - Using executor CeleryExecutor
[2020-08-18 19:17:09,580] {dagbag.py:396} INFO - Filling up the DagBag from /opt/airflow/dags
Set custom environment variable GOOGLE_APPLICATION_CREDENTIALS for deployment setup: local_desktop
Set custom environment variable GOOGLE_APPLICATION_CREDENTIALS for deployment setup: local_desktop


-------------------------------------------------------------------
DAGS
-------------------------------------------------------------------
add_gcp_connections
bigquery_connection_check
dbt_example
kubernetes_sample
tutorial

# import, get, set airflow variables
[email protected]:/opt/airflow$ airflow variables --import /opt/airflow/dag_environment_configs/test_airflow_variables.json
1 of 1 variables successfully updated.
[email protected]:/opt/airflow$ airflow variables --get test_airflow_variable

do you see this?
[email protected]:/opt/airflow$ airflow variables --set test_airflow_variable "lovely"
[email protected]:/opt/airflow$ airflow variables --get test_airflow_variable
lovely
How to Destroy
Time to Complete: 1-2 minutes
#!/bin/bash
source teardown_local_desktop_airflow.sh
- Example terminal output
➜  airflow-toolkit git:(feature-docs) ✗ source teardown_local_desktop_airflow.sh
***********************
Delete Kuberenetes Cluster Helm Deployment and Secrets
***********************
release "airflow" uninstalled
kill: illegal process id: f19
secret "dbt-secret" deleted
secret "gcr-key" deleted
secret "ssh-key-secret" deleted
namespace "airflow" deleted
How to give local desktop airflow more horsepower 🐴
Tradeoffs
Pros
- Simple setup and no need to worry about manually destroying airflow cloud infrastructure
- Free(minimal to no charges to your Google Cloud account)
- Same example DAGs work as is in cloud infrastructure setup
- Minimal kubernetes/helm skills required to start
- Ability to scale infrastructure locally(ex: add more worker pods)
- Run
pytestdirectly within this setup
Cons
- Limited to how much processing power and storage you have on your local desktop machine
- Airflow webserver can freeze occasionally and requires quick restart
General Kubernetes Concepts
- The local desktop airflow kubernetes cluster will use the service account within the
airflownamespace to pull the image from Google Container Registry based on the manually created secret:gcr-key
kubectl get serviceaccounts

NAME      SECRETS   AGE
airflow   1         43m
default   1         43m
- The
KubernetesPodOperatorwill pull the docker image based on the permissions above BUT will rundbtoperations based on the manually created secret:dbt-secret
kubectl get secrets

NAME                            TYPE                                  DATA   AGE
airflow-postgresql              Opaque                                1      50m
airflow-redis                   Opaque                                1      50m
airflow-token-zfpz8             kubernetes.io/service-account-token   3      50m
dbt-secret                      Opaque                                1      50m
default-token-pz55g             kubernetes.io/service-account-token   3      50m
gcr-key                         kubernetes.io/dockerconfigjson        1      50m
sh.helm.release.v1.airflow.v1   helm.sh/release.v1                    1      50m
View Local Kubernetes Dashboard
Optional: Detailed resource management view for local desktop
# install kubernetes dashboard
kubectl apply -f https://raw.githubusercontent.com/kubernetes/dashboard/v2.1.0/aio/deploy/recommended.yaml

# start the web server
kubectl proxy

# view the dashboard
open http://localhost:8001/api/v1/namespaces/kubernetes-dashboard/services/https:kubernetes-dashboard:/proxy#/login

# copy and paste the token output into dashboard UI
kubectl -n kube-system describe secret $(kubectl -n kube-system get secret | awk '/^deployment-controller-token-/{print $1}') | awk '$1=="token:"{print $2}'

Enter
ctrl + cwithin the terminal where you ran the kubernetes dashboard script to close it
Toolkit #2: Terragrunt-Driven Terraform Deployment to Google Cloud
Follow Post-Deployment Instructions for Toolkits #2 & #3 instructions AFTER deployment
Time to Complete: 50-60 minutes(majority of time waiting for cloud composer to finish deploying)
Note: This follows the example directory structure provided by terragrunt with modules housed in the same git repo-further reading
Do NOT run this in parallel with toolkit #3 as default variables will cause conflicts
System Design

terraform state will be split into multiple files per module
Terragrunt Resources
- Keep your Terraform code DRY
- Relative Paths
- Handling Dependencies
- Terraform force unlock
- Third Party Reasons to use terragrunt
- Managing Terraform Secrets
- Google Provider Documentation
Specific Use Cases
- Low cost Google Cloud dev airflow dev environment($10-$20/day)
- Test local desktop DAGs against cloud infrastructure that will have more parity with qa and prod environments
- Add more horsepower to your data pipelines
- Infrastructure as code that is DevOps friendly with terraform modules that do NOT change or duplicate, only terragrunt configs change
How to Deploy
Read Post-Deployment Instructions for Toolkits #2 & #3 after this deployment
- Create a service account secret to authorize the terragrunt/terraform deployment
#!/bin/bash
# create a secrets manager secret from the key
gcloud secrets create terraform-secret \
    --replication-policy="automatic" \
    --data-file=account.json

# List the secret
# example terminal output
# NAME                 CREATED              REPLICATION_POLICY  LOCATIONS
# airflow-conn-secret  2020-08-18T19:45:50  automatic           -
# terraform-secret     2020-08-12T14:34:50  automatic           -
gcloud secrets list


# verify secret contents ad hoc
gcloud secrets versions access latest --secret="terraform-secret"
- replace important terragrunt configs for your specific setup
# file location
# /airflow-toolkit/terragrunt_infrastructure_live/non-prod/account.hcl

locals {
  project               = "wam-bam-258119" # replace this with your specific project
  service_account_email = "[email protected]" # replace this with your specific service account email
}

# file location
# /airflow-toolkit/terragrunt_infrastructure_live/terragrunt.hcl

remote_state {
  backend = "gcs"
  generate = {
    path      = "backend.tf"
    if_exists = "overwrite"
  }
  config = {
    project     = "${local.project}"
    location    = "${local.region}"
    credentials = "${local.credentials_file}"
    bucket      = "secure-bucket-tfstate-airflow-infra-${local.region}" # replace with something unique BEFORE `-${local.region}`
    prefix      = "${path_relative_to_include()}"
  }
}
#!/bin/bash
# assumes you are already in the the repo root directory
cd terragrunt_infrastructure_live/non-prod/us-central1/dev/

# export the Google Cloud project ID where the secrets live-to be used by terragrunt
# example: export PROJECT_ID="wam-bam-258119"
export PROJECT_ID=<your project id>

gcloud config set project $PROJECT_ID #TODO: add this step to the CICD pipeline rather than the get secret shell script

# this has mock outputs to emulate module dependencies with a prefix "mock-"
# OR you can run a more specific plan
# terragrunt run-all plan -out=terragrunt_plan
# --terragrunt-non-interactive flag if this is run for the first time to create the state gcs bucket without a prompt
# https://github.com/gruntwork-io/terragrunt/issues/486
terragrunt run-all plan --terragrunt-non-interactive

# this has mock outputs to emulate module dependencies
terragrunt run-all validate

# follow terminal prompt after entering below command
# do NOT interrupt this process until finished or it will corrupt terraform state
# OR you can apply a more specific plan
# terragrunt run-all apply terragrunt_plan
terragrunt run-all apply
How to Destroy
Time to Complete: 5-10 minutes
#!/bin/bash
# follow terminal prompt after entering below command
terragrunt destroy-all

# you may occasionally see terragrunt errors related to duplicate files
# run the below often to avoid those errors
cd terragrunt_infrastructure_live/

bash terragrunt_cleanup.sh
Tradeoffs
Pros
- Explicit terraform module dependencies(through terragrunt functionality)
- Keeps your terraform code DRY
- terraform state is divided by module
- Separate config and terraform module management
- Ability to spin up multiple environments(dev, qa) with a single
terragrunt plan-allcommand within the dir:./terragrunt_infrastructure_live/non-prod/ - Same example DAGs work as is in local desktop setup
- Minimal kubernetes skills required to start
- Access to more virtual horsepower(ex: add more worker pods through cloud composer configs)
- Dynamically authorizes infrastructure operations through secrets manager
- A DevOps engineer should only need to copy and paste the dev terragrunt configs and update inputs for other environments(qa, prod)
- VPC-native, private-IP, bastion host, ssh via identity aware proxy, and other security-based, reasonable defaults(minimal touchpoints with the public internet)
Cons
- You must destroy your respective dev environments every day or risk accruing costs for idle resources
- Time to complete is long
- Destroying all the infrastructure through terragrunt/terraform does NOT automatically destroy the cloud composer gcs bucket used to sync DAGs-further reading
- If you customize the VPC to prevent any kind of public internet access, cloud composer will not deploy properly(as it needs to reach out to pypi for python dependencies)
- Need to learn another tool: terragrunt(definitely worth it)
Toolkit #3: Simple Terraform Deployment to Google Cloud
Follow Post-Deployment Instructions for Toolkits #2 & #3 instructions AFTER deployment
Time to Complete: 50-60 minutes(majority of time waiting for cloud composer to finish deploying)
Note: This uses terragrunt as a thin wrapper within a single subdirectory
Do NOT run this in parallel with toolkit #2 as default variables will cause conflicts
System Design
terraform state will be stored in one file
Specific Use Cases
- Best used for quick and easy setup for a data engineer, NOT intended for hand off to a DevOps engineer
- Low cost Google Cloud dev airflow dev environment($10-$20/day)
- Test local desktop DAGs against cloud infrastructure that will have more parity with qa and prod environments
- Add more horsepower to your data pipelines
How to Deploy
Read Post-Deployment Instructions for Toolkits #2 & #3 after this deployment
- Create a service account secret to authorize the terraform deployment
#!/bin/bash
# create a secrets manager secret from the key
gcloud secrets create terraform-secret \
    --replication-policy="automatic" \
    --data-file=account.json

# List the secret
# example terminal output
# NAME                 CREATED              REPLICATION_POLICY  LOCATIONS
# airflow-conn-secret  2020-08-18T19:45:50  automatic           -
# terraform-secret     2020-08-12T14:34:50  automatic           -
gcloud secrets list


# verify secret contents ad hoc
gcloud secrets versions access latest --secret="terraform-secret"
- replace important terragrunt/terraform configs for your specific setup
# file location
# /airflow-toolkit/terraform_simple_setup/terragrunt.hcl

remote_state {
  backend = "gcs"
  generate = {
    path      = "backend.tf"
    if_exists = "overwrite"
  }
  config = {
    project     = "wam-bam-258119" # replace with your GCP project id
    location    = "US"
    credentials = "service_account.json"
    bucket      = "secure-bucket-tfstate-composer" # replace with something unique
    prefix      = "dev"
  }
}
# file location
# /airflow-toolkit/terraform_simple_setup/variables.tf

variable "project" {
  description = "name of your GCP project"
  type        = string
  default     = "big-dreams-please" # replace with your GCP project id
}

variable "service_account_email" {
  description = "Service account used for VMs"
  type        = string
  default     = "[email protected]" # replace with your service account email
}
- Copy and paste the
account.jsoninto the directory below and rename itservice_account.jsonAvoids the hassle of calling the terraform-secret for this simple terraform setup
#!/bin/bash

cd terraform_simple_setup/

# utilizes terragrunt as a thin wrapper utility to automatically create the gcs backend remote state bucket
terragrunt init

# preview the cloud resources you will create
# OR you can run a more specific plan
# terraform plan -out=terraform_plan
terraform plan

# validate terraform syntax and configuration
terraform validate

# follow terminal prompt after entering below command
# OR you can apply a more specific plan
# terraform apply terraform_plan
terraform apply
How to Destroy
Time to Complete: 5-10 minutes
#!/bin/bash
# follow terminal prompt after entering below command
terraform destroy
Tradeoffs
Pros
- Explicit terraform module dependencies(through built-in terraform functionality)
- Separate config and terraform module management
- Same example DAGs work as is in local desktop setup
- Minimal kubernetes skills required to start
- Access to more virtual horsepower(ex: add more worker pods through cloud composer configs)
- Dynamically authorizes infrastructure operations through secrets manager
- A DevOps engineer should only need to copy and paste the dev terragrunt configs and update inputs for other environments(qa, prod)
- VPC-native, private-IP, bastion host, ssh via identity aware proxy, and other security-based, reasonable defaults(minimal touchpoints with the public internet)
Cons
- You must destroy your respective dev environments every day or risk accruing costs for idle resources
- Time to complete is long
- Destroying all the infrastructure through terragrunt/terraform does NOT automatically destroy the cloud composer gcs bucket used to sync DAGs-further reading
- If you customize the VPC to prevent any kind of public internet access, cloud composer will not deploy properly(as it needs to reach out to pypi for python dependencies)
- To create a similar environment(qa, prod), you would have to copy and paste the terraform modules into a separate directory and run the above steps. Terraform code is NOT DRY
- The DevOps engineer has to take on a lot more work to maintain this deployment across several environments
- terraform state is all contained within one file
Post-Deployment Instructions for Toolkits #2 & #3
Time to Complete: 5-10 minutes Only compute instances on the same VPC as Cloud Composer can access the environment programmatically
gcloud composercommands will NOT work on your local desktop
- After the terragrunt/terraform deployment is successful, run the below commands in your local desktop terminal
- Add in
Compute Instance Admin(v1) and Service Account Userroles to the iap ssh service account(adjust the terraform code less) OR create a custom role withcompute.instances.setMetadata(adjust the terraform code more)
If you are the owner of the project, you can skip the identity aware proxy ssh step and simply ssh through the console itself
#!/bin/bash

# ssh via identity aware proxy into the bastion host(which will then run commands against cloud composer)
# update the env vars before running ssh tunnel
ACCESS_KEY_FILE="account.json"
PROJECT_ID="airflow-demo-build" # your GCP project ID
ZONE="us-central1-b" # your GCP compute engine ZONE defined in terraform/terragrunt variables, likely us-central1-a or us-central1-b
# SERVICE_ACCOUNT_EMAIL="[email protected]$PROJECT_ID.iam.gserviceaccount.com" # Toolkit 3 Default
SERVICE_ACCOUNT_EMAIL="[email protected]$PROJECT_ID.iam.gserviceaccount.com" # Toolkit 2 Default
KEY_FILE="iap-ssh-access-sa.json"
source utils/cloud_composer/iap_ssh_tunnel.sh

# install basic software in the bastion host
sudo apt-get install kubectl git

# Set Composer project, location, and zone
# The hard-code values are based on defaults set by terraform module variables
# Minimizes redundant flags in downstream commands
gcloud config set project airflow-demo-build # your GCP project ID
gcloud config set composer/location us-central1
gcloud config set compute/zone us-central1-b # your GCP compute engine ZONE defined in terraform/terragrunt variables, likely us-central1-a or us-central1-b

# list cloud composer DAGs
gcloud composer environments run dev-composer \
    list_dags

# capture cloud composer environment config
COMPOSER_ENVIRONMENT="dev-composer"
COMPOSER_CONFIG=$(gcloud composer environments describe ${COMPOSER_ENVIRONMENT} --format='value(config.gkeCluster)')
# COMPOSER_CONFIG ex: projects/wam-bam-258119/zones/us-central1-b/clusters/us-central1-dev-composer-de094856-gke

# capture kubernetes credentials and have kubectl commands point to this cluster
gcloud container clusters get-credentials $COMPOSER_CONFIG

# copy and paste contents of service account json file from local machine into the bastion host
cat <<EOF > account.json
<paste service account file contents>
EOF

# be very careful with naming convention for this secret or else the KubernetesPodOperator will timeout
kubectl create secret generic dbt-secret --from-file=account.json

# Create SSH key pair for secure git clones
ssh-keygen

# copy and paste contents to your git repo SSH keys section
# https://github.com/settings/keys
cat ~/.ssh/id_rsa.pub

# create the ssh key secret
kubectl create secret generic ssh-key-secret \
  --from-file=id_rsa=$HOME/.ssh/id_rsa \
  --from-file=id_rsa.pub=$HOME/.ssh/id_rsa.pub

kubectl get secrets
- Open a separate terminal to run the below
#!/bin/bash
# these commands work from the `airflow-toolkit/` root directory

# reauthorize the main service account to gcloud
gcloud auth activate-service-account --key-file account.json

# add secrets manager IAM policy binding to composer service account
# The hard-code values are based on defaults set by terraform module variables
PROJECT_ID="airflow-demo-build"
MEMBER_SERVICE_ACCOUNT_EMAIL="serviceAccount:[email protected]$PROJECT_ID.iam.gserviceaccount.com" # Toolkit 2 Default
# MEMBER_SERVICE_ACCOUNT_EMAIL="serviceAccount:[email protected]$PROJECT_ID.iam.gserviceaccount.com" # Toolkit 3 Default
SECRET_ID="airflow-conn-secret"

gcloud secrets add-iam-policy-binding $SECRET_ID \
    --member=$MEMBER_SERVICE_ACCOUNT_EMAIL \
    --role="roles/secretmanager.secretAccessor"

# Configure variables to interact with cloud composer
export PROJECT_DIR=$PWD

# Set Composer location
gcloud config set composer/location us-central1

COMPOSER_ENVIRONMENT="dev-composer"
COMPOSER_BUCKET=$(gcloud composer environments describe ${COMPOSER_ENVIRONMENT} --format='value(config.dagGcsPrefix)' | sed 's/\/dags//g')

# sync files in dags folder to the gcs bucket linked to cloud composer
# this may not work if you have python 3.8.5 installed on macOS
# see: https://github.com/GoogleCloudPlatform/gsutil/issues/961
gsutil -m rsync -r $PROJECT_DIR/dags $COMPOSER_BUCKET/dags
Note: The airflow webserver will take 30 seconds to update the view with the updated DAGs. However, you can run DAGs as soon as you upload the new files to the gcs bucket.
- Instructions to access the airflow webserver UI
- Rerun all DAGs within cloud composer for success validation
Note:
bigquery_connection_checkwill fail unlessadd_gcp_connectionssucceeds first
Git Repo Folder Structure
| Folder | Purpose |
|---|---|
| .github/workflows | Quick terragrunt/terraform validations |
| dags | airflow pipeline code |
| dags_archive | draft DAG code |
| dbt_bigquery_example | Working and locally tested dbt code which performs BigQuery SQL transforms |
| Dockerfiles | Docker images to be used by Cloud Composer |
| docs | Images and other relevant documentation |
| terraform_simple_setup | Terraform modules for a terraform-only setup |
| terragrunt_infrastructure_live | Terragrunt orchestrator to run terraform operations |
| terragrunt_infrastructure_modules | Base terraform modules for terragrunt to consume in the live directory |
| tests | Example DAG test cases |
| utils | Various utilities to automate more specific ad hoc tasks |
Frequently Asked Questions(FAQ)
- Why do you use identity aware proxy for remote ssh access into the bastion host?
- Creates a readable audit trail for ssh access patterns
- Do you have an equivalent deployment repo for AWS/Azure?
- No, more then open to a pull request that includes this
- Why not use terratest?
- I don't know the go programming language well enough, but plan to learn in the future ;)
- Why pytest?
- Less verbose testing framework compared to python's built-in unittest
- Already had battle-tested boilerplate testing code