victormejia / Angular Testing Workshop
Programming Languages
Projects that are alternatives of or similar to Angular Testing Workshop
Angular Unit Testing Workshop
Workshop material for: https://www.safaribooksonline.com/live-training/courses/angular-unit-testing-techniques/0636920106197/
You've been tasked to deliver a high-quality, well-tested dashboard to track The Grid's most prominent hackers! We will be learning all about unit testing Angular apps.

Setup
Details
This project was generated with Angular CLI version 10.0.7.
Tools Needed
- Git
- Node (12.x)
- npm (6.x)
- Angular CLI:
npm install -g @angular/cli - latest Google Chrome
- GitHub account
- highly recommend downloading Visual Studio Code: https://code.visualstudio.com/ * install the following extensions: * EditorConfig * TSLint * Angular Language Service * vscode-icons
Configure Project
You will need to do the following:
- fork this repo to your GitHub account
- clone your fork locally
- Globally install the Angular CLI:
npm install -g @angular/cli - inside
angular-testing-workshop, install dependencies:npm install
Verify
The following commands should work:
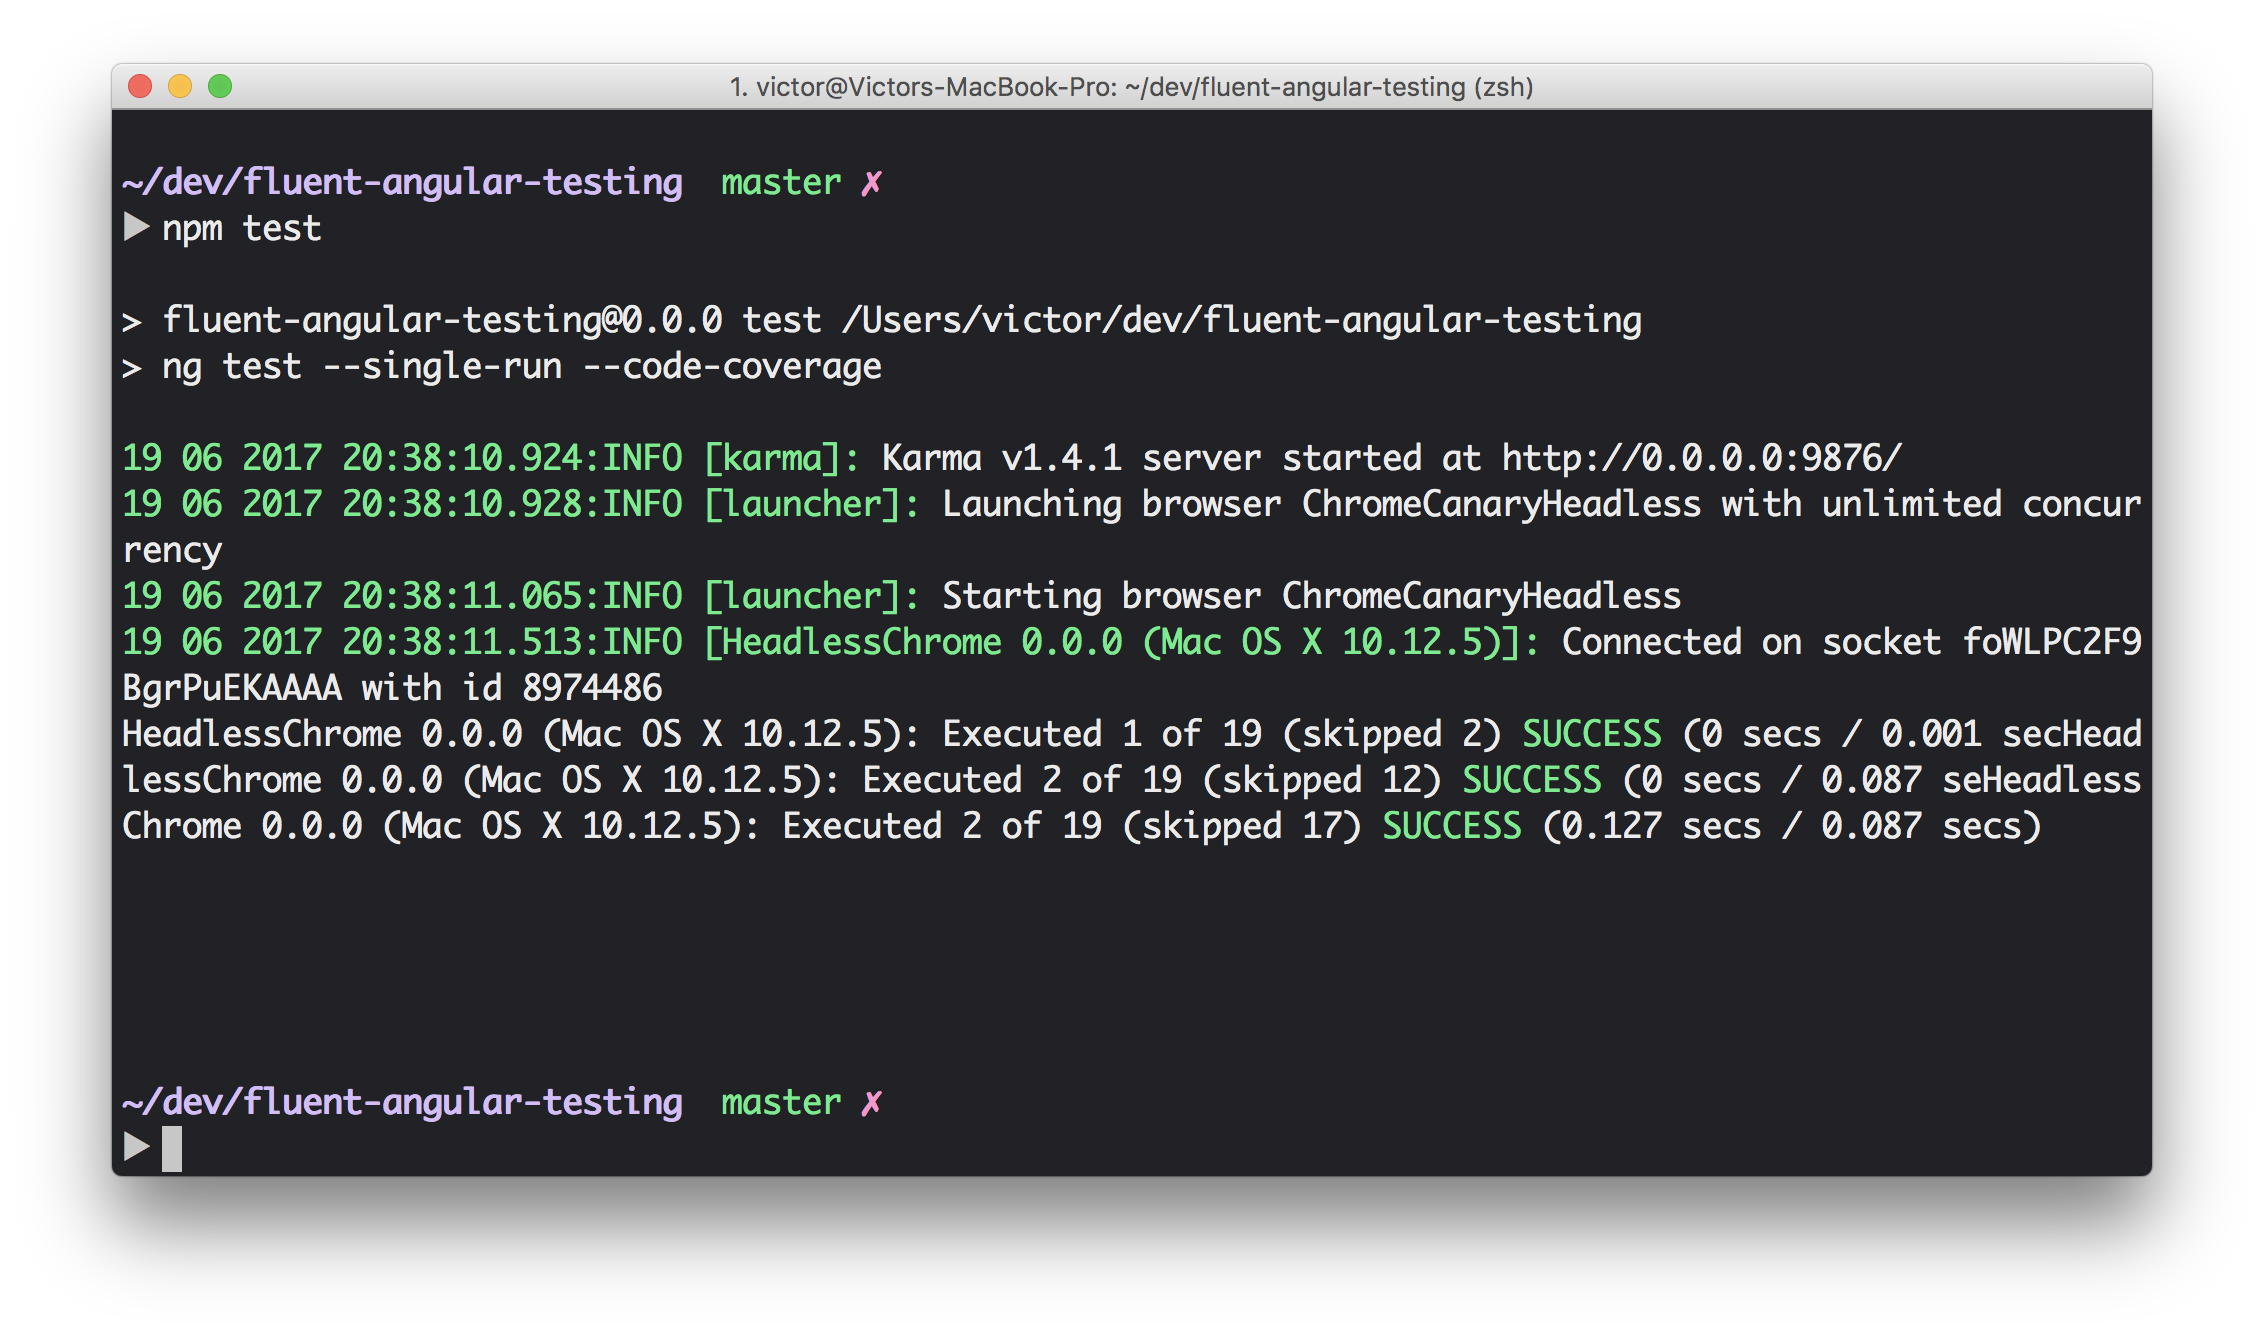
npm start: should open your browser and display the app we will be working with:
npm test: should yield output similar to this (no errors):
Create branch
git checkout -b solution
We will be working on a new branch and working through the modules. In the last module, we will be opening a pull request and using TravisCI to run our builds.
Exercises and Solution
The empty exercise files you'll be completing end in *.spec.ts. The solutions are right next to the file, which are named *.specx.ts. If you to switch between running your specs vs. the solution, in src/app.test.ts change the regex for the specs to:
const context = require.context('./', true, /\.specx\.ts$/);
Module 1: Unit Testing With Jasmine
Details
Why test?
The Angular Testing Guide puts it very clearly:
- Unit tests guard against breaking existing code (“regressions”) when we make changes.
- Unit tetss clarify what the code does (use as documentation).
- They reveal mistakes in design and implementation. Tests force us to look at our code from many angles and also make your code more modular.
Jasmine
- A unit testing framework for JavaScript
- standalone, no DOM required
- Clean syntax: describe, it, expect
- Others: Mocha, QUnit, Jest, Ava
- Often used with a mocking library like Sinon
Sample Module
const SuperAwesomeModule = {
  featureA: () => {
    ...
  },
  featureB: () => {
    ...
  }
}
Suites
- test suite begins with "describe"
- takes a string (spec suite title) and a function (block of code being tested)
- suites can be nested
describe('SuperAwesomeModule', () => {
  describe('featureA', () => {

  });

  describe('featureB', () => {

  });
});
Specs
- call global Jasmine function
it(<string>, <fn>) - a spec contains one or more expectations
- expectation: an assertion that is either true or false.
- spec with all true expectations: pass
- spec with one or more false expectations: fail
describe('SuperAwesomeModule', () => {
  describe('featureA', () => {
    it('should calculate some super awesome calculation', () => {
        ...
    });

    it('should also do this correctly', () => {
        ...
    });
  });
});
Expectations and Matchers
- call global Jasmine function
expect(<actual>).<matcher(expectedValue)> - a matcher implements boolean comparison between the actual value and the expected value
describe('SuperAwesomeModule', () => {
  describe('featureA', () => {
    it('should calculate some super awesome calculation', () => {
        expect(SuperAwesomeModule.featureA([1, 2, 4]).toEqual(7);
    });

    it('should also do this correctly', () => {
        expect(SuperAwesomeModule.featureB('...').toBe(true);
    });
  });
});
Included Matchers
expect(foo).toBe(true); // uses JS strict equality
expect(foo).not.toBe(true);
expect(foo).toEqual(482); // uses deep equality, recursive search through objects
expect(foo).toBeDefined();
expect(foo).not.toBeDefined();
expect(foo).toBeUndefined();
expect(foo).toBeTruthy(); // boolean cast testing
expect(foo).toBeFalsy();
expect(foo).toContain('student'); // find item in array
expect(e).toBeLessThan(pi);
expect(pi).toBeGreaterThan(e);
expect(a).toBeCloseTo(b, 2); // a to be close to b by 2 decimal points
Included Matchers: Exceptions
expect(() => {
  foo(1, '2')
}).toThrowError();

expect(() => {
  foo(1, '2')
}).toThrow(new Error('Invalid parameter type.')
Setup and Teardown
describe('ApiService', function() {
  const serviceInTest;

  beforeEach(function() {
    serviceInTest = new ApiService();
  });

  afterEach(function() {
   ...
  });

  it('retrieves data', function() {
    ...
  });

  it('updates data', function() {
    ...
  });
});
Disabling suites/specs
describe('SuperAwesomeModule', () => {
  xdescribe('featureA', () => {
    it('should ...', () => {

    });

    it('should ...', () => {

    });
  });

  describe('featureB', () => {
    xit('should ...', () => {

    });

    it('should ...', () => {

    });
  });
});
Spies
- test double functions called spies.
- can stub any function and tracks calls to it and all arguments.
- A spy only exists in the describe or it block in which it is defined, and will be removed after each spec.
describe('SuperAwesomeModule', function() {
  beforeEach(function() {
    // track all calls to SuperAwesomeModule.asyncHelperFunction()
    // and return a mock response
    spyOn(SuperAwesomeModule, 'asyncHelperFunction').and.returnValue(Promise.resolve(mockData))
  });

  describe('featureA', function() {
    it('should ...', function() {
      expect(SuperAwesomeModule.featureA(x)).toBe(y);

      // matchers for spies
      expect(SuperAwesomeModule.asyncHelperFunction).toHaveBeenCalled();
    });
  });
});
Asynchronous support
- spec will not start until the done function is called in the call to beforeEach
- spec will not complete until its done is called.
- Default timeout is 5 seconds, can override: jasmine.DEFAULT_TIMEOUT_INTERVAL
describe('long asynchronous specs', function() {
  beforeEach(function(done) {
    done();
  }, 1000);

  it('takes a long time', function(done) {
    setTimeout(function() {
      done();
    }, 9000);
  }, 10000);

  afterEach(function(done) {
    done();
  }, 1000);
});
Tasks
We will test drive the implementation of a scoreCalculator function (sums up scores) that satisfies the following:
should work with one numbershould work with more than one scoreshould treat negative scores as 0should return zero with empty input
Module 2: Configuring Terminal Reporting
Details
Inside the Angular project, running ng test --no-watch --code-coverage will output something like this:
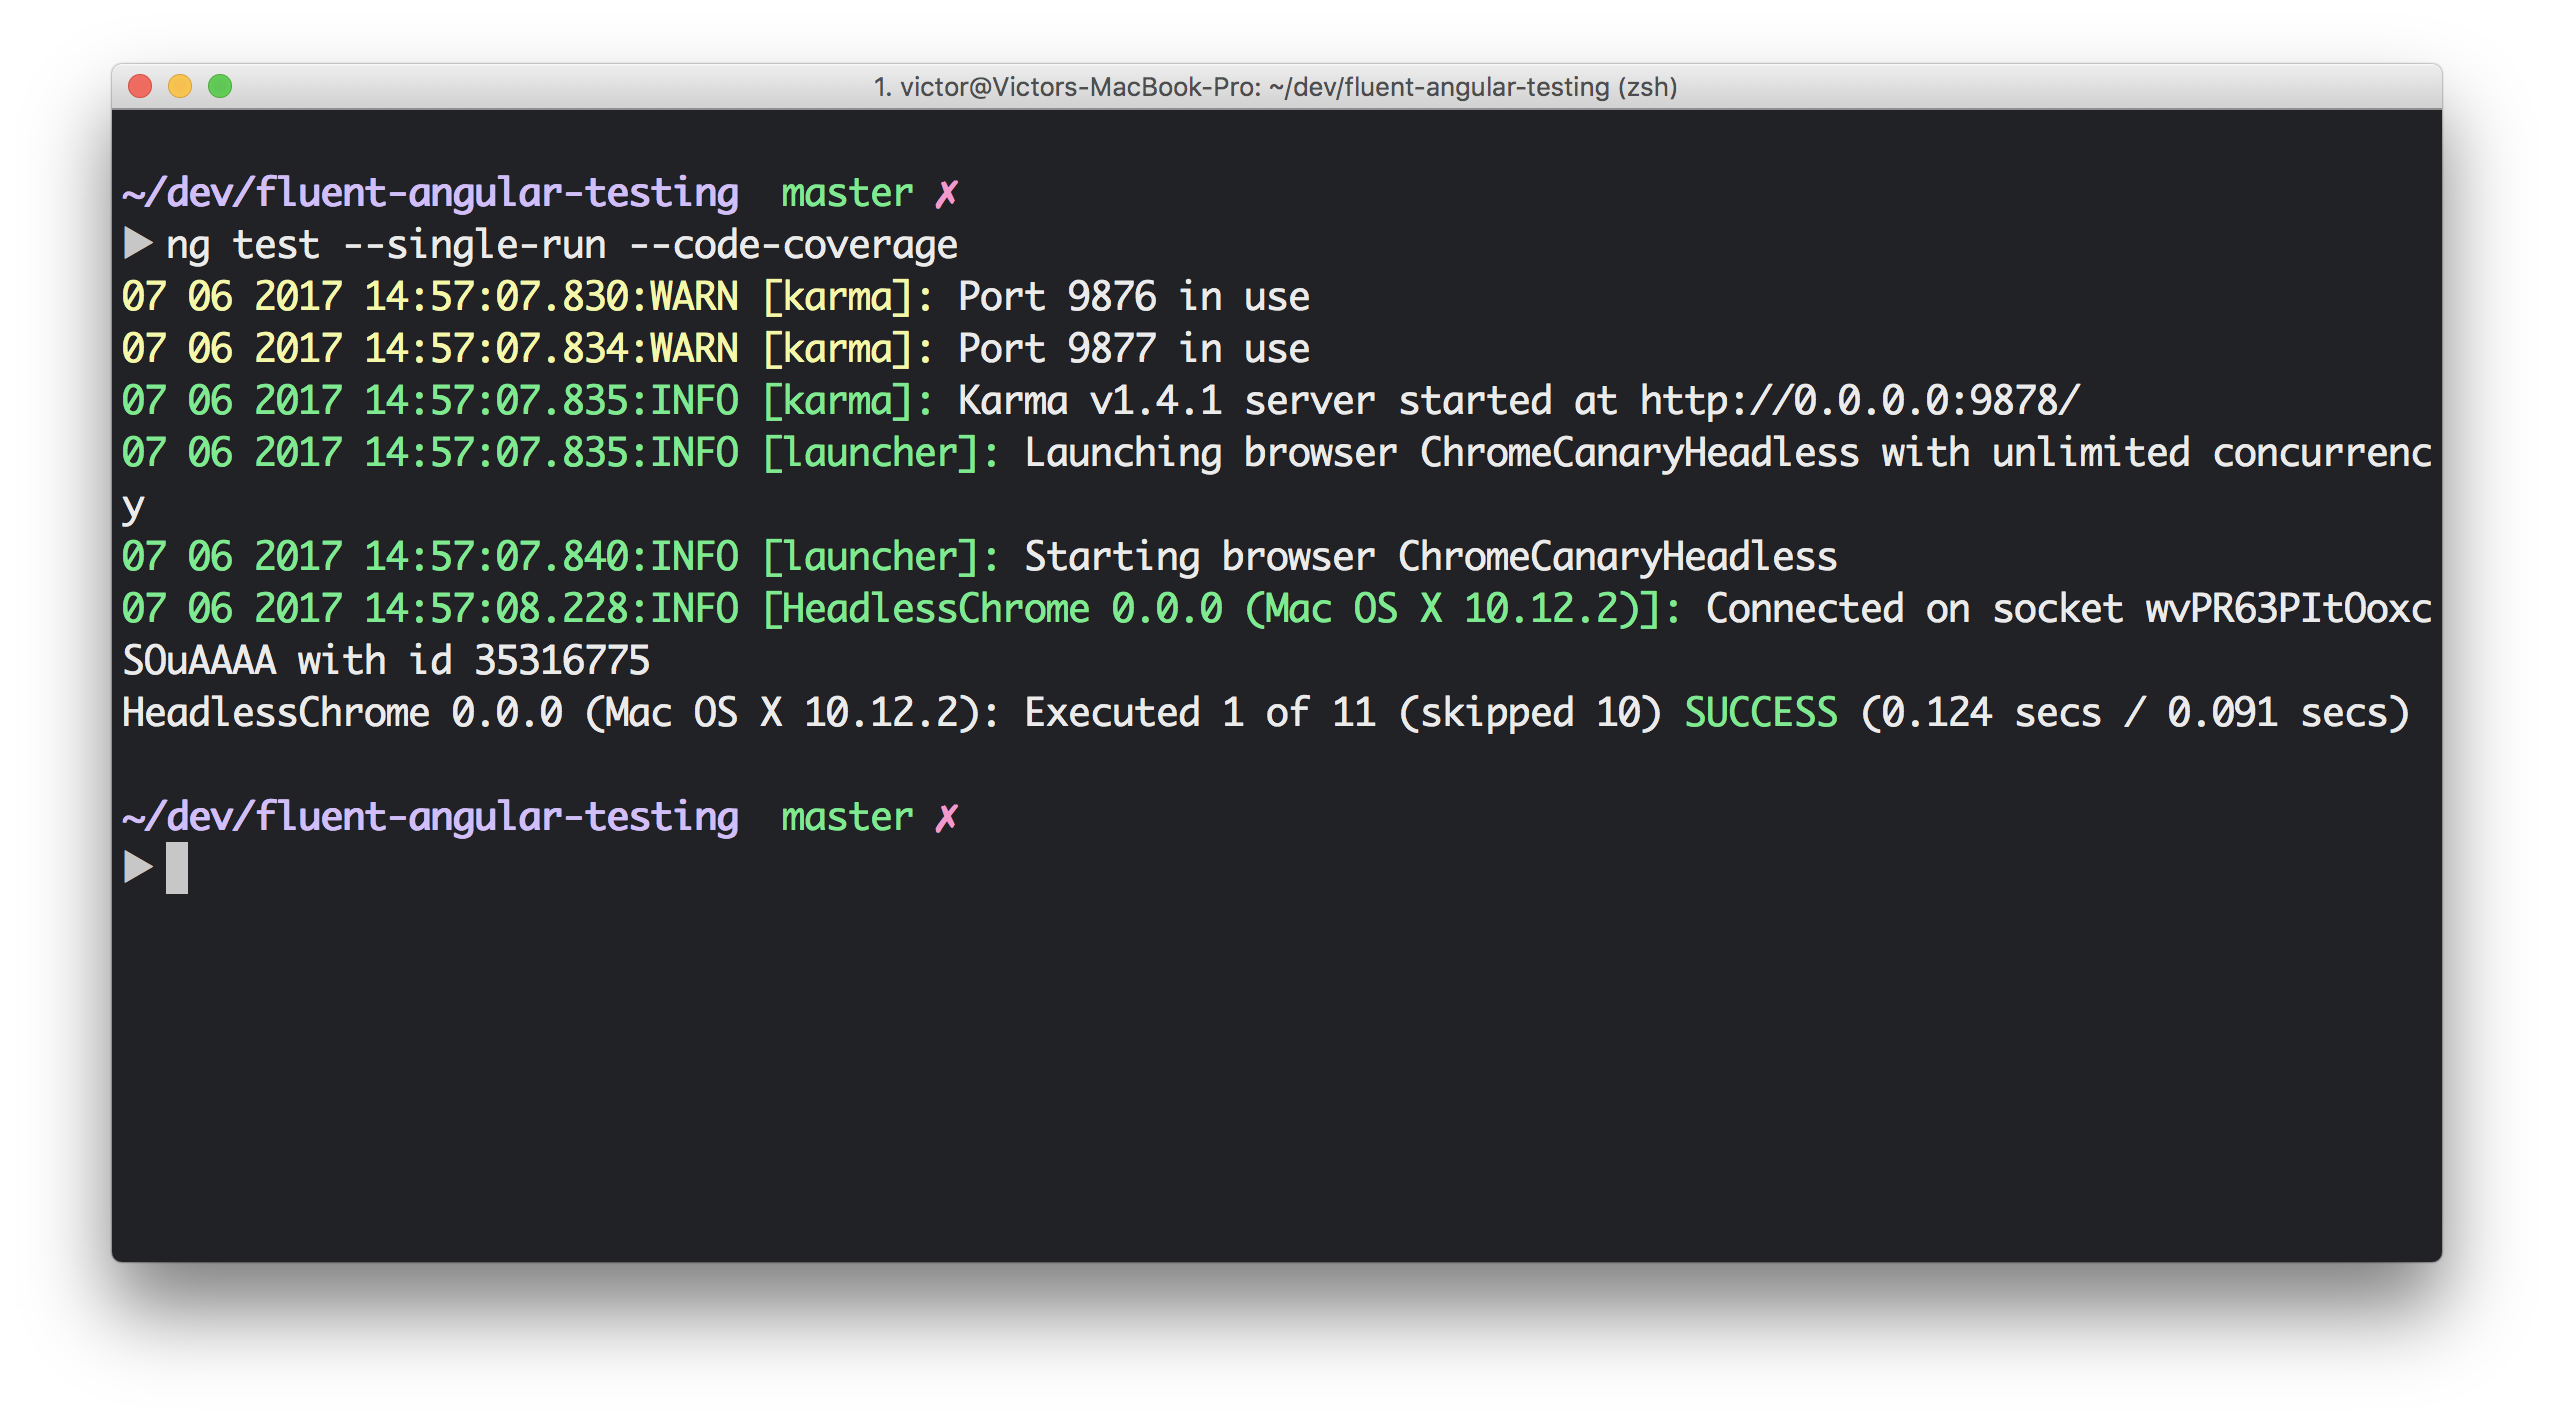
It's a bit difficult to know which tests exactly ran, so let's configure our terminal spec reporting. To do so, you will need to install the karma-spec-reporter plugin and configure karma.conf.js. It should already be included when you ran the initial npm install.
Tasks:
- in the
plugins, require thekarma-spec-reporter:require('karma-spec-reporter') - in the
reporters, replace'progress'with'spec' - in the
reportsarray inside thecoverageIstanbulReporterobject, add'text-summary'
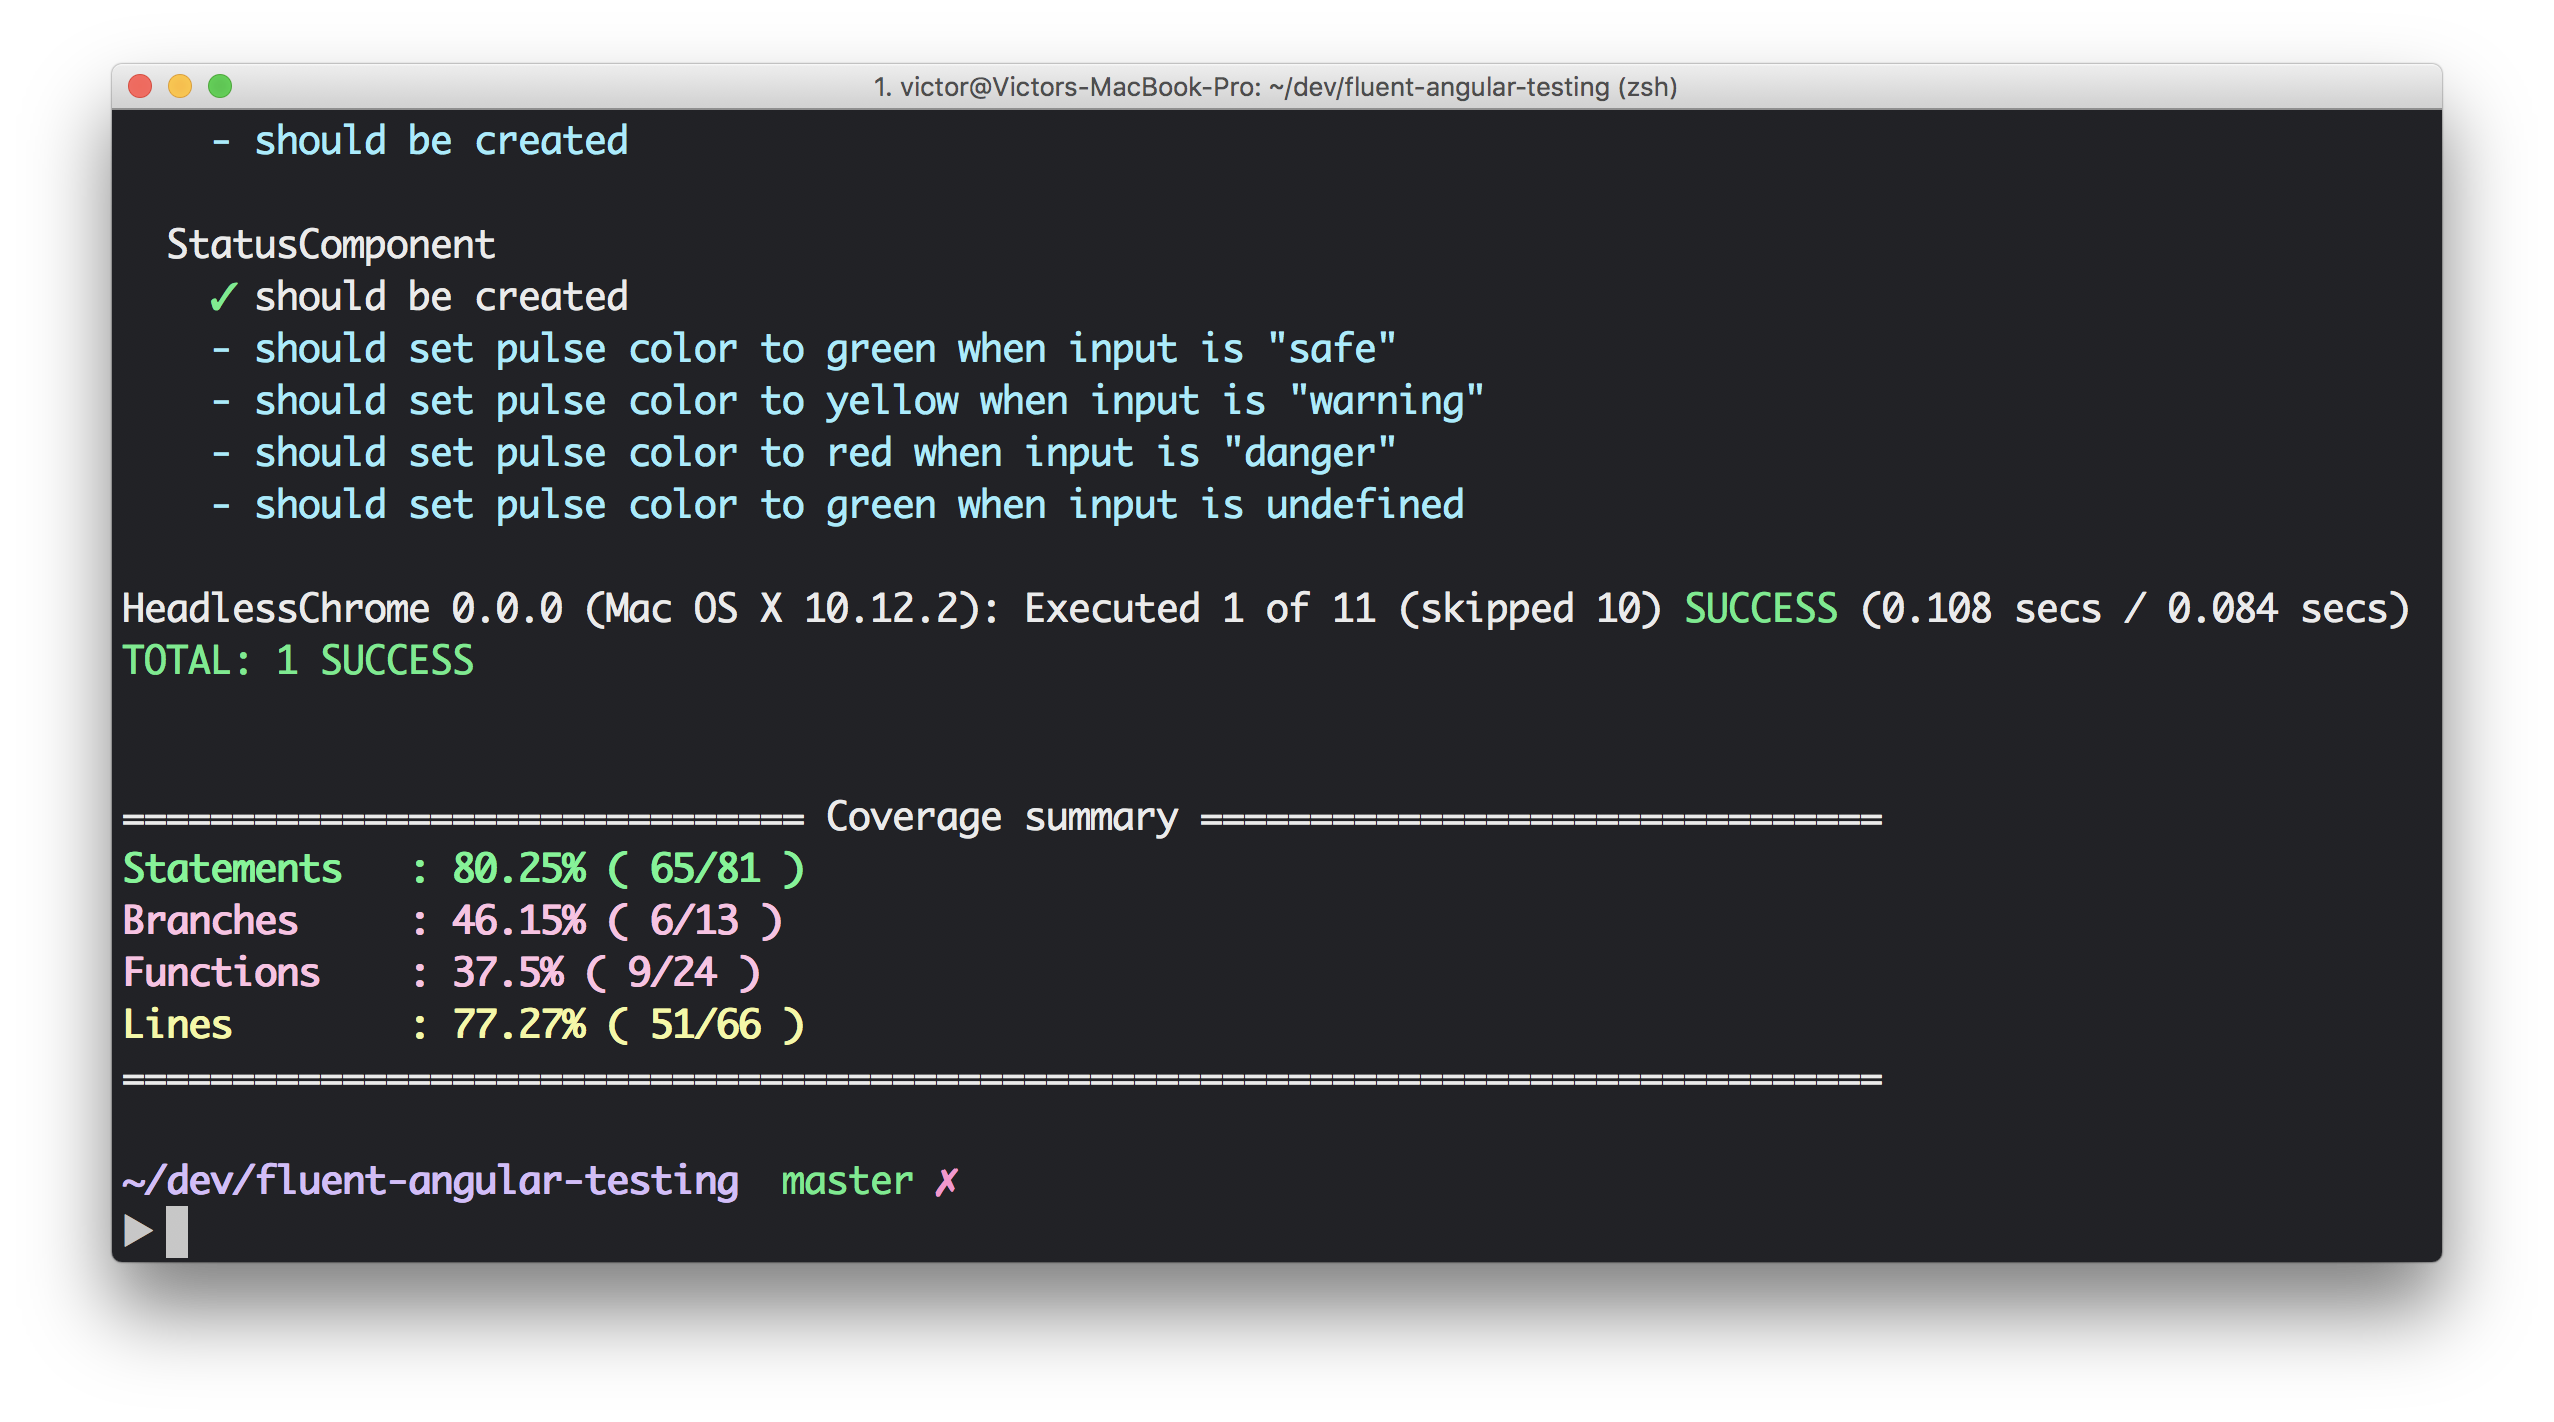
Now, when you run your tests, you should get something like this:
Module 3: Basic Component Testing
Details
Code: src/app/core/menu
In this module, we will learn the basic steps in setting up unit tests using the Angular testing utilities. There are 3 standard methods of testing Angular components:
- Isolated tests: we treat the component class as vanilla JS. Don't render the component.
- Shallow tests: use the Angular testing utilities to render the component, but don't render children components.
- Integration tests: not end-to-end tests here. In this method we render children components also.
When testing components, we will be using the shallow method of testing components, and when our components take in inputs, and/or we want to test outputs, we will use a test host component.
Basic Setup
We first need to import a few of the testing utilities, and also the component to test:
import { async, ComponentFixture, TestBed } from '@angular/core/testing';
import { MenuComponent } from './menu.component';
We start our describe block, and before each of our tests, we want to configure the testing module. In the declarations property is where you declare the component being tested. We first compile the components in test:
let component: MenuComponent;
let fixture: ComponentFixture<MenuComponent>;

beforeEach(async(() => {
  TestBed.configureTestingModule({
    declarations: [ MenuComponent ]
  })
  .compileComponents();
}));
compileComponents() will ensure that external templates and styles are inlined. This is an async operation, so we use the async utility, which runs it in a special async test zone. If you're using webpack, this isn't needed, but it's a good idea to always have this here in case your build system changes.
We then get handles on two important pieces:
beforeEach(() => {
  fixture = TestBed.createComponent(MenuComponent);
  component = fixture.componentInstance;
  fixture.detectChanges();
});
- fixture : A fixture for debugging and testing a component. Provides access to the component instance and also the
DebugElement, a handle on the component's DOM element. - component : The component instance
fixture.detectChanges() initializes the component (calling ngOnInit()) and runs the change detection cycle.
With setup out of the way, we can start writing assertions. For instance, a test to ensure that two menu items get rendered:
it('should render two menu items', () => {
  const menuItems = fixture.debugElement.queryAll(By.css('a'));
  expect(menuItems.length).toBe(2);
});
We use the debugElement's queryAll method to retrieve all DebugElements that satisfy the search, and using the By.css utitlity.
Running this, you will get an error:
Can't bind to 'routerLink' since it isn't a known property of 'a'.
Since we aren't importing the module for routing, Angular doesn't recognize this directive. However, we want to shallow test, so we will tell Angular to ignore components and directives not included in the declarations property by using the NO_ERRORS_SCHEMA constant:
import { NO_ERRORS_SCHEMA } from '@angular/core';
and declare a new schemas property when confiuring the test module:
schemas: [NO_ERRORS_SCHEMA]
Tasks
Write a spec 'should render a different hacker link title'.
- change the component's
hackerLinkproperty to something else - trigger a change detection cycle
- Use the
debugElementand theByutiltity to assert that the new title is reflected in the DOM.
hint: Once you obtain the debugElement reference to the hacker link, you can get the native HTMLElement through the nativeElement property.
Module 4: Testing Components with I/O and Change Detection
Details
Code:
src/app/statussrc/app/hacker-search
In this module, we will learn how to test components with inputs and outputs. The best way to test this kind of components is by using a test host component. Essentially, in your test you create a parent component which houses the component you want to test. This way, it's very easy to feed it inputs, and to listen for any output events.
We will first be looking at the StatusComponent, which displays a small circle indicating the status of the hacker. Green for "safe", yellow for "warning", and red for "danger".
This is how it is used:
<app-status [status]="hacker.status"></app-status>
It takes in as input a status which can be 'danger', 'safe', or 'warning'. If we take a look at the StatusComponent, the input status gets mapped to a CSS class, which is then used to style the small circle.
<div class="status-pulse">
  <span class="pulse" [ngClass]="color"></span>
  <span class="dot" [ngClass]="color"></span>
</div>
With this knowledge, let's create a test host component:
@Component({
  template: '<app-status [status]="appStatus"></app-status>'
})
class TestHostComponent {
  appStatus: string;
}
For the TestBed configuration, we will include both the StatusComponent and the TestHostComponent in the declarations. We then obtain a fixture on the test host component, and the test host component instance. Do not call fixture.detectChanges here since that will trigger the ngOnInit method, which will return the incorrect class since we haven't fed any input to the StatusComponent.
let testHost: TestHostComponent;
let fixture: ComponentFixture<TestHostComponent>;

beforeEach(async(() => {
  TestBed.configureTestingModule({
    declarations: [ StatusComponent, TestHostComponent ]
  })
  .compileComponents();
}));

beforeEach(() => {
  fixture = TestBed.createComponent(TestHostComponent);
  testHost = fixture.componentInstance;
});
With the setup out of the way, we are now ready to write some tests.
Tasks (Part A):
Complete the following tests:
should set pulse color to green when input is "safe"should set pulse color to yellow when input is "warning"should set pulse color to red when input is "danger"should set pulse color to green when input is undefined
For the first four tests, you want to follow these steps:
- Arrange: set the
appStatusproperty on the test host component to what you are currently testing, so something like'safe' - Act: trigger a change detection cycle (
fixture.detectChanges()), and get a reference to the element with class of.pulse. Use thefixture.debugElement.query()utility, andBy.css(). This would look something likefixture.debugElement.query(By.css('.pulse')).nativeElement - Assert: You can then assert things about the
classListproperty of the element.
We now need to take a look at testing components with outputs, and we will be working with the HackerSearch component. This component renders an input, and uses the ReactiveFormsModule in order to easily debounce changes to the input value. Once the user stops typing something in, it will emit a newSearch event.

This is how it is used:
<app-hacker-search (newSearch)="filterData($event)"></app-hacker-search>
The parent component must have a filterData method which will be called with the new search term as the argument. If we take a peek at the implementation in the HackerSearch component, we can know when this gets emitted:
ngOnInit() {
  this.searchTerm
    .valueChanges
    .pipe(debounceTime(500))
    .subscribe(term => {
      this.newSearch.emit(term);
    });
}
When testing this component, we can create a test host component:
@Component({
  template: '<app-hacker-search (newSearch)="filterData($event)"></app-hacker-search>'
})
class TestHostComponent {
  filterData = jasmine.createSpy('filterDataSpy');
}
filterData is simply a spy which we can use to verify that the method on the host component was called when input changed on the HackerSearch component.
For the TestBed configuration, we will include both the HackerSearchComponent and the TestHostComponent in the declarations. We then obtain a fixture on the test host component, and the test host component instance.
let testHost: TestHostComponent;
let fixture: ComponentFixture<TestHostComponent>;

beforeEach(async(() => {
  TestBed.configureTestingModule({
    imports: [ReactiveFormsModule],
    declarations: [ HackerSearchComponent, TestHostComponent ]
  })
  .compileComponents();
}));

beforeEach(() => {
  fixture = TestBed.createComponent(TestHostComponent);
  testHost = fixture.componentInstance;
});
Tasks (Part B):
Complete the following test:
'should emit new search event'
Your strategy for testing this component should be the following:
- trigger change detection cycle to create child component (
fixture.detectChanges()) - Use the
fixture.debugElementtoqueryfor theinputelement using theBy.cssutility - set the value of this input and dispatch a new
'input'event (inputEl.dispatchEvent(new Event('input'));) - assert that the
filterDatamethod was called
Since we are doing asynchronous work, we need to use the async testing utility along with the fixture.whenStable() utility. We will be covering this more in depth in the next module, but for now just understand that the async function wraps a test function in an asynchronous test zone. The test will automatically complete when all asynchronous calls within this zone are done. The fixture.whenStable() can be used to write specs after asynchronous activity or change detection has completed.
it('should emit new search event', async(() => {

}));
Module 5: Testing Components with (Async) Service dependencies
Details
Reference: Test a component with an async service
Code: src/app/hacker-list
In this module, we will learn how to test components with (async) service dependencies. When performing such tests, we must specify the injected services in the providers property when configuring the testing module:
TestBed.configureTestingModule({
  declarations: [ HackerListComponent ],
  providers: [
    { provide: ApiService, useValue: mockApiService },
    { provide: Router, useValue: mockRouter }
  ],
  schemas: [NO_ERRORS_SCHEMA]
})
Here we are using the provide object literal, such that when the DI system retrieves the ApiService, it will use the provided value. Here we don't provide the real service, but instead a mock service. The mockApiService should simply be an object that has the same interface as the actual ApiService:
const mockApiService = {
  getHackers: () => { }
};
This component only utilizes the navigate method of the router, so we can also create a mock for that.
const mockRouter = {
  navigate: () => { }
};
At the top of the describe block, in addition to declaring variables for the component and fixture,we also want to declare a variable to hold a reference to the injected service:
let component: HackerListComponent;
let fixture: ComponentFixture<HackerListComponent>;
let api: ApiService;
How do we get the injected service? The best way to do so is to get it from the component's injector:
api = fixture.debugElement.injector.get(ApiService);
From here on, we can spy on api, and not the mockApiService. It is simply a clone of that object.
Testing Async
Suppose one of your components method performs async work:
ngOnInit() {
  this.api.getProducts()
    .then((data: any) => {
      this.products = data;
    });
}
In your test, you should first spy on the service mock and return a controlled response:
spyOn(api, 'getProducts').and.returnValue(Promise.resolve(mockProducts));
Then, there are two methods of testing this:
- use
asyncandfixture.whenStable - use
fakeAsyncandtick
The first is to use the async testing utility, which is a function that returns a function, which becomes the second argument to the it call. You must then uses the fixture's whenStable method which returns a promise when all async work within this test is complete.
it('...', async(() => {
  spyOn(api, 'getProducts').and.returnValue(Promise.resolve(mockProducts));

  component.ngOnInit();

  fixture.whenStable()
    .then(() => {
      expect(...).toEqual(...);
    });
}));
The second method is to use the fakeAsync testing utility. It allows you to write a test in a more linear fashion:
it('...', fakeAsync(() => {
  spyOn(api, 'getProducts').and.returnValue(Promise.resolve(mockProducts));

  component.ngOnInit();

  flush(); // "flushes" asynchronous tasks

  expect(...).toEqual(...);
}));
If you need fine time control, the tick function simulates the passage of time, and it can take in an optional argument of milliseconds.
Tasks
Write tests for the initial display (describe block)
makes a call to api.getHackers-
sets initial data (using async): SincengOnInitperforms async work, we use theasynctesting utility -
sets initial data (using fakeAsync)': usefakeAsyncinstead. You will need to use thetickfunction here
Write a test for the click on hacker (describe block):
should navigate to the hacker/:id path
Relevant imports:
import { async, ComponentFixture, TestBed, fakeAsync, flush } from '@angular/core/testing';
import { HackerListComponent } from './hacker-list.component';
import { NO_ERRORS_SCHEMA } from '@angular/core';
import { ApiService } from '../core/services/api.service';
import { Router } from '@angular/router';
import { By } from '@angular/platform-browser';
import { mockHackers } from '../core/helpers.spec';
Module 6: Testing Services
Details
Code: src/app/core/services
When it comes to testing services in Angular, you could write isolated tests (no Angular testing utilities) or shallow tests (using Angular utilities like the TestBed and the inject function). I recommend writing isolated tests for services, as they are essentially just a class, as adding in the Angular helping utilities will probably just add complexity to your tests. If your service depends on other services, you can easily stub them out.
Here is our basic ApiService:
@Injectable()
export class ApiService {

  baseUrl = '/api';

  constructor(public http: Http) { }

  getHackers(search: string = '') {
    return this.http.get<Hacker[]>(`${this.baseUrl}/hackers?q=${search}`)
      .toPromise();
  }

  getHackerDetails(id: string) {
    return this.http.get<Hacker>(`${this.baseUrl}/hackers/${id}`)
      .toPromise();
  }
}
When testing services, at the top of your describe block, you will need to declare the a variable that will hold the reference to your service, and create spies for any dependencies.
let service: ApiService;
const httpSpy = jasmine.createSpyObj('http', ['get']);
Using the createSpyObj method gives us great flexibility as we can instruct it to return different values as needed. Unit tests should isolated, fast, and should not make external http requests, which is why we will stub out the Http service instead.
Before each spec, create a brand new instance of the service:
beforeEach(() => {
  service = new ApiService(httpSpy);
});
Now for each spec, the structure will look like this:
it('...', (done) => {
  // create a mock response

  // instruct any dependent service to return the mock response
  // by using the spy object

  // make the call to your service

  // if the call is async (returns a Promise), you can listen
  // for when the problem resolves, assert, and then call done()
});
Note here that we are using the Jasmine built-in done function. This suffices for our unit tests, and there really is no need to bring in the async or fakeAsync utilities. In fact, when dealing with Observables, you will have to use the done function instead.
Tasks
Write the following unit tests for both the getHackers and getHackerDetails of the ApiService.
-
getHackers:'should return list of hackers': You should assert thathttp.getgets called with'/api/hackers?q=', and the data returned is the mock data. -
getHackerDetails:'should return hacker details given hacker id': You should assert thathttp.getgets called with'/api/hackers/${id}'', and the data returned is the mock data.
Module 7: Testing Directives
Details
Code: src/app/core/directives
An attribute directive is used to modify behavior of an existing element or component. Suppose we have a directive that can be added to an input element to prevent numeric input. We can easily achieve this using a @HostListener and listening for the keydown event.
import { Directive, HostListener, ElementRef } from '@angular/core';

@Directive({
  selector: '[appNonNumeric]'
})
export class NonNumericDirective {

  constructor(private element: ElementRef) { }

  @HostListener('keydown', ['$event'])
  onKeydown(event) {
    const numberRegex = /[0-9]/;

    if (numberRegex.test(event.key)) {
      event.preventDefault();
    }
  }

}
And its usage:
<input appNonNumeric type="text" placeholder="Search...">
Looking at the implementation, you could very well write an isolated test and test the onKeydown method. However, we want to test how this directive will make other elements behave. We will be using a test host component along with the Angular testing utitlies.
A test host component can look like this:
@Component({
  template: `<input appNonNumeric type="text"/>
             <textarea appNonNumeric></textarea>`
})
class TestHostComponent {
}
When testing this, we can use the debugElement and By to query for the input. DebugElements have a useful triggerEventHandler that you can call. In this case, we would trigger the keydown event.
Tasks:
Complete the following tests:
-
should allow regular text input: You should query for theinputelement, and trigger thekeydownevent handler. Create a mock event, and callinput.triggerEventHandler('keydown', event). -
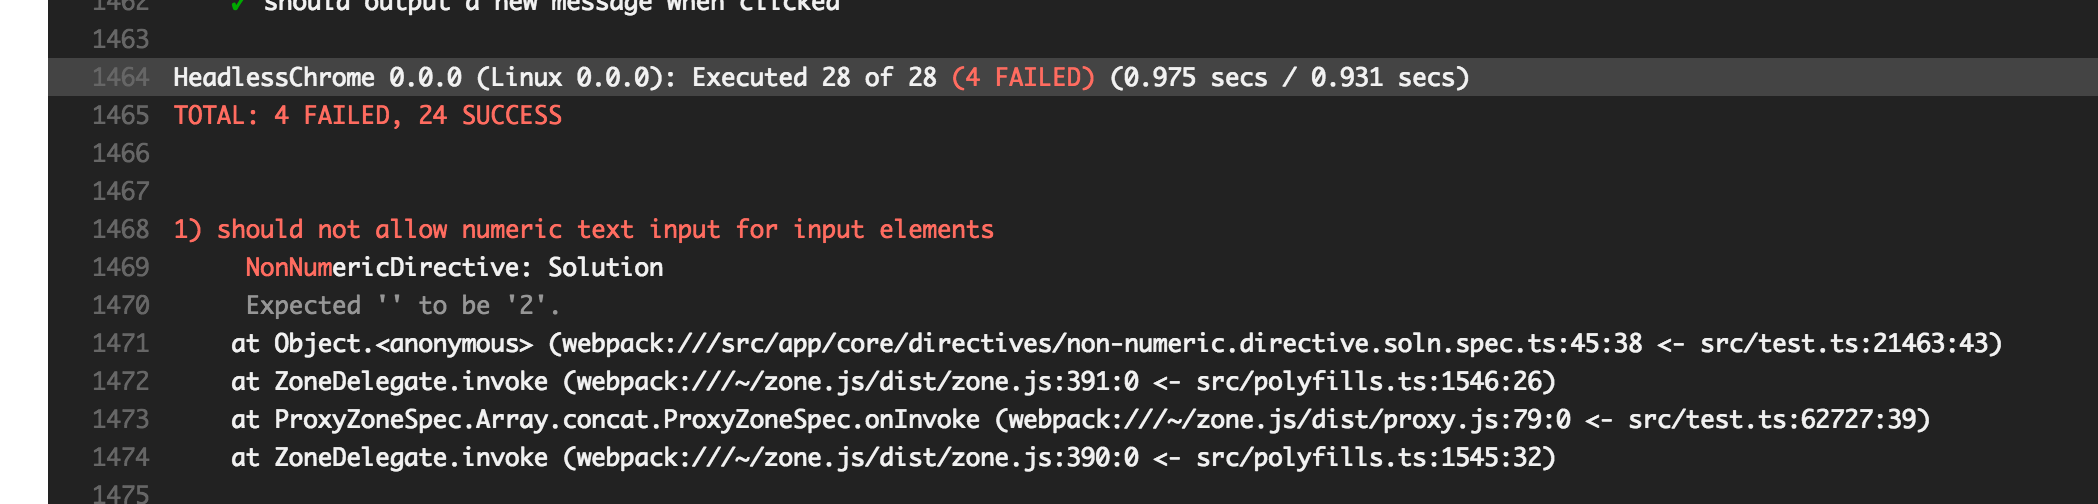
should not allow numeric text input for input elements: Similar setup to the first one, except the event's key property should be a string containing a number should allow regular text input for textarea elementsshould not allow numeric text input for textarea elements
Module 8: Testing Pipes
Details
Code: app/core/pipes
In this module we will learn how to test pipes. Testing pipes in Angular is actually very easy, there is really no set up as we are writing vanilla jasmine tests, without any Angular testing utilities. You should write these kind of isolated tests for both services and pipes.
Suppose we have a pipe to transform any string input to all uppercase letters:
import { Pipe, PipeTransform } from '@angular/core';

@Pipe({
  name: 'uppercase'
})
export class UppercasePipe implements PipeTransform {

  transform(input: string): any {
    return input.toUpperCase();
  }

}
To test, we are simply testing a class. Below is the setup and some sample tests:
import { UppercasePipe } from './uppercase.pipe';

describe('UppercasePipe', () => {
  let pipe: UppercasePipe;

  beforeEach(() => {
    pipe = new UppercasePipe();
  });

  it('creates an instance', () => {
    expect(pipe).toBeTruthy();
  });

  it('transforms input string to uppercase', () => {
    expect(pipe.transform('angular rocks!')).toBe('ANGULAR ROCKS!');
  });
});
Tasks
In these exercises, we are going to test-drive the implementation of the ShortDatePipe, which will transform an input ISO date string and return a "short date" format.
'1960-06-01T11:01:12.720Z' ----> '06/01/1960, 11:01am'
Complete the following tests:
creates an instanceshould not throw errorreturned value should contain date format dd/mm/yyyyreturned value should contain time hh:mm[am|pm]should convert ISO string to correct date format (am)should convert ISO string to correct date format (pm)
You can use this sample data:
'1972-08-23T15:22:34.694Z' ----> '06/01/1960, 11:01am''1980-10-04T21:35:51.869Z' ----> '10/04/1980, 09:35pm'
Module 9: Testing Routed Components
Details
Code: src/app/hacker-detail
Testing routed components is not much different than testing components with async services, the only difference is that instead of dealing with timers or Promises, most likely you'll be dealing with Observables since the router exposes certain Observable properties to read information from the current route.
Take for instance the HackerDetailComponent:
@Component({
  selector: 'app-hacker-detail',
  templateUrl: './hacker-detail.component.html',
  styleUrls: ['./hacker-detail.component.scss']
})
export class HackerDetailComponent implements OnInit {
  @Input() id: string;
  hacker: Hacker;

  constructor(private api: ApiService, private route: ActivatedRoute) { }

  ngOnInit() {
    this.route.params.subscribe(params => {
      this.id = params['id'];
      this.renderDetails(this.id);
    });
  }

  renderDetails(id: string) {
    this.api.getHackerDetails(id)
      .then((data) => {
        this.hacker = data;
      });
  }

}
It has two injected dependencies, the ApiService and the ActivatedRoute. You know how to create a mock for the api service (simply return a resolved promise). However, the params property is an observable that emits an object. Here, we care about the id param, since our route was declared as hackers/:id.
At the beginning of the describe block, you can create mocks for both:
const mockApiService = {
  getHackerDetails: (id) => Promise.resolve(mockHackers[3])
};

const mockActivatedRoute = {
  params: of({ id: 'f1b2e9bf-2794-4ccf-a869-9ddb93478f70'})
};
Using of() is a very convinient way of wrapping objects into an observable.
When configuring the TestBed, for the providers you instruct Angular to use these when the service dependencies are injected:
providers: [
  { provide: ApiService, useValue: mockApiService },
  { provide: ActivatedRoute, useValue: mockActivatedRoute }
],
In your specs, calling fixture.detectChanges() will trigger ngOnInit, which will retrieve the id parameter, and then call renderDetails, which will then call the getHackerDetails method on the api. Lots of async here, so use async() along with fixture.whenStable().
Tasks:
Complete the following tests:
should set the correct hacker nameshould set the correct hacker status message
Module 10: Testing Workflows
Details
There are specific things that as a developer and tester and you can do to create a better testing workflow. From terminal reporting, to commit hooks, you should take advantage of the tools available.
Setup and Configuration
The Angular CLI generates a project for you with testing included out of the box. It's a good idea to generate code coverage reports when you run your tests:
ng test --no-watch --code-coverage
Better yet, create an npm script for this:
"test": "ng test --no-watch --code-coverage"
and also a script to watch your tests automatically:
"test:watch": "ng test --code-coverage"
Also, configure terminal reporting (refer to Module 2 above).
Enforcing coverage thresholds
There are mixed opinions on whether or not you should enforce coverage thresholds. Sure, a codebase of 99% coverage may not necessarily mean that your code is bug free, but tested code is one major step in the way of producing clean code. Enforcing coverage thresholds will promote testability among your team (specially if your team is new to testing), and you can ensure that untested code is not making its way to your codebase.
add the 'json' reporter to the coverageIstanbulReporter object:
coverageIstanbulReporter: {
  reports: [ 'html', 'lcovonly', 'json', 'text-summary' ],
},
and configure the thresholds:
coverageIstanbulReporter: {
  dir: require('path').join(__dirname, './coverage/fluent-angular-testing'),
  thresholds: {
    // set to `true` to let the test command pass when thresholds are not met
    emitWarning: false,
    // thresholds for all files
    global: {
      statements: 90,
      lines: 90,
      branches: 90,
      functions: 90
    },
    // thresholds per file
    each: {
      statements: 80,
      lines: 60,
      branches: 60,
      functions: 80,
    }
  },
},
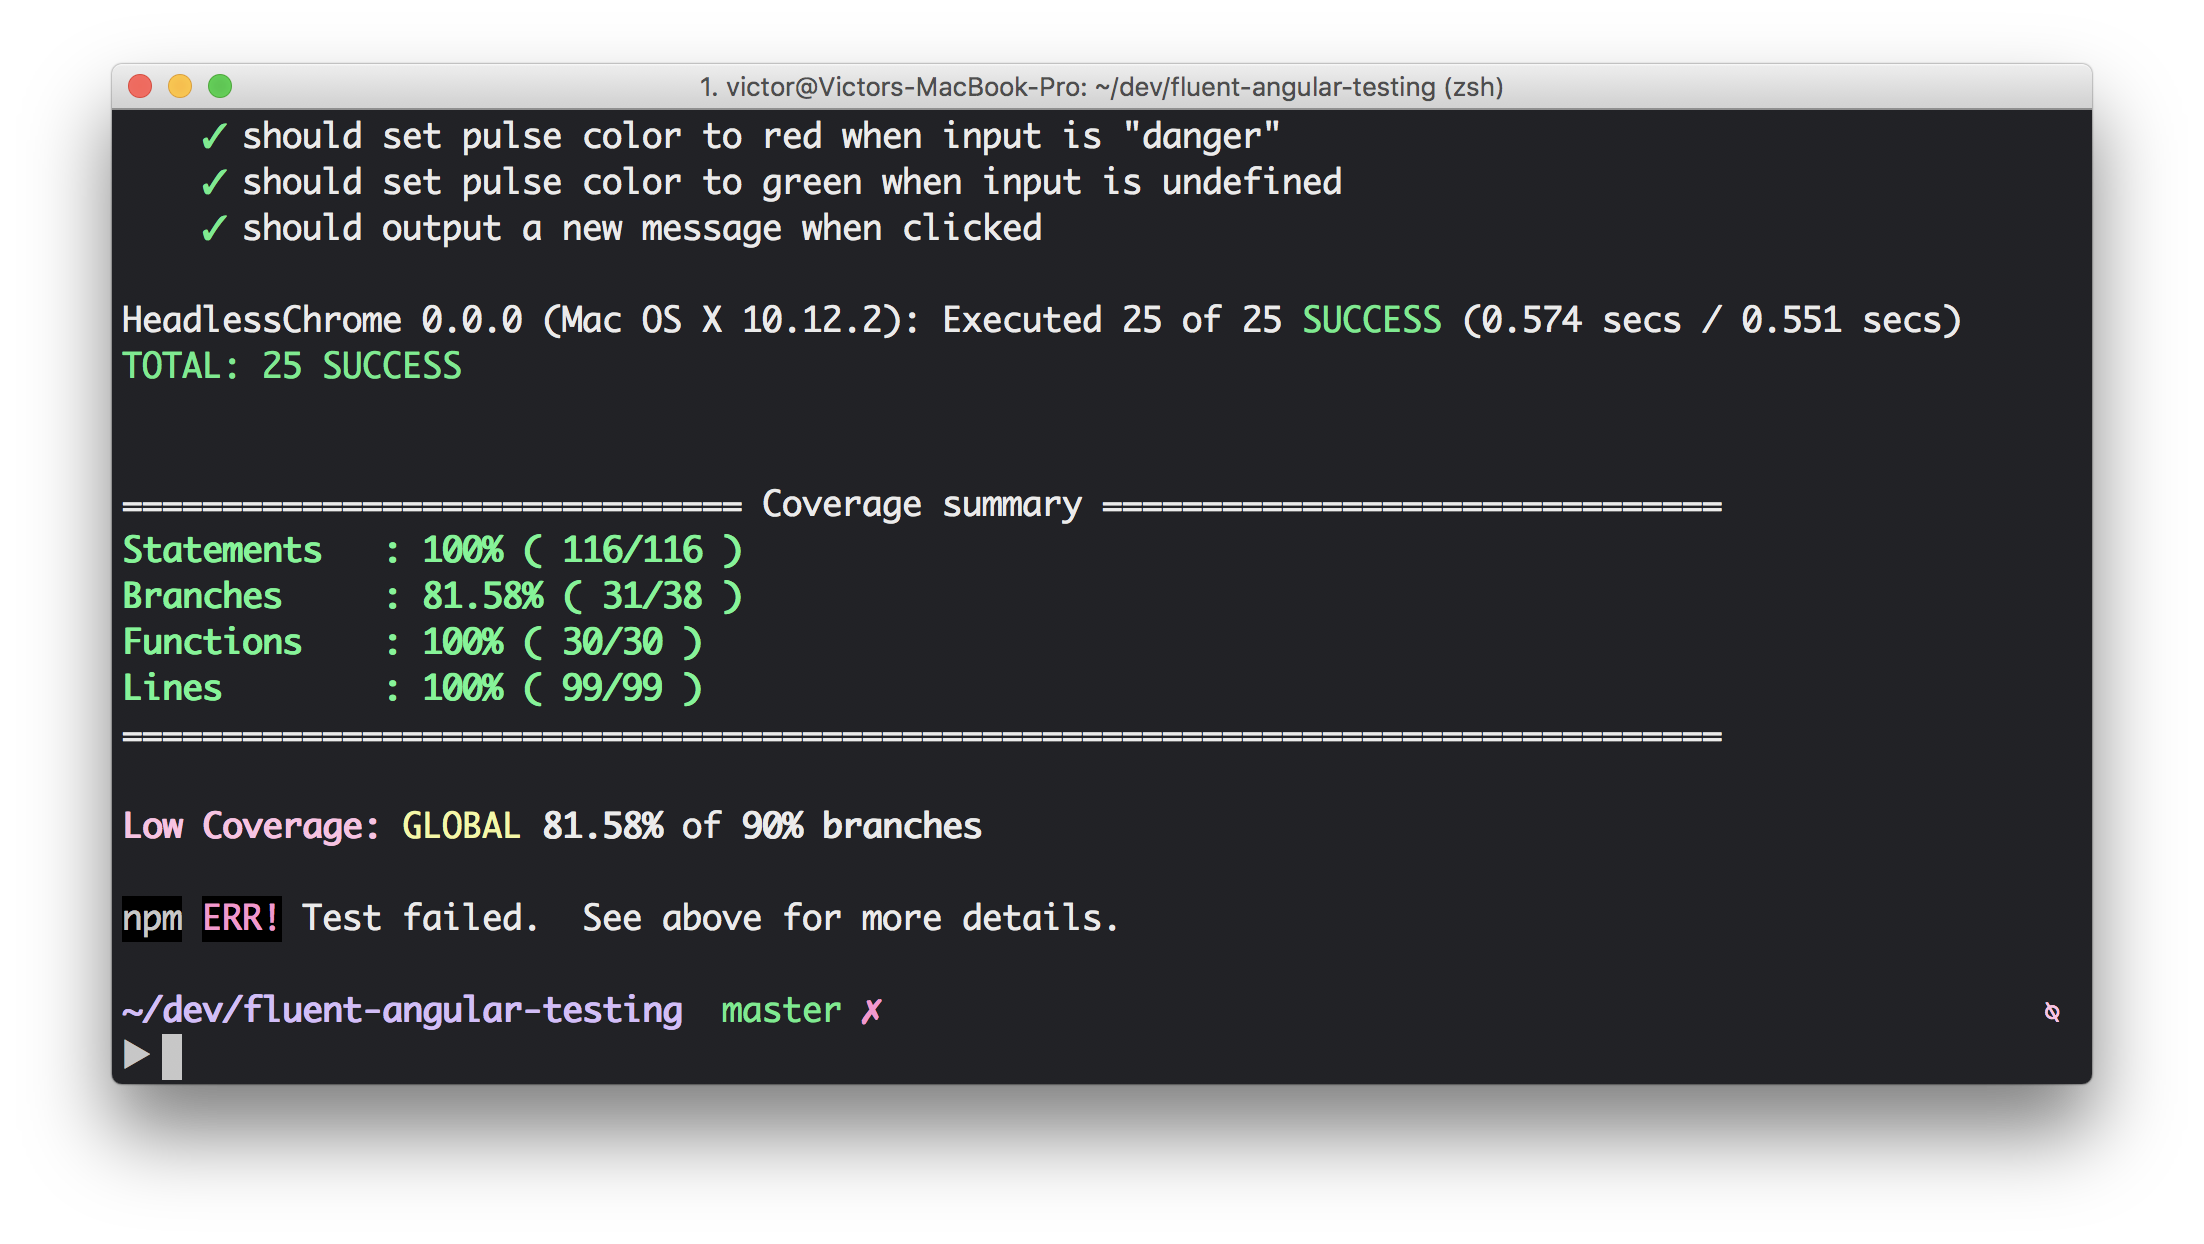
Now, if any of these stats fall below the specified thresholds, running ng test will fail, even if each spec is passing:
Preventing bad commits
Husky can be used to easily configure git hooks to prevent bad commits. It's an npm module, so install it:
npm i --save-dev husky
Then, you can configure a precommit and prepush hook by simply adding npm scripts:
"precommit": "npm run lint",
"prepush": "ng test --single-run --code-coverage"
Before committing, it will run the linter, and before pushing your branch, it will run the test suite. This combined with coverage thresholds can provide a powerful way of enforcing clean, tested code.
Module 11: Continuous Integration (TravisCI and Codecov)
Details
You can use TravisCI to automatically test your code as it's pushed to GitHub, and configure it to run for every pull request.
Head over to TravisCI and sign in with your GitHub account. You can then "flick the repository" switch to "on" for your repo. The next step is to add a .travis.yml file.
dist: trusty
addons:
  chrome: stable
language: node_js
node_js:
  - '8'
before_install:
  - google-chrome-stable --headless --disable-gpu --remote-debugging-port=9222 http://localhost &
install:
  - npm install
  - npm install -g codecov
script:
  - npm test
  - codecov -f coverage/coverage-final.json
There is a a lot going on here. We are instructing TravisCI to use Ubuntu Trusty, Node 8.x, and further instructions to in order to get Chrome headless running. In addition, we will be using codecov.io in order to provide coverage reports for us. It works out of the box with TravisCI, simply sign up using your GitHub account.
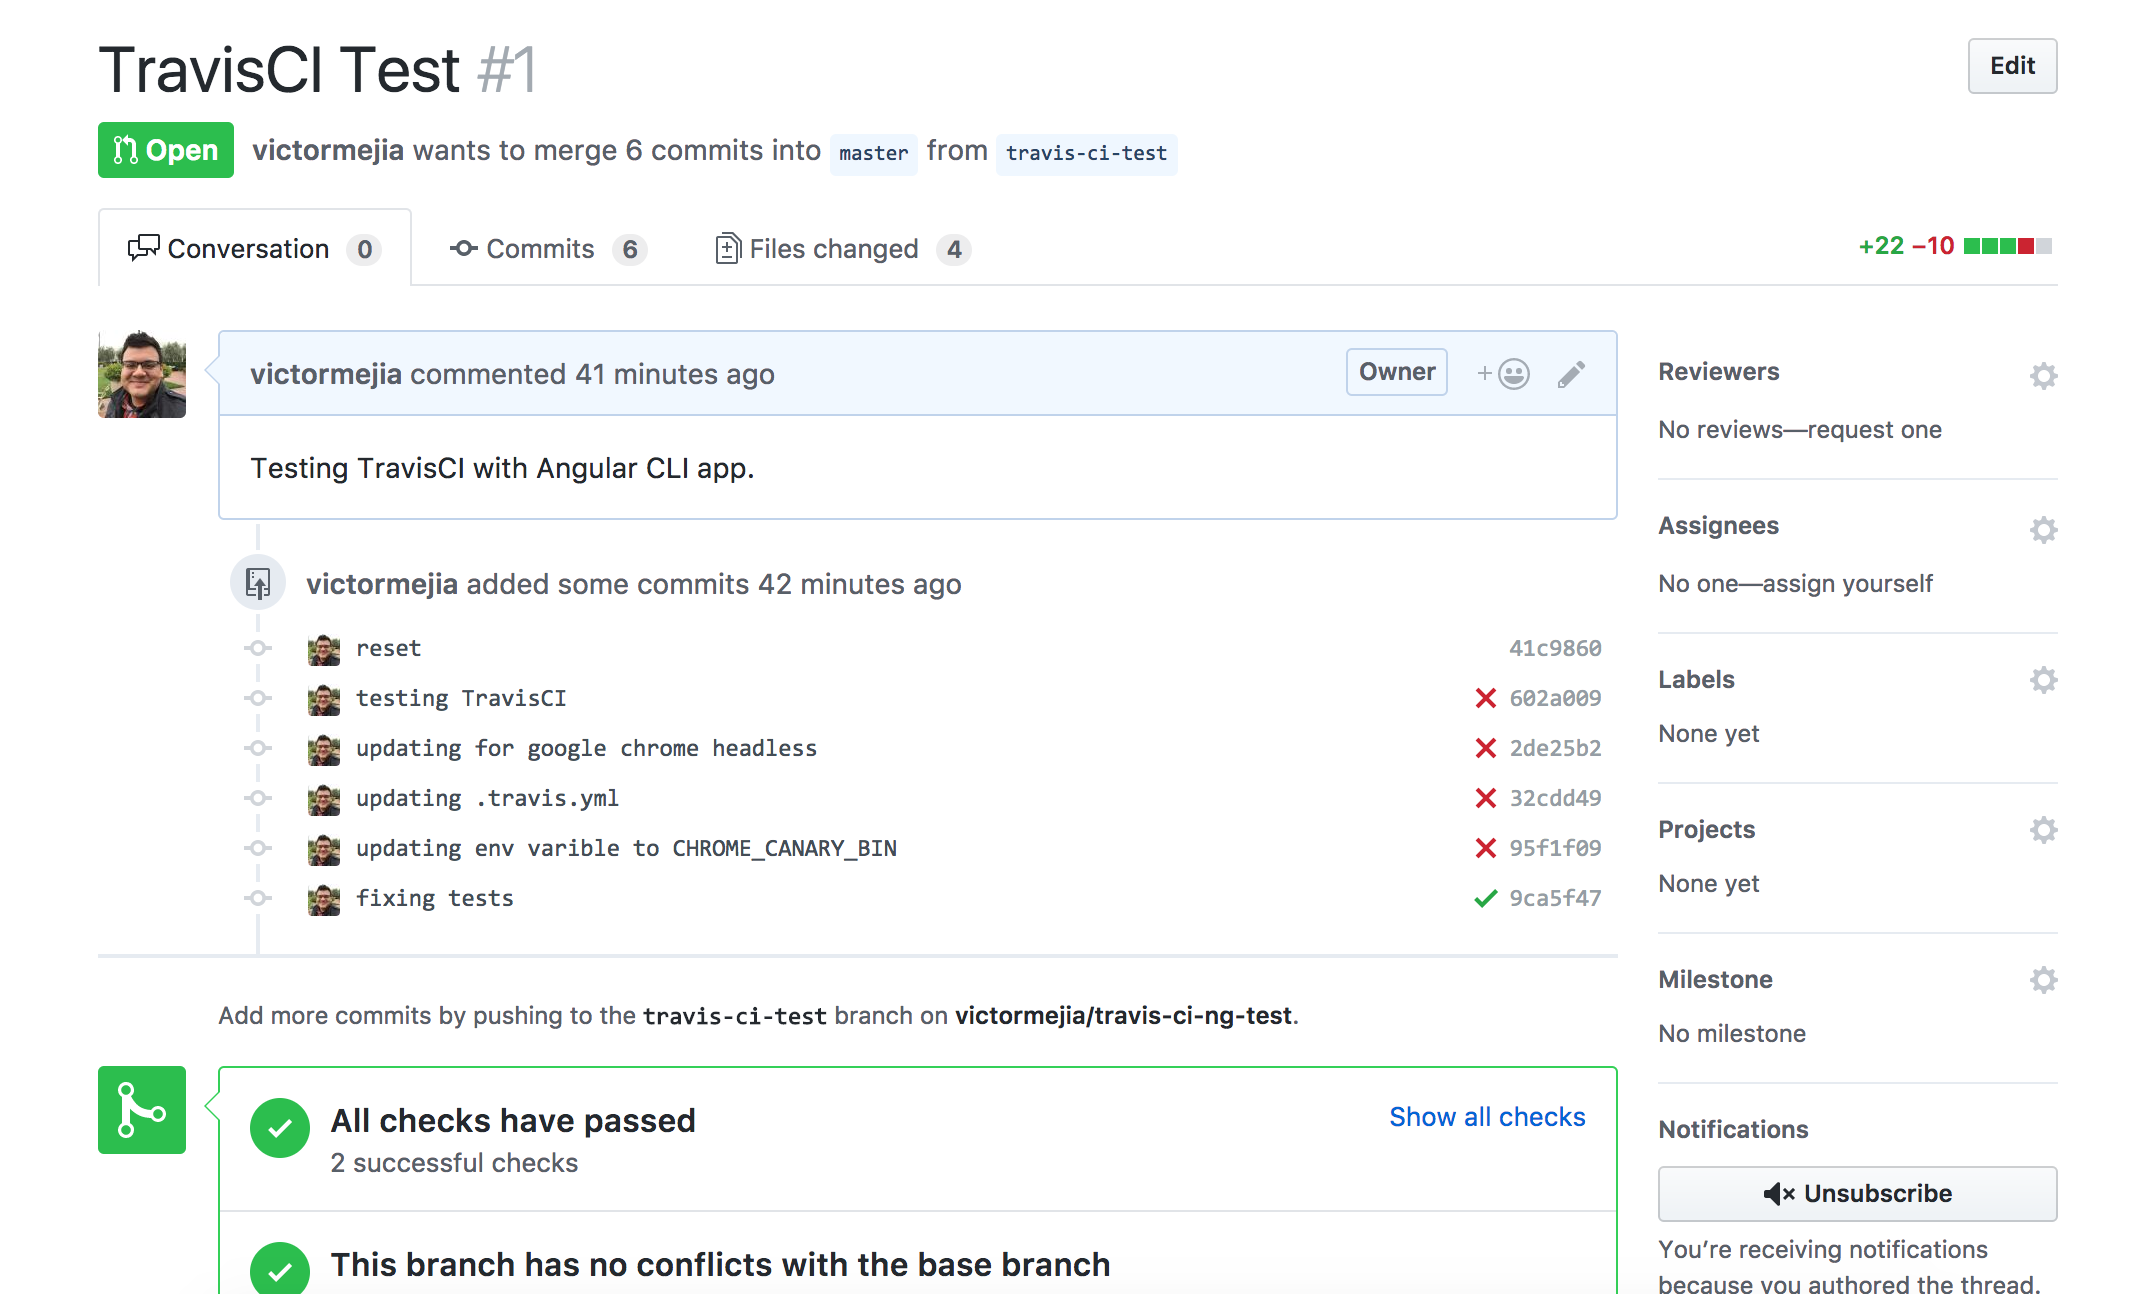
Once you open a PR or push any branch, it will trigger a TravisCI build:
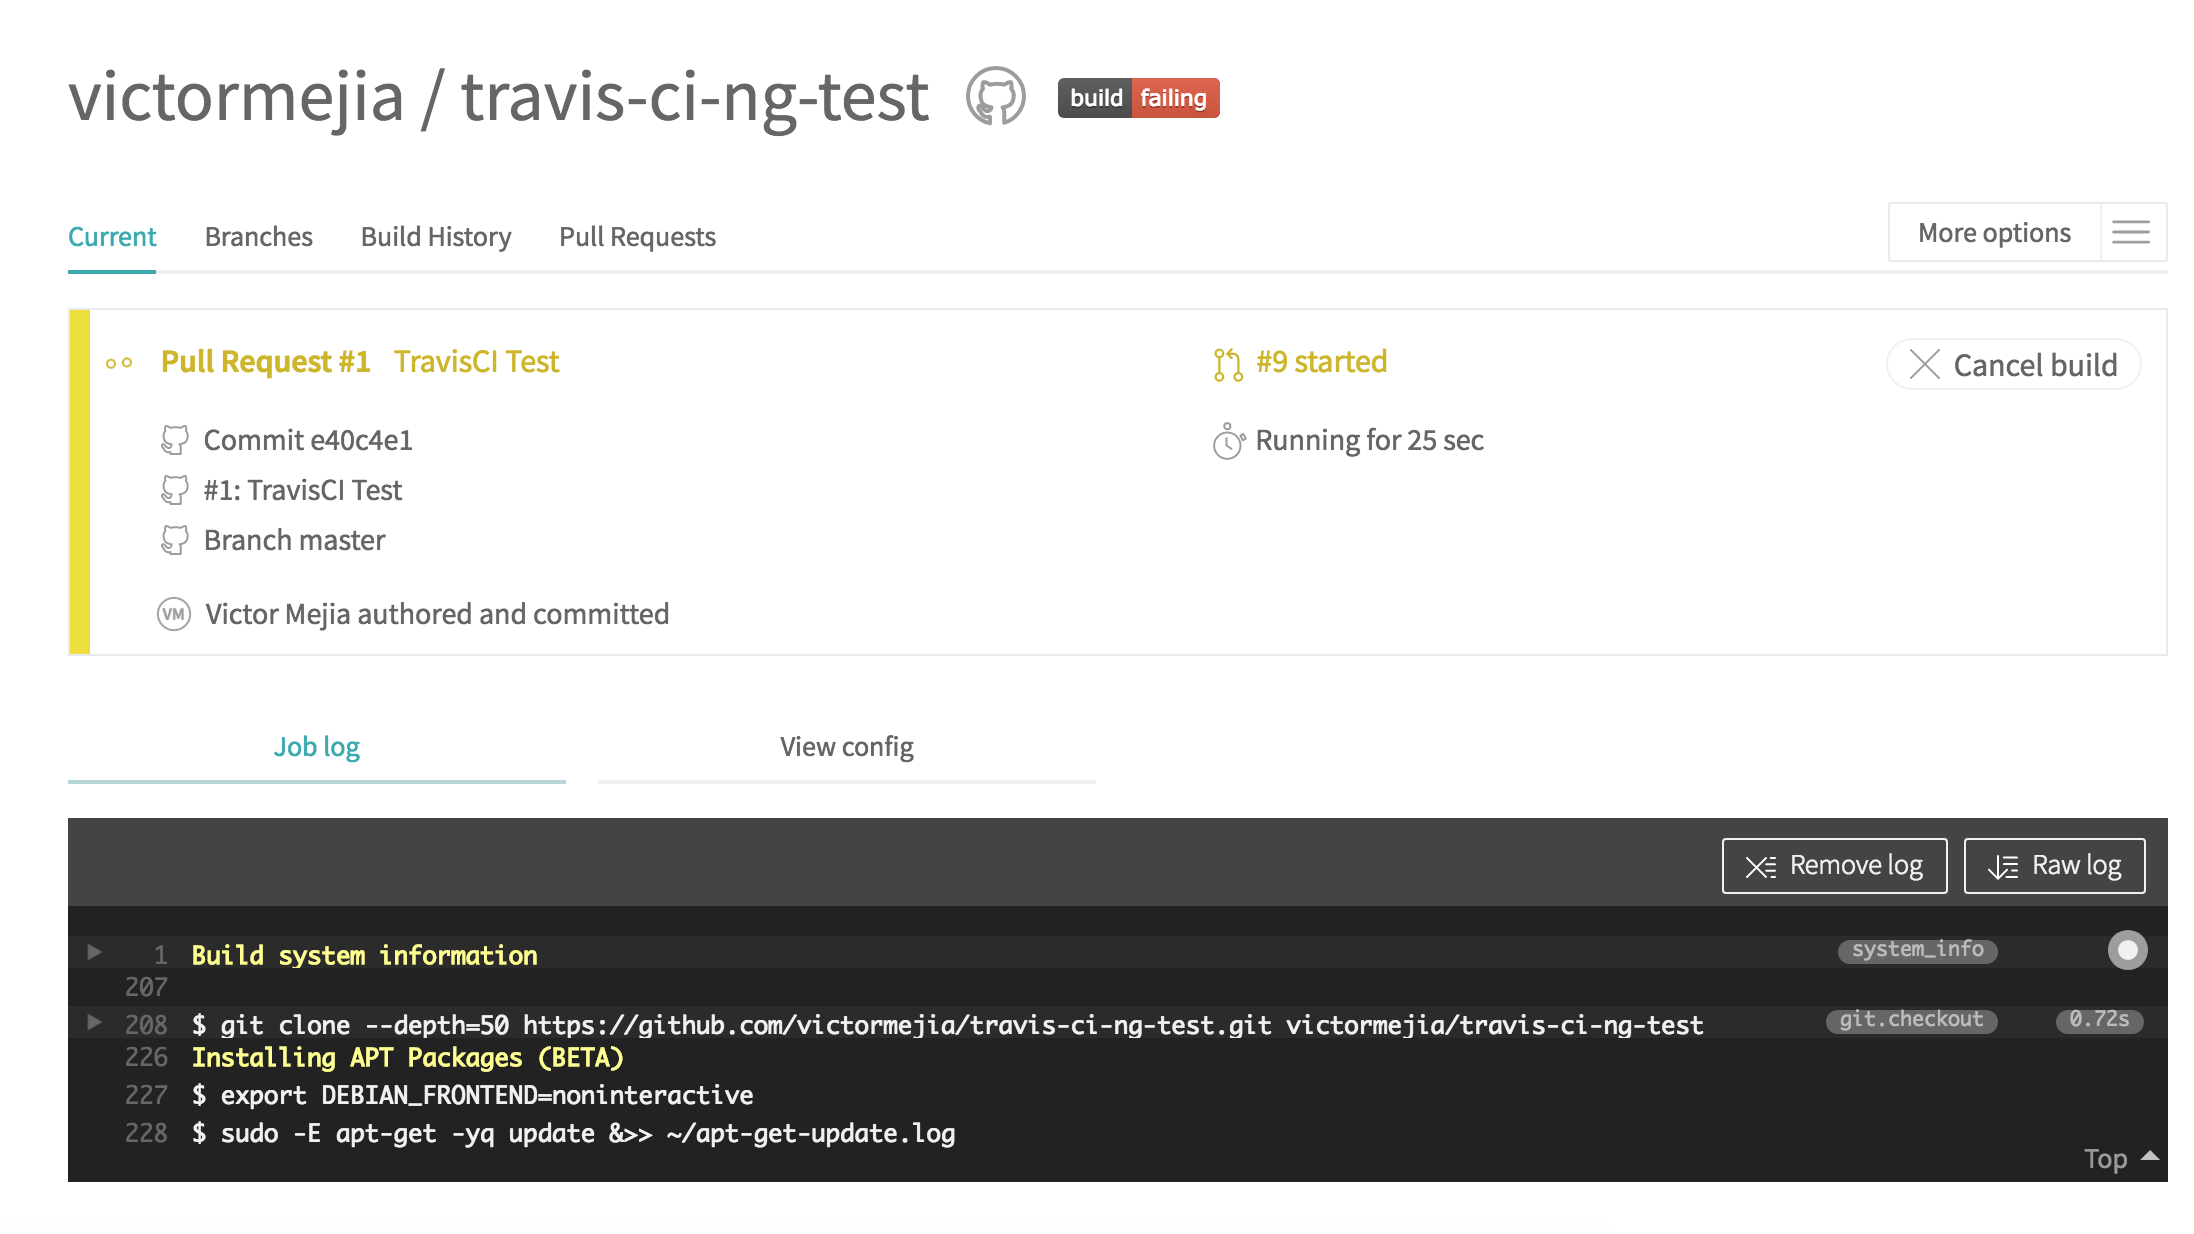
If the build fails, you will know both on GitHub and on TravisCI:
Once fixed, repush your branch, and the build triggers again:
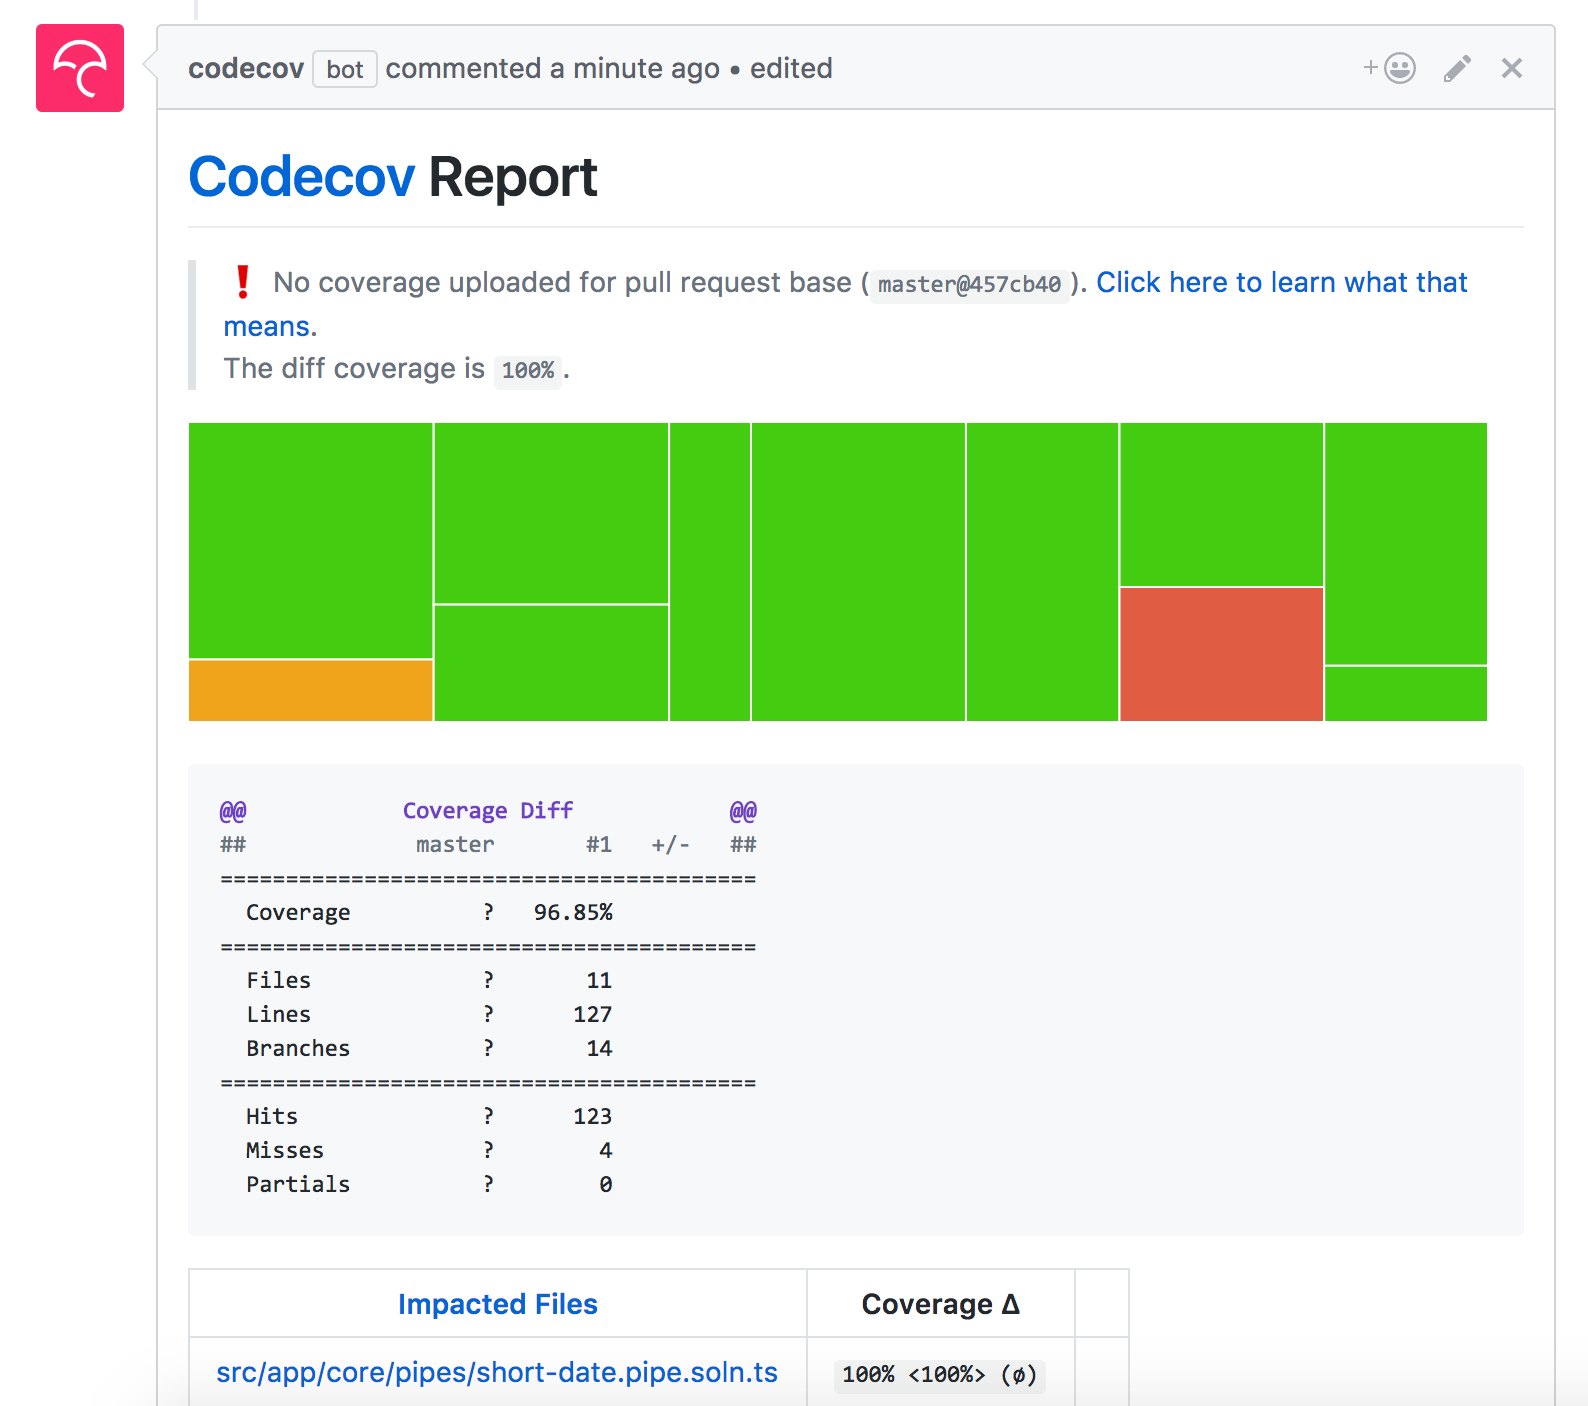
In addition, since we have enabled reporting with Codecov, we get a codecov bot reporting the coverage:
Resources
One of the things I love about the Angular community is its willingness to share awesome content to make your every day developer life even better. This isn't the only resource on testing Angular. I recommend you also check out these awesome resources:
- Official Angular Testing Guide @ angular.io
- "Angular Testing Guide" by Gerard Sans
- Topcoders Angular Testing Workshop by Joe Eames
- Turbocharge Your Angular Testing Workflow, talk @ NG-Conf 2017