Getting started with Cassandra, Spark, and Kafka!
This project is part of the Event Driven Toolkit for Cassandra, Spark, Kafka initiative from Anant where we build step-by-step and distributed message processing architecture.

📚 Table of Contents
| Description and Link | Tools |
|---|---|
| 1. Reminders on Episode 1, start Cassandra API | Node, Python,Astra |
| 2. Start and Setup Apache Kafka™ | Api, Kafka |
| 3. Write into Cassandra | Astra, Kafka |
| 4. Run Apache Spark Jobs against DataStax Astra | Astra, Spark, Kafka |
1. Reminders on Episode 1, setup Cassandra API
This work has been realized during first workshop. The procedure is described step-by-step in the following README.
For reference, recording of first episode is available on youtube
leaves in order to keep it simple when following this demo, but you can use a different tablename, as long as you change the tablename throughout the rest of the demo to use the same table.
1.a - Open Cassandra.API in Gitpod
Gitpod is an IDE 100% online based on Eclipse Theia. To initialize your environment simply click on the button below (CTRL + Click to open in new tab)
- To initialize the Cassandra API in Gitpod
- Click on the button below (CTRL + Click to open in new tab) =>

Expected Output

1.b - Setup the Cassandra.API in Gitpod
To allow best connectivity make sure your REST API's port 8000 is exposed, so that we can send requests to it later:

npm start for NodeJS or python3 app.py for Python).
1.c - Get url for future reference
When we will tell Kafka Consumer where to send events we will need the public URL for the API.
✅ To get it use:
gp url 8000Expected Output

This is what you have running as of now:

2. Start and Setup Apache Kafka™
2.a - Open Cassandra.Realtime in Gitpod
As before, initialize your environment by simply click on the button below (CTRL + Click to open in new tab). This will open a second gitpod workspaces. They will communicate to each other.
Open With > Preview:

⚠️ By default Autosave is not enabled in Gitpod. Don't forget to save your modifications with CTRL+S
2.b - Setup Kafka
Make sure Kafka services are up by running confluent local start. Note that you don't need to start kafka connect yet (and indeed, it won't work until we set it up later on in this demo), but the others should be up.
✅ You can check with the confluent cli:
confluent local status

# if some are not up yet (running again doesn't hurt anything, so you can just run this either way):
confluent local start
Expected Output

confluent local services start. In gitpod, we downloaded v.1.6.0 for you, so you can use the shorter syntax: confluent local <cmd>.
2.c - Create a topic
If you are in gitpod, we set $CONFLUENT_HOME for you. It points to where your confluent binary directory is (/home/gitpod/lib/confluent-5.5.1). If you are not running this in gitpod, you will have to set $CONFLUENT_HOME yourself.
✅ Execute this to create a topicrecord-cassandra-leaves-avro
$CONFLUENT_HOME/bin/kafka-topics --create --zookeeper localhost:2181 --replication-factor 1 --partitions 1 --topic record-cassandra-leaves-avroExpected Output

✅ Check that topicrecord-cassandra-leaves-avronow exist
$CONFLUENT_HOME/bin/kafka-topics --list --zookeeper localhost:2181Expected Output

2.d Create the Kafka schema for topic's messages value
Make sure your python environment has requests and other modules installed.
✅ You can install it using our requirements.txt file:
cd $PROJECT_HOME
pip install -r python/requirements.txt
If you are in gitpod, we set $PROJECT_HOME for you. It is an absolute path to where this directory is inside this repo (/workspace/cassandra.realtime). If you are not running this in gitpod, you will have to set $PROJECT_HOME yourself.
Expected Output

✅ Create the schema
python ./kafka/create-schema.py http://localhost:8081 record-cassandra-leaves ./kafka/leaves-record-schema.avscExpected Output

✅ Check that schema exists
curl http://127.0.0.1:8081/subjects
# should return: ["record-cassandra-leaves-value"]
✅ Alternatively you can check AKHQ. Run this to start AKHQ
java -Dmicronaut.config.files=$PROJECT_HOME/kafka/akhq/gitpod-akhq-config.yml -jar ${BINARY_DIR}/akhq.jarYou can see the AKHQ GUI at http://127.0.0.1:8080/. If you are using gitpod, we exposed 8080 for you by default. You can double check by clicking down here.
Expected Output

💡 ProTip : Use this single-line command to open a preview for port 8080 in gitpod:
gp preview $(gp url 8080)To see the AKHQ Schema registry view specifically:
gp preview $(gp url 8080)/ui/docker-kafka-server/schema
Expected Output

2.e - Import the data into Kafka
We are now ready to start sending messages to Kafka.
✅ Import data with importer
cd $PROJECT_HOME/python
pip install -r requirements.txt
python3 data_importer.py --config-file-path configs/gitpod-config.ini
Expected Output

✅ Confirm that the message arrived in Kafka Topics
You can check the topic that has the schema using kafka-avro-console-consumer:
(
$CONFLUENT_HOME/bin/kafka-avro-console-consumer --topic record-cassandra-leaves-avro --bootstrap-server localhost:9092 --from-beginning --property schema.registry.url=http://localhost:80813. Consume from Kafka, write to Cassandra
3.a - Execute the scala job to pick up messages from Kafka, deserialize and write them to Cassandra
✅ Edit thegitpod-project.propertiesfile with the url of your running cassandra.api instance.
You will need to change the api.host key. It will look something like api.host=https://8000-c0f5dade-a15f-4d23-b52b-468e334d6abb.ws-us02.gitpod.io. Again you can find it by running the following command in the gitpod instance running cassandra.api: gp url 8000.
Change the cassandra.keyspace as well to whatever your keyspace is in Astra.
ℹ️ Note : if you don't do this, the consumer will still run, but will just fail to write to Cassandra, since its current setting isn't stopping on errors.
cd $PROJECT_HOME/kafka-to-cassandra-worker/src/main/resources/
cp gitpod-project.properties.example gitpod-project.properties
vim gitpod-project.properties
#...
✅ Package the project
cd $PROJECT_HOME
mvn -f ./kafka-to-cassandra-worker/pom.xml clean package
This will install dependencies and package your jar. If you make changes to your gitpod-project.properties file, make sure to run mvn clean package again, using -f flag to point to the pom.xml file.
✅ Run the project
There should now be two jars in ./kafka-to-cassandra-worker/target, one with-dependencies, one without. We'll use the one with dependencies:
cd $PROJECT_HOME
mvn -f ./kafka-to-cassandra-worker/pom.xml exec:java -Dexec.mainClass="org.anant.KafkaAvroConsumer" -Dexec.args="kafka-to-cassandra-worker/target/classes/gitpod-project.properties"
Note: if your Cassandra.api gitpod workspace timed out, you might need to reopen it and restart the REST API server. Offset is at
latest, so you won't see anything unless you have messages actively coming in.
✅ Send more messages whenever you want to by re-running the python script
cd $PROJECT_HOME/python
python data_importer.py --config-file-path configs/gitpod-config.ini
✅ confirm we are consuming the correct topic using AKHQ, at/ui/docker-kafka-server/topic.
gp preview $(gp url 8080)/ui/docker-kafka-server/topic(If AKHQ was already on that page, make sure to refresh the view). You should see our consumer group (send-to-cassandra-api-consumer) listed as a consumer on topic record-cassandra-leaves-avro:
Expected Output

3.b - Sending messages to Kafka using Kafka REST Proxy
✅ Check your topics
curl http://localhost:8082/topics/
curl http://localhost:8082/topics/record-cassandra-leaves-avro
✅ Send using data importer's rest proxy mode
cd $PROJECT_HOME/python
python3 data_importer.py --config-file-path configs/gitpod-rest-proxy-config.ini
There should now be new messages for you to consume in your Kafka topic.
Expected output

3.c - Process messages using Kafka Streams and writing to Cassandra using Processor API
You can use the Kafka processor API if you want to send messages to Cassandra using the REST API we are using.
✅ Send message to Cassandra
cd $PROJECT_HOME
mvn  -f ./kafka-to-cassandra-worker/pom.xml exec:java -Dexec.mainClass="org.anant.KafkaStreamsAvroConsumer" -Dexec.args="kafka-to-cassandra-worker/target/classes/gitpod-project.properties"
Make sure to keep sending messages in another terminal or nothing will happen. You can use the same command as before:
cd $PROJECT_HOME/python
python3 data_importer.py --config-file-path configs/gitpod-rest-proxy-config.ini
3.d - Writing to Cassandra using Kafka Connect
We used the Processor API to show what it would look like to write to Cassandra using Kafka Streams and a REST API, but it is generally recommended to use Kafka Connect. We will be using the Datastax connector, but there is also a Confluence Cassandra connector as well as other third party connectors available if you are interested.
3.e - Setup Kafka Connect
The Datastax Kafka connector also has instructions and a download link from the Datastax website as well as Confluent Hub.
3.f - Create a connector properties file
We provide a connect-standalone.properties.example that is setup to run kafka-connect-cassandra-sink-1.4.0.jar. However, you will need to change:
- the name of the astra credentials zip file (cloud.secureConnectBundle). The path should be fine.
- Topic settings, particularly keyspace and tablename, unless tablename is already leaves, then only change keyspace
(topic.record-cassandra-leaves-avro.<my_ks>.leaves.mapping) - Astra database client id and client secret (auth.username should be your client-id and auth.password should be your client-secret)
Fields that require changing are marked by ### TODO make sure to change! in the example file.
✅ Editconnect-standalone.properties.example
cd $PROJECT_HOME/kafka/connect
cp connect-standalone.properties.gitpod-example connect-standalone.properties
vim connect-standalone.properties
# ...
The worker properties file we provide (found at $PROJECT_HOME/kafka/connect/worker-properties/gitpod-avro-worker.properties) should work fine without modification in gitpod. However, if you are not using gitpod, you will need to change /workspace/cassandra.realtime in the plugin path if you are not using gitpod, to whatever your $PROJECT_HOME is.
3.g - Setup Connect with Astra
REMINDER create you Astra Account here
If you have not already, make sure that your Datastax astra secure connect bundle is downloaded.
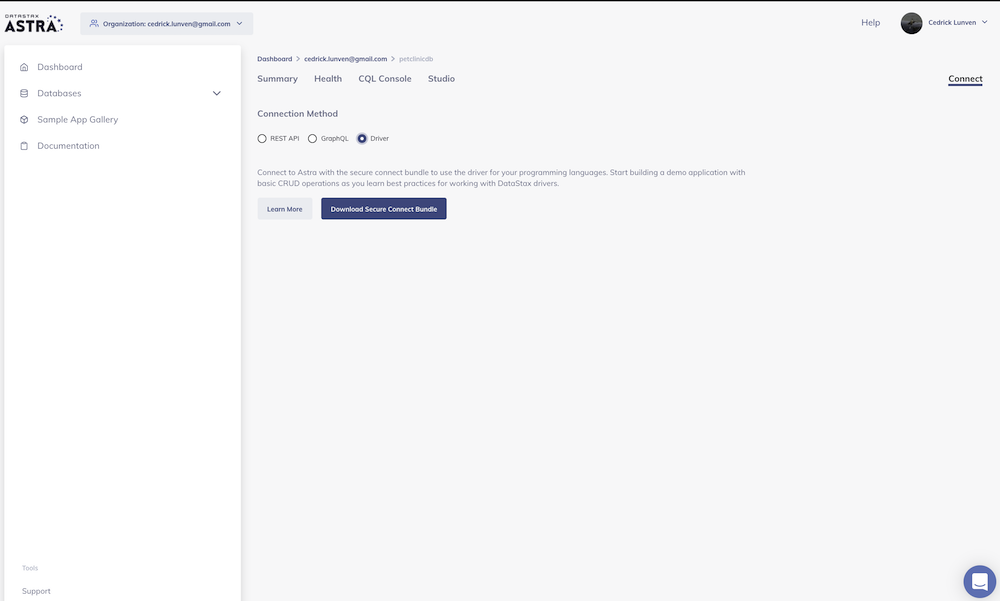
✅ Get the secure cloud bundle
Display the summary screen and locate the connect button.

On the connect screen pick drivers
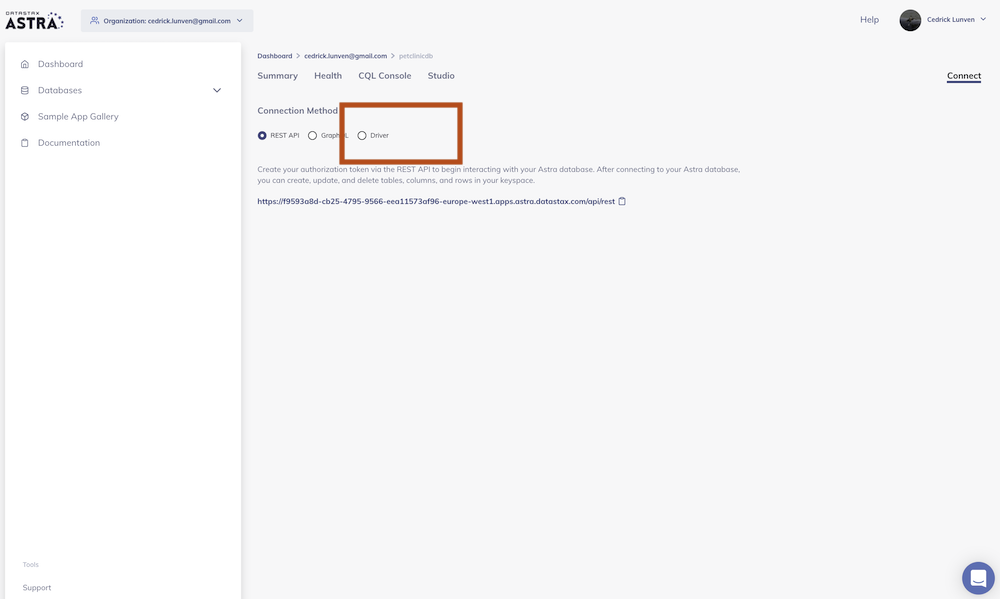
Finally click the download secure bundle button to download the zip of right-click to the button to get the url
✅ Place the secure creds bundle into astra.credentials
If you copied the link....
cd $PROJECT_HOME/kafka/connect/astra.credentials/
curl -L "<YOU_LINK>"  > secure-connect-<database-name-in-astra>.zip
if you have the zip, upload file to gitpod with menu or drag and drop it into $PROJECT_HOME/kafka/connect/astra.credentials/
mv ./path/to/astra.credentials/secure-connect-<database-name-in-astra>.zip $PROJECT_HOME/kafka/connect/astra.credentials/3.h - Start Kafka Connect
Start Kafka connect using your connect-standalone.properties file. First you will have to stop the service that the confluent cli started.
✅ Start Kafka-Connect
confluent local stop connect
$CONFLUENT_HOME/bin/connect-standalone $PROJECT_HOME/kafka/connect/worker-properties/gitpod-avro-worker.properties $PROJECT_HOME/kafka/connect/connect-standalone.properties
Expected output

✅ Send more messages in a separate terminal
cd $PROJECT_HOME/python
python3 data_importer.py --config-file-path configs/gitpod-config.ini
If you're not sure if it's working or not, before sending messages to Kafka using the data_importer.py, in the astra console you can delete records previously created using:
TRUNCATE <your_ks>.leaves;Then send messages, and run a count
SELECT COUNT(*) FROM <your_ks>.leaves;
4. Run Apache Spark Jobs Against DataStax Astra
4.a - Setup
✅ Download Apache Spark 3.0.1
curl -L -s https://archive.apache.org/dist/spark/spark-3.0.1/spark-3.0.1-bin-hadoop2.7.tgz | tar xvz -C $PROJECT_HOME/spark✅ Download sbt 1.4.3
curl -L -s https://github.com/sbt/sbt/releases/download/v1.4.3/sbt-1.4.3.tgz | tar xvz -C $PROJECT_HOME/spark-
✅ Drag-and-drop a Copy of Your Secure Connect Bundle into the/sparkdirectory -
✅ Create 2 tables in DataStax Astra
For Astra Studio
CREATE TABLE leaves_by_tag (
   tag text,
   title text,
   tags list<text>,
   url text,
   PRIMARY KEY ((tag), title)
);

CREATE TABLE tags (
   tag text,
   count int,
   PRIMARY KEY (tag)
);
For CQLSH
CREATE TABLE <your-keyspace>.leaves_by_tag (
   tag text,
   title text,
   tags list<text>,
   url text,
   PRIMARY KEY ((tag), title)
);

CREATE TABLE <your-keyspace>.tags (
   tag text,
   count int,
   PRIMARY KEY (tag)
);
4.b - Start Apache Spark in Standalone Cluster Mode with 1 worker
✅ Open a new terminal and start master
cd $PROJECT_HOME/spark/spark-3.0.1-bin-hadoop2.7/
./sbin/start-master.sh
✅ Start worker
./sbin/start-slave.sh <master-url>
💡 ProTip : Use this single-line command to open a preview for port 8080 in gitpod to get the Spark master URL:
gp preview $(gp url 8080)Important note: May have to open a port slightly above 8080 depending on what is running in your gitpod/local instance (i.e. AKHQ).
Once spark master is started, it should open in a mini window in gitpod and that will show what port to use the gp preview command on, as well as show the spark master url at the top.
Expected Output once master and worker started

4.c - Start sbt Server in spark-cassandra directory
✅ Open a new terminal and start sbt server
cd $PROJECT_HOME/spark/spark-cassandra/
../sbt/bin/sbt
Expected Output (This may take a minute, but you should see this when done)

4.d - Create properties.conf file
We provide a properties.example file that is setup to run with our Spark jobs. However, you will need to input your own specific configs into the designated spots. Fields that require changing are marked by ### TODO in the example file. IMPORTANT: Remember to keep 1 whitespace between each parameter and value.
✅ Open a new terminal and edit theproperties.examplefile
cd $PROJECT_HOME/spark
cp properties.example properties.conf
vim properties.conf
4.e - Create Fat JAR
✅ Runassemblyin sbt server terminal
Expected Output


4.f - Run 1st Apache Spark Job
In the first job, we are going to read the Kafka stream, manipulate the data, and save the data into the leaves_by_tag table we created earlier.
✅ Go to the terminal that we used to start Apache Spark in standalone mode and run the below code block with your specific database name in the designated spot for the --files option
./bin/spark-submit --class sparkCassandra.LeavesByTag --properties-file $PROJECT_HOME/spark/properties.conf --files $PROJECT_HOME/spark/secure-connect-<your-database-name>.zip $PROJECT_HOME/spark/spark-cassandra/target/scala-2.12/spark-cassandra-assembly-0.1.0-SNAPSHOT.jarExpected Output Once the Job is Watching for the Kafka Stream

4.g - Run Kafka Connect
✅ If you stopped Kafka Connect, restart it in a seperate terminal
$CONFLUENT_HOME/bin/connect-standalone $PROJECT_HOME/kafka/connect/worker-properties/gitpod-avro-worker.properties $PROJECT_HOME/kafka/connect/connect-standalone.propertiesExpected output
✅ Send more messages in a separate terminal
cd $PROJECT_HOME/python
python3 data_importer.py --config-file-path configs/gitpod-config.ini
4.h - Confirm Data Was Written to Astra
-
✅ Stop Spark Job withCTRL + Conce there is a steady stream of the following in the terminal with no changes:
-
✅ Check count of rows with the tag of 'spark' in CQLSH or Astra Studio
CQLSH:
select tag, count(*) from <your-keyspace>.leaves_by_tag where tag='spark';Expected Output

Astra Studio:
select tag, count(*) from leaves_by_tag where tag='spark';Expected Output

4.i - Run the 2nd Apache Spark Job
In this job, we are going to take the data we sent via Kafka into the leaves table, transform it with Apache Spark, and write the transformed data into the tags table we created during setup.
✅ Run the following code block in the terminal where you previously ran the first Spark Job. Again, be sure to input your specific database name in the --files option where designated
./bin/spark-submit --class sparkCassandra.Tags --properties-file $PROJECT_HOME/spark/properties.conf --files $PROJECT_HOME/spark/secure-connect-<your-database-name>.zip $PROJECT_HOME/spark/spark-cassandra/target/scala-2.12/spark-cassandra-assembly-0.1.0-SNAPSHOT.jarThe job will complete on its own, so you do not have to manually end it.
Expected Output

4.j - Confirm Data was Written To Astra
✅ Check count of rows with the tag of 'spark' in CQLSH or Astra Studio
CQLSH:
select * from <your-keyspace>.tags where tag='spark';Expected Output

Astra Studio:
select * from tags where tag='spark';Expected Output
