kwea123 / Fish_detection
Projects that are alternatives of or similar to Fish detection
fish_detection
This repository contains a tutorial of fish detection using Open Images Dataset and Tensorflow Object Detection.
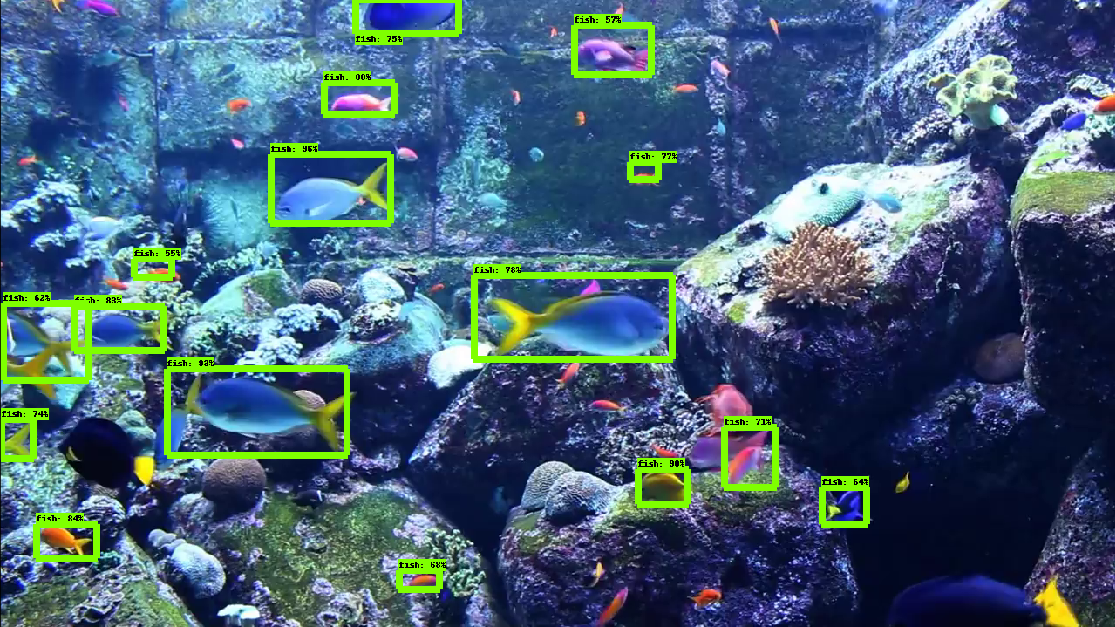
Here is the final result (using googled images):

And a youtube video :
For people who just want to use my pretrained weights, you only have to do 1. Setup Tensorflow Object Detection API and 9. Run inference.
Prepare data
The Open Images Dataset is downloadable from cvdfoundation, of size 513GB. It took around 13 hours with 10MB/s network speed.
Download all the images along with the annotations.
Clone this repository with git clone https://github.com/kwea123/fish_detection.git.
Setup the environment
The OS is ubuntu-16.04.
A Dockerfile with all dependencies is provided. You can build it with
docker build -t $CONTAINER:$TAG ./
This may take a while on the first build.
Otherwise, an environment with all dependencies also works.
Examine the data
Check and extract data
To check how the data format looks like, see read_test.ipynb.
Since we only want to train on fish (and related species), use read_fish.ipynb to see how much data we actually have.
Among all images, there are 24403 individual fish bounding boxes training data.
Also, we save the minimum required data (ImageId and bounding box coordinates) into fish_train.csv and fish_val.csv (you can use the test set too).
Choose an object detection model
I choose Tensorflow Object Detection to be my detection model.
1. Setup Tensorflow Object Detection API
Clone Tensorflow Object Detection github :
git clone https://github.com/tensorflow/models.git
Execute the following commands from models/research/ :
protoc object_detection/protos/*.proto --python_out=. # protoc needs to be version 3
export PYTHONPATH=$PYTHONPATH:`pwd`:`pwd`/slim # needs to be executed each time in a new shell
Normally, protoc version 3 should be installed when you build the docker.
If not, refer to this page and install it (protoc version 2 doesn't work).
If you forget to run them, you could get ImportError: No module named deployment or ImportError: No module named object_detection when training.
2. Prepare TFRecord
In order to train a tensorflow model, we need to prepare the data in its acceptable form, which are tfrecords.
Following the official tutorial, I created create_tfrecords.py which converts the .csv files created in read_fish.ipynb into .record files.
Run
python create_tfrecords.py --output_path data/fish_train.record --csv_input data/fish_train.csv --image_path=/root/data/images/train/
with the paths set correctly to your paths.
3. Create the label map
From /models/research/object_detection/data, you can see sample label maps.
Create your own according to your classes. E.g. mine is fish_label_map.pbtxt
Note : The class id must start from 1.
Now the data prepartion is completed. We move on to prepare the model.
4. Download an existing model
Download a model from Tensorflow detection model zoo, and extract the .tar file.
I use faster_rcnn_inception_v2_coco since it's fast and enough accurate.
Note : I had difficulty obtaining good results using ssd nets. See Issue for more information.
5. Pick the corresponding config
Pick the model's config from /models/research/object_detection/samples/configs. Duplicate it somewhere.
Note : you must pick the config with the same name as your model.
6. Modify the config
Open the duplicated config, (change its name if you wish) and modify the following according to your model:
-
num_classes, which should be at the beginning of the file; -
fine_tune_checkpointand
train_input_reader: {
  tf_record_input_reader {
    input_path: "PATH_TO_BE_CONFIGURED/mscoco_train.record"
  }
  label_map_path: "PATH_TO_BE_CONFIGURED/mscoco_label_map.pbtxt"
}

eval_config: {
  num_examples: 8000
  # Note: The below line limits the evaluation process to 10 evaluations.
  # Remove the below line to evaluate indefinitely.
  max_evals: 10
}

eval_input_reader: {
  tf_record_input_reader {
    input_path: "PATH_TO_BE_CONFIGURED/mscoco_val.record"
  }
  label_map_path: "PATH_TO_BE_CONFIGURED/mscoco_label_map.pbtxt"
  shuffle: false
  num_readers: 1
}
which are towards the end of the file.
Note : The paths should be absolute!
You can refer to my configuration.
6. Start training
You can start training now!
From models/research/, run
python object_detection/legacy/train.py --logtostderr --train_dir=${YOUR MODEL'S OUTPUT DIR} --pipeline_config_path=${YOUR CONFIG's PATH}
Note : The paths should be absolute!
You will get the following training info :
...
INFO:tensorflow:global step 31303: loss = 0.1623 (0.109 sec/step)
INFO:tensorflow:global step 31304: loss = 0.2365 (0.111 sec/step)
...
Your model is on the way!
You can run tensorboard --logdir=${YOUR MODEL'S OUTPUT DIR} to check if the loss actually decreases.
You should see an image like the following :

Important note : You need to constantly keep track of the loss. It will decrease at the beginning and at some time starts to re-increase. You had better stop training at this point (early-stopping). In my case, training for 200k steps (as default) gives me bad results (many missed detections), whereas stopping at around 50k steps (where the loss is minimal) gives me lots of true positives.
7. See validation set results
From models/research/, run
python object_detection/legacy/eval.py --logtostderr --checkpoint_dir=${YOUR MODEL'S OUTPUT DIR} --pipeline_config_path=${YOUR CONFIG's PATH} --eval_dir=${YOUR EVAL'S OUTUPT DIR}
In case a Syntax Error appears on print, modify models/research/object_detection/utils/object_detection_evaluation.py#L842 by adding parentheses for these 3 prints.
Then, run tensorboard --logdir=${YOUR EVAL'S OUTUPT DIR}.
You should see some validation images like the following :

8. Export the graph
Once your model is trained, you need to export a .pb graph, to use for inference.
From models/research/, run
python object_detection/export_inference_graph.py --input_type image_tensor --pipeline_config_path ${YOUR CONFIG's PATH} --trained_checkpoint_prefix ${YOUR MODEL'S OUTPUT DIR}/model.ckpt-XXXX --output_directory ${YOUR GRAPH's PATH}
where XXXX is the last checkpoint step (the largest number in that folder).
9. Run inference
First, find some images with objects you want to detect inside (in my case fish). Download them to models/research/object_detection/test_images with format imageX.jpg, where X is a number, starting from 3 (since there are already two test images by default).
Move the folder containing the .pb graph to /models/research/object_detection/, and copy the label map to /models/research/object_detection/data/.
Open models/research/object_detection/object_detection_tutorial.ipynb.
Modify the "Model preparation" cell where the MODEL_NAME, PATH_TO_LABELS, and NUM_CLASSES are set (set to your values).
Modify the "Detection" cell, set TEST_IMAGE_PATHS correctly (increase the range).
Execute the cells from the top to the bottom, skipping the "Download model" cell.
You can see your detection result, which should be comparable to mine at the beginning of this readme!
More results are available at results.ipynb. The detection threshold is 0.1 and the output numbers are the detection time (in seconds) for each image.
My trained model is available here. You only need this graph and the label map to be able to reproduce my result.
Finally, as for the speed, it runs at 40-50ms per image on one 1080Ti (after warmed up), which is sufficiently fast for me.
Errors I encountered
To make your debug faster, I list some of the errors I met during training and the solutions :
Other useful tutorials
Here are the tutorials I followed :
How To Train an Object Detection Classifier Using TensorFlow 1.5 (GPU) on Windows 10