frol / Flask Restplus Server Example
Programming Languages
Projects that are alternatives of or similar to Flask Restplus Server Example

![]()
RESTful API Server Example
This project showcases my vision on how the RESTful API server should be implemented.
Author's vision update!
I used to use RESTful style APIs for quite a number of projects and this example was the finest foundation I ended up with, but I always felt limited by HTTP request-response nature and RESTful resources. Thus, I was looking for a new solution to the API problem space. I am currently happy with WAMP-proto specification (here is my barebones demo), so I can recommend it. I have also switched to Rust programming language. I am currently working on async/await-powered implementation of WAMP-proto in Rust. Stay tuned!
The goals that were achived in this example:
- RESTful API server should be self-documented using OpenAPI (fka Swagger) specifications, so interactive documentation UI is in place;
- Authentication is handled with OAuth2 and using Resource Owner Password Credentials Grant (Password Flow) for first-party clients makes it usable not only for third-party "external" apps;
- Permissions are handled (and automaticaly documented);
- PATCH method can be handled accordingly to RFC 6902;
- Extensive testing with good code coverage.
I had to patch Flask-RESTplus (see flask_restplus_patched folder), so it can
handle Marshmallow schemas and Webargs arguments.
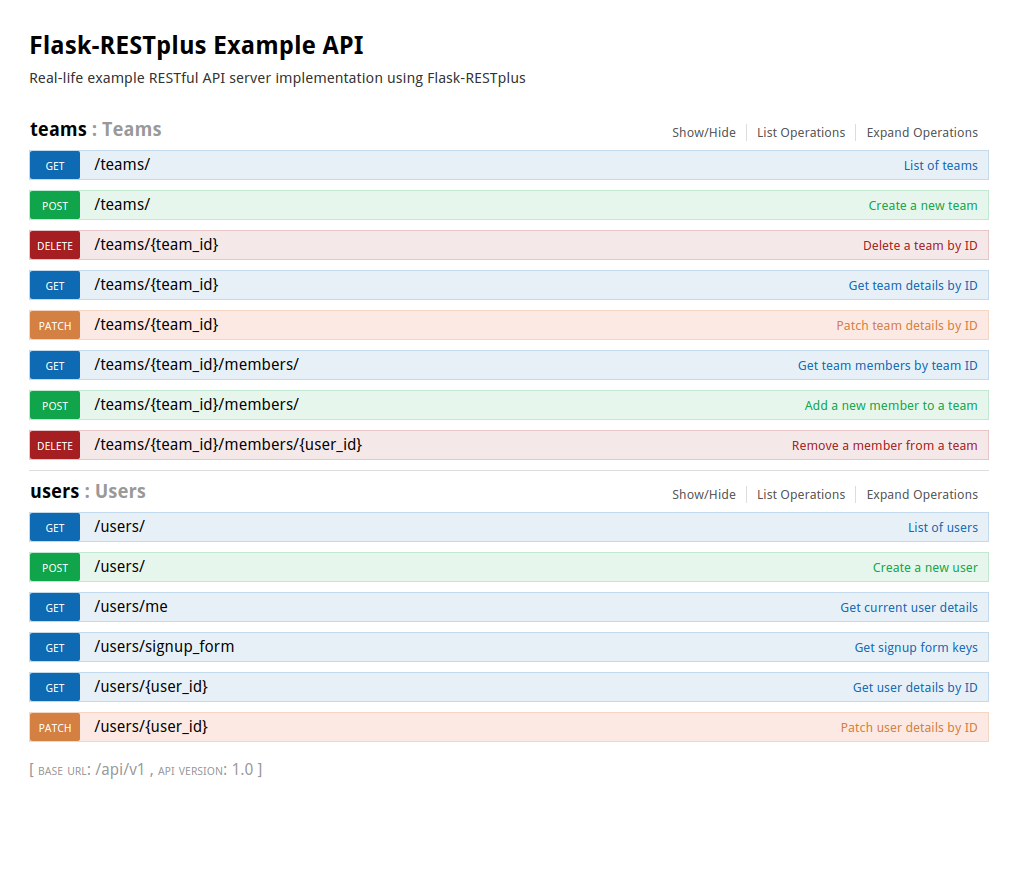
Here is how it looks at this point of time (live demo):
Single File Example
This example should give you a basic understanding of what you can get with Flask, SQLAlchemy, Marshmallow, Flask-RESTplus (+ my patched extension), and OpenAPI.
from flask import Flask
from flask_sqlalchemy import SQLAlchemy
from flask_restplus_patched import Api, Namespace, Resource, ModelSchema

# Extensions initialization
# =========================
app = Flask(__name__)
db = SQLAlchemy(app)
api = Api(app)


# Database table definition (SQLAlchemy)
# ======================================
class User(db.Model):
    id = db.Column(db.Integer, primary_key=True)
    name = db.Column(db.String(), nullable=False)


# Serialization/Deserialization schema definition
# ===============================================
class UserSchema(ModelSchema):
    class Meta:
        model = User


# "Users" resource RESTful API definitions
# ========================================
users_api = Namespace('users')
api.add_namespace(users_api)

@users_api.route('/')
class UsersList(Resource):

    @users_api.response(UserSchema(many=True))
    def get(self):
        return User.query.all()


@users_api.route('/<int:user_id>')
@users_api.resolve_object('user', lambda kwargs: User.query.get_or_404(kwargs.pop('user_id')))
class UserByID(Resource):

    @users_api.response(UserSchema())
    def get(self, user):
        return user


# Run the RESTful API server
# ==========================
if __name__ == '__main__':
    db.create_all()
    with db.session.begin(nested=True):
        db.session.add(User(name='user1'))
        db.session.add(User(name='user2'))
    app.run()
Save it, install the dependencies, and run it:
$ pip install -r app/requirements.txt
$ python server.py
Open http://127.0.0.1:5000 and examine the interactive documentation for your
new RESTful API server! You can use any HTTP tools (e.g. cURL, wget,
Python requests, or just a web browser) to communicate with it, or generate
specialized API client libraries for many programming languages using
Swagger Codegen (learn more
in the API Integration section).
Note, this whole repo features much more than that; it demonstrates how I would organize a production-ready RESTful API server project, so stay tunned.
Project Structure
Root folder
Folders:
-
app- This RESTful API Server example implementation is here. -
flask_restplus_patched- There are some patches for Flask-RESTPlus (read more in Patched Dependencies section). -
migrations- Database migrations are stored here (seeinvoke --listto learn available commands, and learn more about PyInvoke usage below). -
tasks- PyInvoke commands are implemented here. -
tests- These are pytest tests for this RESTful API Server example implementation. -
docs- It contains just images for the README, so you can safely ignore it. -
deploy- It contains some application stack examples.
Files:
README.md-
config.py- This is a config file of this RESTful API Server example. -
conftest.py- A top-most pytest config file (it is empty, but it helps to have a proper PYTHON PATH). -
.coveragerc- Coverage.py (code coverage) config for code coverage reports. -
.travis.yml- Travis CI (automated continuous integration) config for automated testing. -
.pylintrc- Pylint config for code quality checking. -
Dockerfile- Docker config file which is used to build a Docker image running this RESTful API Server example. -
.dockerignore- Lists files and file masks of the files which should be ignored while Docker build process. -
.gitignore- Lists files and file masks of the files which should not be added to git repository. -
LICENSE- MIT License, i.e. you are free to do whatever is needed with the given code with no limits.
Application Structure
app/
├── requirements.txt
├── __init__.py
├── extensions
│   └── __init__.py
└── modules
    ├── __init__.py
    ├── api
    │   └── __init__.py
    ├── auth
    │   ├── __init__.py
    │   ├── models.py
    │   ├── parameters.py
    │   └── views.py
    ├── users
    │   ├── __init__.py
    │   ├── models.py
    │   ├── parameters.py
    │   ├── permissions.py
    │   ├── resources.py
    │   └── schemas.py
    └── teams
        ├── __init__.py
        ├── models.py
        ├── parameters.py
        ├── resources.py
        └── schemas.py
-
app/requirements.txt- The list of Python (PyPi) requirements. -
app/__init__.py- The entrypoint to this RESTful API Server example application (Flask application is created here). -
app/extensions- All extensions (e.g. SQLAlchemy, OAuth2) are initialized here and can be used in the application by importing as, for example,from app.extensions import db. -
app/modules- All endpoints are expected to be implemented here in logicaly separated modules. It is up to you how to draw the line to separate concerns (e.g. you can implement a monolithblogmodule, or split it intotopics+commentsmodules).
Module Structure
Once you added a module name into config.ENABLED_MODULES, it is required to
have your_module.init_app(app, **kwargs) function. Everything else is
completely optional. Thus, here is the required minimum:
your_module/
└── __init__.py
, where __init__.py will look like this:
def init_app(app, **kwargs):
    pass
In this example, however, init_app imports resources and registeres api
(an instance of (patched) flask_restplus.Namespace). Learn more about the
"big picture" in the next section.
Where to start reading the code?
The easiest way to start the application is by using PyInvoke command app.run
implemented in tasks/app/run.py:
$ invoke app.run
The command creates an application by running
app/__init__.py:create_app() function, which in its turn:
- loads an application config;
- initializes extensions:
app/extensions/__init__.py:init_app(); - initializes modules:
app/modules/__init__.py:init_app().
Modules initialization calls init_app() in every enabled module
(listed in config.ENABLED_MODULES).
Let's take teams module as an example to look further.
app/modules/teams/__init__.py:init_app()
imports and registers api instance of (patched) flask_restplus.Namespace
from .resources. Flask-RESTPlus Namespace is designed to provide similar
functionality as Flask Blueprint.
api.route() is used to bind a
resource (classes inherited from flask_restplus.Resource) to a specific
route.
Lastly, every Resource should have methods which are lowercased HTTP method
names (i.e. .get(), .post(), etc). This is where users' requests end up.
Dependencies
Project Dependencies
- Python 2.7, 3.5+ / pypy2 (2.5.0)
- flask-restplus (+ flask)
- sqlalchemy (+ flask-sqlalchemy) - Database ORM.
-
sqlalchemy-utils - for nice
custom fields (e.g.,
PasswordField). - alembic - for DB migrations.
- marshmallow (+ marshmallow-sqlalchemy, flask-marshmallow) - for schema definitions. (supported by the patched Flask-RESTplus)
- webargs - for parameters (input arguments). (supported by the patched Flask-RESTplus)
- apispec - for marshmallow and webargs introspection. (integrated into the patched Flask-RESTplus)
- oauthlib (+ flask-oauthlib) - for authentication.
-
flask-login - for
current_userintegration only. - bcrypt - for password hashing (used as a backend by sqlalchemy-utils.PasswordField).
- permission - for authorization.
- Swagger-UI - for interactive RESTful API documentation.
Build Dependencies
I use pyinvoke with custom tasks to maintain easy and
nice command-line interface. Thus, it is required to have invoke Python
package installed, and optionally you may want to install colorlog, so your
life become colorful.
Patched Dependencies
- flask-restplus is patched to handle marshmallow schemas and webargs input parameters (GH #9).
- swagger-ui (the bundle is automatically downloaded on the first run) just includes a pull-request to support Resource Owner Password Credentials Grant OAuth2 (aka Password Flow) (PR #1853).
Installation
Using Docker
It is very easy to start exploring the example using Docker:
$ docker run -it --rm --publish 5000:5000 frolvlad/flask-restplus-server-example

From sources
Clone the Project
$ git clone https://github.com/frol/flask-restplus-server-example.git
Setup Environment
It is recommended to use virtualenv or Anaconda/Miniconda to manage Python dependencies. Please, learn details yourself.
You will need invoke package to work with everything related to this project.
$ pip install -r tasks/requirements.txt
Run Server
NOTE: All dependencies and database migrations will be automatically handled, so go ahead and turn the server ON! (Read more details on this in Tips section)
$ invoke app.run
Deploy Server
In general, you deploy this app as any other Flask/WSGI application. There are
a few basic deployment strategies documented in the ./deploy/
folder.
Quickstart
Open online interactive API documentation: http://127.0.0.1:5000/api/v1/
Autogenerated swagger config is always available from http://127.0.0.1:5000/api/v1/swagger.json
example.db (SQLite) includes 2 users:
- Admin user
rootwith passwordq - Regular user
userwith passwordw
NOTE: Use On/Off switch in documentation to sign in.
Authentication Details
This example server features OAuth2 Authentication protocol support, but don't be afraid of it! If you learn it, OAuth2 will save you from a lot of troubles.
Authentication with Login and Password (Resource Owner Password Credentials Grant)
Here is how you authenticate with user login and password credentials using cURL:
$ curl 'http://127.0.0.1:5000/auth/oauth2/token?grant_type=password&client_id=documentation&username=root&password=q'
{
    "token_type": "Bearer",
    "access_token": "oqvUpO4aKg5KgYK2EUY2HPsbOlAyEZ",
    "refresh_token": "3UTjLPlnomJPx5FvgsC2wS7GfVNrfH",
    "expires_in": 3600,
    "scope": "auth:read auth:write users:read users:write teams:read teams:write"
}
That is it!
Well, the above request uses query parameters to pass client ID, user login and password which is not recommended (even discouraged) for production use since most of the web servers logs the requested URLs in plain text and we don't want to leak sensitive data this way. Thus, in practice you would use form parameters to pass credentials:
$ curl 'http://127.0.0.1:5000/auth/oauth2/token?grant_type=password' -F 'client_id=documentation' -F 'username=root' -F 'password=q'
, or even pass client_id as Basic HTTP Auth:
$ curl 'http://127.0.0.1:5000/auth/oauth2/token?grant_type=password' --user 'documentation:' -F 'username=root' -F 'password=q'
You grab the access_token and put it into Authorization header
to request "protected" resources:
$ curl --header 'Authorization: Bearer oqvUpO4aKg5KgYK2EUY2HPsbOlAyEZ' 'http://127.0.0.1:5000/api/v1/users/me'
{
    "id": 1,
    "username": "root",
    "email": "[email protected]",
    "first_name": "",
    "middle_name": "",
    "last_name": "",
    "is_active": true,
    "is_regular_user": true,
    "is_admin": true,
    "created": "2016-10-20T14:00:35.912576+00:00",
    "updated": "2016-10-20T14:00:35.912602+00:00"
}
Once the access token expires, you can refresh it with refresh_token. To do
that, OAuth2 RFC defines Refresh Token Flow (notice that there is no need to
store user credentials to do the refresh procedure):
$ curl 'http://127.0.0.1:5000/auth/oauth2/token?grant_type=refresh_token' --user 'documentation:' -F 'refresh_token=3UTjLPlnomJPx5FvgsC2wS7GfVNrfH'
{
    "token_type": "Bearer",
    "access_token": "FwaS90XWwBpM1sLeAytaGGTubhHaok",
    "refresh_token": "YD5Rc1FojKX1ZY9vltMSnFxhm9qpbb",
    "expires_in": 3600,
    "scope": "auth:read auth:write users:read users:write teams:read teams:write"
}
Authentication with Client ID and Secret (Client Credentials Grant)
Here is how you authenticate with user login and password credentials using cURL:
$ curl 'http://127.0.0.1:5000/auth/oauth2/token?grant_type=client_credentials' --user 'documentation:KQ()SWK)SQK)QWSKQW(SKQ)S(QWSQW(SJ*HQ&HQW*SQ*^SSQWSGQSG'
{
    "token_type": "Bearer",
    "access_token": "oqvUpO4aKg5KgYK2EUY2HPsbOlAyEZ",
    "expires_in": 3600,
    "scope": "teams:read users:read users:write teams:write"
}
The same way as in the previous section, you can grab the access_token and
access protected resources.
API Integration
One of the key point of using OpenAPI (Swagger) specification is that it enables automatic code generation. Swagger Codegen project implements client library and server stub generators for over 18 programming languages! There are also many other projects with OpenAPI specification support, so if you lack anything in the official tooling, search for third-party solutions.
I have had a need to work with my API servers from Python and JavaScript, so I started with Swagger Codegen Python and JavaScript generators. Very soon I realized that most (if not all) Swagger Codegen generators lack OAuth2 support, but other than that, the client libraries look fine (I have contributed a few changes to Python and JavaScript generators over the time, and the nice thing all the clients benefit from contributions into a single project). Thus, @khorolets and I implemented hacky OAuth2 support for Python client and even more hacky out-of-client helpers for JavaScript (hopefully, one day OAuth2 support will be contributed into the Swagger Codegen upstream).
To use Swagger Codegen, you only need a swagger.json file describing your API
server. You can get one by accessing http://127.0.0.1:5000/api/v1/swagger.json,
or by running an Invoke task:
$ invoke app.swagger
NOTE: Use stdout rediction to save the output into a file.
To further simplify the codegeneration, there is another Invoke task:
$ invoke app.swagger.codegen --language python --version 1.0.0
To run that, however, you will need Docker installed on your machine since we
use Swagger Codegen as a Docker image. Once that is completed, you will have a
Python client in the clients/python/dist/ folder. The javascript client can
be generated just the same way. Read the generated clients/*/dist/README.md
to learn how to use those clients.
NOTE: As mentioned above, a slightly modified Swagger Codegen version is used to enable OAuth2 support in Python client.
Integrations with Flask-* Projects
Since this project is only an extension to Flask, most (if not all) Flask plugins should work.
Verified compatible projects:
- flask-sqlalchemy
- flask-login
- flask-marshmallow
- flask-oauthlib
- flask-cors
- flask-limiter
Example integration steps
flask-limiter
-
Add
flask-limiterto end of theapp/requirements.txtfile, so it gets installed when the application is deployed. -
Apply the relevant changes to
app/extensions/__init__.py:# ... other imports. from flask_limiter import Limiter from flask_limiter.util import get_remote_address # change limiter configs per your project needs. limiter = Limiter(key_func=get_remote_address, default_limits=["1 per minute"]) from . import api def init_app(app): """ Application extensions initialization. """ for extension in ( # ... other extensions. limiter, # Add this ): extension.init_app(app)
-
(Optional) Set endpoint-specific limits:
from app.extensions import limiter

@api.route('/account/verify')
class IdentityVerify(Resource):
    """
    Handle identity verification.
    """
    # Notice this is different from the simple example at the top of flask-limiter doc page.
    # The reason is explained here: https://flask-limiter.readthedocs.io/en/stable/#using-flask-pluggable-views
    decorators = [limiter.limit("10/second")] # config as you need.

    @api.parameters(parameters.SomeParameters())
    @api.response(schemas.SomeSchema())
    def post(self, args):
        return {"verified": True}
Tips
Once you have invoke, you can learn all available commands related to this project from:
$ invoke --list
Learn more about each command with the following syntax:
$ invoke --help <task>
For example:
$ invoke --help app.run
Usage: inv[oke] [--core-opts] app.run [--options] [other tasks here ...]

Docstring:
  Run DDOTS RESTful API Server.

Options:
  -d, --[no-]development
  -h STRING, --host=STRING
  -i, --[no-]install-dependencies
  -p, --port
  -u, --[no-]upgrade-db
Use the following command to enter ipython shell (ipython must be installed):
$ invoke app.env.enter
app.run and app.env.enter tasks automatically prepare all dependencies
(using pip install) and migrate database schema to the latest version.
Database schema migration is handled via app.db.* tasks group. The most
common migration commands are app.db.upgrade (it is automatically run on
app.run), and app.db.migrate (creates a new migration).
You can use better_exceptions
package to enable detailed tracebacks. Just add better_exceptions to the
app/requirements.txt and import better_exceptions in the app/__init__.py.
Marshmallow Tricks
There are a few helpers already available in the flask_restplus_patched:
-
flask_restplus_patched.parameters.Parameters- base class, which is a thin wrapper on top of Marshmallow Schema. -
flask_restplus_patched.parameters.PostFormParameters- a helper class, which automatically mark all the fields that has no explicitly defined location to be form data parameters. -
flask_restplus_patched.parameters.PatchJSONParameters- a helper class for the common use-case of RFC 6902 describing JSON PATCH. -
flask_restplus_patched.namespace.Namespace.parameters- a helper decorator, which automatically handles and documents the passedParameters.
You can find the examples of the usage throughout the code base (in
/app/modules/*).
JSON Parameters
While there is an implementation for JSON PATCH Parameters, there are other
use-cases, where you may need to handle JSON as input parameters. Naturally,
JSON input is just a form data body text which is treated as JSON on a server
side, so you only need define a single variable called body with
location='json':
class UserSchema(Schema):
    id = base_fields.Integer(required=False)
    username = base_fields.String(required=True)


class MyObjectSchema(Schema):
    id = base_fields.Integer(required=True)
    priority = base_fields.String(required=True)
    owner = base_fields.Nested(UserSchema, required=False)


class CreateMyObjectParameters(Parameters):
    body = base_fields.Nested(MyObjectSchema, location='json', required=True)


api = Namespace('my-objects-controller', description="My Objects Controller", path='/my-objects')


@api.route('/')
class MyObjects(Resource):
    """
    Manipulations with My Objects.
    """

    @api.parameters(CreateMyObjectParameters())
    @api.response(MyObjectSchema())
    @api.response(code=HTTPStatus.CONFLICT)
    @api.doc(id='create_my_object')
    def post(self, args):
        """
        Create a new My Object.
        """
        return create_my_object(args)
Useful Links
- Q&A about this project
- Valuable extensions that didn't make into the upstream
- "The big Picture" - short yet complete idea about how the modern apps should talk.
- "Please. Don't PATCH Like An Idiot."
- "A Concise RESTful API Design Guide"
- "Best Practices for Designing a Pragmatic RESTful API"
- "My take on RESTful authentication"
- "Is it normal design to completely decouple backend and frontend web applications and allow them to communicate with (JSON) REST API?"