malcommac / Flow
Programming Languages
Labels
Projects that are alternatives of or similar to Flow
Flow
![]()
THE ENTIRE PROJECT WAS MOVED TO THE NEW HOME AND IT'S NOW CALLED OWL.
https://github.com/malcommac/Owl This repository will be removed in few months.


![]()
![]()
★★ Star Flow to help the project! ★★
Support the project. Donate now.
Created by Daniele Margutti (@danielemargutti)
Flow is a Swift lightweight library which help you to better manage content in UITableViews. It's easy and fast, perfectly fits the type-safe nature of Swift.
Say goodbye to UITableViewDataSource and UITableViewDelegate : just declare and set your data, let Flow take care of the rest!
WHAT YOU CAN DO
The following code is the only required to create a complete TableView which shows a list of some country flags.
Each flag is represented by a class (the model) called CountryModel; the instance is represented into the tableview by the CountryCell UITableViewCell subclass.
let countries: [CountryModel] = ... // your array of countries
let rows = Row<CountryCell>.create(countries, { row in // create rows
row.onTap = { _, path in // reponds to tap on cells
  print("Tap on '\(row.item.name)'")
  return nil
}
tableManager.add(rows: rows) // just add them to the table
tableManager.reloadData()
A complete table in few lines of code; feel amazing uh? Yeah it is, and there's more: You can handle tap events, customize editing, easy create custom footer and headers and manage the entire content simply as like it was an array!.
A complete article about this topic can be found here: "Forget DataSource and Delegates: a new approach for UITableView"
MAIN FEATURES
Main features of Flow includes:
- Declare the content: Decide cell's class, the model and use array-like methods to add/remove or manage rows into the table. No more data source, no more delegate, just plain understandable methods to manage what kind of data you want to display (auto animations included!).
-
Separation of concerns: Let the cell do its damn job; passing represented item (model) to the cell you can add a layer of separation between your model, your view controller and the cell which represent the model itself. Stop doing cell population inside the
tableView(tableView: UITableView, cellForRowAtIndexPath indexPath: NSIndexPath)datasource function. Be SOLID. - Type-safe: Describe your cell classes, the model to represent and let the library take care of you. Allocation and configuration is automatic: no more reuse identifier strings, no more dequeue operations, no more casts.
- FP (Functional Programming) Style. Cell configurations is easy; you can observe events and manage the behaviour of the cells in a functional style.
- AutoLayout support: Provide a simple mechanism to specify the height of a cell or leave the class decide the best one upon described constraints.
-
Animations: Like
performBatchUpdatesofUICollectionViewFlow manage automatically what kind of animations perform on the table as you change the layout.
OTHER LIBRARIES YOU MAY LIKE
I'm also working on several other projects you may like. Take a look below:
| Library | Description |
|---|---|
| SwiftDate | The best way to manage date/timezones in Swift |
| Hydra | Write better async code: async/await & promises |
| Flow | A new declarative approach to table managment. Forget datasource & delegates. |
| SwiftRichString | Elegant & Painless NSAttributedString in Swift |
| SwiftLocation | Efficient location manager |
| SwiftMsgPack | Fast/efficient msgPack encoder/decoder |
DOCUMENTATION
Main Architecture
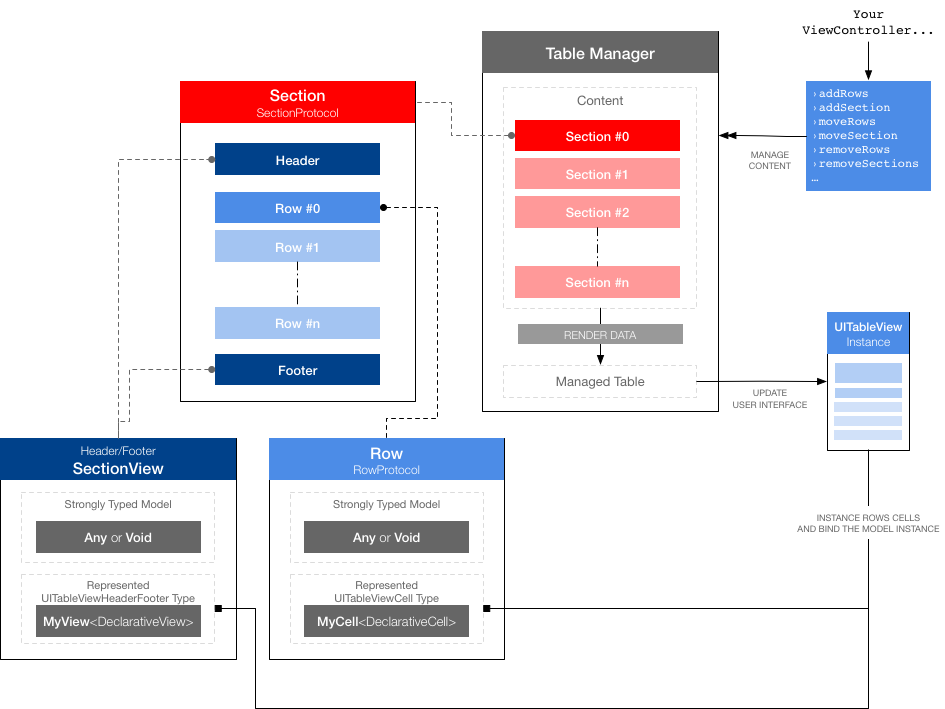
Flow is composed by four different entities:
-
TableManager: a single table manager is responsible to manage the content of aUITableViewinstance. -
Section: represent a section in table. It manages the list of rows and optional header and footer. -
Row: represent a single row in a section; a row is linked to a pair of objects: the model (any class; if not applicableVoidis valid) and the cell (a subclass of theUITableViewCellconforms toDeclarativeCellprotocol). -
SectionView: A section may show header/footer; these objects maybe simpleStringor custom views:SectionView. As forRow,SectionViewis linked to a model and a view (subclass ofUITableViewHeaderFooterView).
Demo Application
A live working example can be found in FlowDemoApp directory. It demostrates how to use Flow in a simple Login screen for a fake social network app. Check it out to see how Flow can really help you to simplify UITableView management.
Create the TableManager
In order to use Flow you must set the ownership of a UITableView instance to an instance of TableManager:
self.tableManager = TableManager(table: self.table!)
From now the UITableView instance is backed by Flow; every change (add/remove/move rows or sections) must be done by calling appropriate methods of the TableManager itself or any child Section/Row.
Prepare a Cell (for Row)
A row is resposible to manage the model and its graphical representation (the cell instance).
To create a new Row instance you need to specify the model class received by the instance cell and the cell class to instantiate into the table.
While sometimes a model is not applicable (your cell maybe a simple static representation or its decorative), the cell class is mandatory.
The cell must be a subclass of UITableViewCell conforms to DeclarativeCell protocol.
This protocol defines at least two important properties:
- the model assocated with the Cell (
public typealias T = MyClass) - a method called right after the row's cell is dequeued (
public func configure(_: T, path: IndexPath))
This is an example of a CountryCell which is responsible to display data for a single country (class CountryModel):
import UIKit
import Flow

public class CountryCell: UITableViewCell, DeclarativeCell {
    // assign to the cell the model to be represented
    public typealias T = CountryModel
    // if your cell has a fixed height you can set it directly at class level as below
    public static var defaultHeight: CGFloat? = 157.0

    // this func is called when a new instance of the cell is dequeued
    // and you need to fill the data with a model instance.
    public func configure(_ country: CountryModel, path: IndexPath) {
      self.countryNameLabel.text = country.name.capitalized()
      self.continentLabel.image = country.continent
      self.flagImageView.setURL(country.countryURL)
      // ... and so on
    }
}
If your cell does not need of a model you can assign public typealias T = Void.
User interface of the cell can be made in two ways:
-
Prototype (only in Storyboards): create a new prototype cell, assign the class to your class (here
CountryCell) and set thereuseIdentifierin IB to the same name of the class (againCountryCell). By default Flow uses as identifier of the cell the same name of the class itself (you can change it by overridingreuseIdentifierstatic property). -
External XIB File: create a new xib file with the same name of your cell class (here
CountryCell.xib) and drag an instance ofUITableViewCellclass as the only single top level object. Assign to it the name of your class and thereuseIdentifier.
Height of a cell can be set in differen ways:
- If cell has a fixed height you can set it at class level by adding
public static var defaultHeight: CGFloat? = ...in your cell subclass. - If cell is autosized you can evaluate the height in row configuration (see below) by providing a value into
estimatedHeightorevaluateEstimatedHeight()function.
Prepare a Row
You can now create a new row to add into the table; a Row instance is created by passing the DeclarativeCell type and an instance of the model represented.
let italy = CountryModel("Italy","Europe","http://...")
...
let rowItaly = Row<CountryCell>(model: italy, { row in
	// ... configuration
})
If model is not applicable just pass Void() as model param.
Inside the callback you can configure the various aspect of the row behaviour and appearance.
All standard UITableView events can be overriden; a common event is onDequeue, called when Row's linked cell instance is dequeued and displayed. Anoter one (onTap) allows you to perform an action on cell's tap event.
So, for example:
let rowItaly = Row<CountryCell>(model: italy, { row in
	row.onDequeue = { _ in
		self.countryNameLabel.text = country.name.capitalized()
		return nil // when nil is returned cell will be deselected automatically
	}
	row.onTap = { _ in
		print("Show detail for country \(row.model)")
	}
})
There are lots of other events you can set into the row configuration callback (onDelete,onSelect,onDeselect,onShouldHighlit and so on).
Prepare Rows for an array of model
When you have an array of model instances to represent, one for each Row, you can use create shortcut.
The following code create an array of Rows<CountryCell> where each row receive the relative item from self.countries array.
let rowAllCountries = Row<CountryCell>.create(self.countries)
Add Rows into the table
Adding rows to a table is easy as call a simple add function.
self.tableManager.add(rows: rowAllCountries) // add rows (by appending a new section)
self.tableManager.reloadData() // apply changes
(Remember: when you add rows without specifing a section a new section is created automatically for you).
Please note: when you apply a change to a table (by using add, remove or move functions, both for Section or Row instances) you must call the reloadData() function in order to reflect changes in UI.
If you want to apply changes using standard table's animations just call update() function; it allows you to specify a list of actions to perform. In this case reloadData() is called automatically for you and the engine evaluate what's changed automatically (inserted/moved/removed rows/section).
The following example add a new section at the end of the table and remove the first:
self.tableManager?.update(animation: .automatic, {
	self.tableManager?.insert(section: profileDetailSection, at: profileSection!.index! + 1)
	self.tableManager?.remove(sectionAt: 0)
})
Create Section and manage header/footer
If not specified sections are created automatically when you add rows into a table.
Section objects encapulate the following properties:
-
rowslist of rows (RowProtocol) inside the section -
headerTitle/headerViewa plain header string or a custom header view (SectionView) -
footerTitle/footerViewa plain footer string or a custom footer view (SectionView)
Creating a new section with rows is pretty simple:
let rowCountries: [RowProtocol] = ...
let sectionCountries = Section(id: SECTION_ID_COUNTRIES row: rowCountries, headerTitle: "\(rowCountries.count) COUNTRIES")"
As like for Row even Section may have custom view for header or footer; in this case your custom header/footer must be an UITableViewHeaderFooterView subclass defined in a separate XIB file (with the same name of the class) which is conform to DeclarativeView protocol.
DeclarativeView protocol defines the model accepted by the custom view (as for Row you can use Void if not applicable).
For example:
import UIKit
import Flow

public class TeamSectionView: UITableViewHeaderFooterView, DeclarativeView {
 public typealias T = TeamModel // the model represented by the view, use `Void` if not applicable

 public static var defaultHeight: CGFloat? = 100

 public func configure(_ item: TeamModel, type: SectionType, section: Int) {
  self.sectionLabel?.text = item.name.uppercased()
 }
}
Now you can create custom view as header for section:
let europeSection = Section(europeRows, headerView: SectionView<ContinentSectionView>(team))
self.tableManager.add(section: europeSection)
self.tableManager.reloadData()
UITableView animations
Flow fully supports animation for UITableView changes. As like for UICollectionView you will need to call a func which encapsulate the operations you want to apply.
In Flow it's called update(animation: UITableViewRowAnimation, block: ((Void) -> (Void))).
Inside the block you can alter the sections of the table, remove or add rows and section or move things into other locations. At the end of the block Flow will take care to collect the animations needed to reflect applied changes both to the model and the UI and execute them.
You just need to remember only two things:
- Deletes are processed before inserts in batch operations. This means the indexes for the deletions are processed relative to the indexes of the collection view’s state before the batch operation, and the indexes for the insertions are processed relative to the indexes of the state after all the deletions in the batch operation.
- In order to make a correct refresh of the data, insertion must be done in order of the row index.
For example:
self.tableManager?.update(animation: .automatic, {
	self.tableManager?.remove(sectionAt: 1) // remove section 1
	self.tableManager?.add(row: newCountry, in: self.tableManager?.section(atIndex: 0)) // add a new row in section 0
})
Observe Row/Cell Events
Flow allows you to encapsulate the logic of your UITableViewCell instances directly in your Row objects. You can listen for dequeue, tap, manage highlights or edit... pratically everything you can do with plain tables, but more confortably.
All events are available and fully described into the Row class.
In this example you will see how to respond to the tap:
// Respond to tap on countrie's cells
let rows = Row<CountryCell>.create(countries, { row in
  row.onTap = { _,path in
  print("Tap on country at \(String(path.row)): '\(row.item.name.capitalized())'")
    return nil
  }
})
All observable events are described in API SDK.
Full SDK Documentation
Full method documentation is available both in source code and in API_SDK file. Click here to read the Full SDK Documentation.
Changelog
Current version of Flow is 0.8.1. Full changelog is available in CHANGELOG.MD file.
Installation
Install via CocoaPods
CocoaPods is a dependency manager for Objective-C, which automates and simplifies the process of using 3rd-party libraries like Flow in your projects. You can install it with the following command:
$ gem install cocoapods
CocoaPods 1.0.1+ is required to build Flow.
Install via Podfile
To integrate Flow into your Xcode project using CocoaPods, specify it in your Podfile:
source 'https://github.com/CocoaPods/Specs.git'
platform :ios, '8.0'

target 'TargetName' do
  use_frameworks!
  pod 'FlowTables'
end
Then, run the following command:
$ pod install
Carthage
Carthage is a decentralized dependency manager that builds your dependencies and provides you with binary frameworks.
You can install Carthage with Homebrew using the following command:
$ brew update
$ brew install carthage
To integrate Flow into your Xcode project using Carthage, specify it in your Cartfile:
github "malcommac/Flow"
Run carthage to build the framework and drag the built Flow.framework into your Xcode project.
REQUIREMENTS & LICENSE
Flow minimum requirements are:
- iOS 8+
- Swift 4+ (Swift 3 is supported in swift-3 branch)
We are supporting both CocoaPods and Chartage.
Flow was created and mantained by Daniele Margutti; you can contact me at [email protected] or on twitter at @danielemargutti.
This library is licensed under MIT License.
If you are using it in your software:
- Add a notice in your credits/copyright box:
Flow for UITableViews - © 2017 Daniele Margutti - www.danielemargutti.com - (optional but appreciated) Click here to report me your app using Flow.
SUPPORT THE PROJECT
Creating and mantaining libraries takes time and as developer you know this better than anyone else.
If you want to contribuite to the development of this project or give to me a thanks please consider to make a small donation using PayPal:
MAKE A SMALL DONATION and support the project.
