rblopes / Generator Phaser Plus
Programming Languages
Projects that are alternatives of or similar to Generator Phaser Plus
Create Phaser Web games with ease.
generator-phaser-plus is a Yeoman generator that makes starting up Phaser 3 game projects dead simple.
Table of Contents
- Installation and Usage
- A Brief Tutorial
- Project Setup
- Miscellaneous Topics
- Contributing
- Release Notes
- License
Installation and Usage
NOTE: Assuming you have at least the latest Node.js release with long-term support installed.
Download and install generator-phaser-plus from npm, using either npm or Yarn.
New on v3.0.0: Installing Yeoman to use generator-phaser-plus is completely optional.
npm install --global generator-phaser-plus
Create a New Phaser Game Project
-
First, create a new directory to keep you project contents and go into it.
mkdir my-awesome-game/
cd my-awesome-game/
-
Run
phaser-plusand fill in the short questionnaire.phaser-plus
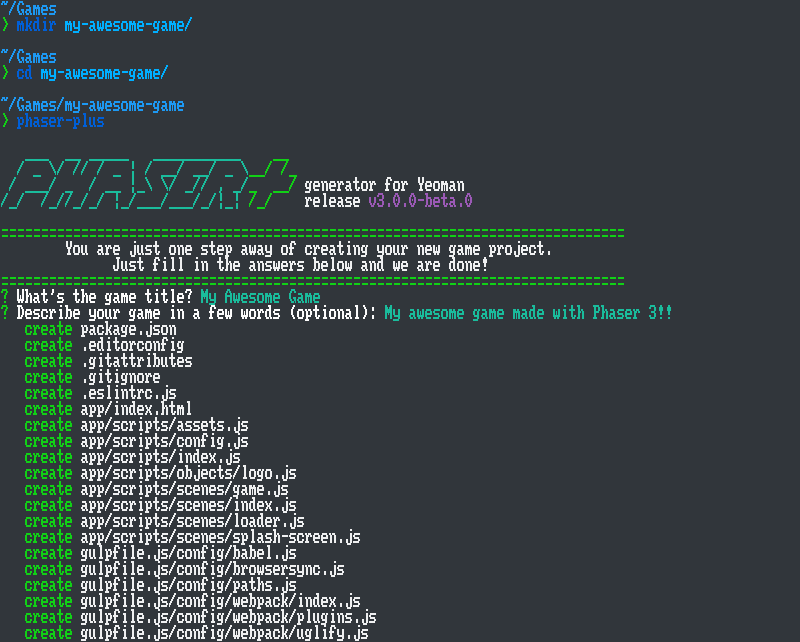
-
After the installation of the development kit finishes, fire up your project running:
npm start # Or: `yarn start`

Generators
generator-phaser-plus comes with a few handy generators to speed up some common Phaser game development tasks.
HINT: You can read a short description of what a command does running it with the
--helpoption.
object generator
phaser-plus object <name>
Creates game object classes. This generator will ask which Phaser game object class your want your new game object class to extend from.
-
Alias:
o. -
Arguments:
-
name: The object class name. Required.
-
plugin generator
Beginning with release 3.8.0, Phaser enhanced its plugin manager and added support for two kinds of custom plugins: Global Plugins and Scene Plugins.
Global plugins are instantiated once and persist throughout the whole game session.
Scene plugins are instantiated with each scene, and each instance is tied to its host scene life cycle.
generator-phaser-plus can create the blueprint of a custom Phaser plugin to use with your games. If you need to add some extra functionality to your game, for example, integrating an external library into Phaser, you can achieve that using a custom plugin.
To create a custom plugin, use the following command:
phaser-plus plugin <name> --type <global|scene>
-
Command Alias:
p. -
Arguments:
-
name: The plugin class name. Required.
-
-
Options:
-
type: Alias:t. The kind of plugin to generate. Can be eitherglobal(the default) orscene.
-
scene generator.
phaser-plus scene <names...>
Creates scene classes and updates the scenes/index.js module with the new entries.
-
Alias:
s. -
Arguments:
-
names. Required. The name (or names) of the scene class.
-
A Brief Tutorial
This step-by-step tutorial takes the official game example as a starting point to guide you through generator-phaser-plus workflow.
The tutorial is written from an absolute beginners perspective, but assumes the user already have a little understanding of JavaScript syntax. Also, some previous Node.js development experience and some reasoning around the terminal emulator and command-line tools is desirable but not a necessary requirement to complete the tutorial.
NOTE: Some portions of sample code are formatted using a simplified 'diff' format. If you are not familiar with that format, keep in mind that whenever you see a line beginning in a plus (+) sign, you should add that highlighted line to your code. Conversely, lines to be deleted begin with a minus (-) sign.
First steps
When you fire up your game project for the first time, you should see a floating Phaser 3 logo rotating on your browser.

Your new game project is alive. We are ready to start producing some code and add the necessary parts to create a real game ─ that is, one that is more than just a spinning logo. Open up your game project in your favorite code editor or IDE, if you did not do so already, to start editing it.
Your first game scene
We will start by creating a new "Title" scene, using the scene generator.
To add that new game scene to your game project, run the following command:
phaser-plus scene title
That command will execute the scene generator to create a stub of a new Phaser Scene class. A scene is where all action in a Phaser game happens. For example, we use scenes to manipulate physics, update the game logic, process player input, display the player's score and so on.
The scene we are creating here will be named Title, and will serve as your game's title screen, with a simple "Start Game" button. Its code will be contained in a file named title.js, under the app/scripts/scenes/ directory.

Immediately after you hit Enter, the generator will create your new scene file but will halt for a moment. This is OK. The generator is now trying to update the scenes index (the app/scripts/scenes/index.js file) so you don't have to do that manually. Because it is modifying an already existing file, the generator gives you the opportunity to review these changes. To see which lines are being added to that file, just type D, followed by Enter, to get a preview of the changes. When you finish reviewing, or just want to proceed anyway, type Y and Enter to answer "Yes" and confirm.

Now that you added a new scene it is time to start using it. For that, you need to do a small update on the scene responsible for defining the game's splash screen appearance.
The SplashScreen class takes care of a few chores. First, it tells Phaser which media assets it must load. Meanwhile, it displays the cover art of your game and a progress bar telling the player how much time for the game engine to finish performing its initialization tasks remain before it can actually start running the game itself.
When all media assets finish loading, it starts the Game scene, with the rotating Phaser logo we saw earlier. You want to change that so the game jumps to the Title scene instead. Open the app/scripts/scenes/splash-screen.js file and find the create method. Modify it as in the highlighted code excerpt below, so the this.scene.start() method argument reads 'Title' instead of 'Game', and save it.
 create() {
   //  We have nothing left to do here. Start the next scene.
-  this.scene.start('Game');
+  this.scene.start('Title');
 }
Done. Now you will be left with a boring black screen. Don't worry, though, things are about to get interesting soon. Let's take a moment, though, and discuss one important aspect of your game project.
Declaring game assets
The crafting of a game requires not only code. In your project, to ambient your virtual world, you will need to use many kinds of media files, collectively known as game assets. Game assets come in a wide range of types, including:
- Artwork, like graphical textures and three dimensional models;
- Audio files for sound effects and background tunes;
- Many sorts of miscellaneous files defining raw data, like level definitions, board maps and many more.
To use these media assets in your game, however, Phaser must know what kind of files it needs to load so they can be processed and committed into the browser's memory.
To save time, generator-phaser-plus projects follow a simple pattern: You copy files to the app/static/assets/ directory and declare them in the splash screen scene preload() method body.
For this part of the tutorial, we are going to use some files from the Phaser Labs.
After you copy the files to the assets directory, let's declare them. Find the preload() method in the splash screen scene class and modify the highlighted lines as follows:
 //  HINT: Declare all game assets to be loaded here.
-this.load.image('logo');
+this.load
+  .image('logo')
+  .image('sky', 'space3.png')
+  .image('red');
Adding the background to the Title scene
After adding your first media assets, you can start adding the elements of our Title scene. Let's start with the background. Inside the create() method body, type the following code block and save the module.
//  Save the center point coordinates for later reference.
const x = this.cameras.main.width / 2;
const y = this.cameras.main.height / 2;

//  Add the starry sky background.
this.add.image(x, y, 'sky');
In Phaser 3, textures have its origin point set at the center coordinate. We will match that origin point with the center of out game screen.
Creating a flame effect
Let's add a fancy flame effect to the scene. For that, write the following code below the one we added for the background image and save.
//  Create and start an particle emitter.
const flameParticle = this.add.particles('red');
const flame = flameParticle.createEmitter({
  speed: 100,
  scale: { start: 1, end: 0 },
  blendMode: 'ADD'
});
With that, we create a particle emitter. First, we tell Phaser which texture to use as the elementary particle. Then we start the emitter: the parameters tell how long the particles will be visible, starting large and scaling down until they completely disappear. The blendMode is the final touch, giving the texture a bright pink flame effect.
However, our flame is stuck to the top left corner now. We will fix this shortly.
Adding the 'Phaser 3' logo
Add this new code snippet below the flame particle emitter effect code.
//  Add the 'Phaser 3' logo.
const logo = this.add.image(x, 100, 'logo');

//  Attach and make the emitter follow the logo.
flame.startFollow(logo);

That will add the Phaser 3 logo near the top of the screen, with the flame effect attached behind it.
Making the logo bounce around the screen
Our title screen looks cool already, but what if we made it more animated? We could go a little overboard and use physics simulation to make the logo bounce around the screen, why not?
Phaser 3 comes with a selection of features out-of-the-box. Some of those, however, require some tweaking before they can be used in full. The configuration module (app/scripts/config.js) is where the parameters of some Phaser features are kept.
Take a moment to examine the contents of that module if you like. That module contains several tweaks that can be adjusted according to you project needs.
To enable physics simulation, uncomment the export const physics line and modify it, like shown below.
 //  Enable physics simulation and configure parameters. Available  systems are:
 //  - `arcade`: Phaser Arcade Physics 2;
 //  - `matter`: Liam Brummitt's (@liabru) Matter.js;
 //  - `impact`: ImpactJS Physics Engine.
-// export const physics = {};
+export const physics = {
+  default: 'arcade',
+  arcade: {
+    gravity: {y: 200}
+  }
+};
This instructs Phaser to enable the Arcade Physics Engine upon initialization with the given parameters and set it as the default physics engine.
Now, back in the Title scene code, let's replace the lines where the logo is added. To give the logo physics properties, we have to make some adjustments.
//  Add a bouncing Phaser 3 logo.
const logo = this.physics.add.image(x, 100, 'logo')
  .setVelocity(100, -100)
  .setBounce(1, 1)
  .setCollideWorldBounds(true);
Note that we are using this.physics.add.image(/* ... */) instead of this.add.image(/* ... */). The difference is that our image now is managed by the physics engine.
Also note how we are chaining method calls to set the physics properties of the image. We are telling it to ascend momentarily before falling down and bounce up every time it hits the floor of the screen.
Adding a simple text button
To finish this part of the tutorial, let's create a 'Start' button using a simple text label.
//  Add a text label.
const label = this.add.text(x, 400, 'START!!', {
  font: '64px Arial',
  color: 'white',
  stroke: 'black',
  strokeThickness: 6
});

//  Move the origin point to the center, make the label interactive.
label
  .setOrigin(0.5, 0.5)
  .setInteractive();
The first block of code defines the aspect of the text label, its coordinates and text.
In the second block, we move the origin point to the center of the label. Unlike other game objects, text labels have an origin point set at the top left corner. Also, we tell Phaser that this object will react to input interactions through a mouse or a touch screen.
But how do we know our button was clicked or touched, then? Game objects provide a mechanism known as event dispatcher. To explain that in a few words, game objects allow to subscribe to certain events, providing the instructions to be performed when these events occur.
When a player clicks our "start" button, we want to show the "Game" scene, where all the game action will happen. Add the code below to enable the text button.
//  When this label is clicked, move on to the next game scene.
label.on('pointerup', () => this.scene.start('Game'));
Here, we are subscribing to the pointerup event of the text label. When the text label is clicked, a pointerup fires immediately after the mouse button is released. When that happens, we tell Phaser scene manager to start the Game scene.
Now save the Title scene module. You should see a big white text label saying "START!!" on the lower part of the game screen. Click it ─ or, if using a mobile device, tap it ─ to be taken back to the "Game" scene, with the spinning Phaser logo, we saw earlier.

With that, we have created a fancy Title screen for our little game.
(To be continued...)
Project Setup
Features
Projects created with generator-phaser-plus have the following features out-of-the-box:
-
Gulp, a lean and simple task manager.
-
Webpack for better integration of components and dependencies.
-
Browsersync for cross-device testing.
-
Babel, with
babel-preset-env, for authoring scripts using the most recent ECMAScript specification features and syntax additions ensuring compatibility with current browsers and devices.
Application Layout
Media assets and source code are organized in a dedicated app/ directory.
app/
│
├── scripts/            # Where application modules are stored
│   ├── objects/        # Custom extended game objects
│   │   └── ...
│   ├── plugins/        # Custom private plugins
│   │   └── ...
│   ├── scenes/         # Game scenes
│   │   ├── index.js    # Reference module for all game scenes
│   │   └── ...
│   ├── config.js       # Contains certain Phaser configuration values
│   └── index.js        # The game application entry point routine
│
├── static/             # Static files served by Browsersync
│   ├── assets/         # Where game assets are stored
│   │   └── ...
│   └── favicon.ico     # A sample Phaser logo favicon
│
└── index.html          # Main page template
Development Tasks
Automated tasks solve recurring development operations and help you prepare the application for distribution. A special gulpfile.js/ directory contains the development tasks and its related modules.
NOTE: If you prefer, install the Gulp command-line interface:
npm install --global gulp-cliAlternatively, the same tasks can be performed using the provided runnable scripts explained below.
There are two main development tasks:
-
defaulttask. This is the main development task, the one you will interact with the most. This task uses Browsersync to start an interactive Web server to test your game in the browser. Under the hood, it uses Webpack to watch application modules for changes, triggering the necessary builds when changes occur. When a build finishes successfully, the page will refresh to show the updated game. It is configured to serve the application code and static assets.Can be run with:
gulp npm start yarn start -
disttask. The distribution task. When your game is ready, use this task to bundle the application code, its dependencies and static assets. It performs the following jobs, in order:- Dispose the previously compiled version of your game, to avoid mixing outdated files.
- Recursively copy all static assets located under the
app/static/directory. - Compile and minify your application modules and dependent libraries.
After running this task, a working copy of the game will be found in the
dist/directory.Can be run with:
gulp dist
npm run dist
yarn dist
Configuration
Gulp tasks configuration (gulpfile.js/config/)
Gulp configuration is organized inside the gulpfile.js/ directory.
gulpfile.js/
└── config/
    ├── webpack/            //  Webpack configuration modules
    │   ├── index.js        //  - The bulk of Webpack settings (entry points, loaders, etc.)
    │   ├── plugins.js      //  - Webpack plugins
    │   └── uglify.js       //  - Uglify settings
    ├── babel.js            //  Babel presets and plugins
    ├── browsersync.js      //  Browsersync settings
    └── paths.js            //  Describes the project layout
Yeoman metadata (.yo-rc.json)
Yeoman creates a hidden configuration file, storing some information required by generator-phaser-plus. This file also indicates the root of the project for Yeoman, so files created by any generator are relative to this location. Below is a commented sample of a regular .yo-rc.json file.
{
  "generator-phaser-plus": {                        //  The generator name, verified by Yeoman
    "meta": {                                       //  Creation date and generator version
      "createdWith": "3.0.0",
      "creationDate": "2018-01-01T12:34:56.789Z"
    },
    "objects": {                                    //  `object` generator data
      "dest": "app/scripts/objects/"                //  Where custom game objects are stored
    },
    "plugins": {                                    //  `plugin` generator data
      "dest": "app/scripts/plugins/"                //  Where private plugins are stored
    },
    "scenes": {                                     //  `scene` generator data
      "dest": "app/scripts/scenes/",                //  Where new scenes are stored
      "index": {                                    //  Data about the scene index module
        "name": "app/scripts/scenes/index.js",      //  The module name
        "requirePath": "./"                         //  The scenes path relative to that module
      }
    }
  }
}
For example, when using the scene generator, Yeoman will consume the related data to perform its task: the destination directory where the new scene module should be placed, and some other data required to update the scene index module with the new entry.
This file is required by Yeoman and you should keep it in case you want to continue using generator-phaser-plus with your project.
NOTE: You may be asked about
.yo-rc.jsoncontents when posting an issue.
Miscellaneous files
-
.eslintrc.js: A file containing the ESLint rules and general configuration. -
.gitattributesand.gitignore: Meta files used by Git. -
.editorconfig: A special file used by EditorConfig to tweak some common text editor's configurations.
Miscellaneous Topics
Managing Dependencies
There will be times you will want to add features not provided by Phaser. This is where plugins and third party libraries come into play.
Thanks to Webpack, integrating npm packages to your project is very simple.
Using npm packages
First, install packages using either npm on Yarn.
npm install <package-name>      # (1)
yarn add <package-name>         # (2)
Let's take for example a fictitious plugin. To use that plugin with your game, open the app/scripts/scenes/preloader.js module and import the plugin in your code.
//  NOTE: This line goes before the scene `class` definition.
import MyPhaserPlugin from 'my-phaser-plugin';
Then, initialize the plugin, as recommended in its documentation.
Manually Adding Third-Party Libraries
Not all libraries are available for distribution through npm, though. In this case, you would have to copy the library scripts to the app/static/ directory of your game project, and to add it to your application, edit the index.html page to include the necessary <script /> tags to load the library. You don't need to import the library to use it in your game application. In general, these kinds of libraries make themselves available using browser globals.
However, this presents two big disadvantages:
-
Every time you need to update that library to more recent versions, you will have to replace the necessary files manually.
-
If you are using a version control system, such as Git, to manage your project, you will need to keep track those files in your repository as well.
To conclude, note that this method is not recommended and should be completely avoided. If you happen to find that kind of library, contact the respective authors and ask them to update their work and publish the referring library on npm.
A Few Recommendations
-
When dealing with third-party libraries, take some time to learn what it does. If it's an open-source library, also take some time to study how it works from the implementer's perspective.
-
Check if the library is well maintained, providing support like documentation and test cases, and authors are committed to their work, keeping it up to date and replying to reported issues within a reasonable time.
-
Verify which license apply to that library and if that license is adequate to your project.
-
If you think you found issues using someone's library, double-check your code to see what is wrong. If you are sure the problem is caused by the library itself, do not hesitate to report the authors so they can provide the necessary corrections.
Contributing
Read the contribution guidelines to learn how you can help generator-phaser-plus.
Release Notes
Read the news page for info about the latest release.
License
This software is distributed under the terms of the MIT License.
The remixed Yeoman logo is shared under a Creative Commons Attribution License.