robmarkcole / Hass Amazon Rekognition
Projects that are alternatives of or similar to Hass Amazon Rekognition
Amazon Rekognition for Home Assistant
![]()
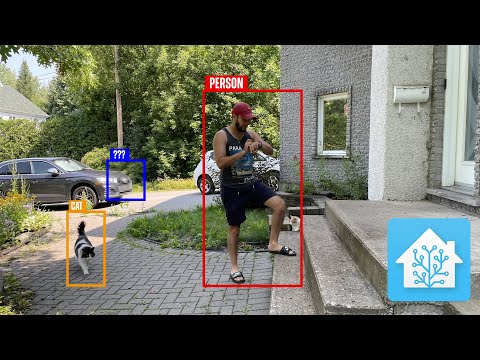
Object detection with Amazon Rekognition. The state of the sensor is the number of detected target objects in the image, which match the configured conditions. The default target is person, but multiple targets can be listed, in which case the state is the total number of any targets detected. The time that any target object was last detected is available as an attribute. Optionally a region of interest (ROI) can be configured, and only objects with their center (represented by a x) will be included in the state count. The ROI will be displayed as a green box, and objects with their center in the ROI have a red box. Rekognition also assigns each image a list of labels, which represent the classes of objects in the image. For example, if the image contained a cat or a dog, the label might be animal. Labels are useful if you don't know exactly what object to monitor for. Labels are exposed via the labels attribute of the entity.
Note that in order to prevent accidental over-billing, the component will not scan images automatically, but requires you to call the image_processing.scan service.
Pricing: As part of the AWS Free Tier, you can get started with Amazon Rekognition Image for free. Upon sign-up, new Amazon Rekognition customers can analyze 5,000 images per month for the first 12 months. After that price is around $1 for 1000 images.
Setup
For advice on getting your Amazon credentials see the Polly docs.
Place the custom_components folder in your configuration directory (or add its contents to an existing custom_components folder). Add to your configuration.yaml:
image_processing:
  - platform: amazon_rekognition
    aws_access_key_id: AWS_ACCESS_KEY_ID
    aws_secret_access_key: AWS_SECRET_ACCESS_KEY
    region_name: eu-west-1 # optional region, default is us-east-1
    confidence: 90 # Optional, default is 80 percent
    targets:
      - target: person
      - target: car
        confidence: 50
    # show_boxes: False
    # roi_x_min: 0.35 # optional, range 0-1, must be less than roi_x_max
    roi_x_max: 0.8 # optional, range 0-1, must be more than roi_x_min
    roi_y_min: 0.4 # optional, range 0-1, must be less than roi_y_max
    roi_y_max: 0.8 # optional, range 0-1, must be more than roi_y_min
    scale: 0.75
    save_file_format: png
    save_file_folder: /config/www/amazon-rekognition/ # Optional image storage
    save_timestamped_file: True # Set True to save timestamped images, default False
    s3_bucket: my_already_existing_bucket
    always_save_latest_file: True
    source:
      - entity_id: camera.local_file
Configuration variables:
- aws_access_key_id: Your AWS key ID
- aws_secret_access_key: Your AWS key secret
- region_name: Your preferred AWS region
- confidence: (Optional) The confidence (in %) above which detected targets are counted in the sensor state. Default value: 80
-
targets: The list of target object names and/or
object_type, defaultperson. Optionally aconfidencecan be set for this target, if not the default confidence is used. Note the minimum possible confidence is 10%. -
show_boxes: (optional, default
True), ifFalsebounding boxes are not shown on saved images - roi_x_min: (optional, default 0), range 0-1, must be less than roi_x_max
- roi_x_max: (optional, default 1), range 0-1, must be more than roi_x_min
- roi_y_min: (optional, default 0), range 0-1, must be less than roi_y_max
- roi_y_max: (optional, default 1), range 0-1, must be more than roi_y_min
- scale: (optional, default 1.0), range 0.1-1.0, applies a scaling factor to the images that are saved. This reduces the disk space used by saved images, and is especially beneficial when using high resolution cameras.
-
save_file_format: (Optional, default
jpg, alternativelypng) The file format to save images as.pnggenerally results in easier to read annotations. - save_file_folder: (Optional) The folder to save processed images to. Note that folder path should be added to whitelist_external_dirs
-
save_timestamped_file: (Optional, default
False, requiressave_file_folderto be configured) Save the processed image with the time of detection in the filename. -
s3_bucket: (Optional, requires
save_timestamped_fileto be True) Backup the timestamped file to an S3 bucket (must already exist) -
always_save_latest_file: (Optional, default
False, requiressave_file_folderto be configured) Always save the last processed image, even if there were no detections. - source: Must be a camera.
For the ROI, the (x=0,y=0) position is the top left pixel of the image, and the (x=1,y=1) position is the bottom right pixel of the image. It might seem a bit odd to have y running from top to bottom of the image, but that is the coordinate system used by pillow.
Bounding box
If you configure save_file_folder an image will be stored with bounding boxes drawn around target objects. Boxes will only be drawn for objects where the detection confidence is above the configured confidence (default 80%).

Using the Summary attribute
The Summary attribute will list the count of detected targets. This count can be broken out using a template sensor, for example if you have a target person:
sensor:
  - platform: template
    sensors:
      rekognition_people:
        friendly_name: "People"
        unit_of_measurement: 'persons'
        value_template: "{{ states.image_processing.rekognition_local_file_1.attributes.summary.person }}"
Events
Every time an image is processed, two kinds of events are published. The events can be viewed via the HA UI from Developer tools -> EVENTS -> :Listen to events. The events are:
-
rekognition.object_detected: contains all the data associated with an object.
<Event rekognition.object_detected[L]: name=person, confidence=99.787, bounding_box=x_min=0.228, y_min=0.258, x_max=0.381, y_max=0.774, width=0.153, height=0.516, box_area=7.905, centroid=x=0.304, y=0.516, entity_id=image_processing.rekognition_local_file_1>
-
rekognition.label_detected: contains the name and confidence of each label.
<Event rekognition.label_detected[L]: name=people, confidence=58.184, entity_id=image_processing.rekognition_local_file_1>
These events can be used to trigger automations, increment counters etc.
Automation
I am using an automation to send a photo notification when there is a new detection. This requires you to setup the folder_watcher integration first. Then in automations.yaml I have:
- id: '3287784389530'
  alias: Rekognition person alert
  trigger:
    event_type: folder_watcher
    platform: event
    event_data:
      event_type: modified
      path: '/config/www/rekognition_my_cam_latest.jpg'
  action:
    service: telegram_bot.send_photo
    data_template:
      caption: Person detected by rekognition
      file: '/config/www/rekognition_my_cam_latest.jpg'
Community guides
Here you can find community made guides, tutorials & videos about how to install/use this Amazon Rekognition integration. If you find more links let us know.
- Object Detection in Home Assistant with Amazon Rekognition video tutorial and the full article
Development
Currently only the helper functions are tested, using pytest.
python3 -m venv venvsource venv/bin/activatepip install -r requirements-dev.txtvenv/bin/py.test custom_components/amazon_rekognition/tests.py -vv -p no:warnings
Video of usage
Checkout this excellent video of usage from MecaHumArduino