inaka / Jayme
Programming Languages
Labels
Projects that are alternatives of or similar to Jayme
![]()

![]()
![]()

![]()
Overview
Jayme is a Swift library that provides you with a set of tools which reduce drastically the amount of code you have to write to perform CRUD operations to a RESTful API. It also encapsulates networking code, encouraging you to separate networking and business logic code out of your view controllers.
Features
Protocol-oriented
Jayme is built following the concepts of protocol-oriented programming, encouraging composition over inheritance, whenever possible.Generics and Associated Types
Generics and associated types are present everywhere in the library to provide you with flexibility.Error Handling
Errors are identified using an enumeration named JaymeError. You can separate meaningful UI flows in your view controllers by switching over aJaymeError. If you need different error definitions, the library allows you to use your own error types, with the aid of associated types.
Futures and Results
Jayme uses the Future Pattern for writing asynchronous code. Both Future and Result structures are key in the library. Make sure you are familiar with them.Logs
Jayme includes a practical logging mechanism that can be quickly enabled or disabled. It also allows you to set a custom logging function, which proves quite useful if your project uses third party logging libraries, like CocoaLumberjack.Unit Tests
Jayme is 100% unit-tested. You can unit test custom methods defined in your repositories relatively easy by following the way it's done in the library.No Dependencies
Jayme does not require any external dependency in order to work. Nonetheless, integrating JSON parsing libraries (like SwiftyJSON is quite straightforward.Architecture
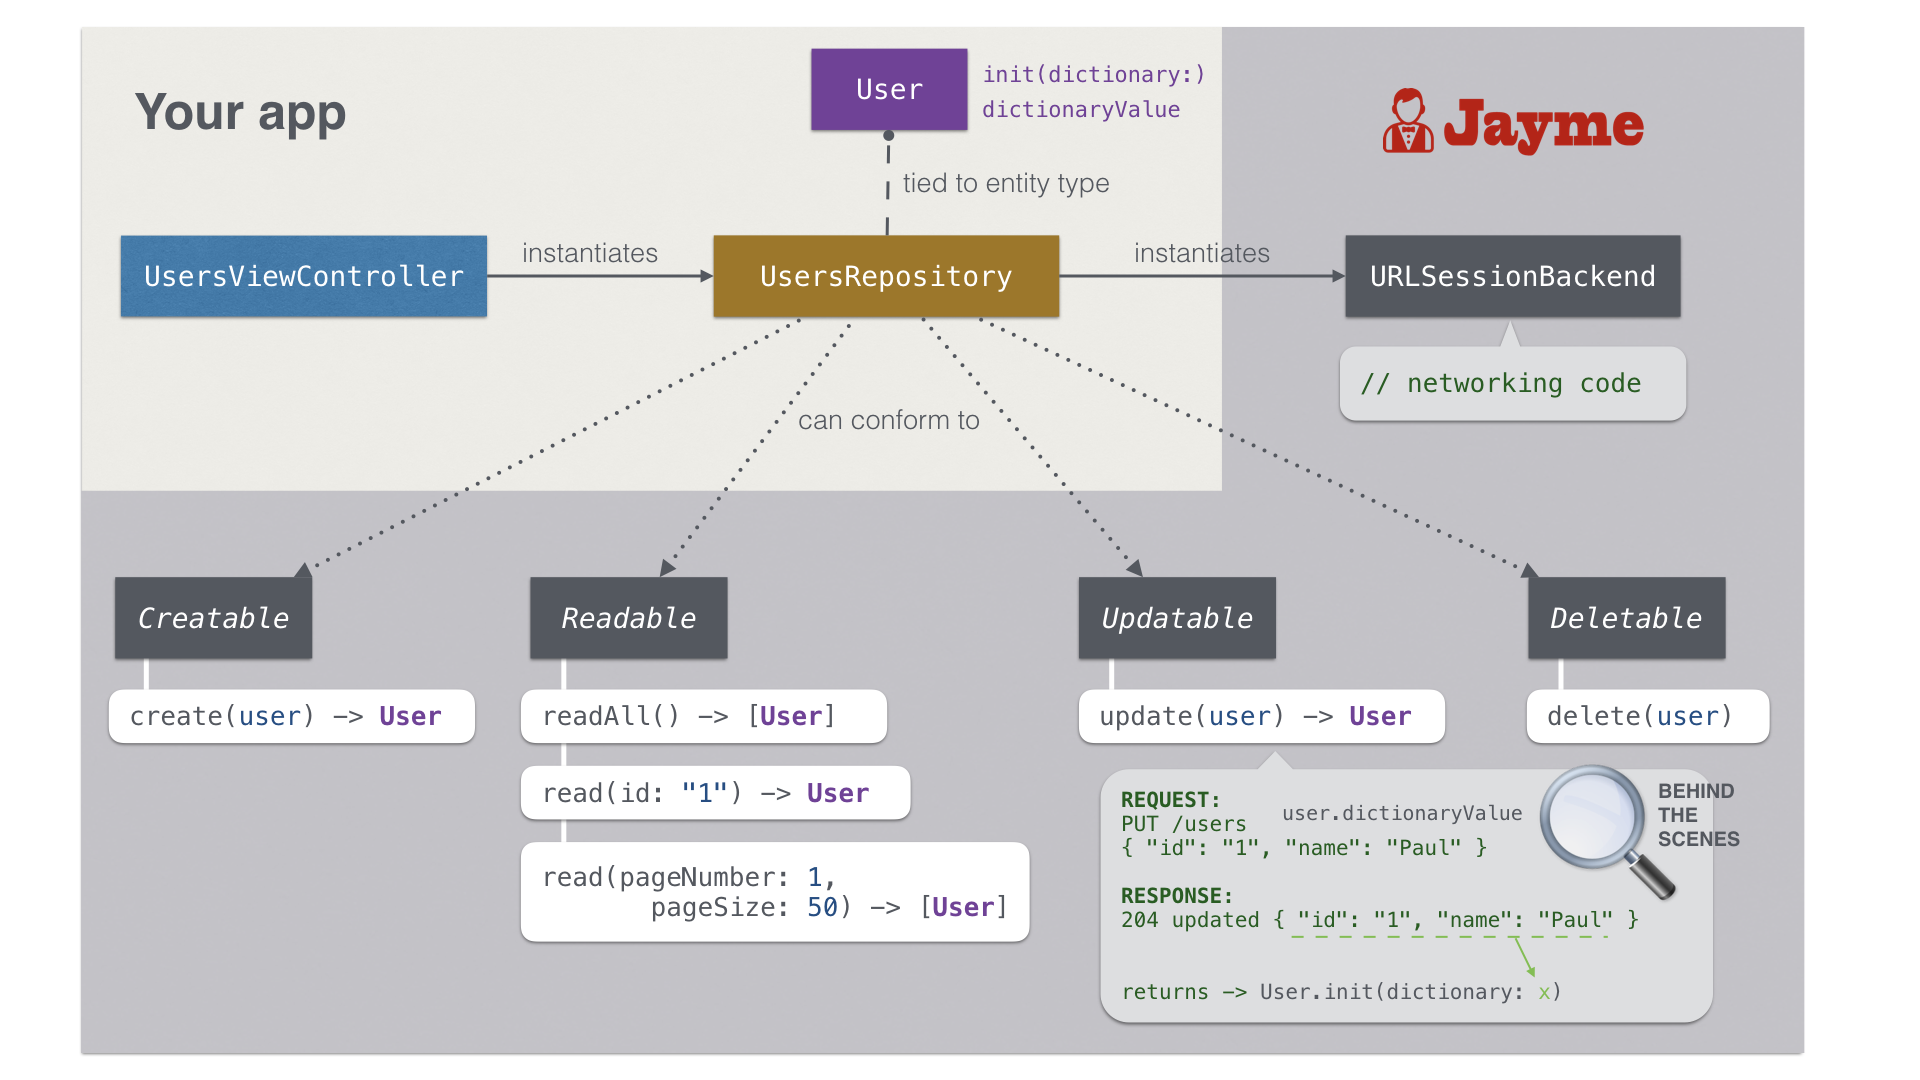
This library works around the Repository Pattern. There are some key concepts that you need to become familiar with before using it. These concepts can be outlined differently depending on how the pattern is implemented, as there are several ways of working with it.
Here is a brief description of each relevant term, based on how Jayme, in particular, implements the pattern:
1. Repositories
- A repository represents a collection that holds entities of a certain kind and that is capable of filtering and returning entities back, based on the needs of your application.
- Your business logic code will usually live in repositories.
- Jayme comes with four protocols containing default implementations for common CRUD operations:
Creatable,Readable,Updatable, andDeletable. Your repositories can conform to any of these, as it's required.
2. Backends
- A backend is a middleman that accepts concrete requests as input (e.g. a
DELETEto/users/123) and performs networking operations to satisfy those requests, giving results back. - Your networking code will usually live in backends.
- Jayme comes with a default backend, named
URLSessionBackend, which performs requests against a server viaURLSession.
3. Entities
- An entity represents a thing that is meaningful in your application; for example, a user.
- Your model objects will usually be represented by entities.
Relationship between repositories and entities
A repository relates to a certain kind of entity using an associated type, named EntityType (examples of entity types are: User, Post, Comment, and so on).
Depending on which protocols your repository conform to, its associated EntityType will be required to conform to some (or all) of these protocols:
-
Identifiable: The entity can be identified through anidfield. -
DictionaryInitializable: The entity can be initialized with a dictionary. -
DictionaryRepresentable: The entity can be represented through a dictionary.
Below is table showing which protocols your EntityType should conform to, depending on which protocols the repository conforms to.
| EntityType | ||||
|---|---|---|---|---|
| Identifiable | DictionaryInitializable | DictionaryRepresentable | ||
| Repository | Creatable | x | x | |
| Readable | x | x | ||
| Updatable | x | x | x | |
| Deletable | x | |||
Default Behavior
The way Creatable, Readable, Updatable, and Deletable work is defined following Inaka's REST Guidelines. The server is expected to follow such guidelines in order for these protocols to work properly.
Below is a table exposing the set of functions that these protocols provide you with:
| Single-Entity Repository (e.g. "profile") |
Multiple-Entity Repository (e.g. "users") |
|
|---|---|---|
| Creatable |
.create(entity)Requests the entity to be created in the server. If success, returns the created entity.POST /profile → ⚪ |
.create(entity)Request the entity to be created in the repository. If success, returns the created entity.POST /users → ⚪.create([entity1, entity2, ...])Requests the entities to be created in the server. If success, returns an array containing the created entities.POST /users → [⚪ ,⚪ , ...] |
| Readable |
.read()Requests to fetch the entity from the server. If success, returns the fetched entity.GET /profile → ⚪ |
.read(id: x)Requests to fetch the entity matching the given id from the server. If success, returns the fetched entity.GET /users/x →⚪.readAll()Requests to fetch all the entities related to this endpoint from the server. If success, returns an array containing the fetched entities.GET /users → [⚪ ,⚪ , ...].read(pageNumber: n, pageSize: N)Requests to fetch a batch of entities from the server, in a paginated manner, following Grape Standards. If success, returns an array containing the `N` entities corresponding to the page number `n`, and also an object containing relevant pagination information obtained from the response.GET /users?page=n&per_page=N → ( [⚪ ,⚪ , ...] , pageInfo ) |
| Updatable |
.update(entity)Requests the entity to be updated on the server. If success, returns the updated entity.PUT /profile → ⚪ |
.update(entity, id: x)Requests the entity with the specified id to be updated on the server. If success, returns the updated entity.PUT /users/x → ⚪.update([entity1, entity2, ...])Requests the passed in entities to be updated on the server. If success, returns an array containing the updated entities.PATCH /users → [⚪ ,⚪ , ...] |
| Deletable |
.delete()Requests the entity to be deleted from the server.DELETE /profile
|
.delete(id: x)Requests the entity matching the given id to be deleted from the server.DELETE /users/x
|
Please, notice the difference between single-entity repositories vs. multiple-entity repositories. Usually, you will have repositories that perform operations with only one singleton entity (for instance:
/profile,/me, or/session), and, on the other hand, repositories that perform operations with multiple entities (such as/users,/posts, or/comments). Although method's interfaces are alike, they slightly differ in either scenario. Thanks to Swift's protocol-oriented features, the default behaviors for these methods are defined in the methods' bodies within extensions of the aforementioned protocols.
You can always customize these methods as you see fit:
- If you need to customize some methods for one specific repository, you would re-implement those methods in such repository.
- If you need, instead, to customize some methods for all your repositories, you can create a middleman protocol that conforms to any of the mentioned above, to which your repositories will end up conforming to, and having an extension of it re-writing the methods' bodies.
Asynchronism
Repositories don't return results directly. Since responses are asynchronous, results cannot be as immediate. Jayme solves this issue by encapsulating the results in objects called Futures.
Futures achieve what completion blocks do, but in a more convenient way, allowing you to write asynchronous code more efficiently. Check out this talk for further reference.
So, instead of:
let users: [User] = UsersRepository().readAll()
You actually need to write:
UsersRepository().readAll().start() { result in
    switch result {
    case .success(let users):
        // got your users here
    case .failure(let error):
        // deal with it
    }
}
Notice that the obtained result is not users directly, but instead, a Result object containing either the users or an error, depending on how the operation went. This structure has the advantage of forcing you to think of the unhappy paths, i.e. what to do in case of failure, something that's often forgotten.
Example
In this example, you'll learn how to setup and use a multiple-entity repository with basic CRUD functionality.
1. Configure your backend
First, you have to set up the backend that your application is going to use. Here is where you specify how your app connects to the server. Jayme provides a URLSessionBackend class ready to be used. If you need a server connection using something different to URLSession, you can write your own Backend.
By default, when you initialize a URLSessionBackend instance, it's created with a default configuration object, which uses basic HTTP headers for JSON communication, and localhost:8080 as the default base URL path. You will normally change that. Here is how:
extension URLSessionBackend {
    class func myAppBackend() -> URLSessionBackend {
        let basePath = "http://your_base_url_path"
        let headers = [HTTPHeader(field: "Accept", value: "application/json"),
                       HTTPHeader(field: "Content-Type", value: "application/json")]
                       // and any header you need to use
        let configuration = URLSessionBackendConfiguration(basePath: basePath, httpHeaders: headers)
        return URLSessionBackend(configuration: configuration)
    }
}
Then, any repository that you write should use:
let backend = URLSessionBackend.myAppBackend()
2. Create your first entity type
Let's create a User structure, for holding basic user data:
struct User {
    let name: String
    let email: String
}
3. Create your first repository
Now, let's create a repository for users, which is capable of reading users from the backend.
class UsersRepository: Readable {
    typealias EntityType = User                    // 1
    let backend = URLSessionBackend.myAppBackend() // 2
    let name = "users"                             // 3
}
These are the three requirements to conform to Readable:
- You need to specify what kind of entity the repository works with, through the
EntityTypetypealias. - You need to instantiate a
URLSessionBackend. Typically, you will use the one you've set up before. - You need to provide a
namefor the repository. This string is whatCreatable,Readable,Updatable, andDeletableprotocols use internally to build paths for the requests. For instance: If you provide the"users"name, then.delete(id: "123")will result in"DELETE /users/123".
This code won't compile yet. Why? Because your EntityType is required to conform to the Identifiable and DictionaryInitializable protocols, as the Readable protocol requires.
So, you have to modify your User struct:
struct User: Identifiable {
    let id: String
    let name: String
    let email: String
}

extension User: DictionaryInitializable {
    init(dictionary: [AnyHashable: Any]) throws {
        // Parse the entity here
        guard
            let id = dictionary["id"] as? String,
            let name = dictionary["name"] as? String,
            let email = dictionary["email"] as? String
            else { throw JaymeError.parsingError }
        self.id = id
        self.name = name
        self.email = email
    }
}
4. Perform a READ operation
Now you're good to go and read users from your view controller!
UsersRepository().readAll().start() { result in
    switch result {
    case .success(let users):
        // You've got all your users fetched in this array!
    case .failure(let error):
        // You've got a discrete JaymeError indicating what happened
    }
}
UsersRepository().read(id: "1").start() { result in
    switch result {
    case .success(let user):
        // You've got the user with id = "1"
    case .failure(let error):
        // You've got a discrete JaymeError indicating what happened
    }
}
Note that all the magic occurs behind the scenes: Building requests, handling responses, parsing JSON objects, etc. You might want to check out these classes and protocols to understand how this magic occur:
URLSessionBackend,DataParser,EntityParser,Creatable,Readable,Updatable,Deletable. You may need to write your own implementations to meet your needings, in case they differ to the standards that Jayme works with.
5. I want to be able to CREATE users
Adding functionality to create users to your repository is as simple as making it conform to Creatable:
class UsersRepository: Readable, Creatable {
    typealias EntityType = User
    let backend = URLSessionBackend.myAppBackend()
    let name = "users"
}
Notice that the Creatable protocol demands that your EntityType must also conform to DictionaryRepresentable. Let's do it:
extension User: DictionaryRepresentable {
    var dictionaryValue: [AnyHashable: Any] {
        return ["id": self.id,
                "name": self.name,
                "email": self.email]
    }
}
Now you can create users from your view controllers:
let user = User(id: "1", name: "Laura", email: "[email protected]")
UsersRepository().create(user).start() { result in
    switch result {
    case .success(let user):
        // User created!
    case .failure(let error):
        // JaymeError indicating what happened
    }
}
6. Nice, but I'm NOT supposed to create the user with an ID
OK, say the business rules of your project state that ids are created server-side, and not client-side as we just did. This is where you need to start customizing the default behaviors.
An easy way to accomplish this is adding a new method to UsersRepository which asks for every user property, except the id, and send those to the server.
You can borrow the default create function defined in the Creatable protocol extension, and modify it as you need:
extension UsersRepository {
    func create(name: String, email: String) -> Future<User, JaymeError> {
        let path = self.name
        let parameters = ["name": name, "email": email] // see? no id!
        return self.backend.future(path: path, method: .POST, parameters: parameters)
            .andThen { DataParser().dictionary(from: $0.0) }
            .andThen { EntityParser().entity(from: $0) }
    }
}
Notice that since you're not using any Creatable function anymore, your UsersRepository no longer need to conform to Creatable. Therefore, User does not need to conform to DictionaryRepresentable either.
Now, from your view controller:
let future = UsersRepository().create(name: "Laura", email: "[email protected]")
future.start() { result in
    switch result {
    case .success(let user):
        // User created!
        // Here, you have a full `user` with the `id` that comes from the server
    case .failure(let error):
        // JaymeError indicating what happened
    }
}
7. Add UPDATE and DELETE functionality
Adding basic update and delete functionality is simple: Make your repository conform to Updatable and Deletable:
extension UsersRepository: Updatable, Deletable {
}
Methods are provided by the extensions in Updatable.swift and Deletable.swift. Your EntityType already conforms to Identifiable, DictionaryInitializable, and DictionaryRepresentable, so there is nothing else to worry about.
Now, you can update and delete users from your view controllers:
UsersRepository().update(updatedUser, id: "1").start() { result in
    switch result {
    case .success(let user):
        // user updated!
    case .failure(let error):
        // JaymeError indicating what happened
    }
}
UsersRepository().delete(id: "1").start() { result in
    switch result {
    case .success:
        // user deleted!
    case .failure(let error):
        // JaymeError indicating what happened
    }
}
8. Add functions for custom endpoints
Let's suppose your server is capable of returning the active users when hitting the /users/active endpoint with a GET method.
This is a perfect example of adding a function for a custom endpoint in your repository. You will usually find lots of them when developing.
This is how it's done:
extension UsersRepository {
    func readActive() -> Future<[User], JaymeError> {
        let path = "\(self.name)/active"
        return self.backend.future(path: path, method: .GET, parameters: nil)
            .andThen { DataParser().dictionary(from: $0.0) }
            .andThen { EntityParser().entity(from: $0) }
    }
}
You will often find yourself writing these kind of custom functions for some of your repositories. So, it's recommendable that you understand how Futures work and how they are chained together in these examples by using the
andThenfunction. You're encouraged to take a look at the Appendix A: Write your own custom functions.
9. You're all set up!
Now you know the basics of how to write code to work with Jayme. You will stumble upon more complex scenarios, which will require you to think how to face them. With this basic knowledge on creating entity types, repositories, and using them in your view controllers, you should be good to go.
We encourage you to read these extra documents:
- Appendix A: Write your own custom functions
- Appendix B: Unit-test your repositories
- Appendix C: Configure your own logging function
- Appendix D: Authenticate your requests
Sample Project
You can check out this sample project that integrates Jayme with GitHub APIs.
Also, there is an Example folder inside the repo containing a more basic implementation of some repositories integrated with view controllers. This sample project needs a local server to work, which you can configure really quickly by doing:
$ cd Jayme/Example/Server
$ python -m SimpleHTTPServer 8080
Setup
- Jayme is available via cocoapods.
- To install it, add
pod 'Jayme'to yourPodfileand runpod install. - Then, add an
import Jaymestatement in any source file of your project that needs to make use of the library.
- To install it, add
Migration Guides
Swift Versions Support
-
As of its 4.1 release, this library works with Swift 4
-
If you look for older languages version support, you can check out:
- 3.0 release for Swift 3 support
- 2.1 release for Swift 2.3 support
- 2.0.2 release for Swift 2.2 support
Contact Us
For questions or general comments regarding the use of this library, please use our public hipchat room.
If you find any bug, a problem while using this library, or have suggestions that can make it better, please open an issue in this repo (or a pull request).
You can also check all of our open-source projects at inaka.github.io.