lesnitsky / Webgl Month
Programming Languages
Projects that are alternatives of or similar to Webgl Month
WebGL month
Hi 👋 My name is Andrei. I have some fun experience with WebGL and I want to share it. I'm starting a month of WebGL, each day I will post a WebGL related tutorial. Not Three.js, not pixi.js, WebGL API itself.
Follow me on twitter to get WebGL month updates or join WebGL month mailing list
Day 1. Intro
This is a series of blog posts related to WebGL. New post will be available every day
Subscribe for updates or join mailing list

Built with GitTutor
Welcome to day 1 of WebGL month. In this article we'll get into high level concepts of rendering which are improtant to understand before approaching actual WebGL API.
WebGL API is often treated as 3D rendering API, which is a wrong assumption. So what WebGL does? To answer this question let's try to render smth with canvas 2d.
We'll need simple html
📄 index.html
<!DOCTYPE html>
<html lang="en">
  <head>
    <meta charset="UTF-8" />
    <meta name="viewport" content="width=device-width, initial-scale=1.0" />
    <meta http-equiv="X-UA-Compatible" content="ie=edge" />
    <title>WebGL Month</title>
  </head>
  <body></body>
</html>
and canvas
📄 index.html
      <meta http-equiv="X-UA-Compatible" content="ie=edge" />
      <title>WebGL Month</title>
    </head>
-   <body></body>
+   <body>
+     <canvas></canvas>
+   </body>
  </html>
Don't forget beloved JS
📄 index.html
    </head>
    <body>
      <canvas></canvas>
+     <script src="./src/canvas2d.js"></script>
    </body>
  </html>
📄 src/canvas2d.js
console.log('Hello WebGL month');
Let's grab a reference to canvas and get 2d context
📄 src/canvas2d.js
- console.log('Hello WebGL month');+ console.log('Hello WebGL month');
+
+ const canvas = document.querySelector('canvas');
+ const ctx = canvas.getContext('2d');
and do smth pretty simple, like drawing a black rectangle
📄 src/canvas2d.js
  const canvas = document.querySelector('canvas');
  const ctx = canvas.getContext('2d');
+
+ ctx.fillRect(0, 0, 100, 50);
Ok, this is pretty simple right? But let's think about what this signle line of code actually did. It filled every pixel inside of rectangle with black color.
Are there any ways to do the same but w/o fillRect?
The answer is yes
Let's implement our own version of
📄 src/canvas2d.js
  const canvas = document.querySelector('canvas');
  const ctx = canvas.getContext('2d');

- ctx.fillRect(0, 0, 100, 50);
+ function fillRect(top, left, width, height) {
+
+ }
So basically each pixel is just a color encoded in 4 integers. R, G, B channel and Alpha.
To store info about each pixel of canvas we'll need a Uint8ClampedArray.
The size of this array is canvas.width * canvas.height (pixels count) * 4 (each pixel has 4 channels).
📄 src/canvas2d.js
  const ctx = canvas.getContext('2d');

  function fillRect(top, left, width, height) {
-
+     const pixelStore = new Uint8ClampedArray(canvas.width * canvas.height * 4);
  }
Now we can fill each pixel storage with colors. Note that alpha component is also in range unlike CSS
📄 src/canvas2d.js
  function fillRect(top, left, width, height) {
      const pixelStore = new Uint8ClampedArray(canvas.width * canvas.height * 4);
+
+     for (let i = 0; i < pixelStore.length; i += 4) {
+         pixelStore[i] = 0; // r
+         pixelStore[i + 1] = 0; // g
+         pixelStore[i + 2] = 0; // b
+         pixelStore[i + 3] = 255; // alpha
+     }
  }
But how do we render this pixels? There is a special canvas renderable class
📄 src/canvas2d.js
          pixelStore[i + 2] = 0; // b
          pixelStore[i + 3] = 255; // alpha
      }
+
+     const imageData = new ImageData(pixelStore, canvas.width, canvas.height);
+     ctx.putImageData(imageData, 0, 0);
  }
+
+ fillRect();
Whoa 🎉 We filled canvas with a color manually iterating over each pixel! But we're not taking into account passed arguments, let's fix it.
Calculate pixel indices inside rectangle
📄 src/canvas2d.js
  const canvas = document.querySelector('canvas');
  const ctx = canvas.getContext('2d');

+ function calculatePixelIndices(top, left, width, height) {
+     const pixelIndices = [];
+
+     for (let x = left; x < left + width; x++) {
+         for (let y = top; y < top + height; y++) {
+             const i =
+                 y * canvas.width * 4 + // pixels to skip from top
+                 x * 4; // pixels to skip from left
+
+             pixelIndices.push(i);
+         }
+     }
+
+     return pixelIndices;
+ }
+
  function fillRect(top, left, width, height) {
      const pixelStore = new Uint8ClampedArray(canvas.width * canvas.height * 4);
and iterate over these pixels instead of the whole canvas
📄 src/canvas2d.js
  function fillRect(top, left, width, height) {
      const pixelStore = new Uint8ClampedArray(canvas.width * canvas.height * 4);
+
+     const pixelIndices = calculatePixelIndices(top, left, width, height);

-     for (let i = 0; i < pixelStore.length; i += 4) {
+     pixelIndices.forEach((i) => {
          pixelStore[i] = 0; // r
          pixelStore[i + 1] = 0; // g
          pixelStore[i + 2] = 0; // b
          pixelStore[i + 3] = 255; // alpha
-     }
+     });

      const imageData = new ImageData(pixelStore, canvas.width, canvas.height);
      ctx.putImageData(imageData, 0, 0);
  }

- fillRect();
+ fillRect(10, 10, 100, 50);
Cool 😎 We've just reimplemented fillRect! But what does it have in common with WebGL?

That's exactly what WebGL API does – it calculates color of each pixel and fills it with calculated color
What's next?
In next article we'll start working with WebGL API and render a WebGL "Hello world". See you tomorrow
Subscribe for updates or join mailing list
Built with GitTutor
Homework
Extend custom fillRect to support custom colors
Day 2. Simple shader and triangle
This is a series of blog posts related to WebGL. New post will be available every day
Subscribe for updates or join mailing list
Built with GitTutor
Yesterday we've learned what WebGL does – calculates each pixel color inside renderable area. But how does it actually do that?
WebGL is an API which works with your GPU to render stuff. While JavaScript is executed by v8 on a CPU, GPU can't execute JavaScript, but it is still programmable
One of the languages GPU "understands" is GLSL, so we'll famialarize ourselves not only with WebGL API, but also with this new language.
GLSL is a C like programming language, so it is easy to learn and write for JavaScript developers.
But where do we write glsl code? How to pass it to GPU in order to execute?
Let's write some code
Let's create a new js file and get a reference to WebGL rendering context
📄 index.html
    </head>
    <body>
      <canvas></canvas>
-     <script src="./src/canvas2d.js"></script>
+     <script src="./src/webgl-hello-world.js"></script>
    </body>
  </html>
📄 src/webgl-hello-world.js
const canvas = document.querySelector('canvas');
const gl = canvas.getContext('webgl');
The program executable by GPU is created by method of WebGL rendering context
📄 src/webgl-hello-world.js
  const canvas = document.querySelector('canvas');
  const gl = canvas.getContext('webgl');
+
+ const program = gl.createProgram();
GPU program consists of two "functions"
These functions are called shaders
WebGL supports several types of shaders
In this example we'll work with vertex and fragment shaders.
Both could be created with createShader method
📄 src/webgl-hello-world.js
  const gl = canvas.getContext('webgl');

  const program = gl.createProgram();
+
+ const vertexShader = gl.createShader(gl.VERTEX_SHADER);
+ const fragmentShader = gl.createShader(gl.FRAGMENT_SHADER);
Now let's write the simpliest possible shader
📄 src/webgl-hello-world.js
  const vertexShader = gl.createShader(gl.VERTEX_SHADER);
  const fragmentShader = gl.createShader(gl.FRAGMENT_SHADER);
+
+ const vShaderSource = `
+ void main() {
+
+ }
+ `;
This should look pretty familiar to those who has some C/C++ experience
Unlike C or C++ main doesn't return anyhting, it assignes a value to a global variable gl_Position instead
📄 src/webgl-hello-world.js
  const vShaderSource = `
  void main() {
-
+     gl_Position = vec4(0, 0, 0, 1);
  }
  `;
Now let's take a closer look to what is being assigned.
There is a bunch of functions available in shaders.
vec4 function creates a vector of 4 components.
gl_Position = vec4(0, 0, 0, 1);
Looks weird.. We live in 3-dimensional world, what on earth is the 4th component? Is it time? 😕
Not really
It turns out that this addition allows for lots of nice techniques for manipulating 3D data. A three dimensional point is defined in a typical Cartesian coordinate system. The added 4th dimension changes this point into a homogeneous coordinate. It still represents a point in 3D space and it can easily be demonstrated how to construct this type of coordinate through a pair of simple functions.
For now we can just ingore the 4th component and set it to 1.0 just because
Alright, we have a shader variable, shader source in another variable. How do we connect these two? With
📄 src/webgl-hello-world.js
      gl_Position = vec4(0, 0, 0, 1);
  }
  `;
+
+ gl.shaderSource(vertexShader, vShaderSource);
GLSL shader should be compiled in order to be executed
📄 src/webgl-hello-world.js
  `;

  gl.shaderSource(vertexShader, vShaderSource);
+ gl.compileShader(vertexShader);
Compilation result could be retreived by . This method returns a "compiler" output. If it is an empty string – everyhting is good
📄 src/webgl-hello-world.js
  gl.shaderSource(vertexShader, vShaderSource);
  gl.compileShader(vertexShader);
+
+ console.log(gl.getShaderInfoLog(vertexShader));
We'll need to do the same with fragment shader, so let's implement a helper function which we'll use for fragment shader as well
📄 src/webgl-hello-world.js
  }
  `;

- gl.shaderSource(vertexShader, vShaderSource);
- gl.compileShader(vertexShader);
+ function compileShader(shader, source) {
+     gl.shaderSource(shader, source);
+     gl.compileShader(shader);

- console.log(gl.getShaderInfoLog(vertexShader));
+     const log = gl.getShaderInfoLog(shader);
+
+     if (log) {
+         throw new Error(log);
+     }
+ }
+
+ compileShader(vertexShader, vShaderSource);
How does the simpliest fragment shader looks like? Exactly the same
📄 src/webgl-hello-world.js
  }
  `;

+ const fShaderSource = `
+     void main() {
+
+     }
+ `;
+
  function compileShader(shader, source) {
      gl.shaderSource(shader, source);
      gl.compileShader(shader);
Computation result of a fragment shader is a color, which is also a vector of 4 components (r, g, b, a). Unlike CSS, values are in range of [0..1] instead of [0..255]. Fragment shader computation result should be assigned to the variable gl_FragColor
📄 src/webgl-hello-world.js
  const fShaderSource = `
      void main() {
-
+         gl_FragColor = vec4(1, 0, 0, 1);
      }
  `;

  }

  compileShader(vertexShader, vShaderSource);
+ compileShader(fragmentShader, fShaderSource);
Now we should connect program with our shaders
📄 src/webgl-hello-world.js
  compileShader(vertexShader, vShaderSource);
  compileShader(fragmentShader, fShaderSource);
+
+ gl.attachShader(program, vertexShader);
+ gl.attachShader(program, fragmentShader);
Next step – link program. This phase is required to verify if vertex and fragment shaders are compatible with each other (we'll get to more details later)
📄 src/webgl-hello-world.js
  gl.attachShader(program, vertexShader);
  gl.attachShader(program, fragmentShader);
+
+ gl.linkProgram(program);
Our application could have several programs, so we should tell gpu which program we want to use before issuing a draw call
📄 src/webgl-hello-world.js
  gl.attachShader(program, fragmentShader);

  gl.linkProgram(program);
+
+ gl.useProgram(program);
Ok, we're ready to draw something
📄 src/webgl-hello-world.js
  gl.linkProgram(program);

  gl.useProgram(program);
+
+ gl.drawArrays();
WebGL can render several types of "primitives"
- Points
- Lines
- Triangels
We should pass a primitive type we want to render
📄 src/webgl-hello-world.js
  gl.useProgram(program);

- gl.drawArrays();
+ gl.drawArrays(gl.POINTS);
There is a way to pass input data containing info about positions of our primitives to vertex shader, so we need to pass the index of the first primitive we want to render
📄 src/webgl-hello-world.js
  gl.useProgram(program);

- gl.drawArrays(gl.POINTS);
+ gl.drawArrays(gl.POINTS, 0);
and primitives count
📄 src/webgl-hello-world.js
  gl.useProgram(program);

- gl.drawArrays(gl.POINTS, 0);
+ gl.drawArrays(gl.POINTS, 0, 1);
Nothing rendered 😢 What is wrong?
Actually to render point, we should also specify a point size inside vertex shader
📄 src/webgl-hello-world.js
  const vShaderSource = `
  void main() {
+     gl_PointSize = 20.0;
      gl_Position = vec4(0, 0, 0, 1);
  }
  `;
Whoa 🎉 We have a point!

It is rendered in the center of the canvas because gl_Position is vec4(0, 0, 0, 1) => x == 0 and y == 0
WebGL coordinate system is different from canvas2d
canvas2d
0.0
-----------------------→ width (px)
|
|
|
↓
height (px)
webgl
                    (0, 1)
                      ↑
                      |
                      |
                      |
(-1, 0) ------ (0, 0)-·---------> (1, 0)
                      |
                      |
                      |
                      |
                    (0, -1)
Now let's pass point coordinate from JS instead of hardcoding it inside shader
Input data of vertex shader is called attribute
Let's define position attribute
📄 src/webgl-hello-world.js
  const fragmentShader = gl.createShader(gl.FRAGMENT_SHADER);

  const vShaderSource = `
+ attribute vec2 position;
+
  void main() {
      gl_PointSize = 20.0;
-     gl_Position = vec4(0, 0, 0, 1);
+     gl_Position = vec4(position.x, position.y, 0, 1);
  }
  `;
In order to fill attribute with data we need to get attribute location. Think of it as of unique identifier of attribute in javascript world
📄 src/webgl-hello-world.js
  gl.useProgram(program);

+ const positionPointer = gl.getAttribLocation(program, 'position');
+
  gl.drawArrays(gl.POINTS, 0, 1);
GPU accepts only typed arrays as input, so let's define a Float32Array as a storage of our point position
📄 src/webgl-hello-world.js
  const positionPointer = gl.getAttribLocation(program, 'position');

+ const positionData = new Float32Array([0, 0]);
+
  gl.drawArrays(gl.POINTS, 0, 1);
But this array couldn't be passed to GPU as-is, GPU should have it's own buffer.
There are different kinds of "buffers" in GPU world, in this case we need ARRAY_BUFFER
📄 src/webgl-hello-world.js
  const positionData = new Float32Array([0, 0]);

+ const positionBuffer = gl.createBuffer(gl.ARRAY_BUFFER);
+
  gl.drawArrays(gl.POINTS, 0, 1);
To make any changes to GPU buffers, we need to "bind" it. After buffer is bound, it is treated as "current", and any buffer modification operation will be performed on "current" buffer.
📄 src/webgl-hello-world.js
  const positionBuffer = gl.createBuffer(gl.ARRAY_BUFFER);

+ gl.bindBuffer(gl.ARRAY_BUFFER, positionBuffer);
+
  gl.drawArrays(gl.POINTS, 0, 1);
To fill buffer with some data, we need to call bufferData method
📄 src/webgl-hello-world.js
  const positionBuffer = gl.createBuffer(gl.ARRAY_BUFFER);

  gl.bindBuffer(gl.ARRAY_BUFFER, positionBuffer);
+ gl.bufferData(gl.ARRAY_BUFFER, positionData);

  gl.drawArrays(gl.POINTS, 0, 1);
To optimize buffer operations (memory management) on GPU side, we should pass a "hint" to GPU indicating how this buffer will be used. There are several ways to use buffers
-
gl.STATIC_DRAW: Contents of the buffer are likely to be used often and not change often. Contents are written to the buffer, but not read. -
gl.DYNAMIC_DRAW: Contents of the buffer are likely to be used often and change often. Contents are written to the buffer, but not read. -
gl.STREAM_DRAW: Contents of the buffer are likely to not be used often. Contents are written to the buffer, but not read.When using a WebGL 2 context, the following values are available additionally:
-
gl.STATIC_READ: Contents of the buffer are likely to be used often and not change often. Contents are read from the buffer, but not written. -
gl.DYNAMIC_READ: Contents of the buffer are likely to be used often and change often. Contents are read from the buffer, but not written. -
gl.STREAM_READ: Contents of the buffer are likely to not be used often. Contents are read from the buffer, but not written. -
gl.STATIC_COPY: Contents of the buffer are likely to be used often and not change often. Contents are neither written or read by the user. -
gl.DYNAMIC_COPY: Contents of the buffer are likely to be used often and change often. Contents are neither written or read by the user. -
gl.STREAM_COPY: Contents of the buffer are likely to be used often and not change often. Contents are neither written or read by the user.
📄 src/webgl-hello-world.js
  const positionBuffer = gl.createBuffer(gl.ARRAY_BUFFER);

  gl.bindBuffer(gl.ARRAY_BUFFER, positionBuffer);
- gl.bufferData(gl.ARRAY_BUFFER, positionData);
+ gl.bufferData(gl.ARRAY_BUFFER, positionData, gl.STATIC_DRAW);

  gl.drawArrays(gl.POINTS, 0, 1);
Now we need to tell GPU how it should read the data from our buffer
Required info:
Attribute size (2 in case of vec2, 3 in case of vec3 etc)
📄 src/webgl-hello-world.js
  gl.bindBuffer(gl.ARRAY_BUFFER, positionBuffer);
  gl.bufferData(gl.ARRAY_BUFFER, positionData, gl.STATIC_DRAW);

+ const attributeSize = 2;
+
  gl.drawArrays(gl.POINTS, 0, 1);
type of data in buffer
📄 src/webgl-hello-world.js
  gl.bufferData(gl.ARRAY_BUFFER, positionData, gl.STATIC_DRAW);

  const attributeSize = 2;
+ const type = gl.FLOAT;

  gl.drawArrays(gl.POINTS, 0, 1);
normalized – indicates if data values should be clamped to a certain range
for gl.BYTE and gl.SHORT, clamps the values to [-1, 1] if true
for gl.UNSIGNED_BYTE and gl.UNSIGNED_SHORT, clamps the values to [0, 1] if true
for types gl.FLOAT and gl.HALF_FLOAT, this parameter has no effect.
📄 src/webgl-hello-world.js
  const attributeSize = 2;
  const type = gl.FLOAT;
+ const nomralized = false;

  gl.drawArrays(gl.POINTS, 0, 1);
We'll talk about these two later 😉
📄 src/webgl-hello-world.js
  const attributeSize = 2;
  const type = gl.FLOAT;
  const nomralized = false;
+ const stride = 0;
+ const offset = 0;

  gl.drawArrays(gl.POINTS, 0, 1);
Now we need to call vertexAttribPointer to setup our position attribute
📄 src/webgl-hello-world.js
  const stride = 0;
  const offset = 0;

+ gl.vertexAttribPointer(positionPointer, attributeSize, type, nomralized, stride, offset);
+
  gl.drawArrays(gl.POINTS, 0, 1);
Let's try to change a position of the point
📄 src/webgl-hello-world.js
  const positionPointer = gl.getAttribLocation(program, 'position');

- const positionData = new Float32Array([0, 0]);
+ const positionData = new Float32Array([1.0, 0.0]);

  const positionBuffer = gl.createBuffer(gl.ARRAY_BUFFER);
Nothing changed 😢 But why?
Turns out – all attributes are disabled by default (filled with 0), so we need to enable our position attrbiute
📄 src/webgl-hello-world.js
  const stride = 0;
  const offset = 0;

+ gl.enableVertexAttribArray(positionPointer);
  gl.vertexAttribPointer(positionPointer, attributeSize, type, nomralized, stride, offset);

  gl.drawArrays(gl.POINTS, 0, 1);
Now we can render more points! Let's mark every corner of a canvas with a point
📄 src/webgl-hello-world.js
  const positionPointer = gl.getAttribLocation(program, 'position');

- const positionData = new Float32Array([1.0, 0.0]);
+ const positionData = new Float32Array([
+     -1.0, // point 1 x
+     -1.0, // point 1 y
+
+     1.0, // point 2 x
+     1.0, // point 2 y
+
+     -1.0, // point 3 x
+     1.0, // point 3 y
+
+     1.0, // point 4 x
+     -1.0, // point 4 y
+ ]);

  const positionBuffer = gl.createBuffer(gl.ARRAY_BUFFER);

  gl.enableVertexAttribArray(positionPointer);
  gl.vertexAttribPointer(positionPointer, attributeSize, type, nomralized, stride, offset);

- gl.drawArrays(gl.POINTS, 0, 1);
+ gl.drawArrays(gl.POINTS, 0, positionData.length / 2);
Let's get back to our shader
We don't necessarily need to explicitly pass position.x and position.y to a vec4 constructor, there is a vec4(vec2, float, float) override
📄 src/webgl-hello-world.js
  void main() {
      gl_PointSize = 20.0;
-     gl_Position = vec4(position.x, position.y, 0, 1);
+     gl_Position = vec4(position, 0, 1);
  }
  `;

  const positionPointer = gl.getAttribLocation(program, 'position');

  const positionData = new Float32Array([
-     -1.0, // point 1 x
-     -1.0, // point 1 y
+     -1.0, // top left x
+     -1.0, // top left y

      1.0, // point 2 x
      1.0, // point 2 y
Now let's move all points closer to the center by dividing each position by 2.0
📄 src/webgl-hello-world.js
  void main() {
      gl_PointSize = 20.0;
-     gl_Position = vec4(position, 0, 1);
+     gl_Position = vec4(position / 2.0, 0, 1);
  }
  `;
Result:

Conclusion
We now have a better understanding of how does GPU and WebGL work and can render something very basic We'll explore more primitive types tomorrow!
Homework
Render a Math.cos graph with dots
Hint: all you need is fill positionData with valid values
Subscribe for updates or join mailing list
Built with GitTutor
Day 3. Shader uniforms, lines and triangles
This is a series of blog posts related to WebGL. New post will be available every day
Subscribe for updates or join mailing list
Built with GitTutor
Yesterday we draw the simplies primitive possible – point. Let's first solve the "homework"
We need to remove hardcoded points data
📄 src/webgl-hello-world.js
  const positionPointer = gl.getAttribLocation(program, 'position');

- const positionData = new Float32Array([
-     -1.0, // top left x
-     -1.0, // top left y
-
-     1.0, // point 2 x
-     1.0, // point 2 y
-
-     -1.0, // point 3 x
-     1.0, // point 3 y
-
-     1.0, // point 4 x
-     -1.0, // point 4 y
- ]);
+ const points = [];
+ const positionData = new Float32Array(points);

  const positionBuffer = gl.createBuffer(gl.ARRAY_BUFFER);
Iterate over each vertical line of pixels of canvas [0..width]
📄 src/webgl-hello-world.js
  const positionPointer = gl.getAttribLocation(program, 'position');

  const points = [];
+
+ for (let i = 0; i < canvas.width; i++) {
+
+ }
+
  const positionData = new Float32Array(points);

  const positionBuffer = gl.createBuffer(gl.ARRAY_BUFFER);
Transform value from [0..width] to [-1..1] (remember webgl coordinat grid? this is left most and right most coordinates)
📄 src/webgl-hello-world.js
  const points = [];

  for (let i = 0; i < canvas.width; i++) {
-
+     const x = i / canvas.width * 2 - 1;
  }

  const positionData = new Float32Array(points);
Calculate cos and add both x and y to points array
📄 src/webgl-hello-world.js
  for (let i = 0; i < canvas.width; i++) {
      const x = i / canvas.width * 2 - 1;
+     const y = Math.cos(x * Math.PI);
+
+     points.push(x, y);
  }

  const positionData = new Float32Array(points);
Graph looks a bit weird, let's fix our vertex shader
📄 src/webgl-hello-world.js
  attribute vec2 position;

  void main() {
-     gl_PointSize = 20.0;
-     gl_Position = vec4(position / 2.0, 0, 1);
+     gl_PointSize = 2.0;
+     gl_Position = vec4(position, 0, 1);
  }
  `;
Niiiice 😎 We now have fancy cos graph!

We calculated cos with JavaScript, but if we need to calculate something for a large dataset, javascript may block rendering thread. Why won't facilitate computation power of GPU (cos will be calculated for each point in parallel).
GLSL doesn't have Math namespace, so we'll need to define M_PI variable
cos function is there though 😏
📄 src/webgl-hello-world.js
  const vShaderSource = `
  attribute vec2 position;

+ #define M_PI 3.1415926535897932384626433832795
+
  void main() {
      gl_PointSize = 2.0;
-     gl_Position = vec4(position, 0, 1);
+     gl_Position = vec4(position.x, cos(position.y * M_PI), 0, 1);
  }
  `;


  for (let i = 0; i < canvas.width; i++) {
      const x = i / canvas.width * 2 - 1;
-     const y = Math.cos(x * Math.PI);
-
-     points.push(x, y);
+     points.push(x, x);
  }

  const positionData = new Float32Array(points);
We have another JavaScript computation inside cycle where we transform pixel coordinates to [-1..1] range
How do we move this to GPU?
We've learned that we can pass some data to a shader with attribute, but width is constant, it doesn't change between points.
There is a special kind of variables – uniforms. Treat uniform as a global variable which can be assigned only once before draw call and stays the same for all "points"
Let's define a uniform
📄 src/webgl-hello-world.js
  const vShaderSource = `
  attribute vec2 position;
+ uniform float width;

  #define M_PI 3.1415926535897932384626433832795
To assign a value to a uniform, we'll need to do smth similar to what we did with attribute. We need to get location of the uniform.
📄 src/webgl-hello-world.js
  gl.useProgram(program);

  const positionPointer = gl.getAttribLocation(program, 'position');
+ const widthUniformLocation = gl.getUniformLocation(program, 'width');

  const points = [];
There's a bunch of methods which can assign different types of values to uniforms
-
gl.uniform1f– assigns a number to a float uniform (gl.uniform1f(0.0)) -
gl.uniform1fv– assigns an array of length 1 to a float uniform (gl.uniform1fv([0.0])) -
gl.uniform2f- assigns two numbers to a vec2 uniform (gl.uniform2f(0.0, 1.0)) -
gl.uniform2f- assigns an array of length 2 to a vec2 uniform (gl.uniform2fv([0.0, 1.0]))
etc
📄 src/webgl-hello-world.js
  const positionPointer = gl.getAttribLocation(program, 'position');
  const widthUniformLocation = gl.getUniformLocation(program, 'width');

+ gl.uniform1f(widthUniformLocation, canvas.width);
+
  const points = [];

  for (let i = 0; i < canvas.width; i++) {
And finally let's move our js computation to a shader
📄 src/webgl-hello-world.js
  #define M_PI 3.1415926535897932384626433832795

  void main() {
+     float x = position.x / width * 2.0 - 1.0;
      gl_PointSize = 2.0;
-     gl_Position = vec4(position.x, cos(position.y * M_PI), 0, 1);
+     gl_Position = vec4(x, cos(x * M_PI), 0, 1);
  }
  `;

  const points = [];

  for (let i = 0; i < canvas.width; i++) {
-     const x = i / canvas.width * 2 - 1;
-     points.push(x, x);
+     points.push(i, i);
  }

  const positionData = new Float32Array(points);
Rendering lines
Now let's try to render lines
We need to fill our position data with line starting and ending point coordinates
📄 src/webgl-hello-world.js
  gl.uniform1f(widthUniformLocation, canvas.width);

- const points = [];
+ const lines = [];
+ let prevLineY = 0;

- for (let i = 0; i < canvas.width; i++) {
-     points.push(i, i);
+ for (let i = 0; i < canvas.width - 5; i += 5) {
+     lines.push(i, prevLineY);
+     const y =  Math.random() * canvas.height;
+     lines.push(i + 5, y);
+
+     prevLineY = y;
  }

- const positionData = new Float32Array(points);
+ const positionData = new Float32Array(lines);

  const positionBuffer = gl.createBuffer(gl.ARRAY_BUFFER);
We'll also need to transform y to a WebGL clipspace, so let's pass a resolution of canvas, not just width
📄 src/webgl-hello-world.js
  const vShaderSource = `
  attribute vec2 position;
- uniform float width;
+ uniform vec2 resolution;

  #define M_PI 3.1415926535897932384626433832795

  void main() {
-     float x = position.x / width * 2.0 - 1.0;
+     vec2 transformedPosition = position / resolution * 2.0 - 1.0;
      gl_PointSize = 2.0;
-     gl_Position = vec4(x, cos(x * M_PI), 0, 1);
+     gl_Position = vec4(transformedPosition, 0, 1);
  }
  `;

  gl.useProgram(program);

  const positionPointer = gl.getAttribLocation(program, 'position');
- const widthUniformLocation = gl.getUniformLocation(program, 'width');
+ const resolutionUniformLocation = gl.getUniformLocation(program, 'resolution');

- gl.uniform1f(widthUniformLocation, canvas.width);
+ gl.uniform2fv(resolutionUniformLocation, [canvas.width, canvas.height]);

  const lines = [];
  let prevLineY = 0;
The final thing – we need to change primitive type to gl.LINES
📄 src/webgl-hello-world.js
  gl.enableVertexAttribArray(positionPointer);
  gl.vertexAttribPointer(positionPointer, attributeSize, type, nomralized, stride, offset);

- gl.drawArrays(gl.POINTS, 0, positionData.length / 2);
+ gl.drawArrays(gl.LINES, 0, positionData.length / 2);
Cool! We can render lines now 👍

Let's try to make the line a bit thicker
Unlike point size, line width should be set from javascript. There is a method gl.lineWidth(width)
Let's try to use it
📄 src/webgl-hello-world.js
  gl.bindBuffer(gl.ARRAY_BUFFER, positionBuffer);
  gl.bufferData(gl.ARRAY_BUFFER, positionData, gl.STATIC_DRAW);
+ gl.lineWidth(10);

  const attributeSize = 2;
  const type = gl.FLOAT;
Nothing changed 😢 But why??
That's why 😂

Nobody cares.
So if you need a fancy line with custom line cap – gl.LINES is not for you
But how do we render fancy line?
Turns out – everything could be rendered with help of next WebGL primitive – triangle. This is the last primitive which could be rendered with WebGL
Building a line of custom width from triangle might seem like a tough task, but don't worry, there are a lot of packages that could help you render custom 2d shapes (and even svg)
Some of these tools:
and others
From now on, remember: EVERYTHING, could be built with triangles and that's how rendering works
- Input – triangle vertices
- vertex shader – transform vertices to webgl clipspace
- Rasterization – calculate which pixels are inside of certain triangle
- Calculate color of each pixel
Here's an illustration of this process from https://opentechschool-brussels.github.io/intro-to-webGL-and-shaders/log1_graphic-pipeline
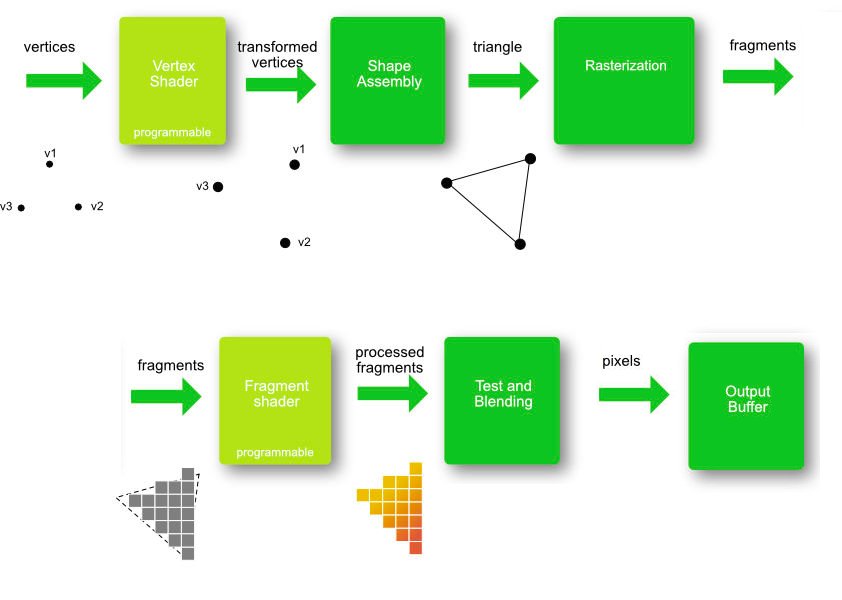
Disclamer: this is a simplified version of what's going on under the hood, read this for more detailed explanation
So lets finally render a triangle
Again – we need to update our position data
and change primitive type
📄 src/webgl-hello-world.js
  gl.uniform2fv(resolutionUniformLocation, [canvas.width, canvas.height]);

- const lines = [];
- let prevLineY = 0;
+ const triangles = [
+     0, 0, // v1 (x, y)
+     canvas.width / 2, canvas.height, // v2 (x, y)
+     canvas.width, 0, // v3 (x, y)
+ ];

- for (let i = 0; i < canvas.width - 5; i += 5) {
-     lines.push(i, prevLineY);
-     const y =  Math.random() * canvas.height;
-     lines.push(i + 5, y);
-
-     prevLineY = y;
- }
-
- const positionData = new Float32Array(lines);
+ const positionData = new Float32Array(triangles);

  const positionBuffer = gl.createBuffer(gl.ARRAY_BUFFER);

  gl.enableVertexAttribArray(positionPointer);
  gl.vertexAttribPointer(positionPointer, attributeSize, type, nomralized, stride, offset);

- gl.drawArrays(gl.LINES, 0, positionData.length / 2);
+ gl.drawArrays(gl.TRIANGLES, 0, positionData.length / 2);
And one more thing... Let's pass a color from javascript instead of hardcoding it inside fragment shader.
We'll need to go through the same steps as for resolution uniform, but declare this uniform in fragment shader
📄 src/webgl-hello-world.js
  `;

  const fShaderSource = `
+     uniform vec4 color;
+
      void main() {
-         gl_FragColor = vec4(1, 0, 0, 1);
+         gl_FragColor = color / 255.0;
      }
  `;


  const positionPointer = gl.getAttribLocation(program, 'position');
  const resolutionUniformLocation = gl.getUniformLocation(program, 'resolution');
+ const colorUniformLocation = gl.getUniformLocation(program, 'color');

  gl.uniform2fv(resolutionUniformLocation, [canvas.width, canvas.height]);
+ gl.uniform4fv(colorUniformLocation, [255, 0, 0, 255]);

  const triangles = [
      0, 0, // v1 (x, y)
Wait, what? An Error 🛑 😱
No precision specified for (float)
What is that?
Turns out that glsl shaders support different precision of float and you need to specify it.
Usually mediump is both performant and precise, but sometimes you might want to use lowp or highp. But be careful, highp is not supported by some mobile GPUs and there is no guarantee you won't get any weird rendering artifacts withh high precesion
📄 src/webgl-hello-world.js
  `;

  const fShaderSource = `
+     precision mediump float;
      uniform vec4 color;

      void main() {
Homework
Render different shapes using triangles:
- rectangle
- hexagon
- circle
See you tomorrow 👋
Subscribe for updates or join mailing list
Built with GitTutor
Day 4. Shader varyings
This is a series of blog posts related to WebGL. New post will be available every day
Subscribe for updates or join mailing list
Built with GitTutor
Yesterday we learned how to render lines and triangles, so let's get started with the homework
How do we draw a rectangle if webgl can only render triangles? We should split a rectangle into two triangles
-------
|    /|
|  /  |
|/    |
-------
Pretty simple, right?
Let's define the coordinates of triangle vertices
📄 src/webgl-hello-world.js
  gl.uniform4fv(colorUniformLocation, [255, 0, 0, 255]);

  const triangles = [
-     0, 0, // v1 (x, y)
-     canvas.width / 2, canvas.height, // v2 (x, y)
-     canvas.width, 0, // v3 (x, y)
+     // first triangle
+     0, 150, // top left
+     150, 150, // top right
+     0, 0, // bottom left
+
+     // second triangle
+     0, 0, // bottom left
+     150, 150, // top right
+     150, 0, // bottom right
  ];

  const positionData = new Float32Array(triangles);

Great, we can render rectangles now!
Now let's draw a hexagon. This is somewhat harder to draw manually, so let's create a helper function
📄 src/webgl-hello-world.js
      150, 0, // bottom right
  ];

+ function createHexagon(center, radius, segmentsCount) {
+
+ }
+
  const positionData = new Float32Array(triangles);

  const positionBuffer = gl.createBuffer(gl.ARRAY_BUFFER);
We need to iterate over (360 - segment angle) degrees with a step of a signle segment angle
📄 src/webgl-hello-world.js
  gl.uniform2fv(resolutionUniformLocation, [canvas.width, canvas.height]);
  gl.uniform4fv(colorUniformLocation, [255, 0, 0, 255]);

- const triangles = [
-     // first triangle
-     0, 150, // top left
-     150, 150, // top right
-     0, 0, // bottom left
-
-     // second triangle
-     0, 0, // bottom left
-     150, 150, // top right
-     150, 0, // bottom right
- ];
-
- function createHexagon(center, radius, segmentsCount) {
-
+ const triangles = [createHexagon()];
+
+ function createHexagon(centerX, centerY, radius, segmentsCount) {
+     const vertices = [];
+
+     for (let i = 0; i < Math.PI * 2; i += Math.PI * 2 / (segmentsCount - 1)) {
+
+     }
+
+     return vertices;
  }

  const positionData = new Float32Array(triangles);
And apply some simple school math

📄 src/webgl-hello-world.js
  gl.uniform2fv(resolutionUniformLocation, [canvas.width, canvas.height]);
  gl.uniform4fv(colorUniformLocation, [255, 0, 0, 255]);

- const triangles = [createHexagon()];
+ const triangles = createHexagon(canvas.width / 2, canvas.height / 2, canvas.height / 2, 6);

  function createHexagon(centerX, centerY, radius, segmentsCount) {
      const vertices = [];
+     const segmentAngle =  Math.PI * 2 / (segmentsCount - 1);

-     for (let i = 0; i < Math.PI * 2; i += Math.PI * 2 / (segmentsCount - 1)) {
-
+     for (let i = 0; i < Math.PI * 2; i += segmentAngle) {
+         const from = i;
+         const to = i + segmentAngle;
+
+         vertices.push(centerX, centerY);
+         vertices.push(centerX + Math.cos(from) * radius, centerY + Math.sin(from) * radius);
+         vertices.push(centerX + Math.cos(to) * radius, centerY + Math.sin(to) * radius);
      }

      return vertices;
Now how do we render circle? Actually a circle can be built with the same function, we just need to increase the number of "segments"
📄 src/webgl-hello-world.js
  gl.uniform2fv(resolutionUniformLocation, [canvas.width, canvas.height]);
  gl.uniform4fv(colorUniformLocation, [255, 0, 0, 255]);

- const triangles = createHexagon(canvas.width / 2, canvas.height / 2, canvas.height / 2, 6);
+ const triangles = createHexagon(canvas.width / 2, canvas.height / 2, canvas.height / 2, 360);

  function createHexagon(centerX, centerY, radius, segmentsCount) {
      const vertices = [];

Varyings
Ok, what next? Let's add some color 🎨
As we already know, we can pass a color to a fragment shader via uniform
But that's not the only way.
Vertex shader can pass a varying to a fragment shader for each vertex, and the value will be interpolated
Sounds a bit complicated, let's see how it works
We need to define a varying in both vertex and fragment shaders.
Make sure type matches. If e.g. varying will be vec3 in vertex shader and vec4 in fragment shader – gl.linkProgram(program) will fail. You can check if program was successfully linked with gl.getProgramParameter(program, gl.LINK_STATUS) and if it is false – gl.getProgramInfoLog(program) to see what went wrang
📄 src/webgl-hello-world.js
  attribute vec2 position;
  uniform vec2 resolution;

+ varying vec4 vColor;
+
  #define M_PI 3.1415926535897932384626433832795

  void main() {
      vec2 transformedPosition = position / resolution * 2.0 - 1.0;
      gl_PointSize = 2.0;
      gl_Position = vec4(transformedPosition, 0, 1);
+
+     vColor = vec4(255, 0, 0, 255);
  }
  `;

  const fShaderSource = `
      precision mediump float;
-     uniform vec4 color;
+
+     varying vec4 vColor;

      void main() {
-         gl_FragColor = color / 255.0;
+         gl_FragColor = vColor / 255.0;
      }
  `;


  const positionPointer = gl.getAttribLocation(program, 'position');
  const resolutionUniformLocation = gl.getUniformLocation(program, 'resolution');
- const colorUniformLocation = gl.getUniformLocation(program, 'color');

  gl.uniform2fv(resolutionUniformLocation, [canvas.width, canvas.height]);
- gl.uniform4fv(colorUniformLocation, [255, 0, 0, 255]);

  const triangles = createHexagon(canvas.width / 2, canvas.height / 2, canvas.height / 2, 360);
Now let's try to colorize our circle based on gl_Position
📄 src/webgl-hello-world.js
      gl_PointSize = 2.0;
      gl_Position = vec4(transformedPosition, 0, 1);

-     vColor = vec4(255, 0, 0, 255);
+     vColor = vec4((gl_Position.xy + 1.0 / 2.0) * 255.0, 0, 255);
  }
  `;

Looks cool, right?
But how do we pass some specific colors from js?
We need to create another attribute
📄 src/webgl-hello-world.js
  const vShaderSource = `
  attribute vec2 position;
+ attribute vec4 color;
  uniform vec2 resolution;

  varying vec4 vColor;
      gl_PointSize = 2.0;
      gl_Position = vec4(transformedPosition, 0, 1);

-     vColor = vec4((gl_Position.xy + 1.0 / 2.0) * 255.0, 0, 255);
+     vColor = color;
  }
  `;


  gl.useProgram(program);

- const positionPointer = gl.getAttribLocation(program, 'position');
+ const positionLocation = gl.getAttribLocation(program, 'position');
+ const colorLocation = gl.getAttribLocation(program, 'color');
+
  const resolutionUniformLocation = gl.getUniformLocation(program, 'resolution');

  gl.uniform2fv(resolutionUniformLocation, [canvas.width, canvas.height]);
  const stride = 0;
  const offset = 0;

- gl.enableVertexAttribArray(positionPointer);
- gl.vertexAttribPointer(positionPointer, attributeSize, type, nomralized, stride, offset);
+ gl.enableVertexAttribArray(positionLocation);
+ gl.vertexAttribPointer(positionLocation, attributeSize, type, nomralized, stride, offset);

  gl.drawArrays(gl.TRIANGLES, 0, positionData.length / 2);
Setup buffer for this attribute
📄 src/webgl-hello-world.js
  }

  const positionData = new Float32Array(triangles);
+ const colorData = new Float32Array(colors);

  const positionBuffer = gl.createBuffer(gl.ARRAY_BUFFER);
+ const colorBuffer = gl.createBuffer(gl.ARRAY_BUFFER);
+
+ gl.bindBuffer(gl.ARRAY_BUFFER, colorBuffer);
+ gl.bufferData(gl.ARRAY_BUFFER, colorData, gl.STATIC_DRAW);

  gl.bindBuffer(gl.ARRAY_BUFFER, positionBuffer);
  gl.bufferData(gl.ARRAY_BUFFER, positionData, gl.STATIC_DRAW);
Fill buffer with data
📄 src/webgl-hello-world.js
  gl.uniform2fv(resolutionUniformLocation, [canvas.width, canvas.height]);

  const triangles = createHexagon(canvas.width / 2, canvas.height / 2, canvas.height / 2, 360);
+ const colors = fillWithColors(360);

  function createHexagon(centerX, centerY, radius, segmentsCount) {
      const vertices = [];
      return vertices;
  }

+ function fillWithColors(segmentsCount) {
+     const colors = [];
+
+     for (let i = 0; i < segmentsCount; i++) {
+         for (let j = 0; j < 3; j++) {
+             if (j == 0) { // vertex in center of circle
+                 colors.push(0, 0, 0, 255);
+             } else {
+                 colors.push(i / 360 * 255, 0, 0, 255);
+             }
+         }
+     }
+
+     return colors;
+ }
+
  const positionData = new Float32Array(triangles);
  const colorData = new Float32Array(colors);
And setup the attribute pointer (the way how attribute reads data from the buffer).
📄 src/webgl-hello-world.js
  gl.enableVertexAttribArray(positionLocation);
  gl.vertexAttribPointer(positionLocation, attributeSize, type, nomralized, stride, offset);

+ gl.bindBuffer(gl.ARRAY_BUFFER, colorBuffer);
+
+ gl.enableVertexAttribArray(colorLocation);
+ gl.vertexAttribPointer(colorLocation, 4, type, nomralized, stride, offset);
+
  gl.drawArrays(gl.TRIANGLES, 0, positionData.length / 2);
Notice this gl.bindBuffer before attribute related calls. gl.vertexAttribPointer points attribute to a buffer which wa most recently bound, don't forget this step, this is a common mistake

Conclusion
We've learned another way to pass data to a fragment shader. This is useful for per vertex colors and textures (we'll work with textures later)
Homework
Render a 7-gon and colorize each triangle with colors of rainbow 🌈
See you tomorrow 👋
Subscribe for updates or join mailing list
Built with GitTutor
Day 5. Interleaved buffers
This is a series of blog posts related to WebGL. New post will be available every day
Subscribe for updates or join mailing list
Built with GitTutor
Hey 👋 Welcome to a WebGL month. Yesterday we've learned how to use varyings. Today we're going to explore one more concept, but let's solve a homework from yesterday first
We need to define raingbow colors first
📄 src/webgl-hello-world.js
  gl.uniform2fv(resolutionUniformLocation, [canvas.width, canvas.height]);

+ const rainbowColors = [
+     [255, 0.0, 0.0, 255], // red
+     [255, 165, 0.0, 255], // orange
+     [255, 255, 0.0, 255], // yellow
+     [0.0, 255, 0.0, 255], // green
+     [0.0, 101, 255, 255], // skyblue
+     [0.0, 0.0, 255, 255], // blue,
+     [128, 0.0, 128, 255], // purple
+ ];
+
  const triangles = createHexagon(canvas.width / 2, canvas.height / 2, canvas.height / 2, 360);
  const colors = fillWithColors(360);
Render a 7-gon
📄 src/webgl-hello-world.js
      [128, 0.0, 128, 255], // purple
  ];

- const triangles = createHexagon(canvas.width / 2, canvas.height / 2, canvas.height / 2, 360);
- const colors = fillWithColors(360);
+ const triangles = createHexagon(canvas.width / 2, canvas.height / 2, canvas.height / 2, 7);
+ const colors = fillWithColors(7);

  function createHexagon(centerX, centerY, radius, segmentsCount) {
      const vertices = [];
Fill colors buffer with rainbow colors
📄 src/webgl-hello-world.js
      for (let i = 0; i < segmentsCount; i++) {
          for (let j = 0; j < 3; j++) {
-             if (j == 0) { // vertex in center of circle
-                 colors.push(0, 0, 0, 255);
-             } else {
-                 colors.push(i / 360 * 255, 0, 0, 255);
-             }
+             colors.push(...rainbowColors[i]);
          }
      }

Where's the red? Well, to render 7 polygons, we need 8-gon 🤦 My bad, sorry.
Now we have a colored 8-gon and we store vertices coordinates and colors in two separate buffers. Having two separate buffers allows to update them separately (imagine we need to change colors, but not positions)
On the other hand if both positions and colors will be the same – we can store this data in a single buffer.
Let's refactor the code to acheive it
We need to structure our buffer data by attribute.
x1, y1, color.r, color.g, color.b, color.a
x2, y2, color.r, color.g, color.b, color.a
x3, y3, color.r, color.g, color.b, color.a
...
📄 src/webgl-hello-world.js
  ];

  const triangles = createHexagon(canvas.width / 2, canvas.height / 2, canvas.height / 2, 7);
- const colors = fillWithColors(7);

  function createHexagon(centerX, centerY, radius, segmentsCount) {
-     const vertices = [];
+     const vertexData = [];
      const segmentAngle =  Math.PI * 2 / (segmentsCount - 1);

      for (let i = 0; i < Math.PI * 2; i += segmentAngle) {
          const from = i;
          const to = i + segmentAngle;

-         vertices.push(centerX, centerY);
-         vertices.push(centerX + Math.cos(from) * radius, centerY + Math.sin(from) * radius);
-         vertices.push(centerX + Math.cos(to) * radius, centerY + Math.sin(to) * radius);
+         const color = rainbowColors[i / segmentAngle];
+
+         vertexData.push(centerX, centerY);
+         vertexData.push(...color);
+
+         vertexData.push(centerX + Math.cos(from) * radius, centerY + Math.sin(from) * radius);
+         vertexData.push(...color);
+
+         vertexData.push(centerX + Math.cos(to) * radius, centerY + Math.sin(to) * radius);
+         vertexData.push(...color);
      }

-     return vertices;
+     return vertexData;
  }

  function fillWithColors(segmentsCount) {
We don't need color buffer anymore
📄 src/webgl-hello-world.js
  }

  const positionData = new Float32Array(triangles);
- const colorData = new Float32Array(colors);
-
  const positionBuffer = gl.createBuffer(gl.ARRAY_BUFFER);
- const colorBuffer = gl.createBuffer(gl.ARRAY_BUFFER);
-
- gl.bindBuffer(gl.ARRAY_BUFFER, colorBuffer);
- gl.bufferData(gl.ARRAY_BUFFER, colorData, gl.STATIC_DRAW);

  gl.bindBuffer(gl.ARRAY_BUFFER, positionBuffer);
  gl.bufferData(gl.ARRAY_BUFFER, positionData, gl.STATIC_DRAW);
and it also makes sense to rename positionData and positionBuffer to a vertexData and vertexBuffer
📄 src/webgl-hello-world.js
      return colors;
  }

- const positionData = new Float32Array(triangles);
- const positionBuffer = gl.createBuffer(gl.ARRAY_BUFFER);
+ const vertexData = new Float32Array(triangles);
+ const vertexBuffer = gl.createBuffer(gl.ARRAY_BUFFER);

- gl.bindBuffer(gl.ARRAY_BUFFER, positionBuffer);
- gl.bufferData(gl.ARRAY_BUFFER, positionData, gl.STATIC_DRAW);
+ gl.bindBuffer(gl.ARRAY_BUFFER, vertexBuffer);
+ gl.bufferData(gl.ARRAY_BUFFER, vertexData, gl.STATIC_DRAW);
  gl.lineWidth(10);

  const attributeSize = 2;
But how do we specify how this data should be read from buffer and passed to a valid shader attributes
We can do this with vertexAttribPointer, stride and offset arguments
stride tells how much data should be read for each vertex in bytes
Each vertex contains:
- position (x, y, 2 floats)
- color (r, g, b, a, 4 floats)
So we have a total of 6 floats 4 bytes each
This means that stride is 6 * 4
Offset specifies how much data should be skipped in the beginning of the chunk
Color data goes right after position, position is 2 floats, so offset for color is 2 * 4
📄 src/webgl-hello-world.js
  const attributeSize = 2;
  const type = gl.FLOAT;
  const nomralized = false;
- const stride = 0;
+ const stride = 24;
  const offset = 0;

  gl.enableVertexAttribArray(positionLocation);
  gl.vertexAttribPointer(positionLocation, attributeSize, type, nomralized, stride, offset);

- gl.bindBuffer(gl.ARRAY_BUFFER, colorBuffer);
-
  gl.enableVertexAttribArray(colorLocation);
- gl.vertexAttribPointer(colorLocation, 4, type, nomralized, stride, offset);
+ gl.vertexAttribPointer(colorLocation, 4, type, nomralized, stride, 8);

- gl.drawArrays(gl.TRIANGLES, 0, positionData.length / 2);
+ gl.drawArrays(gl.TRIANGLES, 0, vertexData.length / 6);
And voila, we have the same result, but with a single buffer 🎉
Conclusion
Let's summarize how vertexAttribPointer(location, size, type, normalized, stride offset) method works for a single buffer (this buffer is called interleavd)
-
location: specifies which attribute do we want to setup -
size: how much data should be read for this exact attribute -
type: type of data being read -
normalized: whether the data should be "normalized" (clamped to[-1..1]for gl.BYTE and gl.SHORT, and to[0..1]for gl.UNSIGNED_BYTE and gl.UNSIGNED_SHORT) -
stride: how much data is there for each vertex in total (in bytes) -
offset: how much data should be skipped in a beginning of each chunk of data
So now you can use different combinations of buffers to fill your attributes with data
See you tomorrow 👋
This is a series of blog posts related to WebGL. New post will be available every day
Subscribe for updates or join mailing list
Built with GitTutor
Day 6. Index buffer
This is a series of blog posts related to WebGL. New post will be available every day
Subscribe for updates or join mailing list
Built with GitTutor
Hey 👋Welcome back to WebGL month. Yesterday we've learned how to use interleaved buffers. However our buffer contains a lot of duplicate data, because some polygons share the same vertices
Let's get back to a simple example of rectangle
📄 src/webgl-hello-world.js
      [128, 0.0, 128, 255], // purple
  ];

- const triangles = createHexagon(canvas.width / 2, canvas.height / 2, canvas.height / 2, 7);
+ const triangles = createRect(0, 0, canvas.height, canvas.height);

  function createHexagon(centerX, centerY, radius, segmentsCount) {
      const vertexData = [];
and fill it only with unique vertex coordinates
📄 src/webgl-hello-world.js
  const triangles = createRect(0, 0, canvas.height, canvas.height);

+ function createRect(top, left, width, height) {
+     return [
+         left, top, // x1 y1
+         left + width, top, // x2 y2
+         left, top + height, // x3 y3
+         left + width, top + height, // x4 y4
+     ];
+ }
+
  function createHexagon(centerX, centerY, radius, segmentsCount) {
      const vertexData = [];
      const segmentAngle =  Math.PI * 2 / (segmentsCount - 1);
Let's also disable color attribute for now
📄 src/webgl-hello-world.js
  const attributeSize = 2;
  const type = gl.FLOAT;
  const nomralized = false;
- const stride = 24;
+ const stride = 0;
  const offset = 0;

  gl.enableVertexAttribArray(positionLocation);
  gl.vertexAttribPointer(positionLocation, attributeSize, type, nomralized, stride, offset);

- gl.enableVertexAttribArray(colorLocation);
- gl.vertexAttribPointer(colorLocation, 4, type, nomralized, stride, 8);
+ // gl.enableVertexAttribArray(colorLocation);
+ // gl.vertexAttribPointer(colorLocation, 4, type, nomralized, stride, 8);

  gl.drawArrays(gl.TRIANGLES, 0, vertexData.length / 6);
Ok, so our buffer contains 4 vertices, but how does webgl render 2 triangles with only 4 vertices? THere's a special type of buffer which can specify how to fetch data from vertex buffer and build primitives (in our case triangles)
This buffer is called index buffer and it contains indices of vertex data chunks in vertex buffer.
So we need to specify indices of triangle vertices.
📄 src/webgl-hello-world.js
  const vertexData = new Float32Array(triangles);
  const vertexBuffer = gl.createBuffer(gl.ARRAY_BUFFER);

+ const indexBuffer = gl.createBuffer(gl.ARRAY_BUFFER);
+
+ const indexData = new Uint6Array([
+     0, 1, 2, // first triangle
+     1, 2, 3, // second trianlge
+ ]);
+
  gl.bindBuffer(gl.ARRAY_BUFFER, vertexBuffer);
  gl.bufferData(gl.ARRAY_BUFFER, vertexData, gl.STATIC_DRAW);
  gl.lineWidth(10);
Next step – upload data to a WebGL buffer.
To tell GPU that we're using index buffer we need to pass gl.ELEMENT_ARRAY_BUFFER as a first argument of gl.bindBuffer and gl.bufferData
📄 src/webgl-hello-world.js
      1, 2, 3, // second trianlge
  ]);

+ gl.bindBuffer(gl.ELEMENT_ARRAY_BUFFER, indexBuffer);
+ gl.bufferData(gl.ELEMENT_ARRAY_BUFFER, indexData, gl.STATIC_DRAW);
+
  gl.bindBuffer(gl.ARRAY_BUFFER, vertexBuffer);
  gl.bufferData(gl.ARRAY_BUFFER, vertexData, gl.STATIC_DRAW);
  gl.lineWidth(10);
And the final step: to render indexed vertices we need to call different method – drawElements instead of drawArrays
📄 src/webgl-hello-world.js
  const indexBuffer = gl.createBuffer(gl.ARRAY_BUFFER);

- const indexData = new Uint6Array([
+ const indexData = new Uint8Array([
      0, 1, 2, // first triangle
      1, 2, 3, // second trianlge
  ]);
  // gl.enableVertexAttribArray(colorLocation);
  // gl.vertexAttribPointer(colorLocation, 4, type, nomralized, stride, 8);

- gl.drawArrays(gl.TRIANGLES, 0, vertexData.length / 6);
+ gl.drawElements(gl.TRIANGLES, indexData.length, gl.UNSIGNED_BYTE, 0);
Wait, why is nothing rendered?
The reason is that we've disabled color attribute, so it got filled with zeros. (0, 0, 0, 0) – transparent black. Let's fix that
📄 src/webgl-hello-world.js
      void main() {
          gl_FragColor = vColor / 255.0;
+         gl_FragColor.a = 1.0;
      }
  `;
Conclusion
We now know how to use index buffer to eliminate number of vertices we need to upload to gpu. Rectangle example is very simple (only 2 vertices are duplicated), on the other hand this is 33%, so on a larger amount of data being rendered this might be quite a performance improvement, especially if you update vertex data frequently and reupload buffer contents
Homework
Render n-gon using index buffer
See you tomorrow 👋
This is a series of blog posts related to WebGL. New post will be available every day
Subscribe for updates or join mailing list
Built with GitTutor
WebGL month. Day 7. Tooling and refactor
This is a series of blog posts related to WebGL. New post will be available every day
Subscribe for updates or join mailing list
Built with GitTutor
Hey 👋
Welcome to the WebGL month.
Since our codebase grows and will keep getting more complicated, we need some tooling and cleanup.
We'll need webpack, so let's create package.json and install it
📄 package.json
{
  "name": "webgl-month",
  "version": "1.0.0",
  "description": "Daily WebGL tutorials",
  "main": "index.js",
  "scripts": {
    "test": "echo \"Error: no test specified\" && exit 1"
  },
  "repository": {
    "type": "git",
    "url": "git+https://github.com/lesnitsky/webgl-month.git"
  },
  "author": "",
  "license": "ISC",
  "bugs": {
    "url": "https://github.com/lesnitsky/webgl-month/issues"
  },
  "homepage": "https://github.com/lesnitsky/webgl-month#readme",
  "devDependencies": {
    "webpack": "^4.35.2",
    "webpack-cli": "^3.3.5"
  }
}
We'll need a simple webpack config
📄 webpack.config.js
const path = require('path');

module.exports = {
    entry: {
        'week-1': './src/week-1.js',
    },

    output: {
        path: path.resolve(__dirname, 'dist'),
        filename: '[name].js',
    },

    mode: 'development',
};
and update script source
📄 index.html
    </head>
    <body>
      <canvas></canvas>
-     <script src="./src/webgl-hello-world.js"></script>
+     <script src="./dist/week-1.js"></script>
    </body>
  </html>
Since shaders are raw strings, we can store shader source in separate file and use raw-loader for webpack.
📄 package.json
    },
    "homepage": "https://github.com/lesnitsky/webgl-month#readme",
    "devDependencies": {
+     "raw-loader": "^3.0.0",
      "webpack": "^4.35.2",
      "webpack-cli": "^3.3.5"
    }
📄 webpack.config.js
          filename: '[name].js',
      },

+     module: {
+         rules: [
+             {
+                 test: /\.glsl$/,
+                 use: 'raw-loader',
+             },
+         ],
+     },
+
      mode: 'development',
  };
and let's actually move shaders to separate files
📄 src/shaders/fragment.glsl
precision mediump float;

varying vec4 vColor;

void main() {
    gl_FragColor = vColor / 255.0;
    gl_FragColor.a = 1.0;
}
📄 src/shaders/vertex.glsl
attribute vec2 position;
attribute vec4 color;
uniform vec2 resolution;

varying vec4 vColor;

#define M_PI 3.1415926535897932384626433832795

void main() {
    vec2 transformedPosition = position / resolution * 2.0 - 1.0;
    gl_PointSize = 2.0;
    gl_Position = vec4(transformedPosition, 0, 1);

    vColor = color;
}
📄 src/week-1.js
+ import vShaderSource from './shaders/vertex.glsl';
+ import fShaderSource from './shaders/fragment.glsl';
+
  const canvas = document.querySelector('canvas');
  const gl = canvas.getContext('webgl');

  const vertexShader = gl.createShader(gl.VERTEX_SHADER);
  const fragmentShader = gl.createShader(gl.FRAGMENT_SHADER);

- const vShaderSource = `
- attribute vec2 position;
- attribute vec4 color;
- uniform vec2 resolution;
-
- varying vec4 vColor;
-
- #define M_PI 3.1415926535897932384626433832795
-
- void main() {
-     vec2 transformedPosition = position / resolution * 2.0 - 1.0;
-     gl_PointSize = 2.0;
-     gl_Position = vec4(transformedPosition, 0, 1);
-
-     vColor = color;
- }
- `;
-
- const fShaderSource = `
-     precision mediump float;
-
-     varying vec4 vColor;
-
-     void main() {
-         gl_FragColor = vColor / 255.0;
-         gl_FragColor.a = 1.0;
-     }
- `;
-
  function compileShader(shader, source) {
      gl.shaderSource(shader, source);
      gl.compileShader(shader);
We can also move functions which create vertices positions to separate file
📄 src/shape-helpers.js
export function createRect(top, left, width, height) {
    return [
        left, top, // x1 y1
        left + width, top, // x2 y2
        left, top + height, // x3 y3
        left + width, top + height, // x4 y4
    ];
}

export function createHexagon(centerX, centerY, radius, segmentsCount) {
    const vertexData = [];
    const segmentAngle =  Math.PI * 2 / (segmentsCount - 1);

    for (let i = 0; i < Math.PI * 2; i += segmentAngle) {
        const from = i;
        const to = i + segmentAngle;

        const color = rainbowColors[i / segmentAngle];

        vertexData.push(centerX, centerY);
        vertexData.push(...color);

        vertexData.push(centerX + Math.cos(from) * radius, centerY + Math.sin(from) * radius);
        vertexData.push(...color);

        vertexData.push(centerX + Math.cos(to) * radius, centerY + Math.sin(to) * radius);
        vertexData.push(...color);
    }

    return vertexData;
}
📄 src/week-1.js
  import vShaderSource from './shaders/vertex.glsl';
  import fShaderSource from './shaders/fragment.glsl';

+ import { createRect } from './shape-helpers';
+
+
  const canvas = document.querySelector('canvas');
  const gl = canvas.getContext('webgl');


  const triangles = createRect(0, 0, canvas.height, canvas.height);

- function createRect(top, left, width, height) {
-     return [
-         left, top, // x1 y1
-         left + width, top, // x2 y2
-         left, top + height, // x3 y3
-         left + width, top + height, // x4 y4
-     ];
- }
-
- function createHexagon(centerX, centerY, radius, segmentsCount) {
-     const vertexData = [];
-     const segmentAngle =  Math.PI * 2 / (segmentsCount - 1);
-
-     for (let i = 0; i < Math.PI * 2; i += segmentAngle) {
-         const from = i;
-         const to = i + segmentAngle;
-
-         const color = rainbowColors[i / segmentAngle];
-
-         vertexData.push(centerX, centerY);
-         vertexData.push(...color);
-
-         vertexData.push(centerX + Math.cos(from) * radius, centerY + Math.sin(from) * radius);
-         vertexData.push(...color);
-
-         vertexData.push(centerX + Math.cos(to) * radius, centerY + Math.sin(to) * radius);
-         vertexData.push(...color);
-     }
-
-     return vertexData;
- }
-
  function fillWithColors(segmentsCount) {
      const colors = [];
Since we're no longer using color attribute, we can drop everyhting related to it
📄 src/shaders/fragment.glsl
  precision mediump float;

- varying vec4 vColor;
-
  void main() {
-     gl_FragColor = vColor / 255.0;
-     gl_FragColor.a = 1.0;
+     gl_FragColor = vec4(1, 0, 0, 1);
  }
📄 src/shaders/vertex.glsl
  attribute vec2 position;
- attribute vec4 color;
  uniform vec2 resolution;

- varying vec4 vColor;
-
  #define M_PI 3.1415926535897932384626433832795

  void main() {
      vec2 transformedPosition = position / resolution * 2.0 - 1.0;
      gl_PointSize = 2.0;
      gl_Position = vec4(transformedPosition, 0, 1);
-
-     vColor = color;
  }
📄 src/week-1.js
  import { createRect } from './shape-helpers';

-
  const canvas = document.querySelector('canvas');
  const gl = canvas.getContext('webgl');

  gl.useProgram(program);

  const positionLocation = gl.getAttribLocation(program, 'position');
- const colorLocation = gl.getAttribLocation(program, 'color');
-
  const resolutionUniformLocation = gl.getUniformLocation(program, 'resolution');

  gl.uniform2fv(resolutionUniformLocation, [canvas.width, canvas.height]);

- const rainbowColors = [
-     [255, 0.0, 0.0, 255], // red
-     [255, 165, 0.0, 255], // orange
-     [255, 255, 0.0, 255], // yellow
-     [0.0, 255, 0.0, 255], // green
-     [0.0, 101, 255, 255], // skyblue
-     [0.0, 0.0, 255, 255], // blue,
-     [128, 0.0, 128, 255], // purple
- ];
-
  const triangles = createRect(0, 0, canvas.height, canvas.height);

- function fillWithColors(segmentsCount) {
-     const colors = [];
-
-     for (let i = 0; i < segmentsCount; i++) {
-         for (let j = 0; j < 3; j++) {
-             colors.push(...rainbowColors[i]);
-         }
-     }
-
-     return colors;
- }
-
  const vertexData = new Float32Array(triangles);
  const vertexBuffer = gl.createBuffer(gl.ARRAY_BUFFER);

  gl.enableVertexAttribArray(positionLocation);
  gl.vertexAttribPointer(positionLocation, attributeSize, type, nomralized, stride, offset);

- // gl.enableVertexAttribArray(colorLocation);
- // gl.vertexAttribPointer(colorLocation, 4, type, nomralized, stride, 8);
-
  gl.drawElements(gl.TRIANGLES, indexData.length, gl.UNSIGNED_BYTE, 0);
Webpack will help us keep our codebase cleaner in the future, but we're good for now
See you tomorrow 👋
This is a series of blog posts related to WebGL. New post will be available every day
Subscribe for updates or join mailing list
Built with GitTutor
Day 8. Textures
This is a series of blog posts related to WebGL. New post will be available every day
Subscribe for updates or join mailing list
Built with GitTutor
Hey 👋 Welcome back to WebGL month.
We've already learned several ways to pass color data to shader, but there is one more and it is very powerful. Today we'll learn about textures
Let's create simple shaders
📄 src/shaders/texture.f.glsl
precision mediump float;

void main() {
    gl_FragColor = vec4(1, 0, 0, 1);
}
📄 src/shaders/texture.v.glsl
attribute vec2 position;

void main() {
    gl_Position = vec4(position, 0, 1);
}
📄 src/texture.js
import vShaderSource from './shaders/texture.v.glsl';
import fShaderSource from './shaders/texture.f.glsl';
Get the webgl context
📄 src/texture.js
  import vShaderSource from './shaders/texture.v.glsl';
  import fShaderSource from './shaders/texture.f.glsl';
+
+ const canvas = document.querySelector('canvas');
+ const gl = canvas.getContext('webgl');
Create shaders
📄 src/texture.js
  import vShaderSource from './shaders/texture.v.glsl';
  import fShaderSource from './shaders/texture.f.glsl';
+ import { compileShader } from './gl-helpers';

  const canvas = document.querySelector('canvas');
  const gl = canvas.getContext('webgl');
+
+ const vShader = gl.createShader(gl.VERTEX_SHADER);
+ const fShader = gl.createShader(gl.FRAGMENT_SHADER);
+
+ compileShader(gl, vShader, vShaderSource);
+ compileShader(gl, fShader, fShaderSource);
and program
📄 src/texture.js
  compileShader(gl, vShader, vShaderSource);
  compileShader(gl, fShader, fShaderSource);
+
+ const program = gl.createProgram();
+
+ gl.attachShader(program, vShader);
+ gl.attachShader(program, fShader);
+
+ gl.linkProgram(program);
+ gl.useProgram(program);
Create a vertex position buffer and fill it with data
📄 src/texture.js
  import vShaderSource from './shaders/texture.v.glsl';
  import fShaderSource from './shaders/texture.f.glsl';
  import { compileShader } from './gl-helpers';
+ import { createRect } from './shape-helpers';
+

  const canvas = document.querySelector('canvas');
  const gl = canvas.getContext('webgl');

  gl.linkProgram(program);
  gl.useProgram(program);
+
+ const vertexPosition = new Float32Array(createRect(-1, -1, 2, 2));
+ const vertexPositionBuffer = gl.createBuffer();
+
+ gl.bindBuffer(gl.ARRAY_BUFFER, vertexPositionBuffer);
+ gl.bufferData(gl.ARRAY_BUFFER, vertexPosition, gl.STATIC_DRAW);
Setup position attribute
📄 src/texture.js
  gl.bindBuffer(gl.ARRAY_BUFFER, vertexPositionBuffer);
  gl.bufferData(gl.ARRAY_BUFFER, vertexPosition, gl.STATIC_DRAW);
+
+ const attributeLocations = {
+     position: gl.getAttribLocation(program, 'position'),
+ };
+
+ gl.enableVertexAttribArray(attributeLocations.position);
+ gl.vertexAttribPointer(attributeLocations.position, 2, gl.FLOAT, false, 0, 0);
setup index buffer
📄 src/texture.js
  gl.enableVertexAttribArray(attributeLocations.position);
  gl.vertexAttribPointer(attributeLocations.position, 2, gl.FLOAT, false, 0, 0);
+
+ const vertexIndices = new Uint8Array([0, 1, 2, 1, 2, 3]);
+ const indexBuffer = gl.createBuffer();
+
+ gl.bindBuffer(gl.ELEMENT_ARRAY_BUFFER, indexBuffer);
+ gl.bufferData(gl.ELEMENT_ARRAY_BUFFER, vertexIndices, gl.STATIC_DRAW);
and issue a draw call
📄 src/texture.js
  gl.bindBuffer(gl.ELEMENT_ARRAY_BUFFER, indexBuffer);
  gl.bufferData(gl.ELEMENT_ARRAY_BUFFER, vertexIndices, gl.STATIC_DRAW);
+
+ gl.drawElements(gl.TRIANGLES, vertexIndices.length, gl.UNSIGNED_BYTE, 0);
So now we can proceed to textures.
You can upload image to a GPU and use it to calculate pixel color. In a simple case, when canvas size is the same or at least proportional to image size, we can render image pixel by pixel reading each pixel color of image and using it as gl_FragColor
Let's make a helper to load images
📄 src/gl-helpers.js
          throw new Error(log);
      }
  }
+
+ export async function loadImage(src) {
+     const img = new Image();
+
+     let _resolve;
+     const p = new Promise((resolve) => _resolve = resolve);
+
+     img.onload = () => {
+         _resolve(img);
+     }
+
+     img.src = src;
+
+     return p;
+ }
Load image and create webgl texture
📄 src/texture.js
  import vShaderSource from './shaders/texture.v.glsl';
  import fShaderSource from './shaders/texture.f.glsl';
- import { compileShader } from './gl-helpers';
+ import { compileShader, loadImage } from './gl-helpers';
  import { createRect } from './shape-helpers';

+ import textureImageSrc from '../assets/images/texture.jpg';

  const canvas = document.querySelector('canvas');
  const gl = canvas.getContext('webgl');
  gl.bindBuffer(gl.ELEMENT_ARRAY_BUFFER, indexBuffer);
  gl.bufferData(gl.ELEMENT_ARRAY_BUFFER, vertexIndices, gl.STATIC_DRAW);

- gl.drawElements(gl.TRIANGLES, vertexIndices.length, gl.UNSIGNED_BYTE, 0);
+ loadImage(textureImageSrc).then((textureImg) => {
+     const texture = gl.createTexture();
+
+     gl.drawElements(gl.TRIANGLES, vertexIndices.length, gl.UNSIGNED_BYTE, 0);
+ });
[GTI} add image
📄 assets/images/texture.jpg
we also need an appropriate webpack loader
📄 package.json
    "homepage": "https://github.com/lesnitsky/webgl-month#readme",
    "devDependencies": {
      "raw-loader": "^3.0.0",
+     "url-loader": "^2.0.1",
      "webpack": "^4.35.2",
      "webpack-cli": "^3.3.5"
    }
📄 webpack.config.js
                  test: /\.glsl$/,
                  use: 'raw-loader',
              },
+
+             {
+                 test: /\.jpg$/,
+                 use: 'url-loader',
+             },
          ],
      },
to operate with textures we need to do the same as with buffers – bind it
📄 src/texture.js
  loadImage(textureImageSrc).then((textureImg) => {
      const texture = gl.createTexture();

+     gl.bindTexture(gl.TEXTURE_2D, texture);
+
      gl.drawElements(gl.TRIANGLES, vertexIndices.length, gl.UNSIGNED_BYTE, 0);
  });
and upload image to a bound texture
📄 src/texture.js
      gl.bindTexture(gl.TEXTURE_2D, texture);

+     gl.texImage2D(
+         gl.TEXTURE_2D,
+     );
+
      gl.drawElements(gl.TRIANGLES, vertexIndices.length, gl.UNSIGNED_BYTE, 0);
  });
Let's ignore the 2nd argument for now, we'll speak about it later
📄 src/texture.js
      gl.texImage2D(
          gl.TEXTURE_2D,
+         0,
      );

      gl.drawElements(gl.TRIANGLES, vertexIndices.length, gl.UNSIGNED_BYTE, 0);
the 3rd and the 4th argumetns specify internal texture format and source (image) format. For our image it is gl.RGBA. Check out this page for more details about formats
📄 src/texture.js
      gl.texImage2D(
          gl.TEXTURE_2D,
          0,
+         gl.RGBA,
+         gl.RGBA,
      );

      gl.drawElements(gl.TRIANGLES, vertexIndices.length, gl.UNSIGNED_BYTE, 0);
next argument specifies source type (0..255 is UNSIGNED_BYTE)
📄 src/texture.js
          0,
          gl.RGBA,
          gl.RGBA,
+         gl.UNSIGNED_BYTE,
      );

      gl.drawElements(gl.TRIANGLES, vertexIndices.length, gl.UNSIGNED_BYTE, 0);
and image itself
📄 src/texture.js
          gl.RGBA,
          gl.RGBA,
          gl.UNSIGNED_BYTE,
+         textureImg,
      );

      gl.drawElements(gl.TRIANGLES, vertexIndices.length, gl.UNSIGNED_BYTE, 0);
We also need to specify different parameters of texture. We'll talk about this parameters in next tutorials.
📄 src/texture.js
          textureImg,
      );

+     gl.texParameteri(gl.TEXTURE_2D, gl.TEXTURE_WRAP_S, gl.CLAMP_TO_EDGE);
+     gl.texParameteri(gl.TEXTURE_2D, gl.TEXTURE_WRAP_T, gl.CLAMP_TO_EDGE);
+     gl.texParameteri(gl.TEXTURE_2D, gl.TEXTURE_MIN_FILTER, gl.LINEAR);
+     gl.texParameteri(gl.TEXTURE_2D, gl.TEXTURE_MAG_FILTER, gl.LINEAR);
+
      gl.drawElements(gl.TRIANGLES, vertexIndices.length, gl.UNSIGNED_BYTE, 0);
  });
To be able to work with texture in shader we need to specify a uniform of sampler2D type
📄 src/shaders/texture.f.glsl
  precision mediump float;

+ uniform sampler2D texture;
+
  void main() {
      gl_FragColor = vec4(1, 0, 0, 1);
  }
and specify the value of this uniform. There is a way to use multiple textures, we'll talk about it in next tutorials
📄 src/texture.js
      position: gl.getAttribLocation(program, 'position'),
  };

+ const uniformLocations = {
+     texture: gl.getUniformLocation(program, 'texture'),
+ };
+
  gl.enableVertexAttribArray(attributeLocations.position);
  gl.vertexAttribPointer(attributeLocations.position, 2, gl.FLOAT, false, 0, 0);

      gl.texParameteri(gl.TEXTURE_2D, gl.TEXTURE_MIN_FILTER, gl.LINEAR);
      gl.texParameteri(gl.TEXTURE_2D, gl.TEXTURE_MAG_FILTER, gl.LINEAR);

+     gl.activeTexture(gl.TEXTURE0);
+     gl.uniform1i(uniformLocations.texture, 0);
+
      gl.drawElements(gl.TRIANGLES, vertexIndices.length, gl.UNSIGNED_BYTE, 0);
  });
Let's also pass canvas resolution to a shader
📄 src/shaders/texture.f.glsl
  precision mediump float;

  uniform sampler2D texture;
+ uniform vec2 resolution;

  void main() {
      gl_FragColor = vec4(1, 0, 0, 1);
📄 src/texture.js
  const uniformLocations = {
      texture: gl.getUniformLocation(program, 'texture'),
+     resolution: gl.getUniformLocation(program, 'resolution'),
  };

  gl.enableVertexAttribArray(attributeLocations.position);
      gl.activeTexture(gl.TEXTURE0);
      gl.uniform1i(uniformLocations.texture, 0);

+     gl.uniform2fv(uniformLocations.resolution, [canvas.width, canvas.height]);
+
      gl.drawElements(gl.TRIANGLES, vertexIndices.length, gl.UNSIGNED_BYTE, 0);
  });
There is a special gl_FragCoord variable which contains coordinate of each pixel. Together with resolution uniform we can get a texture coordinate (coordinate of the pixel in image). Texture coordinates are in range [0..1].
📄 src/shaders/texture.f.glsl
  uniform vec2 resolution;

  void main() {
+     vec2 texCoord = gl_FragCoord.xy / resolution;
      gl_FragColor = vec4(1, 0, 0, 1);
  }
and use texture2D to render the whole image.
📄 src/shaders/texture.f.glsl
  void main() {
      vec2 texCoord = gl_FragCoord.xy / resolution;
-     gl_FragColor = vec4(1, 0, 0, 1);
+     gl_FragColor = texture2D(texture, texCoord);
  }
Cool 😎 We can now render images, but there is much more to learn about textures, so see you tomorrow
This is a series of blog posts related to WebGL. New post will be available every day
Subscribe for updates or join mailing list
Built with GitTutor
WebGL Month. Day 9. Image filters
This is a series of blog posts related to WebGL. New post will be available every day
Subscribe for updates or join mailing list
Built with GitTutor
Hey 👋 Welcome back to WebGL month
Yesterday we've learned how to use textures in webgl, so let's get advantage of that knowledge to build something fun.
Today we're going to explore how to implement simple image filters
Inverse
The very first and simple filter might be inverse all colors of the image.
How do we inverse colors?
Original values are in range [0..1]
If we subtract from each component 1 we'll get negative values, there's an abs function in glsl
You can also define other functions apart of void main in glsl pretty much like in C/C++, so let's create inverse function
📄 src/shaders/texture.f.glsl
  uniform sampler2D texture;
  uniform vec2 resolution;

+ vec4 inverse(vec4 color) {
+     return abs(vec4(color.rgb - 1.0, color.a));
+ }
+
  void main() {
      vec2 texCoord = gl_FragCoord.xy / resolution;
      gl_FragColor = texture2D(texture, texCoord);
and let's actually use it
📄 src/shaders/texture.f.glsl
  void main() {
      vec2 texCoord = gl_FragCoord.xy / resolution;
      gl_FragColor = texture2D(texture, texCoord);
+
+     gl_FragColor = inverse(gl_FragColor);
  }
Voila, we have an inverse filter with just 4 lines of code

Black and White
Let's think of how to implement black and white filter.
White color is vec4(1, 1, 1, 1)
Black is vec4(0, 0, 0, 1)
What are shades of gray? Aparently we need to add the same value to each color component.
So basically we need to calculate the "brightness" value of each component. In very naive implmentation we can just add all color components and divide by 3 (arithmetical mean).
Note: this is not the best approach, as different colors will give the same result (eg. vec3(0.5, 0, 0) and vec3(0, 0.5, 0), but in reality these colors have different "brightness", I'm just trying to keep these examples simple to understand)
Ok, let's try to implement this
📄 src/shaders/texture.f.glsl
      return abs(vec4(color.rgb - 1.0, color.a));
  }

+ vec4 blackAndWhite(vec4 color) {
+     return vec4(vec3(1.0, 1.0, 1.0) * (color.r + color.g + color.b) / 3.0, color.a);
+ }
+
  void main() {
      vec2 texCoord = gl_FragCoord.xy / resolution;
      gl_FragColor = texture2D(texture, texCoord);

-     gl_FragColor = inverse(gl_FragColor);
+     gl_FragColor = blackAndWhite(gl_FragColor);
  }
Whoa! Looks nice

Sepia
Ok, one more fancy effect is a "old-fashioned" photos with sepia filter.
Sepia is reddish-brown color. RGB values are 112, 66, 20
Let's define sepia function and color
📄 src/shaders/texture.f.glsl
      return vec4(vec3(1.0, 1.0, 1.0) * (color.r + color.g + color.b) / 3.0, color.a);
  }

+ vec4 sepia(vec4 color) {
+     vec3 sepiaColor = vec3(112, 66, 20) / 255.0;
+ }
+
  void main() {
      vec2 texCoord = gl_FragCoord.xy / resolution;
      gl_FragColor = texture2D(texture, texCoord);
A naive and simple implementation will be to interpolate original color with sepia color by a certain factor. There is a mix function for this
📄 src/shaders/texture.f.glsl
  vec4 sepia(vec4 color) {
      vec3 sepiaColor = vec3(112, 66, 20) / 255.0;
+     return vec4(
+         mix(color.rgb, sepiaColor, 0.4),
+         color.a
+     );
  }

  void main() {
      vec2 texCoord = gl_FragCoord.xy / resolution;
      gl_FragColor = texture2D(texture, texCoord);

-     gl_FragColor = blackAndWhite(gl_FragColor);
+     gl_FragColor = sepia(gl_FragColor);
  }
Result:

This should give you a better idea of what can be done in fragment shader.
Try to implement some other filters, like saturation or vibrance
See you tomorrow 👋
This is a series of blog posts related to WebGL. New post will be available every day
Subscribe for updates or join mailing list
Built with GitTutor
WebGL Month. Day 10. Multiple textures
This is a series of blog posts related to WebGL. New post will be available every day
Subscribe for updates or join mailing list
Built with GitTutor
Hey 👋 Welcome back to WebGL month. We already know how to use a single image as a texture, but what if we want to render multiple images?
We'll learn how to do this today.
First we need to define another sampler2D in fragment shader
📄 src/shaders/texture.f.glsl
  precision mediump float;

  uniform sampler2D texture;
+ uniform sampler2D otherTexture;
  uniform vec2 resolution;

  vec4 inverse(vec4 color) {
And render 2 rectangles instead of a single one. Left rectangle will use already existing texture, right – new one.
📄 src/texture.js
  gl.linkProgram(program);
  gl.useProgram(program);

- const vertexPosition = new Float32Array(createRect(-1, -1, 2, 2));
+ const vertexPosition = new Float32Array([
+     ...createRect(-1, -1, 1, 2), // left rect
+     ...createRect(-1, 0, 1, 2), // right rect
+ ]);
  const vertexPositionBuffer = gl.createBuffer();

  gl.bindBuffer(gl.ARRAY_BUFFER, vertexPositionBuffer);
  gl.enableVertexAttribArray(attributeLocations.position);
  gl.vertexAttribPointer(attributeLocations.position, 2, gl.FLOAT, false, 0, 0);

- const vertexIndices = new Uint8Array([0, 1, 2, 1, 2, 3]);
+ const vertexIndices = new Uint8Array([
+     // left rect
+     0, 1, 2,
+     1, 2, 3,
+
+     // right rect
+     4, 5, 6,
+     5, 6, 7,
+ ]);
  const indexBuffer = gl.createBuffer();

  gl.bindBuffer(gl.ELEMENT_ARRAY_BUFFER, indexBuffer);
We'll also need a way to specify texture coordinates for each rectangle, as we can't use gl_FragCoord any longer, so we need to define another attribute (texCoord)
📄 src/shaders/texture.v.glsl
  attribute vec2 position;
+ attribute vec2 texCoord;

  void main() {
      gl_Position = vec4(position, 0, 1);
The content of this attribute should be coordinates of 2 rectangles. Top left is 0,0, width and height are 1.0
📄 src/texture.js
  gl.linkProgram(program);
  gl.useProgram(program);

+ const texCoords = new Float32Array([
+     ...createRect(0, 0, 1, 1), // left rect
+     ...createRect(0, 0, 1, 1), // right rect
+ ]);
+ const texCoordsBuffer = gl.createBuffer();
+
+ gl.bindBuffer(gl.ARRAY_BUFFER, texCoordsBuffer);
+ gl.bufferData(gl.ARRAY_BUFFER, texCoords, gl.STATIC_DRAW);
+
  const vertexPosition = new Float32Array([
      ...createRect(-1, -1, 1, 2), // left rect
      ...createRect(-1, 0, 1, 2), // right rect
We also need to setup texCoord attribute in JS
📄 src/texture.js
  const attributeLocations = {
      position: gl.getAttribLocation(program, 'position'),
+     texCoord: gl.getAttribLocation(program, 'texCoord'),
  };

  const uniformLocations = {
  gl.enableVertexAttribArray(attributeLocations.position);
  gl.vertexAttribPointer(attributeLocations.position, 2, gl.FLOAT, false, 0, 0);

+ gl.bindBuffer(gl.ARRAY_BUFFER, texCoordsBuffer);
+
+ gl.enableVertexAttribArray(attributeLocations.texCoord);
+ gl.vertexAttribPointer(attributeLocations.texCoord, 2, gl.FLOAT, false, 0, 0);
+
  const vertexIndices = new Uint8Array([
      // left rect
      0, 1, 2,
and pass this data to fragment shader via varying
📄 src/shaders/texture.f.glsl
      );
  }

+ varying vec2 vTexCoord;
+
  void main() {
-     vec2 texCoord = gl_FragCoord.xy / resolution;
+     vec2 texCoord = vTexCoord;
      gl_FragColor = texture2D(texture, texCoord);

      gl_FragColor = sepia(gl_FragColor);
📄 src/shaders/texture.v.glsl
  attribute vec2 position;
  attribute vec2 texCoord;

+ varying vec2 vTexCoord;
+
  void main() {
      gl_Position = vec4(position, 0, 1);
+
+     vTexCoord = texCoord;
  }
Ok, we rendered two rectangles, but they use the same texture. Let's add one more attribute which will specify which texture to use and pass this data to fragment shader via another varying
📄 src/shaders/texture.v.glsl
  attribute vec2 position;
  attribute vec2 texCoord;
+ attribute float texIndex;

  varying vec2 vTexCoord;
+ varying float vTexIndex;

  void main() {
      gl_Position = vec4(position, 0, 1);

      vTexCoord = texCoord;
+     vTexIndex = texIndex;
  }
So now fragment shader will know which texture to use
DISCLAMER: this is not the perfect way to use multiple textures in a fragment shader, but rather an example of how to acheive this
📄 src/shaders/texture.f.glsl
  }

  varying vec2 vTexCoord;
+ varying float vTexIndex;

  void main() {
      vec2 texCoord = vTexCoord;
-     gl_FragColor = texture2D(texture, texCoord);

-     gl_FragColor = sepia(gl_FragColor);
+     if (vTexIndex == 0.0) {
+         gl_FragColor = texture2D(texture, texCoord);
+     } else {
+         gl_FragColor = texture2D(otherTexture, texCoord);
+     }
  }
tex indices are 0 for the left rectangle and 1 for the right
📄 src/texture.js
  gl.bindBuffer(gl.ARRAY_BUFFER, texCoordsBuffer);
  gl.bufferData(gl.ARRAY_BUFFER, texCoords, gl.STATIC_DRAW);

+ const texIndicies = new Float32Array([
+     ...Array.from({ length: 4 }).fill(0), // left rect
+     ...Array.from({ length: 4 }).fill(1), // right rect
+ ]);
+ const texIndiciesBuffer = gl.createBuffer();
+
+ gl.bindBuffer(gl.ARRAY_BUFFER, texIndiciesBuffer);
+ gl.bufferData(gl.ARRAY_BUFFER, texIndicies, gl.STATIC_DRAW);
+
  const vertexPosition = new Float32Array([
      ...createRect(-1, -1, 1, 2), // left rect
      ...createRect(-1, 0, 1, 2), // right rect
and again, we need to setup vertex attribute
📄 src/texture.js
  const attributeLocations = {
      position: gl.getAttribLocation(program, 'position'),
      texCoord: gl.getAttribLocation(program, 'texCoord'),
+     texIndex: gl.getAttribLocation(program, 'texIndex'),
  };

  const uniformLocations = {
  gl.enableVertexAttribArray(attributeLocations.texCoord);
  gl.vertexAttribPointer(attributeLocations.texCoord, 2, gl.FLOAT, false, 0, 0);

+ gl.bindBuffer(gl.ARRAY_BUFFER, texIndiciesBuffer);
+
+ gl.enableVertexAttribArray(attributeLocations.texIndex);
+ gl.vertexAttribPointer(attributeLocations.texIndex, 1, gl.FLOAT, false, 0, 0);
+
  const vertexIndices = new Uint8Array([
      // left rect
      0, 1, 2,
Now let's load our second texture image
📄 src/texture.js
  import { createRect } from './shape-helpers';

  import textureImageSrc from '../assets/images/texture.jpg';
+ import textureGreenImageSrc from '../assets/images/texture-green.jpg';

  const canvas = document.querySelector('canvas');
  const gl = canvas.getContext('webgl');
  gl.bindBuffer(gl.ELEMENT_ARRAY_BUFFER, indexBuffer);
  gl.bufferData(gl.ELEMENT_ARRAY_BUFFER, vertexIndices, gl.STATIC_DRAW);

- loadImage(textureImageSrc).then((textureImg) => {
+ Promise.all([
+     loadImage(textureImageSrc),
+     loadImage(textureGreenImageSrc),
+ ]).then(([textureImg, textureGreenImg]) => {
      const texture = gl.createTexture();

      gl.bindTexture(gl.TEXTURE_2D, texture);
As we'll have to create another texture – we'll need to extract some common code to separate helper functions
📄 src/gl-helpers.js
      return p;
  }
+
+ export function createTexture(gl) {
+     const texture = gl.createTexture();
+
+     gl.bindTexture(gl.TEXTURE_2D, texture);
+
+     gl.texParameteri(gl.TEXTURE_2D, gl.TEXTURE_WRAP_S, gl.CLAMP_TO_EDGE);
+     gl.texParameteri(gl.TEXTURE_2D, gl.TEXTURE_WRAP_T, gl.CLAMP_TO_EDGE);
+     gl.texParameteri(gl.TEXTURE_2D, gl.TEXTURE_MIN_FILTER, gl.LINEAR);
+     gl.texParameteri(gl.TEXTURE_2D, gl.TEXTURE_MAG_FILTER, gl.LINEAR);
+
+     return texture;
+ }
+
+ export function setImage(gl, texture, img) {
+     gl.bindTexture(gl.TEXTURE_2D, texture);
+
+     gl.texImage2D(
+         gl.TEXTURE_2D,
+         0,
+         gl.RGBA,
+         gl.RGBA,
+         gl.UNSIGNED_BYTE,
+         img,
+     );
+ }
📄 src/texture.js
      loadImage(textureImageSrc),
      loadImage(textureGreenImageSrc),
  ]).then(([textureImg, textureGreenImg]) => {
-     const texture = gl.createTexture();
-
-     gl.bindTexture(gl.TEXTURE_2D, texture);
-
-     gl.texImage2D(
-         gl.TEXTURE_2D,
-         0,
-         gl.RGBA,
-         gl.RGBA,
-         gl.UNSIGNED_BYTE,
-         textureImg,
-     );
-
-     gl.texParameteri(gl.TEXTURE_2D, gl.TEXTURE_WRAP_S, gl.CLAMP_TO_EDGE);
-     gl.texParameteri(gl.TEXTURE_2D, gl.TEXTURE_WRAP_T, gl.CLAMP_TO_EDGE);
-     gl.texParameteri(gl.TEXTURE_2D, gl.TEXTURE_MIN_FILTER, gl.LINEAR);
-     gl.texParameteri(gl.TEXTURE_2D, gl.TEXTURE_MAG_FILTER, gl.LINEAR);
+

      gl.activeTexture(gl.TEXTURE0);
      gl.uniform1i(uniformLocations.texture, 0);
Now let's use our newely created helpers
📄 src/texture.js
  import vShaderSource from './shaders/texture.v.glsl';
  import fShaderSource from './shaders/texture.f.glsl';
- import { compileShader, loadImage } from './gl-helpers';
+ import { compileShader, loadImage, createTexture, setImage } from './gl-helpers';
  import { createRect } from './shape-helpers';

  import textureImageSrc from '../assets/images/texture.jpg';
      loadImage(textureImageSrc),
      loadImage(textureGreenImageSrc),
  ]).then(([textureImg, textureGreenImg]) => {
+     const texture = createTexture(gl);
+     setImage(gl, texture, textureImg);

+     const otherTexture = createTexture(gl);
+     setImage(gl, otherTexture, textureGreenImg);

      gl.activeTexture(gl.TEXTURE0);
      gl.uniform1i(uniformLocations.texture, 0);
get uniform location
📄 src/texture.js
  const uniformLocations = {
      texture: gl.getUniformLocation(program, 'texture'),
+     otherTexture: gl.getUniformLocation(program, 'otherTexture'),
      resolution: gl.getUniformLocation(program, 'resolution'),
  };
and set necessary textures to necessary uniforms
to set a texture to a uniform you should specify
- active texture unit in range
[gl.TEXTURE0..gl.TEXTURE31](number of texture units depends on GPU and can be retreived withgl.getParameter) - bind texture to a texture unit
- set texture unit "index" to a
sampler2Duniform
📄 src/texture.js
      setImage(gl, otherTexture, textureGreenImg);

      gl.activeTexture(gl.TEXTURE0);
+     gl.bindTexture(gl.TEXTURE_2D, texture);
      gl.uniform1i(uniformLocations.texture, 0);

+     gl.activeTexture(gl.TEXTURE1);
+     gl.bindTexture(gl.TEXTURE_2D, otherTexture);
+     gl.uniform1i(uniformLocations.otherTexture, 1);
+
      gl.uniform2fv(uniformLocations.resolution, [canvas.width, canvas.height]);

      gl.drawElements(gl.TRIANGLES, vertexIndices.length, gl.UNSIGNED_BYTE, 0);
That's it, we can now render multiple textures
See you tomorrow 👋
This is a series of blog posts related to WebGL. New post will be available every day
Subscribe for updates or join mailing list

Built with GitTutor
Day 11. Reducing boilerplate
This is a series of blog posts related to WebGL. New post will be available every day


Join mailing list to get new posts right to your inbox
Built with
![]()
Yesterday we've learned how to use multiple textures. This required a shader modification, as well as javascript, but this changes might be partially done automatically
There is a package glsl-extract-sync which can get the info about shader attributes and uniforms
Install this package with
npm i glsl-extract-sync
📄 package.json
      "url-loader": "^2.0.1",
      "webpack": "^4.35.2",
      "webpack-cli": "^3.3.5"
+   },
+   "dependencies": {
+     "glsl-extract-sync": "0.0.0"
    }
  }
Now let's create a helper function which will get all references to attributes and uniforms with help of this package
📄 src/gl-helpers.js
+ import extract from 'glsl-extract-sync';
+
  export function compileShader(gl, shader, source) {
      gl.shaderSource(shader, source);
      gl.compileShader(shader);
          img,
      );
  }
+
+ export function setupShaderInput(gl, program, vShaderSource, fShaderSource) {
+
+ }
We need to extract info about both vertex and fragment shaders
📄 src/gl-helpers.js
  }

  export function setupShaderInput(gl, program, vShaderSource, fShaderSource) {
-
+     const vShaderInfo = extract(vShaderSource);
+     const fShaderInfo = extract(fShaderSource);
  }
📄 src/texture.js
  import vShaderSource from './shaders/texture.v.glsl';
  import fShaderSource from './shaders/texture.f.glsl';
- import { compileShader, loadImage, createTexture, setImage } from './gl-helpers';
+ import { compileShader, loadImage, createTexture, setImage, setupShaderInput } from './gl-helpers';
  import { createRect } from './shape-helpers';

  import textureImageSrc from '../assets/images/texture.jpg';
  gl.bindBuffer(gl.ARRAY_BUFFER, vertexPositionBuffer);
  gl.bufferData(gl.ARRAY_BUFFER, vertexPosition, gl.STATIC_DRAW);

+ console.log(setupShaderInput(gl, program, vShaderSource, fShaderSource));
+
  const attributeLocations = {
      position: gl.getAttribLocation(program, 'position'),
      texCoord: gl.getAttribLocation(program, 'texCoord'),
Only vertex shader might have attributes, but uniforms may be defined in both shaders
📄 src/gl-helpers.js
  export function setupShaderInput(gl, program, vShaderSource, fShaderSource) {
      const vShaderInfo = extract(vShaderSource);
      const fShaderInfo = extract(fShaderSource);
+
+     const attributes = vShaderInfo.attributes;
+     const uniforms = [
+         ...vShaderInfo.uniforms,
+         ...fShaderInfo.uniforms,
+     ];
  }
Now we can get all attribute locations
📄 src/gl-helpers.js
          ...vShaderInfo.uniforms,
          ...fShaderInfo.uniforms,
      ];
+
+     const attributeLocations = attributes.reduce((attrsMap, attr) => {
+         attrsMap[attr.name] = gl.getAttribLocation(program, attr.name);
+         return attrsMap;
+     }, {});
  }
and enable all attributes
📄 src/gl-helpers.js
          attrsMap[attr.name] = gl.getAttribLocation(program, attr.name);
          return attrsMap;
      }, {});
+
+     attributes.forEach((attr) => {
+         gl.enableVertexAttribArray(attributeLocations[attr.name]);
+     });
  }
We should also get all uniform locations
📄 src/gl-helpers.js
      attributes.forEach((attr) => {
          gl.enableVertexAttribArray(attributeLocations[attr.name]);
      });
+
+     const uniformLocations = uniforms.reduce((uniformsMap, uniform) => {
+         uniformsMap[uniform.name] = gl.getUniformLocation(program, uniform.name);
+         return uniformsMap;
+     }, {});
  }
and finally return attribute and uniform locations
📄 src/gl-helpers.js
          uniformsMap[uniform.name] = gl.getUniformLocation(program, uniform.name);
          return uniformsMap;
      }, {});
+
+     return {
+         attributeLocations,
+         uniformLocations,
+     }
  }
Ok, let's get advantage of our new sweet helper
📄 src/texture.js
  gl.bindBuffer(gl.ARRAY_BUFFER, vertexPositionBuffer);
  gl.bufferData(gl.ARRAY_BUFFER, vertexPosition, gl.STATIC_DRAW);

- console.log(setupShaderInput(gl, program, vShaderSource, fShaderSource));
+ const programInfo = setupShaderInput(gl, program, vShaderSource, fShaderSource);

- const attributeLocations = {
-     position: gl.getAttribLocation(program, 'position'),
-     texCoord: gl.getAttribLocation(program, 'texCoord'),
-     texIndex: gl.getAttribLocation(program, 'texIndex'),
- };
-
- const uniformLocations = {
-     texture: gl.getUniformLocation(program, 'texture'),
-     otherTexture: gl.getUniformLocation(program, 'otherTexture'),
-     resolution: gl.getUniformLocation(program, 'resolution'),
- };
-
- gl.enableVertexAttribArray(attributeLocations.position);
- gl.vertexAttribPointer(attributeLocations.position, 2, gl.FLOAT, false, 0, 0);
+ gl.vertexAttribPointer(programInfo.attributeLocations.position, 2, gl.FLOAT, false, 0, 0);

  gl.bindBuffer(gl.ARRAY_BUFFER, texCoordsBuffer);
-
- gl.enableVertexAttribArray(attributeLocations.texCoord);
- gl.vertexAttribPointer(attributeLocations.texCoord, 2, gl.FLOAT, false, 0, 0);
+ gl.vertexAttribPointer(programInfo.attributeLocations.texCoord, 2, gl.FLOAT, false, 0, 0);

  gl.bindBuffer(gl.ARRAY_BUFFER, texIndiciesBuffer);
-
- gl.enableVertexAttribArray(attributeLocations.texIndex);
- gl.vertexAttribPointer(attributeLocations.texIndex, 1, gl.FLOAT, false, 0, 0);
+ gl.vertexAttribPointer(programInfo.attributeLocations.texIndex, 1, gl.FLOAT, false, 0, 0);

  const vertexIndices = new Uint8Array([
      // left rect

      gl.activeTexture(gl.TEXTURE0);
      gl.bindTexture(gl.TEXTURE_2D, texture);
-     gl.uniform1i(uniformLocations.texture, 0);
+     gl.uniform1i(programInfo.uniformLocations.texture, 0);

      gl.activeTexture(gl.TEXTURE1);
      gl.bindTexture(gl.TEXTURE_2D, otherTexture);
-     gl.uniform1i(uniformLocations.otherTexture, 1);
+     gl.uniform1i(programInfo.uniformLocations.otherTexture, 1);

-     gl.uniform2fv(uniformLocations.resolution, [canvas.width, canvas.height]);
+     gl.uniform2fv(programInfo.uniformLocations.resolution, [canvas.width, canvas.height]);

      gl.drawElements(gl.TRIANGLES, vertexIndices.length, gl.UNSIGNED_BYTE, 0);
  });
Looks quite like a cleanup 😎
One more thing that we use often are buffers. Let's create a helper class
📄 src/GLBuffer.js
export class GLBuffer {
    constructor(gl, target, data) {

    }
}
We'll need data, buffer target and actual gl buffer, so let's assign everything passed from outside and craete a gl buffer.
📄 src/GLBuffer.js
  export class GLBuffer {
      constructor(gl, target, data) {
-
+         this.target = target;
+         this.data = data;
+         this.glBuffer = gl.createBuffer();
      }
  }
We didn't assign a gl to instance because it might cause a memory leak, so we'll need to pass it from outside
Let's implement an alternative to a gl.bindBuffer
📄 src/GLBuffer.js
          this.data = data;
          this.glBuffer = gl.createBuffer();
      }
+
+     bind(gl) {
+         gl.bindBuffer(this.target, this.glBuffer);
+     }
  }
and a convenient way to set buffer data
📄 src/GLBuffer.js
      bind(gl) {
          gl.bindBuffer(this.target, this.glBuffer);
      }
+
+     setData(gl, data, usage) {
+         this.data = data;
+         this.bind(gl);
+         gl.bufferData(this.target, this.data, usage);
+     }
  }
Now let's make a data argument of constructor and add a usage argument to be able to do everything we need with just a constructor call
📄 src/GLBuffer.js
  export class GLBuffer {
-     constructor(gl, target, data) {
+     constructor(gl, target, data, usage) {
          this.target = target;
          this.data = data;
          this.glBuffer = gl.createBuffer();
+
+         if (typeof data !== 'undefined') {
+             this.setData(gl, data, usage);
+         }
      }

      bind(gl) {
Cool, now we can replace texCoords buffer with our thin wrapper
📄 src/texture.js
  import textureImageSrc from '../assets/images/texture.jpg';
  import textureGreenImageSrc from '../assets/images/texture-green.jpg';
+ import { GLBuffer } from './GLBuffer';

  const canvas = document.querySelector('canvas');
  const gl = canvas.getContext('webgl');
  gl.linkProgram(program);
  gl.useProgram(program);

- const texCoords = new Float32Array([
+ const texCoordsBuffer = new GLBuffer(gl, gl.ARRAY_BUFFER, new Float32Array([
      ...createRect(0, 0, 1, 1), // left rect
      ...createRect(0, 0, 1, 1), // right rect
- ]);
- const texCoordsBuffer = gl.createBuffer();
-
- gl.bindBuffer(gl.ARRAY_BUFFER, texCoordsBuffer);
- gl.bufferData(gl.ARRAY_BUFFER, texCoords, gl.STATIC_DRAW);
+ ]), gl.STATIC_DRAW);

  const texIndicies = new Float32Array([
      ...Array.from({ length: 4 }).fill(0), // left rect

  gl.vertexAttribPointer(programInfo.attributeLocations.position, 2, gl.FLOAT, false, 0, 0);

- gl.bindBuffer(gl.ARRAY_BUFFER, texCoordsBuffer);
+ texCoordsBuffer.bind(gl);
  gl.vertexAttribPointer(programInfo.attributeLocations.texCoord, 2, gl.FLOAT, false, 0, 0);

  gl.bindBuffer(gl.ARRAY_BUFFER, texIndiciesBuffer);
Do the same for texIndices buffer
📄 src/texture.js
      ...createRect(0, 0, 1, 1), // right rect
  ]), gl.STATIC_DRAW);

- const texIndicies = new Float32Array([
+ const texIndiciesBuffer = new GLBuffer(gl, gl.ARRAY_BUFFER, new Float32Array([
      ...Array.from({ length: 4 }).fill(0), // left rect
      ...Array.from({ length: 4 }).fill(1), // right rect
- ]);
- const texIndiciesBuffer = gl.createBuffer();
-
- gl.bindBuffer(gl.ARRAY_BUFFER, texIndiciesBuffer);
- gl.bufferData(gl.ARRAY_BUFFER, texIndicies, gl.STATIC_DRAW);
+ ]), gl.STATIC_DRAW);

  const vertexPosition = new Float32Array([
      ...createRect(-1, -1, 1, 2), // left rect
  texCoordsBuffer.bind(gl);
  gl.vertexAttribPointer(programInfo.attributeLocations.texCoord, 2, gl.FLOAT, false, 0, 0);

- gl.bindBuffer(gl.ARRAY_BUFFER, texIndiciesBuffer);
+ texIndiciesBuffer.bind(gl);
  gl.vertexAttribPointer(programInfo.attributeLocations.texIndex, 1, gl.FLOAT, false, 0, 0);

  const vertexIndices = new Uint8Array([
vertex positions
📄 src/texture.js
      ...Array.from({ length: 4 }).fill(1), // right rect
  ]), gl.STATIC_DRAW);

- const vertexPosition = new Float32Array([
+ const vertexPositionBuffer = new GLBuffer(gl, gl.ARRAY_BUFFER, new Float32Array([
      ...createRect(-1, -1, 1, 2), // left rect
      ...createRect(-1, 0, 1, 2), // right rect
- ]);
- const vertexPositionBuffer = gl.createBuffer();
+ ]), gl.STATIC_DRAW);

- gl.bindBuffer(gl.ARRAY_BUFFER, vertexPositionBuffer);
- gl.bufferData(gl.ARRAY_BUFFER, vertexPosition, gl.STATIC_DRAW);

  const programInfo = setupShaderInput(gl, program, vShaderSource, fShaderSource);

+ vertexPositionBuffer.bind(gl);
  gl.vertexAttribPointer(programInfo.attributeLocations.position, 2, gl.FLOAT, false, 0, 0);

  texCoordsBuffer.bind(gl);
and index buffer
📄 src/texture.js
  texIndiciesBuffer.bind(gl);
  gl.vertexAttribPointer(programInfo.attributeLocations.texIndex, 1, gl.FLOAT, false, 0, 0);

- const vertexIndices = new Uint8Array([
+ const indexBuffer = new GLBuffer(gl, gl.ELEMENT_ARRAY_BUFFER, new Uint8Array([
      // left rect
      0, 1, 2,
      1, 2, 3,
      // right rect
      4, 5, 6,
      5, 6, 7,
- ]);
- const indexBuffer = gl.createBuffer();
-
- gl.bindBuffer(gl.ELEMENT_ARRAY_BUFFER, indexBuffer);
- gl.bufferData(gl.ELEMENT_ARRAY_BUFFER, vertexIndices, gl.STATIC_DRAW);
+ ]), gl.STATIC_DRAW);

  Promise.all([
      loadImage(textureImageSrc),

      gl.uniform2fv(programInfo.uniformLocations.resolution, [canvas.width, canvas.height]);

-     gl.drawElements(gl.TRIANGLES, vertexIndices.length, gl.UNSIGNED_BYTE, 0);
+     gl.drawElements(gl.TRIANGLES, indexBuffer.data.length, gl.UNSIGNED_BYTE, 0);
  });
Now we are able to work with shaders being more productive with less code!
See you tomorrow 👋
This is a series of blog posts related to WebGL. New post will be available every day
Join mailing list to get new posts right to your inbox
Built with
![]()
Day 12. Highdpi displays and webgl viewport
This is a series of blog posts related to WebGL. New post will be available every day
Join mailing list to get new posts right to your inbox
Built with
![]()
Hey 👋 Welcome back to WebGL month
All previous tutorials where done on a default size canvas, let's make the picture bigger!
We'll need to tune a bit of css first to make body fill the screen
📄 index.html
      <meta name="viewport" content="width=device-width, initial-scale=1.0" />
      <meta http-equiv="X-UA-Compatible" content="ie=edge" />
      <title>WebGL Month</title>
+
+     <style>
+     html, body {
+       height: 100%;
+     }
+
+     body {
+       margin: 0;
+     }
+     </style>
    </head>
    <body>
      <canvas></canvas>
Now we can read body dimensions
📄 src/texture.js
  const canvas = document.querySelector('canvas');
  const gl = canvas.getContext('webgl');

+ const width = document.body.offsetWidth;
+ const height = document.body.offsetHeight;
+
  const vShader = gl.createShader(gl.VERTEX_SHADER);
  const fShader = gl.createShader(gl.FRAGMENT_SHADER);
And set canvas dimensions
📄 src/texture.js
  const width = document.body.offsetWidth;
  const height = document.body.offsetHeight;

+ canvas.width = width;
+ canvas.height = height;
+
  const vShader = gl.createShader(gl.VERTEX_SHADER);
  const fShader = gl.createShader(gl.FRAGMENT_SHADER);
Ok, canvas size changed, but our picture isn't full screen, why?
Turns out that changing canvas size isn't enought, we also need to specify a viwport. Treat viewport as a rectangle which will be used as drawing area and interpolate it to [-1...1] clipspace
📄 src/texture.js
      gl.uniform2fv(programInfo.uniformLocations.resolution, [canvas.width, canvas.height]);

+     gl.viewport(0, 0, canvas.width, canvas.height);
+
      gl.drawElements(gl.TRIANGLES, indexBuffer.data.length, gl.UNSIGNED_BYTE, 0);
  });
Now our picture fills the whole document, but it is a bit blurry. Obvious reason – our texture is not big enough, so it should be stretched and loses quality. That's correct, but there is another reason.
Modern displays fit higher amount of actual pixels in a physical pixel size (apple calls it retina). There is a global variable devicePixelRatio which might help us.
📄 src/texture.js
  const width = document.body.offsetWidth;
  const height = document.body.offsetHeight;

- canvas.width = width;
- canvas.height = height;
+ canvas.width = width * devicePixelRatio;
+ canvas.height = height * devicePixelRatio;

  const vShader = gl.createShader(gl.VERTEX_SHADER);
  const fShader = gl.createShader(gl.FRAGMENT_SHADER);
Ok, now our canvas has an appropriate size, but it is bigger than body on retina displays. How do we fix it?
We can downscale canvas to a physical size with css width and height property
📄 src/texture.js
  canvas.width = width * devicePixelRatio;
  canvas.height = height * devicePixelRatio;

+ canvas.style.width = `${width}px`;
+ canvas.style.height = `${height}px`;
+
  const vShader = gl.createShader(gl.VERTEX_SHADER);
  const fShader = gl.createShader(gl.FRAGMENT_SHADER);
Just to summarize, width and height attributes of canvas specify actual size in pixels, but in order to make picture sharp on highdpi displays we need to multiply width and hegiht on devicePixelRatio and downscale canvas back with css
Now we can alos make our canvas resizable
📄 src/texture.js
      gl.drawElements(gl.TRIANGLES, indexBuffer.data.length, gl.UNSIGNED_BYTE, 0);
  });
+
+
+ window.addEventListener('resize', () => {
+     const width = document.body.offsetWidth;
+     const height = document.body.offsetHeight;
+
+     canvas.width = width * devicePixelRatio;
+     canvas.height = height * devicePixelRatio;
+
+     canvas.style.width = `${width}px`;
+     canvas.style.height = `${height}px`;
+
+     gl.viewport(0, 0, canvas.width, canvas.height);
+ });
Oops, canvas clears after resize. Turns out that modification of width or height attribute forces browser to clear canvas (the same for 2d context), so we need to issue a draw call again.
📄 src/texture.js
      canvas.style.height = `${height}px`;

      gl.viewport(0, 0, canvas.width, canvas.height);
+
+     gl.drawElements(gl.TRIANGLES, indexBuffer.data.length, gl.UNSIGNED_BYTE, 0);
  });
That's it for today, see you tomorrow 👋


Join mailing list to get new posts right to your inbox
Built with
![]()
Day 13. Simple animation
This is a series of blog posts related to WebGL. New post will be available every day
Join mailing list to get new posts right to your inbox
Built with
![]()
Hey 👋 Welcome to WebGL month.
All previous tutorials where based on static images, let's add some motion!
We'll need a simple vertex shader
📄 src/shaders/rotating-square.v.glsl
attribute vec2 position;
uniform vec2 resolution;

void main() {
    gl_Position = vec4(position / resolution * 2.0 - 1.0, 0, 1);
}
fragment shader
📄 src/shaders/rotating-square.f.glsl
precision mediump float;

void main() {
    gl_FragColor = vec4(1, 0, 0, 1);
}
New entry point
📄 index.html
    </head>
    <body>
      <canvas></canvas>
-     <script src="./dist/texture.js"></script>
+     <script src="./dist/rotating-square.js"></script>
    </body>
  </html>
📄 src/rotating-square.js
import vShaderSource from './shaders/rotating-square.v.glsl';
import fShaderSource from './shaders/rotating-square.f.glsl';
📄 webpack.config.js
      entry: {
          'week-1': './src/week-1.js',
          'texture': './src/texture.js',
+         'rotating-square': './src/rotating-square.js',
      },

      output: {
Get WebGL context
📄 src/rotating-square.js
  import vShaderSource from './shaders/rotating-square.v.glsl';
  import fShaderSource from './shaders/rotating-square.f.glsl';
+
+ const canvas = document.querySelector('canvas');
+ const gl = canvas.getContext('webgl');
+
Make canvas fullscreen
📄 src/rotating-square.js
  const canvas = document.querySelector('canvas');
  const gl = canvas.getContext('webgl');

+ const width = document.body.offsetWidth;
+ const height = document.body.offsetHeight;
+
+ canvas.width = width * devicePixelRatio;
+ canvas.height = height * devicePixelRatio;
+
+ canvas.style.width = `${width}px`;
+ canvas.style.height = `${height}px`;
Create shaders
📄 src/rotating-square.js
  import vShaderSource from './shaders/rotating-square.v.glsl';
  import fShaderSource from './shaders/rotating-square.f.glsl';
+ import { compileShader } from './gl-helpers';

  const canvas = document.querySelector('canvas');
  const gl = canvas.getContext('webgl');

  canvas.style.width = `${width}px`;
  canvas.style.height = `${height}px`;
+
+ const vShader = gl.createShader(gl.VERTEX_SHADER);
+ const fShader = gl.createShader(gl.FRAGMENT_SHADER);
+
+ compileShader(gl, vShader, vShaderSource);
+ compileShader(gl, fShader, fShaderSource);
Create program
📄 src/rotating-square.js
  compileShader(gl, vShader, vShaderSource);
  compileShader(gl, fShader, fShaderSource);
+
+ const program = gl.createProgram();
+
+ gl.attachShader(program, vShader);
+ gl.attachShader(program, fShader);
+
+ gl.linkProgram(program);
+ gl.useProgram(program);
Get attribute and uniform locations
📄 src/rotating-square.js
  import vShaderSource from './shaders/rotating-square.v.glsl';
  import fShaderSource from './shaders/rotating-square.f.glsl';
- import { compileShader } from './gl-helpers';
+ import { setupShaderInput, compileShader } from './gl-helpers';

  const canvas = document.querySelector('canvas');
  const gl = canvas.getContext('webgl');

  gl.linkProgram(program);
  gl.useProgram(program);
+
+ const programInfo = setupShaderInput(gl, program, vShaderSource, fShaderSource);
Create vertices to draw a square
📄 src/rotating-square.js
  import vShaderSource from './shaders/rotating-square.v.glsl';
  import fShaderSource from './shaders/rotating-square.f.glsl';
  import { setupShaderInput, compileShader } from './gl-helpers';
+ import { createRect } from './shape-helpers';
+ import { GLBuffer } from './GLBuffer';

  const canvas = document.querySelector('canvas');
  const gl = canvas.getContext('webgl');
  gl.useProgram(program);

  const programInfo = setupShaderInput(gl, program, vShaderSource, fShaderSource);
+
+ const vertexPositionBuffer = new GLBuffer(gl, gl.ARRAY_BUFFER, new Float32Array([
+     ...createRect(canvas.width / 2 - 100, canvas.height / 2 - 100, 200, 200),
+ ]), gl.STATIC_DRAW);
Setup attribute pointer
📄 src/rotating-square.js
  const vertexPositionBuffer = new GLBuffer(gl, gl.ARRAY_BUFFER, new Float32Array([
      ...createRect(canvas.width / 2 - 100, canvas.height / 2 - 100, 200, 200),
  ]), gl.STATIC_DRAW);
+
+ gl.vertexAttribPointer(programInfo.attributeLocations.position, 2, gl.FLOAT, false, 0, 0);
Create index buffer
📄 src/rotating-square.js
  ]), gl.STATIC_DRAW);

  gl.vertexAttribPointer(programInfo.attributeLocations.position, 2, gl.FLOAT, false, 0, 0);
+
+ const indexBuffer = new GLBuffer(gl, gl.ELEMENT_ARRAY_BUFFER, new Uint8Array([
+     0, 1, 2,
+     1, 2, 3,
+ ]), gl.STATIC_DRAW);
Pass resolution and setup viewport
📄 src/rotating-square.js
      0, 1, 2,
      1, 2, 3,
  ]), gl.STATIC_DRAW);
+
+ gl.uniform2fv(programInfo.uniformLocations.resolution, [canvas.width, canvas.height]);
+
+ gl.viewport(0, 0, canvas.width, canvas.height);
And finally issue a draw call
📄 src/rotating-square.js
  gl.uniform2fv(programInfo.uniformLocations.resolution, [canvas.width, canvas.height]);

  gl.viewport(0, 0, canvas.width, canvas.height);
+ gl.drawElements(gl.TRIANGLES, indexBuffer.data.length, gl.UNSIGNED_BYTE, 0);
Now let's think of how can we rotate this square
Actually we can fit in in the circle and each vertex position might be calculated with radius, cos and sin and all we'll need is add some delta angle to each vertex

Let's refactor our createRect helper to take angle into account
📄 src/rotating-square.js
  const programInfo = setupShaderInput(gl, program, vShaderSource, fShaderSource);

  const vertexPositionBuffer = new GLBuffer(gl, gl.ARRAY_BUFFER, new Float32Array([
-     ...createRect(canvas.width / 2 - 100, canvas.height / 2 - 100, 200, 200),
+     ...createRect(canvas.width / 2 - 100, canvas.height / 2 - 100, 200, 200, 0),
  ]), gl.STATIC_DRAW);

  gl.vertexAttribPointer(programInfo.attributeLocations.position, 2, gl.FLOAT, false, 0, 0);
📄 src/shape-helpers.js
- export function createRect(top, left, width, height) {
+ const Pi_4 = Math.PI / 4;
+
+ export function createRect(top, left, width, height, angle = 0) {
+     const centerX = width / 2;
+     const centerY = height / 2;
+
+     const diagonalLength = Math.sqrt(centerX ** 2 + centerY ** 2);
+
+     const x1 = centerX + diagonalLength * Math.cos(angle + Pi_4);
+     const y1 = centerY + diagonalLength * Math.sin(angle + Pi_4);
+
+     const x2 = centerX + diagonalLength * Math.cos(angle + Pi_4 * 3);
+     const y2 = centerY + diagonalLength * Math.sin(angle + Pi_4 * 3);
+
+     const x3 = centerX + diagonalLength * Math.cos(angle - Pi_4);
+     const y3 = centerY + diagonalLength * Math.sin(angle - Pi_4);
+
+     const x4 = centerX + diagonalLength * Math.cos(angle - Pi_4 * 3);
+     const y4 = centerY + diagonalLength * Math.sin(angle - Pi_4 * 3);
+
      return [
-         left, top, // x1 y1
-         left + width, top, // x2 y2
-         left, top + height, // x3 y3
-         left + width, top + height, // x4 y4
+         x1 + left, y1 + top,
+         x2 + left, y2 + top,
+         x3 + left, y3 + top,
+         x4 + left, y4 + top,
      ];
  }
Now we need to define initial angle
📄 src/rotating-square.js
gl.uniform2fv(programInfo.uniformLocations.resolution, [canvas.width, canvas.height]);
gl.viewport(0, 0, canvas.width, canvas.height);
- gl.drawElements(gl.TRIANGLES, indexBuffer.data.length, gl.UNSIGNED_BYTE, 0);
+
+ let angle = 0;
and a function which will be called each frame
📄 src/rotating-square.js
gl.viewport(0, 0, canvas.width, canvas.height);
let angle = 0;
+
+ function frame() {
+ requestAnimationFrame(frame);
+ }
+
+ frame();
Each frame WebGL just goes through vertex data and renders it. In order to make it render smth different we need to update this data
📄 src/rotating-square.js
let angle = 0;
function frame() {
+ vertexPositionBuffer.setData(
+ gl,
+ new Float32Array(
+ createRect(canvas.width / 2 - 100, canvas.height / 2 - 100, 200, 200, angle)
+ ),
+ gl.STATIC_DRAW,
+ );
+
requestAnimationFrame(frame);
}
We also need to update rotation angle each frame
📄 src/rotating-square.js
gl.STATIC_DRAW,
);
+ angle += Math.PI / 60;
+
requestAnimationFrame(frame);
}
and issue a draw call
📄 src/rotating-square.js
angle += Math.PI / 60;
+ gl.drawElements(gl.TRIANGLES, indexBuffer.data.length, gl.UNSIGNED_BYTE, 0);
requestAnimationFrame(frame);
}
Cool! We now have a rotating square! 🎉

What we've just done could be simplified with rotation matrix
Don't worry if you're not fluent in linear algebra, me neither, there is a special package 😉
📄 package.json
"webpack-cli": "^3.3.5"
},
"dependencies": {
+ "gl-matrix": "^3.0.0",
"glsl-extract-sync": "0.0.0"
}
}
We'll need to define a rotation matrix uniform
📄 src/shaders/rotating-square.v.glsl
attribute vec2 position;
uniform vec2 resolution;
+ uniform mat2 rotationMatrix;
+
void main() {
gl_Position = vec4(position / resolution * 2.0 - 1.0, 0, 1);
}
And multiply vertex positions
📄 src/shaders/rotating-square.v.glsl
uniform mat2 rotationMatrix;
void main() {
- gl_Position = vec4(position / resolution * 2.0 - 1.0, 0, 1);
+ gl_Position = vec4((position / resolution * 2.0 - 1.0) * rotationMatrix, 0, 1);
}
Now we can get rid of vertex position updates
📄 src/rotating-square.js
import { setupShaderInput, compileShader } from './gl-helpers';
import { createRect } from './shape-helpers';
import { GLBuffer } from './GLBuffer';
+ import { mat2 } from 'gl-matrix';
const canvas = document.querySelector('canvas');
const gl = canvas.getContext('webgl');
gl.viewport(0, 0, canvas.width, canvas.height);
- let angle = 0;
+ const rotationMatrix = mat2.create();
function frame() {
- vertexPositionBuffer.setData(
- gl,
- new Float32Array(
- createRect(canvas.width / 2 - 100, canvas.height / 2 - 100, 200, 200, angle)
- ),
- gl.STATIC_DRAW,
- );
-
- angle += Math.PI / 60;
gl.drawElements(gl.TRIANGLES, indexBuffer.data.length, gl.UNSIGNED_BYTE, 0);
requestAnimationFrame(frame);
and use rotation matrix instead
📄 src/rotating-square.js
const rotationMatrix = mat2.create();
function frame() {
+ gl.uniformMatrix2fv(programInfo.uniformLocations.rotationMatrix, false, rotationMatrix);
+
+ mat2.rotate(rotationMatrix, rotationMatrix, -Math.PI / 60);
gl.drawElements(gl.TRIANGLES, indexBuffer.data.length, gl.UNSIGNED_BYTE, 0);
requestAnimationFrame(frame);
Conclusion
What seemed a complex math in our shape helper refactor turned out to be pretty easy doable with matrix math. GPU performs matrix multiplication very fast (it has special optimisations on hardware level for this kind of operations), so a lot of transformations can be made with transform matrix. This is very improtant concept, especcially in 3d rendering world.
That's it for today, see you tomorrow! 👋
This is a series of blog posts related to WebGL. New post will be available every day
Join mailing list to get new posts right to your inbox
Built with
![]()
Day 14. Intro to 3d
This is a series of blog posts related to WebGL. New post will be available every day
Join mailing list to get new posts right to your inbox
Built with
![]()
Hey 👋 Welcome to WebGL month. Today we're going to explore some important topics before starting to work with 3D.
Let's talk about projections first. As you might know a point in 2d space has a projection on X and Y axises.
In 3d space we can project a point not only on axises, but also on a plane
This is how point in space will be projected on a plane

Display is also a flat plane, so basically every point in a 3d space could be projected on it.
As we know, WebGL could render only triangles, so every 3d object should be built from a lot of triangles. The more triangles object consists of – the more precise object will look like.
That's how a triangle in 3d space could be projected on a plane

Notice that on a plane triangle looks a bit different, because vertices of the triangle are not in the plane parallel to the one we project this triangle on (rotated).
You can build 3D models in editors like Blender or 3ds Max. There are special file formats which describe 3d objects, so in order to render these objects we'll need to parse these files and build triangles. We'll explore how to do this in upcoming tutorilas.
One more important concept of 3d is perspective. Farther objects seem smaller
Imagine we're looking at some objects from the top

Notice that projected faces of cubes are different in size (bottom is larger than top) because of perspective.
Another variable in this complex "how to render 3d" equasion is field of view (what the max distance to the object which is visible by the camera, how wide is camera lens) and how much of objects fit the "camera lens".
Taking into account all these specifics seems like a lot of work to do, but luckily this work was already done, and that's where we need linear algebra and matrix multiplication stuff. Again, if you're not fluent in linear algebra – don't worrly, there is an awesome package gl-matrix which will help you with all this stuff.
Turns out that in order to get a 2d coordinates on a screen of a point in 3d space we just need to multiply a homogeneous coordinates of the point and a special "projection matrix". This matrix describes the field of view, near and far bounds of camera frustum (region of space in the modeled world which may appear on the screen). Perspective projection looks more realistic, because it takes into account a distance to the object, so we'll use a mat4.perspective method from gl-matrix.
There are two more matrices which simplify life in 3d rendering world
- Model matrix – matrix containing object transforms (translation, rotation, scale). If no transforms applied – this is an identity matrix
1. 0, 0, 0,
0, 1, 0, 0,
0, 0, 1, 0,
0, 0, 0, 1,
- View matrix – matrix describing position and direction of the "camera"
There's also a good article on MDN explaining these concepts
Join mailing list to get new posts right to your inbox
Built with
![]()
Day 15. Rendring a cube
This is a series of blog posts related to WebGL. New post will be available every day
Join mailing list to get new posts right to your inbox
Built with
![]()
Hey 👋 Welcome to WebGL month. [Yesterday] we've explored some concepts required for 3d rendering, so let's finally render something 💪
We'll need a new entry point
📄 index.html
</head>
<body>
<canvas></canvas>
- <script src="./dist/rotating-square.js"></script>
+ <script src="./dist/3d.js"></script>
</body>
</html>
📄 src/3d.js
console.log('Hello 3d!');
📄 webpack.config.js
'week-1': './src/week-1.js',
texture: './src/texture.js',
'rotating-square': './src/rotating-square.js',
+ '3d': './src/3d.js',
},
output: {
Simple vertex and fragment shaders. Notice that we use vec3 for position now as we'll work in 3-dimensional clipsace.
📄 src/shaders/3d.f.glsl
precision mediump float;
void main() {
gl_FragColor = vec4(1, 0, 0, 1);
}
📄 src/shaders/3d.v.glsl
attribute vec3 position;
void main() {
gl_Position = vec4(position, 1.0);
}
We'll also need a familiar from previous tutorials boilerplate for our WebGL program
📄 src/3d.js
- console.log('Hello 3d!');
+ import vShaderSource from './shaders/3d.v.glsl';
+ import fShaderSource from './shaders/3d.f.glsl';
+ import { compileShader, setupShaderInput } from './gl-helpers';
+
+ const canvas = document.querySelector('canvas');
+ const gl = canvas.getContext('webgl');
+
+ const width = document.body.offsetWidth;
+ const height = document.body.offsetHeight;
+
+ canvas.width = width * devicePixelRatio;
+ canvas.height = height * devicePixelRatio;
+
+ canvas.style.width = `${width}px`;
+ canvas.style.height = `${height}px`;
+
+ const vShader = gl.createShader(gl.VERTEX_SHADER);
+ const fShader = gl.createShader(gl.FRAGMENT_SHADER);
+
+ compileShader(gl, vShader, vShaderSource);
+ compileShader(gl, fShader, fShaderSource);
+
+ const program = gl.createProgram();
+
+ gl.attachShader(program, vShader);
+ gl.attachShader(program, fShader);
+
+ gl.linkProgram(program);
+ gl.useProgram(program);
+
+ const programInfo = setupShaderInput(gl, program, vShaderSource, fShaderSource);
Now let's define cube vertices for each face. We'll start with front face
📄 src/3d.js
gl.useProgram(program);
const programInfo = setupShaderInput(gl, program, vShaderSource, fShaderSource);
+
+ const cubeVertices = new Float32Array([
+ // Front face
+ -1.0, -1.0, 1.0,
+ 1.0, -1.0, 1.0,
+ 1.0, 1.0, 1.0,
+ -1.0, 1.0, 1.0,
+ ]);
back face
📄 src/3d.js
1.0, -1.0, 1.0,
1.0, 1.0, 1.0,
-1.0, 1.0, 1.0,
+
+ // Back face
+ -1.0, -1.0, -1.0,
+ -1.0, 1.0, -1.0,
+ 1.0, 1.0, -1.0,
+ 1.0, -1.0, -1.0,
]);
top face
📄 src/3d.js
-1.0, 1.0, -1.0,
1.0, 1.0, -1.0,
1.0, -1.0, -1.0,
+
+ // Top face
+ -1.0, 1.0, -1.0,
+ -1.0, 1.0, 1.0,
+ 1.0, 1.0, 1.0,
+ 1.0, 1.0, -1.0,
]);
bottom face
📄 src/3d.js
-1.0, 1.0, 1.0,
1.0, 1.0, 1.0,
1.0, 1.0, -1.0,
+
+ // Bottom face
+ -1.0, -1.0, -1.0,
+ 1.0, -1.0, -1.0,
+ 1.0, -1.0, 1.0,
+ -1.0, -1.0, 1.0,
]);
right face
📄 src/3d.js
1.0, -1.0, -1.0,
1.0, -1.0, 1.0,
-1.0, -1.0, 1.0,
+
+ // Right face
+ 1.0, -1.0, -1.0,
+ 1.0, 1.0, -1.0,
+ 1.0, 1.0, 1.0,
+ 1.0, -1.0, 1.0,
]);
left face
📄 src/3d.js
1.0, 1.0, -1.0,
1.0, 1.0, 1.0,
1.0, -1.0, 1.0,
+
+ // Left face
+ -1.0, -1.0, -1.0,
+ -1.0, -1.0, 1.0,
+ -1.0, 1.0, 1.0,
+ -1.0, 1.0, -1.0,
]);
Now we need to define vertex indices
📄 src/3d.js
-1.0, 1.0, 1.0,
-1.0, 1.0, -1.0,
]);
+
+ const indices = new Uint8Array([
+ 0, 1, 2, 0, 2, 3, // front
+ 4, 5, 6, 4, 6, 7, // back
+ 8, 9, 10, 8, 10, 11, // top
+ 12, 13, 14, 12, 14, 15, // bottom
+ 16, 17, 18, 16, 18, 19, // right
+ 20, 21, 22, 20, 22, 23, // left
+ ]);
and create gl buffers
📄 src/3d.js
import vShaderSource from './shaders/3d.v.glsl';
import fShaderSource from './shaders/3d.f.glsl';
import { compileShader, setupShaderInput } from './gl-helpers';
+ import { GLBuffer } from './GLBuffer';
const canvas = document.querySelector('canvas');
const gl = canvas.getContext('webgl');
16, 17, 18, 16, 18, 19, // right
20, 21, 22, 20, 22, 23, // left
]);
+
+ const vertexBuffer = new GLBuffer(gl, gl.ARRAY_BUFFER, cubeVertices, gl.STATIC_DRAW);
+ const indexBuffer = new GLBuffer(gl, gl.ELEMENT_ARRAY_BUFFER, indices, gl.STATIC_DRAW);
Setup vertex attribute pointer
📄 src/3d.js
const vertexBuffer = new GLBuffer(gl, gl.ARRAY_BUFFER, cubeVertices, gl.STATIC_DRAW);
const indexBuffer = new GLBuffer(gl, gl.ELEMENT_ARRAY_BUFFER, indices, gl.STATIC_DRAW);
+
+ vertexBuffer.bind(gl);
+ gl.vertexAttribPointer(programInfo.attributeLocations.position, 3, gl.FLOAT, false, 0, 0);
setup viewport
📄 src/3d.js
vertexBuffer.bind(gl);
gl.vertexAttribPointer(programInfo.attributeLocations.position, 3, gl.FLOAT, false, 0, 0);
+
+ gl.viewport(0, 0, canvas.width, canvas.height);
and issue a draw call
📄 src/3d.js
gl.vertexAttribPointer(programInfo.attributeLocations.position, 3, gl.FLOAT, false, 0, 0);
gl.viewport(0, 0, canvas.width, canvas.height);
+
+ gl.drawElements(gl.TRIANGLES, indexBuffer.data.length, gl.UNSIGNED_BYTE, 0);
Ok, we did everything right, but we just see a red canvas? That's expected result, because every face of cube has a length of 2 with left-most vertices at -1 and right-most at 1, so we need to add some matrix magic from yesterday.
Let's define uniforms for each matrix
📄 src/shaders/3d.v.glsl
attribute vec3 position;
+ uniform mat4 modelMatrix;
+ uniform mat4 viewMatrix;
+ uniform mat4 projectionMatrix;
+
void main() {
gl_Position = vec4(position, 1.0);
}
and multiply every matrix.
📄 src/shaders/3d.v.glsl
uniform mat4 projectionMatrix;
void main() {
- gl_Position = vec4(position, 1.0);
+ gl_Position = projectionMatrix * viewMatrix * modelMatrix * vec4(position, 1.0);
}
Now we need to define JS representations of the same matrices
📄 src/3d.js
+ import { mat4 } from 'gl-matrix';
+
import vShaderSource from './shaders/3d.v.glsl';
import fShaderSource from './shaders/3d.f.glsl';
import { compileShader, setupShaderInput } from './gl-helpers';
vertexBuffer.bind(gl);
gl.vertexAttribPointer(programInfo.attributeLocations.position, 3, gl.FLOAT, false, 0, 0);
+ const modelMatrix = mat4.create();
+ const viewMatrix = mat4.create();
+ const projectionMatrix = mat4.create();
+
gl.viewport(0, 0, canvas.width, canvas.height);
gl.drawElements(gl.TRIANGLES, indexBuffer.data.length, gl.UNSIGNED_BYTE, 0);
We'll leave model matrix as-is (mat4.create returns an identity matrix), meaning cube won't have any transforms (no translation, no rotation, no scale).
We'll use lookAt method to setup viewMatrix
📄 src/3d.js
const viewMatrix = mat4.create();
const projectionMatrix = mat4.create();
+ mat4.lookAt(
+ viewMatrix,
+ );
+
gl.viewport(0, 0, canvas.width, canvas.height);
gl.drawElements(gl.TRIANGLES, indexBuffer.data.length, gl.UNSIGNED_BYTE, 0);
The 2nd argument is a position of a viewer. Let's place this point on top and in front of the cube
📄 src/3d.js
mat4.lookAt(
viewMatrix,
+ [0, 7, -7],
);
gl.viewport(0, 0, canvas.width, canvas.height);
The 3rd argument is a point where we want to look at. Coordinate of our cube is (0, 0, 0), that's exactly what we want to look at
📄 src/3d.js
mat4.lookAt(
viewMatrix,
[0, 7, -7],
+ [0, 0, 0],
);
gl.viewport(0, 0, canvas.width, canvas.height);
The last argument is up vector. We can setup a view matrix in a way that any vector will be treated as pointing to the top of our world, so let's make y axis pointing to the top
📄 src/3d.js
viewMatrix,
[0, 7, -7],
[0, 0, 0],
+ [0, 1, 0],
);
gl.viewport(0, 0, canvas.width, canvas.height);
To setup projection matrix we'll use perspective method
📄 src/3d.js
[0, 1, 0],
);
+ mat4.perspective(
+ projectionMatrix,
+ );
+
gl.viewport(0, 0, canvas.width, canvas.height);
gl.drawElements(gl.TRIANGLES, indexBuffer.data.length, gl.UNSIGNED_BYTE, 0);
View and perspective matrices together are kind of a "camera" parameters. We already have a position and direction of a camera, let's setup other parameters.
The 2nd argument of perspective method is a field of view (how wide is camera lens). Wider the angle – more objecs will fit the screen (you surely heard of a "wide angle" camera in recent years phones, that's about the same).
📄 src/3d.js
mat4.perspective(
projectionMatrix,
+ Math.PI / 360 * 90,
);
gl.viewport(0, 0, canvas.width, canvas.height);
Next argument is aspect ration of a canvas. It could be calculated by a simple division
📄 src/3d.js
mat4.perspective(
projectionMatrix,
Math.PI / 360 * 90,
+ canvas.width / canvas.height,
);
gl.viewport(0, 0, canvas.width, canvas.height);
The 4th and 5th argumnts setup a distance to objects which are visible by camera. Some objects might be too close, others too far, so they shouldn't be rendered. The 4th argument – distance to the closest object to render, the 5th – to the farthest
📄 src/3d.js
projectionMatrix,
Math.PI / 360 * 90,
canvas.width / canvas.height,
+ 0.01,
+ 100,
);
gl.viewport(0, 0, canvas.width, canvas.height);
and finally we need to pass matrices to shader
📄 src/3d.js
100,
);
+ gl.uniformMatrix4fv(programInfo.uniformLocations.modelMatrix, false, modelMatrix);
+ gl.uniformMatrix4fv(programInfo.uniformLocations.viewMatrix, false, viewMatrix);
+ gl.uniformMatrix4fv(programInfo.uniformLocations.projectionMatrix, false, projectionMatrix);
+
gl.viewport(0, 0, canvas.width, canvas.height);
gl.drawElements(gl.TRIANGLES, indexBuffer.data.length, gl.UNSIGNED_BYTE, 0);
Looks quite like a cube 🎉

Now let's implement a rotation animation with help of model matrix and rotate method from gl-matrix
📄 src/3d.js
gl.viewport(0, 0, canvas.width, canvas.height);
gl.drawElements(gl.TRIANGLES, indexBuffer.data.length, gl.UNSIGNED_BYTE, 0);
+
+ function frame() {
+ mat4.rotateY(modelMatrix, modelMatrix, Math.PI / 180);
+
+ requestAnimationFrame(frame);
+ }
+
+ frame();
We also need to update a uniform
📄 src/3d.js
function frame() {
mat4.rotateY(modelMatrix, modelMatrix, Math.PI / 180);
+ gl.uniformMatrix4fv(programInfo.uniformLocations.modelMatrix, false, modelMatrix);
+
requestAnimationFrame(frame);
}
and issue a draw call
📄 src/3d.js
mat4.rotateY(modelMatrix, modelMatrix, Math.PI / 180);
gl.uniformMatrix4fv(programInfo.uniformLocations.modelMatrix, false, modelMatrix);
+ gl.drawElements(gl.TRIANGLES, indexBuffer.data.length, gl.UNSIGNED_BYTE, 0);
requestAnimationFrame(frame);
}
Cool! We have a rotation 🎉

That's it for today, see you tomorrow 👋
Join mailing list to get new posts right to your inbox
Built with
![]()
Day 16. Colorizing cube and exploring depth buffer
This is a series of blog posts related to WebGL. New post will be available every day

Join mailing list to get new posts right to your inbox
Built with
![]()
Hey 👋
Welcome to WebGL month
Yesterday we've rendered a cube, but all faces are of the same color, let's change this.
Let's define face colors
📄 src/3d.js
20, 21, 22, 20, 22, 23, // left
]);
+ const faceColors = [
+ [1.0, 1.0, 1.0, 1.0], // Front face: white
+ [1.0, 0.0, 0.0, 1.0], // Back face: red
+ [0.0, 1.0, 0.0, 1.0], // Top face: green
+ [0.0, 0.0, 1.0, 1.0], // Bottom face: blue
+ [1.0, 1.0, 0.0, 1.0], // Right face: yellow
+ [1.0, 0.0, 1.0, 1.0], // Left face: purple
+ ];
+
const vertexBuffer = new GLBuffer(gl, gl.ARRAY_BUFFER, cubeVertices, gl.STATIC_DRAW);
const indexBuffer = new GLBuffer(gl, gl.ELEMENT_ARRAY_BUFFER, indices, gl.STATIC_DRAW);
Now we need to repeat face colors for each face vertex
📄 src/3d.js
[1.0, 0.0, 1.0, 1.0], // Left face: purple
];
+ const colors = [];
+
+ for (var j = 0; j < faceColors.length; ++j) {
+ const c = faceColors[j];
+ colors.push(
+ ...c, // vertex 1
+ ...c, // vertex 2
+ ...c, // vertex 3
+ ...c, // vertex 4
+ );
+ }
+
+
const vertexBuffer = new GLBuffer(gl, gl.ARRAY_BUFFER, cubeVertices, gl.STATIC_DRAW);
const indexBuffer = new GLBuffer(gl, gl.ELEMENT_ARRAY_BUFFER, indices, gl.STATIC_DRAW);
and create a webgl buffer
📄 src/3d.js
const vertexBuffer = new GLBuffer(gl, gl.ARRAY_BUFFER, cubeVertices, gl.STATIC_DRAW);
+ const colorsBuffer = new GLBuffer(gl, gl.ARRAY_BUFFER, new Float32Array(colors), gl.STATIC_DRAW);
const indexBuffer = new GLBuffer(gl, gl.ELEMENT_ARRAY_BUFFER, indices, gl.STATIC_DRAW);
vertexBuffer.bind(gl);
Next we need to define an attribute to pass color from js to vertex shader, and varying to pass it from vertex to fragment shader
📄 src/shaders/3d.v.glsl
attribute vec3 position;
+ attribute vec4 color;
uniform mat4 modelMatrix;
uniform mat4 viewMatrix;
uniform mat4 projectionMatrix;
+ varying vec4 vColor;
+
void main() {
gl_Position = projectionMatrix * viewMatrix * modelMatrix * vec4(position, 1.0);
+ vColor = color;
}
and use it instead of hardcoded red in fragment shader
📄 src/shaders/3d.f.glsl
precision mediump float;
+ varying vec4 vColor;
+
void main() {
- gl_FragColor = vec4(1, 0, 0, 1);
+ gl_FragColor = vColor;
}
and finally setup vertex attribute in js
📄 src/3d.js
vertexBuffer.bind(gl);
gl.vertexAttribPointer(programInfo.attributeLocations.position, 3, gl.FLOAT, false, 0, 0);
+ colorsBuffer.bind(gl);
+ gl.vertexAttribPointer(programInfo.attributeLocations.color, 4, gl.FLOAT, false, 0, 0);
+
const modelMatrix = mat4.create();
const viewMatrix = mat4.create();
const projectionMatrix = mat4.create();
Ok, colors are there, but something is wrong

Let's see what is going on in more details by rendering faces incrementally
let count = 3;
function frame() {
if (count <= index.data.length) {
gl.drawElements(gl.TRIANGLES, count, gl.UNSIGNED_BYTE, 0);
count += 3;
setTimeout(frame, 500);
}
}

Seems like triangles which rendered later overlap the ones which are actually closer to the viewer 😕 How do we fix it?
📄 src/3d.js
gl.linkProgram(program);
gl.useProgram(program);
+ gl.enable(gl.DEPTH_TEST);
+
const programInfo = setupShaderInput(gl, program, vShaderSource, fShaderSource);
const cubeVertices = new Float32Array([
After vertices are assembled into primitives (triangles) fragment shader paints each pixel inside of triangle, but before calculation of a color fragment passes some "tests". One of those tests is depth and we need to manually enable it.
Other types of tests are:
-
gl.SCISSORS_TEST- whether a fragment inside of a certain triangle (don't confuse this with viewport, there is a special scissor[https://developer.mozilla.org/en-US/docs/Web/API/WebGLRenderingContext/scissor] method) -
gl.STENCIL_TEST– similar to a depth, but we can manually define a "mask" and discard some pixels (we'll work with stencil buffer in next tutorials) - pixel ownership test – some pixels on screen might belong to other OpenGL contexts (imagine your browser is overlapped by other window), so this pixels get discarded (not painted)
Cool, we now have a working 3d cube, but we're duplicating a lot of colors to fill vertex buffer, can we do it better? We're using a fixed color palette (6 colors), so we can pass these colors to a shader and use just index of that color.
Let's drop color attrbiute and introduce a colorIndex instead
📄 src/shaders/3d.v.glsl
attribute vec3 position;
- attribute vec4 color;
+ attribute float colorIndex;
uniform mat4 modelMatrix;
uniform mat4 viewMatrix;
Shaders support "arrays" of uniforms, so we can pass our color palette to this array and use index to get a color out of it
📄 src/shaders/3d.v.glsl
uniform mat4 modelMatrix;
uniform mat4 viewMatrix;
uniform mat4 projectionMatrix;
+ uniform vec4 colors[6];
varying vec4 vColor;
void main() {
gl_Position = projectionMatrix * viewMatrix * modelMatrix * vec4(position, 1.0);
- vColor = color;
+ vColor = colors[int(colorIndex)];
}
We need to make appropriate changes to setup color index attribute
📄 src/3d.js
const colors = [];
for (var j = 0; j < faceColors.length; ++j) {
- const c = faceColors[j];
- colors.push(
- ...c, // vertex 1
- ...c, // vertex 2
- ...c, // vertex 3
- ...c, // vertex 4
- );
+ colors.push(j, j, j, j);
}
gl.vertexAttribPointer(programInfo.attributeLocations.position, 3, gl.FLOAT, false, 0, 0);
colorsBuffer.bind(gl);
- gl.vertexAttribPointer(programInfo.attributeLocations.color, 4, gl.FLOAT, false, 0, 0);
+ gl.vertexAttribPointer(programInfo.attributeLocations.colorIndex, 1, gl.FLOAT, false, 0, 0);
const modelMatrix = mat4.create();
const viewMatrix = mat4.create();
To fill an array uniform, we need to set each "item" in this array individually, like so
gl.uniform4fv(programInfo.uniformLocations[`colors[0]`], color[0]);
gl.uniform4fv(programInfo.uniformLocations[`colors[1]`], colors[1]);
gl.uniform4fv(programInfo.uniformLocations[`colors[2]`], colors[2]);
...
Obviously this can be done in a loop.
📄 src/3d.js
colors.push(j, j, j, j);
}
+ faceColors.forEach((color, index) => {
+ gl.uniform4fv(programInfo.uniformLocations[`colors[${index}]`], color);
+ });
const vertexBuffer = new GLBuffer(gl, gl.ARRAY_BUFFER, cubeVertices, gl.STATIC_DRAW);
const colorsBuffer = new GLBuffer(gl, gl.ARRAY_BUFFER, new Float32Array(colors), gl.STATIC_DRAW);
Nice, we have the same result, but using 4 times less of data in attributes.
This might seem as an unnecessary optimisation, but it might help when you have to update large buffers frequently

That's it for today!
See you in next tutorials 👋
This is a series of blog posts related to WebGL. New post will be available every day
Join mailing list to get new posts right to your inbox
Built with
![]()
Day 17. Exploring OBJ format
This is a series of blog posts related to WebGL. New post will be available every day
Join mailing list to get new posts right to your inbox
Built with
![]()
Hey 👋
Welcome to WebGL month.
Yesterday we've fixed our cube example, but vertices of this cube were defined right in our js code. This might get more complicated when rendering more complex objects.
Luckily 3D editors like Blender can export object definition in several formats.
Let's export a cube from blender

Let's explore exported file
First two lines start with # which is just a comment
📄 assets/objects/cube.obj
+ # Blender v2.79 (sub 0) OBJ File: ''
+ # www.blender.org
mtllib line references the file of material of the object
We'll ignore this for now
📄 assets/objects/cube.obj
# Blender v2.79 (sub 0) OBJ File: ''
# www.blender.org
+ mtllib cube.mtl
o defines the name of the object
📄 assets/objects/cube.obj
# Blender v2.79 (sub 0) OBJ File: ''
# www.blender.org
mtllib cube.mtl
+ o Cube
Lines with v define vertex positions
📄 assets/objects/cube.obj
# www.blender.org
mtllib cube.mtl
o Cube
+ v 1.000000 -1.000000 -1.000000
+ v 1.000000 -1.000000 1.000000
+ v -1.000000 -1.000000 1.000000
+ v -1.000000 -1.000000 -1.000000
+ v 1.000000 1.000000 -0.999999
+ v 0.999999 1.000000 1.000001
+ v -1.000000 1.000000 1.000000
+ v -1.000000 1.000000 -1.000000
vn define vertex normals. In this case normals are perpendicular ot the cube facess
📄 assets/objects/cube.obj
v 0.999999 1.000000 1.000001
v -1.000000 1.000000 1.000000
v -1.000000 1.000000 -1.000000
+ vn 0.0000 -1.0000 0.0000
+ vn 0.0000 1.0000 0.0000
+ vn 1.0000 0.0000 0.0000
+ vn -0.0000 -0.0000 1.0000
+ vn -1.0000 -0.0000 -0.0000
+ vn 0.0000 0.0000 -1.0000
usemtl tells which material to use for the elements (faces) following this line
📄 assets/objects/cube.obj
vn -0.0000 -0.0000 1.0000
vn -1.0000 -0.0000 -0.0000
vn 0.0000 0.0000 -1.0000
+ usemtl Material
f lines define object faces referencing vertices and normals by indices
📄 assets/objects/cube.obj
vn 0.0000 0.0000 -1.0000
usemtl Material
s off
+ f 1//1 2//1 3//1 4//1
+ f 5//2 8//2 7//2 6//2
+ f 1//3 5//3 6//3 2//3
+ f 2//4 6//4 7//4 3//4
+ f 3//5 7//5 8//5 4//5
+ f 5//6 1//6 4//6 8//6
So in this case the first face consists of vertices 1, 2, 3 and 4
Other thing to mention – our face consists of 4 vertices, but webgl can render only triangles. We can break this faces to triangles in JS or do this in Blender
Enter edit mode (Tab key), and hit Control + T (on macOS). That's it, cube faces are now triangulated

Now let's load .obj file with raw loader
📄 src/3d.js
import fShaderSource from './shaders/3d.f.glsl';
import { compileShader, setupShaderInput } from './gl-helpers';
import { GLBuffer } from './GLBuffer';
+ import cubeObj from '../assets/objects/cube.obj';
const canvas = document.querySelector('canvas');
const gl = canvas.getContext('webgl');
📄 webpack.config.js
module: {
rules: [
{
- test: /\.glsl$/,
+ test: /\.(glsl|obj)$/,
use: 'raw-loader',
},
and implement parser to get vertices and vertex indices
📄 src/3d.js
import vShaderSource from './shaders/3d.v.glsl';
import fShaderSource from './shaders/3d.f.glsl';
- import { compileShader, setupShaderInput } from './gl-helpers';
+ import { compileShader, setupShaderInput, parseObj } from './gl-helpers';
import { GLBuffer } from './GLBuffer';
import cubeObj from '../assets/objects/cube.obj';
const programInfo = setupShaderInput(gl, program, vShaderSource, fShaderSource);
- const cubeVertices = new Float32Array([
- // Front face
- -1.0, -1.0, 1.0,
- 1.0, -1.0, 1.0,
- 1.0, 1.0, 1.0,
- -1.0, 1.0, 1.0,
-
- // Back face
- -1.0, -1.0, -1.0,
- -1.0, 1.0, -1.0,
- 1.0, 1.0, -1.0,
- 1.0, -1.0, -1.0,
-
- // Top face
- -1.0, 1.0, -1.0,
- -1.0, 1.0, 1.0,
- 1.0, 1.0, 1.0,
- 1.0, 1.0, -1.0,
-
- // Bottom face
- -1.0, -1.0, -1.0,
- 1.0, -1.0, -1.0,
- 1.0, -1.0, 1.0,
- -1.0, -1.0, 1.0,
-
- // Right face
- 1.0, -1.0, -1.0,
- 1.0, 1.0, -1.0,
- 1.0, 1.0, 1.0,
- 1.0, -1.0, 1.0,
-
- // Left face
- -1.0, -1.0, -1.0,
- -1.0, -1.0, 1.0,
- -1.0, 1.0, 1.0,
- -1.0, 1.0, -1.0,
- ]);
-
- const indices = new Uint8Array([
- 0, 1, 2, 0, 2, 3, // front
- 4, 5, 6, 4, 6, 7, // back
- 8, 9, 10, 8, 10, 11, // top
- 12, 13, 14, 12, 14, 15, // bottom
- 16, 17, 18, 16, 18, 19, // right
- 20, 21, 22, 20, 22, 23, // left
- ]);
+ const { vertices, indices } = parseObj(cubeObj);
const faceColors = [
[1.0, 1.0, 1.0, 1.0], // Front face: white
gl.uniform4fv(programInfo.uniformLocations[`colors[${index}]`], color);
});
- const vertexBuffer = new GLBuffer(gl, gl.ARRAY_BUFFER, cubeVertices, gl.STATIC_DRAW);
+ const vertexBuffer = new GLBuffer(gl, gl.ARRAY_BUFFER, vertices, gl.STATIC_DRAW);
const colorsBuffer = new GLBuffer(gl, gl.ARRAY_BUFFER, new Float32Array(colors), gl.STATIC_DRAW);
const indexBuffer = new GLBuffer(gl, gl.ELEMENT_ARRAY_BUFFER, indices, gl.STATIC_DRAW);
📄 src/gl-helpers.js
uniformLocations,
}
}
+
+ export function parseObj(objSource) {
+ const vertices = [];
+ const indices = [];
+
+ return { vertices, indices };
+ }
We can iterate over each line and search for those starting with v to get vertex coordinatess
📄 src/gl-helpers.js
}
}
+ export function parseVec(string, prefix) {
+ return string.replace(prefix, '').split(' ').map(Number);
+ }
+
export function parseObj(objSource) {
const vertices = [];
const indices = [];
+ objSource.split('\n').forEach(line => {
+ if (line.startsWith('v ')) {
+ vertices.push(...parseVec(line, 'v '));
+ }
+ });
+
return { vertices, indices };
}
and do the same with faces
📄 src/gl-helpers.js
return string.replace(prefix, '').split(' ').map(Number);
}
+ export function parseFace(string) {
+ return string.replace('f ', '').split(' ').map(chunk => {
+ return chunk.split('/').map(Number);
+ })
+ }
+
export function parseObj(objSource) {
const vertices = [];
const indices = [];
if (line.startsWith('v ')) {
vertices.push(...parseVec(line, 'v '));
}
+
+ if (line.startsWith('f ')) {
+ indices.push(...parseFace(line).map(face => face[0]));
+ }
});
return { vertices, indices };
Let's also return typed arrays
📄 src/gl-helpers.js
}
});
- return { vertices, indices };
+ return {
+ vertices: new Float32Array(vertices),
+ indices: new Uint8Array(indices),
+ };
}
Ok, everything seem to work fine, but we have an error
glDrawElements: attempt to access out of range vertices in attribute 0
That's because indices in .obj file starts with 1, so we need to decrement each index
📄 src/gl-helpers.js
}
if (line.startsWith('f ')) {
- indices.push(...parseFace(line).map(face => face[0]));
+ indices.push(...parseFace(line).map(face => face[0] - 1));
}
});
Let's also change the way we colorize our faces, just to make it possible to render any object with any amount of faces with random colors
📄 src/3d.js
const colors = [];
- for (var j = 0; j < faceColors.length; ++j) {
- colors.push(j, j, j, j);
+ for (var j = 0; j < indices.length / 3; ++j) {
+ const randomColorIndex = Math.floor(Math.random() * faceColors.length);
+ colors.push(randomColorIndex, randomColorIndex, randomColorIndex);
}
faceColors.forEach((color, index) => {
One more issue with existing code, is that we use gl.UNSIGNED_BYTE, so index buffer might only of a Uint8Array which fits numbers up to 255, so if object will have more than 255 vertices – it will be rendered incorrectly. Let's fix this
📄 src/3d.js
gl.viewport(0, 0, canvas.width, canvas.height);
- gl.drawElements(gl.TRIANGLES, indexBuffer.data.length, gl.UNSIGNED_BYTE, 0);
+ gl.drawElements(gl.TRIANGLES, indexBuffer.data.length, gl.UNSIGNED_SHORT, 0);
function frame() {
mat4.rotateY(modelMatrix, modelMatrix, Math.PI / 180);
gl.uniformMatrix4fv(programInfo.uniformLocations.modelMatrix, false, modelMatrix);
- gl.drawElements(gl.TRIANGLES, indexBuffer.data.length, gl.UNSIGNED_BYTE, 0);
+ gl.drawElements(gl.TRIANGLES, indexBuffer.data.length, gl.UNSIGNED_SHORT, 0);
requestAnimationFrame(frame);
}
📄 src/gl-helpers.js
return {
vertices: new Float32Array(vertices),
- indices: new Uint8Array(indices),
+ indices: new Uint16Array(indices),
};
}
Now let's render different object, for example monkey
📄 src/3d.js
import fShaderSource from './shaders/3d.f.glsl';
import { compileShader, setupShaderInput, parseObj } from './gl-helpers';
import { GLBuffer } from './GLBuffer';
- import cubeObj from '../assets/objects/cube.obj';
+ import monkeyObj from '../assets/objects/monkey.obj';
const canvas = document.querySelector('canvas');
const gl = canvas.getContext('webgl');
const programInfo = setupShaderInput(gl, program, vShaderSource, fShaderSource);
- const { vertices, indices } = parseObj(cubeObj);
+ const { vertices, indices } = parseObj(monkeyObj);
const faceColors = [
[1.0, 1.0, 1.0, 1.0], // Front face: white
mat4.lookAt(
viewMatrix,
- [0, 7, -7],
+ [0, 0, -7],
[0, 0, 0],
[0, 1, 0],
);
Cool! We now can render any objects exported from blender 🎉

That's it for today, see you tomorrow 👋
Join mailing list to get new posts right to your inbox
Built with
![]()
Day 18. Flat shading
This is a series of blog posts related to WebGL. New post will be available every day


Join mailing list to get new posts right to your inbox
Built with
![]()
Hey 👋
Welcome to WebGL month.
Today we'll learn how to implement flat shading. But let's first talk about light itself.
A typical 3d scene will contain an object, global light and some specific source of light (torch, lamp etc.)
So how do we break all these down to something we can turn into a code
Here's an example

Pay attention to the red arrows coming from cube faces. These arrows are "normals", and each face color will depend on the angle between a vector of light and face normal.
Let's change the way our object is colorized and make all faces the same color to see better how light affects face colors
📄 src/3d.js
const { vertices, indices } = parseObj(monkeyObj);
const faceColors = [
- [1.0, 1.0, 1.0, 1.0], // Front face: white
- [1.0, 0.0, 0.0, 1.0], // Back face: red
- [0.0, 1.0, 0.0, 1.0], // Top face: green
- [0.0, 0.0, 1.0, 1.0], // Bottom face: blue
- [1.0, 1.0, 0.0, 1.0], // Right face: yellow
- [1.0, 0.0, 1.0, 1.0], // Left face: purple
+ [0.5, 0.5, 0.5, 1.0]
];
const colors = [];
for (var j = 0; j < indices.length / 3; ++j) {
- const randomColorIndex = Math.floor(Math.random() * faceColors.length);
- colors.push(randomColorIndex, randomColorIndex, randomColorIndex);
+ colors.push(0, 0, 0, 0);
}
faceColors.forEach((color, index) => {
We'll also need to extract normals from our object and use drawArrays instead of drawElements, as each vertex can't be referenced by index, because vertex coordinates and normals have different indices
📄 src/3d.js
const programInfo = setupShaderInput(gl, program, vShaderSource, fShaderSource);
- const { vertices, indices } = parseObj(monkeyObj);
+ const { vertices, normals } = parseObj(monkeyObj);
const faceColors = [
[0.5, 0.5, 0.5, 1.0]
const colors = [];
- for (var j = 0; j < indices.length / 3; ++j) {
+ for (var j = 0; j < vertices.length / 3; ++j) {
colors.push(0, 0, 0, 0);
}
const vertexBuffer = new GLBuffer(gl, gl.ARRAY_BUFFER, vertices, gl.STATIC_DRAW);
const colorsBuffer = new GLBuffer(gl, gl.ARRAY_BUFFER, new Float32Array(colors), gl.STATIC_DRAW);
- const indexBuffer = new GLBuffer(gl, gl.ELEMENT_ARRAY_BUFFER, indices, gl.STATIC_DRAW);
vertexBuffer.bind(gl);
gl.vertexAttribPointer(programInfo.attributeLocations.position, 3, gl.FLOAT, false, 0, 0);
gl.viewport(0, 0, canvas.width, canvas.height);
- gl.drawElements(gl.TRIANGLES, indexBuffer.data.length, gl.UNSIGNED_SHORT, 0);
+ gl.drawArrays(gl.TRIANGLES, 0, vertexBuffer.data.length / 3);
function frame() {
mat4.rotateY(modelMatrix, modelMatrix, Math.PI / 180);
gl.uniformMatrix4fv(programInfo.uniformLocations.modelMatrix, false, modelMatrix);
- gl.drawElements(gl.TRIANGLES, indexBuffer.data.length, gl.UNSIGNED_SHORT, 0);
+
+ gl.drawArrays(gl.TRIANGLES, 0, vertexBuffer.data.length / 3);
requestAnimationFrame(frame);
}
📄 src/gl-helpers.js
}
export function parseObj(objSource) {
- const vertices = [];
- const indices = [];
+ const _vertices = [];
+ const _normals = [];
+ const vertexIndices = [];
+ const normalIndices = [];
objSource.split('\n').forEach(line => {
if (line.startsWith('v ')) {
- vertices.push(...parseVec(line, 'v '));
+ _vertices.push(parseVec(line, 'v '));
+ }
+
+ if (line.startsWith('vn ')) {
+ _normals.push(parseVec(line, 'vn '));
}
if (line.startsWith('f ')) {
- indices.push(...parseFace(line).map(face => face[0] - 1));
+ const parsedFace = parseFace(line);
+
+ vertexIndices.push(...parsedFace.map(face => face[0] - 1));
+ normalIndices.push(...parsedFace.map(face => face[2] - 1));
}
});
+ const vertices = [];
+ const normals = [];
+
+ for (let i = 0; i < vertexIndices.length; i++) {
+ const vertexIndex = vertexIndices[i];
+ const normalIndex = normalIndices[i];
+
+ const vertex = _vertices[vertexIndex];
+ const normal = _normals[normalIndex];
+
+ vertices.push(...vertex);
+ normals.push(...normal);
+ }
+
return {
vertices: new Float32Array(vertices),
- indices: new Uint16Array(indices),
+ normals: new Float32Array(normals),
};
}
Define normal attribute
📄 src/3d.js
const vertexBuffer = new GLBuffer(gl, gl.ARRAY_BUFFER, vertices, gl.STATIC_DRAW);
const colorsBuffer = new GLBuffer(gl, gl.ARRAY_BUFFER, new Float32Array(colors), gl.STATIC_DRAW);
+ const normalsBuffer = new GLBuffer(gl, gl.ARRAY_BUFFER, normals, gl.STATIC_DRAW);
vertexBuffer.bind(gl);
gl.vertexAttribPointer(programInfo.attributeLocations.position, 3, gl.FLOAT, false, 0, 0);
colorsBuffer.bind(gl);
gl.vertexAttribPointer(programInfo.attributeLocations.colorIndex, 1, gl.FLOAT, false, 0, 0);
+ normalsBuffer.bind(gl);
+ gl.vertexAttribPointer(programInfo.attributeLocations.normal, 3, gl.FLOAT, false, 0, 0);
+
const modelMatrix = mat4.create();
const viewMatrix = mat4.create();
const projectionMatrix = mat4.create();
📄 src/shaders/3d.v.glsl
attribute vec3 position;
+ attribute vec3 normal;
attribute float colorIndex;
uniform mat4 modelMatrix;
Let's also define a position of light and pass it to shader via uniform
📄 src/3d.js
gl.uniformMatrix4fv(programInfo.uniformLocations.viewMatrix, false, viewMatrix);
gl.uniformMatrix4fv(programInfo.uniformLocations.projectionMatrix, false, projectionMatrix);
+ gl.uniform3fv(programInfo.uniformLocations.directionalLightVector, [0, 0, -7]);
+
gl.viewport(0, 0, canvas.width, canvas.height);
gl.drawArrays(gl.TRIANGLES, 0, vertexBuffer.data.length / 3);
📄 src/shaders/3d.v.glsl
uniform mat4 viewMatrix;
uniform mat4 projectionMatrix;
uniform vec4 colors[6];
+ uniform vec3 directionalLightVector;
varying vec4 vColor;
Now we can use normal vector and directional light vector to calculate light "intensity" and multiply initial color
📄 src/shaders/3d.v.glsl
void main() {
gl_Position = projectionMatrix * viewMatrix * modelMatrix * vec4(position, 1.0);
- vColor = colors[int(colorIndex)];
+
+ float intensity = dot(normal, directionalLightVector);
+
+ vColor = colors[int(colorIndex)] * intensity;
}

Now some faces are brighter, some are lighter, so overall approach is working, but image seem to be too bright
One issue with current implementation is that we're using "non-normalized" vector for light direction
📄 src/shaders/3d.v.glsl
void main() {
gl_Position = projectionMatrix * viewMatrix * modelMatrix * vec4(position, 1.0);
- float intensity = dot(normal, directionalLightVector);
+ float intensity = dot(normal, normalize(directionalLightVector));
vColor = colors[int(colorIndex)] * intensity;
}

Looks better, but still too bright.
This is because we also multiply alpha component of the color by our intensity, so darker faces become lighter because they have opacity close to 0.
📄 src/3d.js
- import { mat4 } from 'gl-matrix';
+ import { mat4, vec3 } from 'gl-matrix';
import vShaderSource from './shaders/3d.v.glsl';
import fShaderSource from './shaders/3d.f.glsl';
📄 src/shaders/3d.v.glsl
float intensity = dot(normal, normalize(directionalLightVector));
- vColor = colors[int(colorIndex)] * intensity;
+ vColor.rgb = vec3(0.3, 0.3, 0.3) + colors[int(colorIndex)].rgb * intensity;
+ vColor.a = 1.0;
}

Now it is too dark 😕
Let's add some "global light"

Looks better, but still not perfect. It seems like the light source rotates together with object. This happens because we transform vertex positions, but normals stay the same. We need to transform normals as well. There is a special transformation matrix which could be calculatd as invert-transpose from model matrix.
📄 src/3d.js
const modelMatrix = mat4.create();
const viewMatrix = mat4.create();
const projectionMatrix = mat4.create();
+ const normalMatrix = mat4.create();
mat4.lookAt(
viewMatrix,
function frame() {
mat4.rotateY(modelMatrix, modelMatrix, Math.PI / 180);
+ mat4.invert(normalMatrix, modelMatrix);
+ mat4.transpose(normalMatrix, normalMatrix);
+
gl.uniformMatrix4fv(programInfo.uniformLocations.modelMatrix, false, modelMatrix);
+ gl.uniformMatrix4fv(programInfo.uniformLocations.normalMatrix, false, normalMatrix);
gl.drawArrays(gl.TRIANGLES, 0, vertexBuffer.data.length / 3);
📄 src/shaders/3d.v.glsl
uniform mat4 modelMatrix;
uniform mat4 viewMatrix;
uniform mat4 projectionMatrix;
+ uniform mat4 normalMatrix;
uniform vec4 colors[6];
uniform vec3 directionalLightVector;
void main() {
gl_Position = projectionMatrix * viewMatrix * modelMatrix * vec4(position, 1.0);
- float intensity = dot(normal, normalize(directionalLightVector));
+ vec3 transformedNormal = (normalMatrix * vec4(normal, 1.0)).xyz;
+ float intensity = dot(transformedNormal, normalize(directionalLightVector));
vColor.rgb = vec3(0.3, 0.3, 0.3) + colors[int(colorIndex)].rgb * intensity;
vColor.a = 1.0;

Cool, looks good enough!
That's it for today.
See you tomorrow 👋
Join mailing list to get new posts right to your inbox
Built with
![]()
Day 19. Rendering multiple objects
This is a series of blog posts related to WebGL. New post will be available every day


Join mailing list to get new posts right to your inbox
Built with
![]()
Hey 👋
Welcome to WebGL month.
In previous tutorials we've been rendering only a signle object, but typical 3D scene consists of a multiple objects. Today we're going to learn how to render many objects on scene.
Since we're rendering objects with a solid color, let's get rid of colorIndex attribute and pass a signle color via uniform
📄 src/3d.js
const { vertices, normals } = parseObj(monkeyObj);
- const faceColors = [
- [0.5, 0.5, 0.5, 1.0]
- ];
-
- const colors = [];
-
- for (var j = 0; j < vertices.length / 3; ++j) {
- colors.push(0, 0, 0, 0);
- }
-
- faceColors.forEach((color, index) => {
- gl.uniform4fv(programInfo.uniformLocations[`colors[${index}]`], color);
- });
+ gl.uniform3fv(programInfo.uniformLocations.color, [0.5, 0.5, 0.5]);
const vertexBuffer = new GLBuffer(gl, gl.ARRAY_BUFFER, vertices, gl.STATIC_DRAW);
- const colorsBuffer = new GLBuffer(gl, gl.ARRAY_BUFFER, new Float32Array(colors), gl.STATIC_DRAW);
const normalsBuffer = new GLBuffer(gl, gl.ARRAY_BUFFER, normals, gl.STATIC_DRAW);
vertexBuffer.bind(gl);
gl.vertexAttribPointer(programInfo.attributeLocations.position, 3, gl.FLOAT, false, 0, 0);
- colorsBuffer.bind(gl);
- gl.vertexAttribPointer(programInfo.attributeLocations.colorIndex, 1, gl.FLOAT, false, 0, 0);
-
normalsBuffer.bind(gl);
gl.vertexAttribPointer(programInfo.attributeLocations.normal, 3, gl.FLOAT, false, 0, 0);
📄 src/shaders/3d.v.glsl
attribute vec3 position;
attribute vec3 normal;
- attribute float colorIndex;
uniform mat4 modelMatrix;
uniform mat4 viewMatrix;
uniform mat4 projectionMatrix;
uniform mat4 normalMatrix;
- uniform vec4 colors[6];
+ uniform vec3 color;
uniform vec3 directionalLightVector;
varying vec4 vColor;
vec3 transformedNormal = (normalMatrix * vec4(normal, 1.0)).xyz;
float intensity = dot(transformedNormal, normalize(directionalLightVector));
- vColor.rgb = vec3(0.3, 0.3, 0.3) + colors[int(colorIndex)].rgb * intensity;
+ vColor.rgb = vec3(0.3, 0.3, 0.3) + color * intensity;
vColor.a = 1.0;
}
We'll need a helper class to store object related info
📄 src/Object3D.js
export class Object3D {
constructor() {
}
}
Each object should contain it's own vertices and normals
📄 src/Object3D.js
+ import { parseObj } from "./gl-helpers";
+
export class Object3D {
- constructor() {
-
- }
+ constructor(source) {
+ const { vertices, normals } = parseObj(source);
+
+ this.vertices = vertices;
+ this.normals = normals;
+ }
}
As well as a model matrix to store object transform
📄 src/Object3D.js
import { parseObj } from "./gl-helpers";
+ import { mat4 } from "gl-matrix";
export class Object3D {
constructor(source) {
this.vertices = vertices;
this.normals = normals;
+
+ this.modelMatrix = mat4.create();
}
}
Since normal matrix is computable from model matrix it makes sense to define a getter
📄 src/Object3D.js
this.normals = normals;
this.modelMatrix = mat4.create();
+ this._normalMatrix = mat4.create();
+ }
+
+ get normalMatrix () {
+ mat4.invert(this._normalMatrix, this.modelMatrix);
+ mat4.transpose(this._normalMatrix, this._normalMatrix);
+
+ return this._normalMatrix;
}
}
Now we can refactor our code and use new helper class
📄 src/3d.js
import { compileShader, setupShaderInput, parseObj } from './gl-helpers';
import { GLBuffer } from './GLBuffer';
import monkeyObj from '../assets/objects/monkey.obj';
+ import { Object3D } from './Object3D';
const canvas = document.querySelector('canvas');
const gl = canvas.getContext('webgl');
const programInfo = setupShaderInput(gl, program, vShaderSource, fShaderSource);
- const { vertices, normals } = parseObj(monkeyObj);
+ const monkey = new Object3D(monkeyObj);
gl.uniform3fv(programInfo.uniformLocations.color, [0.5, 0.5, 0.5]);
- const vertexBuffer = new GLBuffer(gl, gl.ARRAY_BUFFER, vertices, gl.STATIC_DRAW);
- const normalsBuffer = new GLBuffer(gl, gl.ARRAY_BUFFER, normals, gl.STATIC_DRAW);
+ const vertexBuffer = new GLBuffer(gl, gl.ARRAY_BUFFER, monkey.vertices, gl.STATIC_DRAW);
+ const normalsBuffer = new GLBuffer(gl, gl.ARRAY_BUFFER, monkey.normals, gl.STATIC_DRAW);
vertexBuffer.bind(gl);
gl.vertexAttribPointer(programInfo.attributeLocations.position, 3, gl.FLOAT, false, 0, 0);
normalsBuffer.bind(gl);
gl.vertexAttribPointer(programInfo.attributeLocations.normal, 3, gl.FLOAT, false, 0, 0);
- const modelMatrix = mat4.create();
const viewMatrix = mat4.create();
const projectionMatrix = mat4.create();
- const normalMatrix = mat4.create();
mat4.lookAt(
viewMatrix,
100,
);
- gl.uniformMatrix4fv(programInfo.uniformLocations.modelMatrix, false, modelMatrix);
gl.uniformMatrix4fv(programInfo.uniformLocations.viewMatrix, false, viewMatrix);
gl.uniformMatrix4fv(programInfo.uniformLocations.projectionMatrix, false, projectionMatrix);
gl.viewport(0, 0, canvas.width, canvas.height);
- gl.drawArrays(gl.TRIANGLES, 0, vertexBuffer.data.length / 3);
-
function frame() {
- mat4.rotateY(modelMatrix, modelMatrix, Math.PI / 180);
-
- mat4.invert(normalMatrix, modelMatrix);
- mat4.transpose(normalMatrix, normalMatrix);
+ mat4.rotateY(monkey.modelMatrix, monkey.modelMatrix, Math.PI / 180);
- gl.uniformMatrix4fv(programInfo.uniformLocations.modelMatrix, false, modelMatrix);
- gl.uniformMatrix4fv(programInfo.uniformLocations.normalMatrix, false, normalMatrix);
+ gl.uniformMatrix4fv(programInfo.uniformLocations.modelMatrix, false, monkey.modelMatrix);
+ gl.uniformMatrix4fv(programInfo.uniformLocations.normalMatrix, false, monkey.normalMatrix);
gl.drawArrays(gl.TRIANGLES, 0, vertexBuffer.data.length / 3);
Now let's import more objects
📄 src/3d.js
import { compileShader, setupShaderInput, parseObj } from './gl-helpers';
import { GLBuffer } from './GLBuffer';
import monkeyObj from '../assets/objects/monkey.obj';
+ import torusObj from '../assets/objects/torus.obj';
+ import coneObj from '../assets/objects/cone.obj';
+
import { Object3D } from './Object3D';
const canvas = document.querySelector('canvas');
const programInfo = setupShaderInput(gl, program, vShaderSource, fShaderSource);
const monkey = new Object3D(monkeyObj);
+ const torus = new Object3D(torusObj);
+ const cone = new Object3D(coneObj);
gl.uniform3fv(programInfo.uniformLocations.color, [0.5, 0.5, 0.5]);
and store them in a collection
📄 src/3d.js
const torus = new Object3D(torusObj);
const cone = new Object3D(coneObj);
+ const objects = [
+ monkey,
+ torus,
+ cone,
+ ];
+
gl.uniform3fv(programInfo.uniformLocations.color, [0.5, 0.5, 0.5]);
const vertexBuffer = new GLBuffer(gl, gl.ARRAY_BUFFER, monkey.vertices, gl.STATIC_DRAW);
and instead of issuing a draw call for just a monkey, we'll iterate over collection
📄 src/3d.js
gl.viewport(0, 0, canvas.width, canvas.height);
function frame() {
- mat4.rotateY(monkey.modelMatrix, monkey.modelMatrix, Math.PI / 180);
+ objects.forEach((object) => {
+ mat4.rotateY(object.modelMatrix, object.modelMatrix, Math.PI / 180);
- gl.uniformMatrix4fv(programInfo.uniformLocations.modelMatrix, false, monkey.modelMatrix);
- gl.uniformMatrix4fv(programInfo.uniformLocations.normalMatrix, false, monkey.normalMatrix);
+ gl.uniformMatrix4fv(programInfo.uniformLocations.modelMatrix, false, object.modelMatrix);
+ gl.uniformMatrix4fv(programInfo.uniformLocations.normalMatrix, false, object.normalMatrix);
- gl.drawArrays(gl.TRIANGLES, 0, vertexBuffer.data.length / 3);
+ gl.drawArrays(gl.TRIANGLES, 0, vertexBuffer.data.length / 3);
+ });
requestAnimationFrame(frame);
}
Ok, but why do we still have only monkey rendered?
No wonder, vertex and normals buffer stays the same, so we just render the same object N times. Let's update vertex and normals buffer each time we want to render an object
📄 src/3d.js
gl.uniformMatrix4fv(programInfo.uniformLocations.modelMatrix, false, object.modelMatrix);
gl.uniformMatrix4fv(programInfo.uniformLocations.normalMatrix, false, object.normalMatrix);
+ vertexBuffer.setData(gl, object.vertices, gl.STATIC_DRAW);
+ normalsBuffer.setData(gl, object.normals, gl.STATIC_DRAW);
+
gl.drawArrays(gl.TRIANGLES, 0, vertexBuffer.data.length / 3);
});

Cool, we've rendered multiple objects, but they are all in the same spot. Let's fix that
Each object will have a property storing a position in space
📄 src/3d.js
const programInfo = setupShaderInput(gl, program, vShaderSource, fShaderSource);
- const monkey = new Object3D(monkeyObj);
- const torus = new Object3D(torusObj);
- const cone = new Object3D(coneObj);
+ const monkey = new Object3D(monkeyObj, [0, 0, 0]);
+ const torus = new Object3D(torusObj, [-3, 0, 0]);
+ const cone = new Object3D(coneObj, [3, 0, 0]);
const objects = [
monkey,
📄 src/Object3D.js
import { mat4 } from "gl-matrix";
export class Object3D {
- constructor(source) {
+ constructor(source, position) {
const { vertices, normals } = parseObj(source);
this.vertices = vertices;
this.normals = normals;
+ this.position = position;
this.modelMatrix = mat4.create();
this._normalMatrix = mat4.create();
and this position should be respected by model matrix
📄 src/Object3D.js
this.position = position;
this.modelMatrix = mat4.create();
+ mat4.fromTranslation(this.modelMatrix, position);
this._normalMatrix = mat4.create();
}
And one more thing. We can also define a color specific to each object
📄 src/3d.js
const programInfo = setupShaderInput(gl, program, vShaderSource, fShaderSource);
- const monkey = new Object3D(monkeyObj, [0, 0, 0]);
- const torus = new Object3D(torusObj, [-3, 0, 0]);
- const cone = new Object3D(coneObj, [3, 0, 0]);
+ const monkey = new Object3D(monkeyObj, [0, 0, 0], [1, 0, 0]);
+ const torus = new Object3D(torusObj, [-3, 0, 0], [0, 1, 0]);
+ const cone = new Object3D(coneObj, [3, 0, 0], [0, 0, 1]);
const objects = [
monkey,
cone,
];
- gl.uniform3fv(programInfo.uniformLocations.color, [0.5, 0.5, 0.5]);
-
const vertexBuffer = new GLBuffer(gl, gl.ARRAY_BUFFER, monkey.vertices, gl.STATIC_DRAW);
const normalsBuffer = new GLBuffer(gl, gl.ARRAY_BUFFER, monkey.normals, gl.STATIC_DRAW);
gl.uniformMatrix4fv(programInfo.uniformLocations.modelMatrix, false, object.modelMatrix);
gl.uniformMatrix4fv(programInfo.uniformLocations.normalMatrix, false, object.normalMatrix);
+ gl.uniform3fv(programInfo.uniformLocations.color, object.color);
+
vertexBuffer.setData(gl, object.vertices, gl.STATIC_DRAW);
normalsBuffer.setData(gl, object.normals, gl.STATIC_DRAW);
📄 src/Object3D.js
import { mat4 } from "gl-matrix";
export class Object3D {
- constructor(source, position) {
+ constructor(source, position, color) {
const { vertices, normals } = parseObj(source);
this.vertices = vertices;
this.modelMatrix = mat4.create();
mat4.fromTranslation(this.modelMatrix, position);
this._normalMatrix = mat4.create();
+
+ this.color = color;
}
get normalMatrix () {

Yay! We now can render multiple objects with individual transforms and colors 🎉
That's it for today, see you tomorrow 👋
Join mailing list to get new posts right to your inbox
Built with
![]()
Day 20. Texturing 3d objects
This is a series of blog posts related to WebGL. New post will be available every day


Join mailing list to get new posts right to your inbox
Built with
![]()
Hey 👋 Welcome to WebGL month
Today we're going to explore how to add textures to 3d objects.
First we'll need a new entry point
📄 index.html
</head>
<body>
<canvas></canvas>
- <script src="./dist/3d.js"></script>
+ <script src="./dist/3d-textured.js"></script>
</body>
</html>
📄 src/3d-textured.js
console.log('Hello textures');
📄 webpack.config.js
texture: './src/texture.js',
'rotating-square': './src/rotating-square.js',
'3d': './src/3d.js',
+ '3d-textured': './src/3d-textured.js',
},
output: {
Now let's create simple shaders to render a 3d object with solid color. Learn more in this tutorial
📄 src/shaders/3d-textured.f.glsl
precision mediump float;
void main() {
gl_FragColor = vec4(1, 0, 0, 1);
}
📄 src/shaders/3d-textured.v.glsl
attribute vec3 position;
uniform mat4 modelMatrix;
uniform mat4 viewMatrix;
uniform mat4 projectionMatrix;
void main() {
gl_Position = projectionMatrix * viewMatrix * modelMatrix * vec4(position, 1.0);
}
We'll need a canvas, webgl context and make canvas fullscreen
📄 src/3d-textured.js
- console.log('Hello textures');
+ const canvas = document.querySelector('canvas');
+ const gl = canvas.getContext('webgl');
+
+ const width = document.body.offsetWidth;
+ const height = document.body.offsetHeight;
+
+ canvas.width = width * devicePixelRatio;
+ canvas.height = height * devicePixelRatio;
+
+ canvas.style.width = `${width}px`;
+ canvas.style.height = `${height}px`;
Create and compile shaders. Learn more here
📄 src/3d-textured.js
+ import vShaderSource from './shaders/3d-textured.v.glsl';
+ import fShaderSource from './shaders/3d-textured.f.glsl';
+ import { compileShader } from './gl-helpers';
+
const canvas = document.querySelector('canvas');
const gl = canvas.getContext('webgl');
canvas.style.width = `${width}px`;
canvas.style.height = `${height}px`;
+
+ const vShader = gl.createShader(gl.VERTEX_SHADER);
+ const fShader = gl.createShader(gl.FRAGMENT_SHADER);
+
+ compileShader(gl, vShader, vShaderSource);
+ compileShader(gl, fShader, fShaderSource);
Create, link and use webgl program
📄 src/3d-textured.js
compileShader(gl, vShader, vShaderSource);
compileShader(gl, fShader, fShaderSource);
+
+ const program = gl.createProgram();
+
+ gl.attachShader(program, vShader);
+ gl.attachShader(program, fShader);
+
+ gl.linkProgram(program);
+ gl.useProgram(program);
Enable depth test since we're rendering 3d. Learn more here
📄 src/3d-textured.js
gl.linkProgram(program);
gl.useProgram(program);
+
+ gl.enable(gl.DEPTH_TEST);
Setup shader input. Learn more here
📄 src/3d-textured.js
import vShaderSource from './shaders/3d-textured.v.glsl';
import fShaderSource from './shaders/3d-textured.f.glsl';
- import { compileShader } from './gl-helpers';
+ import { compileShader, setupShaderInput } from './gl-helpers';
const canvas = document.querySelector('canvas');
const gl = canvas.getContext('webgl');
gl.useProgram(program);
gl.enable(gl.DEPTH_TEST);
+
+ const programInfo = setupShaderInput(gl, program, vShaderSource, fShaderSource);
Now let's go to Blender and create a cube, but make sure to check "Generate UVs" so that blender can map cube vertices to a plain image.

Next open "UV Editing" view

Enter edit mode

Unwrapped cube looks good already, so we can export UV layout

Now if we open exported image in some editor we'll see something like this

Cool, now we can actually fill our texture with some content
Let's render a minecraft dirt block

Next we need to export our object from blender, but don't forget to triangulate it first

And finally export our object

Now let's import our cube and create an object. Learn here about this helper class
📄 src/3d-textured.js
import vShaderSource from './shaders/3d-textured.v.glsl';
import fShaderSource from './shaders/3d-textured.f.glsl';
import { compileShader, setupShaderInput } from './gl-helpers';
+ import cubeObj from '../assets/objects/textured-cube.obj';
+ import { Object3D } from './Object3D';
const canvas = document.querySelector('canvas');
const gl = canvas.getContext('webgl');
gl.enable(gl.DEPTH_TEST);
const programInfo = setupShaderInput(gl, program, vShaderSource, fShaderSource);
+
+ const cube = new Object3D(cubeObj, [0, 0, 0], [1, 0, 0]);
If we'll look into object source, we'll see lines like below
vt 0.625000 0.000000
vt 0.375000 0.250000
vt 0.375000 0.000000
vt 0.625000 0.250000
vt 0.375000 0.500000
These are texture coordinates which are referenced by faces in the 2nd "property"
f 2/1/1 3/2/1 1/3/1
# vertexIndex / textureCoordinateIndex / normalIndex
so we need to update our parser to support texture coordinates
📄 src/gl-helpers.js
export function parseObj(objSource) {
const _vertices = [];
const _normals = [];
+ const _texCoords = [];
+
const vertexIndices = [];
const normalIndices = [];
+ const texCoordIndices = [];
objSource.split('\n').forEach(line => {
if (line.startsWith('v ')) {
_normals.push(parseVec(line, 'vn '));
}
+ if (line.startsWith('vt ')) {
+ _texCoords.push(parseVec(line, 'vt '));
+ }
+
if (line.startsWith('f ')) {
const parsedFace = parseFace(line);
vertexIndices.push(...parsedFace.map(face => face[0] - 1));
+ texCoordIndices.push(...parsedFace.map(face => face[1] - 1));
normalIndices.push(...parsedFace.map(face => face[2] - 1));
}
});
const vertices = [];
const normals = [];
+ const texCoords = [];
for (let i = 0; i < vertexIndices.length; i++) {
const vertexIndex = vertexIndices[i];
const normalIndex = normalIndices[i];
+ const texCoordIndex = texCoordIndices[i];
const vertex = _vertices[vertexIndex];
const normal = _normals[normalIndex];
+ const texCoord = _texCoords[texCoordIndex];
vertices.push(...vertex);
normals.push(...normal);
+
+ if (texCoord) {
+ texCoords.push(...texCoord);
+ }
}
return {
vertices: new Float32Array(vertices),
- normals: new Float32Array(normals),
+ normals: new Float32Array(normals),
+ texCoords: new Float32Array(texCoords),
};
}
and add this property to Object3D
📄 src/Object3D.js
export class Object3D {
constructor(source, position, color) {
- const { vertices, normals } = parseObj(source);
+ const { vertices, normals, texCoords } = parseObj(source);
this.vertices = vertices;
this.normals = normals;
this.position = position;
+ this.texCoords = texCoords;
this.modelMatrix = mat4.create();
mat4.fromTranslation(this.modelMatrix, position);
Now we need to define gl buffers. Learn more about this helper class here
📄 src/3d-textured.js
import { compileShader, setupShaderInput } from './gl-helpers';
import cubeObj from '../assets/objects/textured-cube.obj';
import { Object3D } from './Object3D';
+ import { GLBuffer } from './GLBuffer';
const canvas = document.querySelector('canvas');
const gl = canvas.getContext('webgl');
const programInfo = setupShaderInput(gl, program, vShaderSource, fShaderSource);
const cube = new Object3D(cubeObj, [0, 0, 0], [1, 0, 0]);
+
+ const vertexBuffer = new GLBuffer(gl, gl.ARRAY_BUFFER, cube.vertices, gl.STATIC_DRAW);
+ const texCoordsBuffer = new GLBuffer(gl, gl.ARRAY_BUFFER, cube.texCoords, gl.STATIC_DRAW);
We also need to define an attribute to pass tex coords to the vertex shader
📄 src/shaders/3d-textured.v.glsl
attribute vec3 position;
+ attribute vec2 texCoord;
uniform mat4 modelMatrix;
uniform mat4 viewMatrix;
and varying to pass texture coordinate to the fragment shader. Learn more here
📄 src/shaders/3d-textured.f.glsl
precision mediump float;
+ varying vec2 vTexCoord;
+
void main() {
gl_FragColor = vec4(1, 0, 0, 1);
}
📄 src/shaders/3d-textured.v.glsl
uniform mat4 viewMatrix;
uniform mat4 projectionMatrix;
+ varying vec2 vTexCoord;
+
void main() {
gl_Position = projectionMatrix * viewMatrix * modelMatrix * vec4(position, 1.0);
+
+ vTexCoord = texCoord;
}
Let's setup attributes
📄 src/3d-textured.js
const vertexBuffer = new GLBuffer(gl, gl.ARRAY_BUFFER, cube.vertices, gl.STATIC_DRAW);
const texCoordsBuffer = new GLBuffer(gl, gl.ARRAY_BUFFER, cube.texCoords, gl.STATIC_DRAW);
+
+ vertexBuffer.bind(gl);
+ gl.vertexAttribPointer(programInfo.attributeLocations.position, 3, gl.FLOAT, false, 0, 0);
+
+ texCoordsBuffer.bind(gl);
+ gl.vertexAttribPointer(programInfo.attributeLocations.texCoord, 2, gl.FLOAT, false, 0, 0);
Create and setup view and projection matrix. Learn more here
📄 src/3d-textured.js
+ import { mat4 } from 'gl-matrix';
+
import vShaderSource from './shaders/3d-textured.v.glsl';
import fShaderSource from './shaders/3d-textured.f.glsl';
import { compileShader, setupShaderInput } from './gl-helpers';
texCoordsBuffer.bind(gl);
gl.vertexAttribPointer(programInfo.attributeLocations.texCoord, 2, gl.FLOAT, false, 0, 0);
+
+ const viewMatrix = mat4.create();
+ const projectionMatrix = mat4.create();
+
+ mat4.lookAt(
+ viewMatrix,
+ [0, 0, -7],
+ [0, 0, 0],
+ [0, 1, 0],
+ );
+
+ mat4.perspective(
+ projectionMatrix,
+ Math.PI / 360 * 90,
+ canvas.width / canvas.height,
+ 0.01,
+ 100,
+ );
Pass view and projection matrices to shader via uniforms
📄 src/3d-textured.js
0.01,
100,
);
+
+ gl.uniformMatrix4fv(programInfo.uniformLocations.viewMatrix, false, viewMatrix);
+ gl.uniformMatrix4fv(programInfo.uniformLocations.projectionMatrix, false, projectionMatrix);
Setup viewport
📄 src/3d-textured.js
gl.uniformMatrix4fv(programInfo.uniformLocations.viewMatrix, false, viewMatrix);
gl.uniformMatrix4fv(programInfo.uniformLocations.projectionMatrix, false, projectionMatrix);
+
+ gl.viewport(0, 0, canvas.width, canvas.height);
and finally render our cube
📄 src/3d-textured.js
gl.uniformMatrix4fv(programInfo.uniformLocations.projectionMatrix, false, projectionMatrix);
gl.viewport(0, 0, canvas.width, canvas.height);
+
+ function frame() {
+ mat4.rotateY(cube.modelMatrix, cube.modelMatrix, Math.PI / 180);
+
+ gl.uniformMatrix4fv(programInfo.uniformLocations.modelMatrix, false, cube.modelMatrix);
+ gl.uniformMatrix4fv(programInfo.uniformLocations.normalMatrix, false, cube.normalMatrix);
+
+ gl.drawArrays(gl.TRIANGLES, 0, vertexBuffer.data.length / 3);
+
+ requestAnimationFrame(frame);
+ }
+
+ frame();
but before rendering the cube we need to load our texture image. Learn more about loadImage helper here
📄 src/3d-textured.js
import vShaderSource from './shaders/3d-textured.v.glsl';
import fShaderSource from './shaders/3d-textured.f.glsl';
- import { compileShader, setupShaderInput } from './gl-helpers';
+ import { compileShader, setupShaderInput, loadImage } from './gl-helpers';
import cubeObj from '../assets/objects/textured-cube.obj';
import { Object3D } from './Object3D';
import { GLBuffer } from './GLBuffer';
+ import textureSource from '../assets/images/cube-texture.png';
const canvas = document.querySelector('canvas');
const gl = canvas.getContext('webgl');
requestAnimationFrame(frame);
}
- frame();
+ loadImage(textureSource).then((image) => {
+ frame();
+ });
📄 webpack.config.js
},
{
- test: /\.jpg$/,
+ test: /\.(jpg|png)$/,
use: 'url-loader',
},
],
and create webgl texture. Learn more here
📄 src/3d-textured.js
import vShaderSource from './shaders/3d-textured.v.glsl';
import fShaderSource from './shaders/3d-textured.f.glsl';
- import { compileShader, setupShaderInput, loadImage } from './gl-helpers';
+ import { compileShader, setupShaderInput, loadImage, createTexture, setImage } from './gl-helpers';
import cubeObj from '../assets/objects/textured-cube.obj';
import { Object3D } from './Object3D';
import { GLBuffer } from './GLBuffer';
}
loadImage(textureSource).then((image) => {
+ const texture = createTexture(gl);
+ setImage(gl, texture, image);
+
frame();
});
and read fragment colors from texture
📄 src/shaders/3d-textured.f.glsl
precision mediump float;
+ uniform sampler2D texture;
varying vec2 vTexCoord;
void main() {
- gl_FragColor = vec4(1, 0, 0, 1);
+ gl_FragColor = texture2D(texture, vTexCoord);
}
Let's move camera a bit to top to see the "grass" side
📄 src/3d-textured.js
mat4.lookAt(
viewMatrix,
- [0, 0, -7],
+ [0, 4, -7],
[0, 0, 0],
[0, 1, 0],
);
Something is wrong, top part is partially white, but why?
Turns out that image is flipped when read by GPU, so we need to flip it back
Turns out that image is flipped when read by GPU, so we need to flip it back
📄 src/shaders/3d-textured.f.glsl
varying vec2 vTexCoord;
void main() {
- gl_FragColor = texture2D(texture, vTexCoord);
+ gl_FragColor = texture2D(texture, vTexCoord * vec2(1, -1) + vec2(0, 1));
}

Cool, we rendered a minecraft cube with WebGL 🎉
That's it for today, see you tomorrow 👋!
Join mailing list to get new posts right to your inbox
Built with
![]()
Day 21. Rendering a minecraft terrain
This is a series of blog posts related to WebGL. New post will be available every day


Join mailing list to get new posts right to your inbox
Built with
![]()
Hey 👋
Welcome to WebGL month.
Yesterday we rendered a single minecraft dirt cube, let's render a terrain today!
We'll need to store each block position in separate transform matrix
📄 src/3d-textured.js
gl.viewport(0, 0, canvas.width, canvas.height);
+ const matrices = [];
+
function frame() {
mat4.rotateY(cube.modelMatrix, cube.modelMatrix, Math.PI / 180);
Now let's create 10k blocks iteration over x and z axis from -50 to 50
📄 src/3d-textured.js
const matrices = [];
+ for (let i = -50; i < 50; i++) {
+ for (let j = -50; j < 50; j++) {
+ const matrix = mat4.create();
+ }
+ }
+
function frame() {
mat4.rotateY(cube.modelMatrix, cube.modelMatrix, Math.PI / 180);
Each block is a size of 2 (vertex coordinates are in [-1..1] range) so positions should be divisible by two
📄 src/3d-textured.js
for (let i = -50; i < 50; i++) {
for (let j = -50; j < 50; j++) {
const matrix = mat4.create();
+
+ const position = [i * 2, (Math.floor(Math.random() * 2) - 1) * 2, j * 2];
}
}
Now we need to create a transform matrix. Let's use ma4.fromTranslation
📄 src/3d-textured.js
const matrix = mat4.create();
const position = [i * 2, (Math.floor(Math.random() * 2) - 1) * 2, j * 2];
+ mat4.fromTranslation(matrix, position);
}
}
Let's also rotate each block around Y axis to make terrain look more random
📄 src/3d-textured.js
gl.viewport(0, 0, canvas.width, canvas.height);
const matrices = [];
+ const rotationMatrix = mat4.create();
for (let i = -50; i < 50; i++) {
for (let j = -50; j < 50; j++) {
const position = [i * 2, (Math.floor(Math.random() * 2) - 1) * 2, j * 2];
mat4.fromTranslation(matrix, position);
+
+ mat4.fromRotation(rotationMatrix, Math.PI * Math.round(Math.random() * 4), [0, 1, 0]);
+ mat4.multiply(matrix, matrix, rotationMatrix);
}
}
and finally push matrix of each block to matrices collection
📄 src/3d-textured.js
mat4.fromRotation(rotationMatrix, Math.PI * Math.round(Math.random() * 4), [0, 1, 0]);
mat4.multiply(matrix, matrix, rotationMatrix);
+
+ matrices.push(matrix);
}
}
Since our blocks are static, we don't need a rotation transform in each frame
📄 src/3d-textured.js
}
function frame() {
- mat4.rotateY(cube.modelMatrix, cube.modelMatrix, Math.PI / 180);
-
gl.uniformMatrix4fv(programInfo.uniformLocations.modelMatrix, false, cube.modelMatrix);
gl.uniformMatrix4fv(programInfo.uniformLocations.normalMatrix, false, cube.normalMatrix);
Now we'll need to iterate over matrices collection and issue a draw call for each cube with its transform matrix passed to uniform
📄 src/3d-textured.js
}
function frame() {
- gl.uniformMatrix4fv(programInfo.uniformLocations.modelMatrix, false, cube.modelMatrix);
- gl.uniformMatrix4fv(programInfo.uniformLocations.normalMatrix, false, cube.normalMatrix);
+ matrices.forEach((matrix) => {
+ gl.uniformMatrix4fv(programInfo.uniformLocations.modelMatrix, false, matrix);
+ gl.uniformMatrix4fv(programInfo.uniformLocations.normalMatrix, false, cube.normalMatrix);
- gl.drawArrays(gl.TRIANGLES, 0, vertexBuffer.data.length / 3);
+ gl.drawArrays(gl.TRIANGLES, 0, vertexBuffer.data.length / 3);
+ });
requestAnimationFrame(frame);
}
Now let's create an animation of rotating camera. Camera has a position and a point where it is pointed. So to implement this, we need to rotate focus point around camera position. Let's first get rid of static view matrix
📄 src/3d-textured.js
const viewMatrix = mat4.create();
const projectionMatrix = mat4.create();
- mat4.lookAt(viewMatrix, [0, 4, -7], [0, 0, 0], [0, 1, 0]);
-
mat4.perspective(projectionMatrix, (Math.PI / 360) * 90, canvas.width / canvas.height, 0.01, 100);
gl.uniformMatrix4fv(programInfo.uniformLocations.viewMatrix, false, viewMatrix);
Define camera position, camera focus point vector and focus point transform matrix
📄 src/3d-textured.js
- import { mat4 } from 'gl-matrix';
+ import { mat4, vec3 } from 'gl-matrix';
import vShaderSource from './shaders/3d-textured.v.glsl';
import fShaderSource from './shaders/3d-textured.f.glsl';
}
}
+ const cameraPosition = [0, 10, 0];
+ const cameraFocusPoint = vec3.fromValues(30, 0, 0);
+ const cameraFocusPointMatrix = mat4.create();
+
+ mat4.fromTranslation(cameraFocusPointMatrix, cameraFocusPoint);
+
function frame() {
matrices.forEach((matrix) => {
gl.uniformMatrix4fv(programInfo.uniformLocations.modelMatrix, false, matrix);
Our camera is located in 0.0.0, so we need to translate camera focus point to 0.0.0, rotate it, and translate back to original position
📄 src/3d-textured.js
mat4.fromTranslation(cameraFocusPointMatrix, cameraFocusPoint);
function frame() {
+ mat4.translate(cameraFocusPointMatrix, cameraFocusPointMatrix, [-30, 0, 0]);
+ mat4.rotateY(cameraFocusPointMatrix, cameraFocusPointMatrix, Math.PI / 360);
+ mat4.translate(cameraFocusPointMatrix, cameraFocusPointMatrix, [30, 0, 0]);
+
matrices.forEach((matrix) => {
gl.uniformMatrix4fv(programInfo.uniformLocations.modelMatrix, false, matrix);
gl.uniformMatrix4fv(programInfo.uniformLocations.normalMatrix, false, cube.normalMatrix);
Final step – update view matrix uniform
📄 src/3d-textured.js
mat4.rotateY(cameraFocusPointMatrix, cameraFocusPointMatrix, Math.PI / 360);
mat4.translate(cameraFocusPointMatrix, cameraFocusPointMatrix, [30, 0, 0]);
+ mat4.getTranslation(cameraFocusPoint, cameraFocusPointMatrix);
+
+ mat4.lookAt(viewMatrix, cameraPosition, cameraFocusPoint, [0, 1, 0]);
+ gl.uniformMatrix4fv(programInfo.uniformLocations.viewMatrix, false, viewMatrix);
+
matrices.forEach((matrix) => {
gl.uniformMatrix4fv(programInfo.uniformLocations.modelMatrix, false, matrix);
- gl.uniformMatrix4fv(programInfo.uniformLocations.normalMatrix, false, cube.normalMatrix);
gl.drawArrays(gl.TRIANGLES, 0, vertexBuffer.data.length / 3);
});
That's it!
This approach is not very performant though, as we're issuing 2 gl calls for each object, so it is a 20k of gl calls each frame. GL calls are expensive, so we'll need to reduce this number. We'll learn a great technique tomorrow!
Join mailing list to get new posts right to your inbox
Built with
![]()
Day 22. Optimizing minecraft terrain by reducing number of webgl calls by 5000 times
This is a series of blog posts related to WebGL. New post will be available every day
Join mailing list to get new posts right to your inbox
Built with
![]()
Hey 👋
Welcome to WebGL month
Yesterday we've rendered minecraft terrain, but implementation wasn't optimal. We had to issue two gl calls for each block. One to update model matrix uniform, another to issue a draw call. There is a way to render the whole scene with a SINGLE call, so that way we'll reduce number of calls by 5000 times 🤯.
These technique is called WebGL instancing. Our cubes share the same vertex and tex coord data, the only difference is model matrix. Instead of passing it as uniform we can define an attribute
📄 src/shaders/3d-textured.v.glsl
attribute vec3 position;
attribute vec2 texCoord;
+ attribute mat4 modelMatrix;
- uniform mat4 modelMatrix;
uniform mat4 viewMatrix;
uniform mat4 projectionMatrix;
Matrix attributes are actually a number of vec4 attributes, so if mat4 attribute location is 0, we'll have 4 separate attributes with locations 0, 1, 2, 3. Our setupShaderInput helper doesn't support these, so we'll need to enable each attribute manually
📄 src/3d-textured.js
const programInfo = setupShaderInput(gl, program, vShaderSource, fShaderSource);
+ for (let i = 0; i < 4; i++) {
+ gl.enableVertexAttribArray(programInfo.attributeLocations.modelMatrix + i);
+ }
+
const cube = new Object3D(cubeObj, [0, 0, 0], [1, 0, 0]);
const vertexBuffer = new GLBuffer(gl, gl.ARRAY_BUFFER, cube.vertices, gl.STATIC_DRAW);
Now we need to define a Float32Array for matrices data. The size is 100 * 100 (size of our world) * 4 * 4 (dimensions of the model matrix)
📄 src/3d-textured.js
gl.viewport(0, 0, canvas.width, canvas.height);
- const matrices = [];
+ const matrices = new Float32Array(100 * 100 * 4 * 4);
const rotationMatrix = mat4.create();
for (let i = -50; i < 50; i++) {
To save resources we can use a single model matrix for all cubes while filling matrices array with data
📄 src/3d-textured.js
gl.viewport(0, 0, canvas.width, canvas.height);
const matrices = new Float32Array(100 * 100 * 4 * 4);
+ const modelMatrix = mat4.create();
const rotationMatrix = mat4.create();
for (let i = -50; i < 50; i++) {
for (let j = -50; j < 50; j++) {
- const matrix = mat4.create();
-
const position = [i * 2, (Math.floor(Math.random() * 2) - 1) * 2, j * 2];
- mat4.fromTranslation(matrix, position);
+ mat4.fromTranslation(modelMatrix, position);
mat4.fromRotation(rotationMatrix, Math.PI * Math.round(Math.random() * 4), [0, 1, 0]);
- mat4.multiply(matrix, matrix, rotationMatrix);
+ mat4.multiply(modelMatrix, modelMatrix, rotationMatrix);
matrices.push(matrix);
}
We'll also need a counter to know the offset at the matrices Float32Array to write data to an appropriate location
📄 src/3d-textured.js
const modelMatrix = mat4.create();
const rotationMatrix = mat4.create();
+ let cubeIndex = 0;
+
for (let i = -50; i < 50; i++) {
for (let j = -50; j < 50; j++) {
const position = [i * 2, (Math.floor(Math.random() * 2) - 1) * 2, j * 2];
mat4.fromRotation(rotationMatrix, Math.PI * Math.round(Math.random() * 4), [0, 1, 0]);
mat4.multiply(modelMatrix, modelMatrix, rotationMatrix);
- matrices.push(matrix);
+ modelMatrix.forEach((value, index) => {
+ matrices[cubeIndex * 4 * 4 + index] = value;
+ });
+
+ cubeIndex++;
}
}
Next we need a matrices gl buffer
📄 src/3d-textured.js
}
}
+ const matricesBuffer = new GLBuffer(gl, gl.ARRAY_BUFFER, matrices, gl.STATIC_DRAW);
+
const cameraPosition = [0, 10, 0];
const cameraFocusPoint = vec3.fromValues(30, 0, 0);
const cameraFocusPointMatrix = mat4.create();
and setup attribute pointer using stride and offset, since our buffer is interleaved. Learn more about interleaved buffers here
📄 src/3d-textured.js
const matricesBuffer = new GLBuffer(gl, gl.ARRAY_BUFFER, matrices, gl.STATIC_DRAW);
+ const offset = 4 * 4; // 4 floats 4 bytes each
+ const stride = offset * 4; // 4 rows of 4 floats
+
+ for (let i = 0; i < 4; i++) {
+ gl.vertexAttribPointer(programInfo.attributeLocations.modelMatrix + i, 4, gl.FLOAT, false, stride, i * offset);
+ }
+
const cameraPosition = [0, 10, 0];
const cameraFocusPoint = vec3.fromValues(30, 0, 0);
const cameraFocusPointMatrix = mat4.create();
Instancing itself isn't supported be webgl 1 out of the box, but available via extension, so we need to get it
📄 src/3d-textured.js
const offset = 4 * 4; // 4 floats 4 bytes each
const stride = offset * 4; // 4 rows of 4 floats
+ const ext = gl.getExtension('ANGLE_instanced_arrays');
+
for (let i = 0; i < 4; i++) {
gl.vertexAttribPointer(programInfo.attributeLocations.modelMatrix + i, 4, gl.FLOAT, false, stride, i * offset);
}
Basically what this extension does, is helps us avoid repeating vertex positions and texture coordinates for each cube, since these are the same. By using instancing we tell WebGL to render N instances of objects, reusing some attribute data for each object, and getting "unique" data for other attributes. To specify which attributes contain data for each object, we need to call vertexAttribDivisorANGLE(location, divisor) method of the extension.
Divisor is used to determine how to read data from attributes filled with data for each object.
Our modelMatrix attribute has a matrix for each object, so divisor should be 1.
We can use modelMarix A for objects 0 and 1, B for objects 2 and 3 – in this case divisor is 2.
In our case it is 1.
📄 src/3d-textured.js
for (let i = 0; i < 4; i++) {
gl.vertexAttribPointer(programInfo.attributeLocations.modelMatrix + i, 4, gl.FLOAT, false, stride, i * offset);
+ ext.vertexAttribDivisorANGLE(programInfo.attributeLocations.modelMatrix + i, 1);
}
const cameraPosition = [0, 10, 0];
Finally we can get read of iteration over all matrices, and use a single call. However we should call it on the instance of extension instead of gl itself. The last argument should be the number of instances we want to render
📄 src/3d-textured.js
mat4.lookAt(viewMatrix, cameraPosition, cameraFocusPoint, [0, 1, 0]);
gl.uniformMatrix4fv(programInfo.uniformLocations.viewMatrix, false, viewMatrix);
- matrices.forEach((matrix) => {
- gl.uniformMatrix4fv(programInfo.uniformLocations.modelMatrix, false, matrix);
-
- gl.drawArrays(gl.TRIANGLES, 0, vertexBuffer.data.length / 3);
- });
+ ext.drawArraysInstancedANGLE(gl.TRIANGLES, 0, vertexBuffer.data.length / 3, 100 * 100);
requestAnimationFrame(frame);
}
That's it! We just reduced number of gl calls by 5000 times 🎉!
WebGL instancing extension is widely support, so don't hesitate to use it whenever it makes sense.
Typical case – need to render a lot of the same objects but with different locations, colors and other type of "attributes"
Thanks for reading! See you tomorrow 👋
Join mailing list to get new posts right to your inbox
Built with
![]()
Day 23. Skybox in WebGL
This is a series of blog posts related to WebGL. New post will be available every day
Join mailing list to get new posts right to your inbox
Built with
![]()
Hey 👋
Welcome to WebGL month.
In previous tutorials we've rendered objects without any surroundings, but what if we want to add sky to our scene?
There's a special texture type which mught help us with it
We can treat our scene as a giant cube where camera is always in the center of this cube. So all we need it render this cube and apply a texture, like below

Vertex shader will have vertex positions and texCoord attribute, view and projection matrix uniforms. We don't need model matrix as our "world" cube is static
📄 src/shaders/skybox.v.glsl
attribute vec3 position;
varying vec3 vTexCoord;
uniform mat4 projectionMatrix;
uniform mat4 viewMatrix;
void main() {
}
If our cube vertices coordinates are in [-1..1] range, we can use this coordinates as texture coordinates directly
📄 src/shaders/skybox.v.glsl
uniform mat4 viewMatrix;
void main() {
-
+ vTexCoord = position;
}
And to calculate position of transformed vertex we need to multiply vertex position, view matrix and projection matrix
📄 src/shaders/skybox.v.glsl
void main() {
vTexCoord = position;
+ gl_Position = projectionMatrix * viewMatrix * vec4(position, 1.0);
}
Fragment shader should have a vTexCoord varying to receive tex coords from vertex shader
📄 src/shaders/skybox.f.glsl
precision mediump float;
varying vec3 vTexCoord;
void main() {
}
and a special type of texture – sampler cube
📄 src/shaders/skybox.f.glsl
precision mediump float;
varying vec3 vTexCoord;
+ uniform samplerCube skybox;
void main() {
-
}
and all we need to calculate fragment color is to read color from cubemap texture
📄 src/shaders/skybox.f.glsl
uniform samplerCube skybox;
void main() {
+ gl_FragColor = textureCube(skybox, vTexCoord);
}
As usual we need to get a canvas reference, webgl context, and make canvas fullscreen
📄 src/skybox.js
const canvas = document.querySelector('canvas');
const gl = canvas.getContext('webgl');
const width = document.body.offsetWidth;
const height = document.body.offsetHeight;
canvas.width = width * devicePixelRatio;
canvas.height = height * devicePixelRatio;
canvas.style.width = `${width}px`;
canvas.style.height = `${height}px`;
Setup webgl program
📄 src/skybox.js
+ import vShaderSource from './shaders/skybox.v.glsl';
+ import fShaderSource from './shaders/skybox.f.glsl';
+
+ import { compileShader, setupShaderInput } from './gl-helpers';
+
const canvas = document.querySelector('canvas');
const gl = canvas.getContext('webgl');
canvas.style.width = `${width}px`;
canvas.style.height = `${height}px`;
+
+ const vShader = gl.createShader(gl.VERTEX_SHADER);
+ const fShader = gl.createShader(gl.FRAGMENT_SHADER);
+
+ compileShader(gl, vShader, vShaderSource);
+ compileShader(gl, fShader, fShaderSource);
+
+ const program = gl.createProgram();
+
+ gl.attachShader(program, vShader);
+ gl.attachShader(program, fShader);
+
+ gl.linkProgram(program);
+ gl.useProgram(program);
+
+ const programInfo = setupShaderInput(gl, program, vShaderSource, fShaderSource);
Create cube object and setup buffer for vertex positions
📄 src/skybox.js
import fShaderSource from './shaders/skybox.f.glsl';
import { compileShader, setupShaderInput } from './gl-helpers';
+ import { Object3D } from './Object3D';
+ import { GLBuffer } from './GLBuffer';
+
+ import cubeObj from '../assets/objects/cube.obj';
const canvas = document.querySelector('canvas');
const gl = canvas.getContext('webgl');
gl.useProgram(program);
const programInfo = setupShaderInput(gl, program, vShaderSource, fShaderSource);
+
+ const cube = new Object3D(cubeObj, [0, 0, 0], [0, 0, 0]);
+ const vertexBuffer = new GLBuffer(gl, gl.ARRAY_BUFFER, cube.vertices, gl.STATIC_DRAW);
Setup position attribute
📄 src/skybox.js
const cube = new Object3D(cubeObj, [0, 0, 0], [0, 0, 0]);
const vertexBuffer = new GLBuffer(gl, gl.ARRAY_BUFFER, cube.vertices, gl.STATIC_DRAW);
+
+ vertexBuffer.bind(gl);
+ gl.vertexAttribPointer(programInfo.attributeLocations.position, 3, gl.FLOAT, false, 0, 0);
Setup view, projection matrices, pass values to uniforms and set viewport
📄 src/skybox.js
import { GLBuffer } from './GLBuffer';
import cubeObj from '../assets/objects/cube.obj';
+ import { mat4 } from 'gl-matrix';
const canvas = document.querySelector('canvas');
const gl = canvas.getContext('webgl');
vertexBuffer.bind(gl);
gl.vertexAttribPointer(programInfo.attributeLocations.position, 3, gl.FLOAT, false, 0, 0);
+
+ const viewMatrix = mat4.create();
+ const projectionMatrix = mat4.create();
+
+ mat4.lookAt(viewMatrix, [0, 0, 0], [0, 0, -1], [0, 1, 0]);
+
+ mat4.perspective(projectionMatrix, (Math.PI / 360) * 90, canvas.width / canvas.height, 0.01, 100);
+
+ gl.uniformMatrix4fv(programInfo.uniformLocations.viewMatrix, false, viewMatrix);
+ gl.uniformMatrix4fv(programInfo.uniformLocations.projectionMatrix, false, projectionMatrix);
+
+ gl.viewport(0, 0, canvas.width, canvas.height);
And define a function which will render our scene
📄 src/skybox.js
gl.uniformMatrix4fv(programInfo.uniformLocations.projectionMatrix, false, projectionMatrix);
gl.viewport(0, 0, canvas.width, canvas.height);
+
+ function frame() {
+ gl.drawArrays(gl.TRIANGLES, 0, vertexBuffer.data.length / 3);
+
+ requestAnimationFrame(frame);
+ }
Now the fun part. Texture for each side of the cube should be stored in separate file, so we need to laod all images. Check out this site for other textures
📄 src/skybox.js
import vShaderSource from './shaders/skybox.v.glsl';
import fShaderSource from './shaders/skybox.f.glsl';
- import { compileShader, setupShaderInput } from './gl-helpers';
+ import { compileShader, setupShaderInput, loadImage } from './gl-helpers';
import { Object3D } from './Object3D';
import { GLBuffer } from './GLBuffer';
import cubeObj from '../assets/objects/cube.obj';
import { mat4 } from 'gl-matrix';
+ import rightTexture from '../assets/images/skybox/right.JPG';
+ import leftTexture from '../assets/images/skybox/left.JPG';
+ import upTexture from '../assets/images/skybox/up.JPG';
+ import downTexture from '../assets/images/skybox/down.JPG';
+ import backTexture from '../assets/images/skybox/back.JPG';
+ import frontTexture from '../assets/images/skybox/front.JPG';
+
const canvas = document.querySelector('canvas');
const gl = canvas.getContext('webgl');
requestAnimationFrame(frame);
}
+
+ Promise.all([
+ loadImage(rightTexture),
+ loadImage(leftTexture),
+ loadImage(upTexture),
+ loadImage(downTexture),
+ loadImage(backTexture),
+ loadImage(frontTexture),
+ ]).then((images) => {
+ frame();
+ });
Now we need to create a webgl texture
📄 src/skybox.js
loadImage(backTexture),
loadImage(frontTexture),
]).then((images) => {
+ const texture = gl.createTexture();
+
frame();
});
And pass a special texture type to bind method – gl.TEXTURE_CUBE_MAP
📄 src/skybox.js
loadImage(frontTexture),
]).then((images) => {
const texture = gl.createTexture();
+ gl.bindTexture(gl.TEXTURE_CUBE_MAP, texture);
frame();
});
Then we need to setup texture
📄 src/skybox.js
const texture = gl.createTexture();
gl.bindTexture(gl.TEXTURE_CUBE_MAP, texture);
+ gl.texParameteri(gl.TEXTURE_CUBE_MAP, gl.TEXTURE_MIN_FILTER, gl.LINEAR);
+ gl.texParameteri(gl.TEXTURE_CUBE_MAP, gl.TEXTURE_MAG_FILTER, gl.LINEAR);
+ gl.texParameteri(gl.TEXTURE_CUBE_MAP, gl.TEXTURE_WRAP_S, gl.CLAMP_TO_EDGE);
+ gl.texParameteri(gl.TEXTURE_CUBE_MAP, gl.TEXTURE_WRAP_T, gl.CLAMP_TO_EDGE);
+
frame();
});
and upload each image to gpu
Targets are:
-
gl.TEXTURE_CUBE_MAP_POSITIVE_X– right -
gl.TEXTURE_CUBE_MAP_NEGATIVE_X– left -
gl.TEXTURE_CUBE_MAP_POSITIVE_Y– top -
gl.TEXTURE_CUBE_MAP_NEGATIVE_Y– bottom -
gl.TEXTURE_CUBE_MAP_POSITIVE_Z– front -
gl.TEXTURE_CUBE_MAP_NEGATIVE_Z– back
Since all these values are integers, we can iterate over all images and add image index to TEXTURE_CUBE_MAP_POSITIVE_X target
📄 src/skybox.js
gl.texParameteri(gl.TEXTURE_CUBE_MAP, gl.TEXTURE_WRAP_S, gl.CLAMP_TO_EDGE);
gl.texParameteri(gl.TEXTURE_CUBE_MAP, gl.TEXTURE_WRAP_T, gl.CLAMP_TO_EDGE);
+ images.forEach((image, index) => {
+ gl.texImage2D(gl.TEXTURE_CUBE_MAP_POSITIVE_X + index, 0, gl.RGBA, gl.RGBA, gl.UNSIGNED_BYTE, image);
+ });
+
frame();
});
and finally let's reuse the code from previous tutorial to implement camera rotation animation
📄 src/skybox.js
import { GLBuffer } from './GLBuffer';
import cubeObj from '../assets/objects/cube.obj';
- import { mat4 } from 'gl-matrix';
+ import { mat4, vec3 } from 'gl-matrix';
import rightTexture from '../assets/images/skybox/right.JPG';
import leftTexture from '../assets/images/skybox/left.JPG';
gl.viewport(0, 0, canvas.width, canvas.height);
+ const cameraPosition = [0, 0, 0];
+ const cameraFocusPoint = vec3.fromValues(0, 0, 1);
+ const cameraFocusPointMatrix = mat4.create();
+
+ mat4.fromTranslation(cameraFocusPointMatrix, cameraFocusPoint);
+
function frame() {
+ mat4.translate(cameraFocusPointMatrix, cameraFocusPointMatrix, [0, 0, -1]);
+ mat4.rotateY(cameraFocusPointMatrix, cameraFocusPointMatrix, Math.PI / 360);
+ mat4.translate(cameraFocusPointMatrix, cameraFocusPointMatrix, [0, 0, 1]);
+
+ mat4.getTranslation(cameraFocusPoint, cameraFocusPointMatrix);
+
+ mat4.lookAt(viewMatrix, cameraPosition, cameraFocusPoint, [0, 1, 0]);
+ gl.uniformMatrix4fv(programInfo.uniformLocations.viewMatrix, false, viewMatrix);
+
gl.drawArrays(gl.TRIANGLES, 0, vertexBuffer.data.length / 3);
requestAnimationFrame(frame);
That's it, we now have a skybox which makes scene look more impressive 😎
Thanks for reading!
See you tomorrow 👋
Join mailing list to get new posts right to your inbox
Built with
![]()
Day 24. Combining terrain and skybox
This is a series of blog posts related to WebGL. New post will be available every day
Join mailing list to get new posts right to your inbox
Built with
![]()
Hey 👋
Welcome to WebGL month
In previous tutorials we've rendered minecraft terrain and skybox, but in different examples. How do we combine them? WebGL allows to use multiple programs, so we can combine both examples with a slight refactor.
Let's create a new entry point file minecraft.js and assume skybox.js and minecraft-terrain.js export prepare and render functions
import { prepare as prepareSkybox, render as renderSkybox } from './skybox';
import { prepare as prepareTerrain, render as renderTerrain } from './minecraft-terrain';
Next we'll need to setup a canvas
const canvas = document.querySelector('canvas');
const gl = canvas.getContext('webgl');
const width = document.body.offsetWidth;
const height = document.body.offsetHeight;
canvas.width = width * devicePixelRatio;
canvas.height = height * devicePixelRatio;
canvas.style.width = `${width}px`;
canvas.style.height = `${height}px`;
Setup camera matrices
const viewMatrix = mat4.create();
const projectionMatrix = mat4.create();
mat4.lookAt(viewMatrix, [0, 0, 0], [0, 0, -1], [0, 1, 0]);
mat4.perspective(projectionMatrix, (Math.PI / 360) * 90, canvas.width / canvas.height, 0.01, 142);
gl.viewport(0, 0, canvas.width, canvas.height);
const cameraPosition = [0, 5, 0];
const cameraFocusPoint = vec3.fromValues(0, 0, 30);
const cameraFocusPointMatrix = mat4.create();
mat4.fromTranslation(cameraFocusPointMatrix, cameraFocusPoint);
Define a render function
function render() {
renderSkybox(gl, viewMatrix, projectionMatrix);
renderTerrain(gl, viewMatrix, projectionMatrix);
requestAnimationFrame(render);
}
and execute "preparation" code
(async () => {
await prepareSkybox(gl);
await prepareTerrain(gl);
render();
})();
Now we need to implement prepare and render functions of skybox and terrain
Both functions will require access to shared state, like WebGL program, attributes and buffers, so let's create an object
const State = {};
export async function prepare(gl) {
// initialization code goes here
}
So what's a "preparation" step?
It's about creating program
export async function prepare(gl) {
+ const vShader = gl.createShader(gl.VERTEX_SHADER);
+ const fShader = gl.createShader(gl.FRAGMENT_SHADER);
+ compileShader(gl, vShader, vShaderSource);
+ compileShader(gl, fShader, fShaderSource);
+ const program = gl.createProgram();
+ State.program = program;
+ gl.attachShader(program, vShader);
+ gl.attachShader(program, fShader);
+ gl.linkProgram(program);
+ gl.useProgram(program);
+ State.programInfo = setupShaderInput(gl, program, vShaderSource, fShaderSource);
}
Buffers
gl.useProgram(program);
State.programInfo = setupShaderInput(gl, program, vShaderSource, fShaderSource);
+ const cube = new Object3D(cubeObj, [0, 0, 0], [0, 0, 0]);
+ State.vertexBuffer = new GLBuffer(gl, gl.ARRAY_BUFFER, cube.vertices, gl.STATIC_DRAW);
}
Textures
const cube = new Object3D(cubeObj, [0, 0, 0], [0, 0, 0]);
State.vertexBuffer = new GLBuffer(gl, gl.ARRAY_BUFFER, cube.vertices, gl.STATIC_DRAW);
+ await Promise.all([
+ loadImage(rightTexture),
+ loadImage(leftTexture),
+ loadImage(upTexture),
+ loadImage(downTexture),
+ loadImage(backTexture),
+ loadImage(frontTexture),
+ ]).then((images) => {
+ State.texture = gl.createTexture();
+ gl.bindTexture(gl.TEXTURE_CUBE_MAP, State.texture);
+ gl.texParameteri(gl.TEXTURE_CUBE_MAP, gl.TEXTURE_MIN_FILTER, gl.LINEAR);
+ gl.texParameteri(gl.TEXTURE_CUBE_MAP, gl.TEXTURE_MAG_FILTER, gl.LINEAR);
+ gl.texParameteri(gl.TEXTURE_CUBE_MAP, gl.TEXTURE_WRAP_S, gl.CLAMP_TO_EDGE);
+ gl.texParameteri(gl.TEXTURE_CUBE_MAP, gl.TEXTURE_WRAP_T, gl.CLAMP_TO_EDGE);
+ images.forEach((image, index) => {
+ gl.texImage2D(gl.TEXTURE_CUBE_MAP_POSITIVE_X + index, 0, gl.RGBA, gl.RGBA, gl.UNSIGNED_BYTE, image);
+ });
+ });
}
and setting up attributes
gl.texImage2D(gl.TEXTURE_CUBE_MAP_POSITIVE_X index, 0, gl.RGBA, gl.RGBA, gl.UNSIGNED_BYTE, image);
});
});
+ setupAttributes(gl);
}
We need a separate function to setup attributes because we'll need to do this in render function as well. Attributes share the state between different programs, so we'll need to setup them properly each time we use different program
setupAttributes looks like this for skybox
function setupAttributes(gl) {
State.vertexBuffer.bind(gl);
gl.vertexAttribPointer(State.programInfo.attributeLocations.position, 3, gl.FLOAT, false, 0, 0);
}
And now we need a render function which will pass view and projection matrices to uniforms and issue a draw call
export function render(gl, viewMatrix, projectionMatrix) {
gl.useProgram(State.program);
gl.uniformMatrix4fv(State.programInfo.uniformLocations.viewMatrix, false, viewMatrix);
gl.uniformMatrix4fv(State.programInfo.uniformLocations.projectionMatrix, false, projectionMatrix);
setupAttributes(gl);
gl.drawArrays(gl.TRIANGLES, 0, State.vertexBuffer.data.length / 3);
}
This refactor is pretty straightforward, as it requires only moving pieces of code to necessary functions, so this steps will look the same for minecraft-terrain, with one exception
We're using ANGLE_instanced_arrays extension to render terrain, which sets up divisorAngle. As attributes share the state between programs, we'll need to "reset" those divisor angles.
function resetDivisorAngles() {
for (let i = 0; i < 4; i++) {
State.ext.vertexAttribDivisorANGLE(State.programInfo.attributeLocations.modelMatrix + i, 0);
}
}
and call this function after a draw call
export function render(gl, viewMatrix, projectionMatrix) {
gl.useProgram(State.program);
setupAttributes(gl);
gl.uniformMatrix4fv(State.programInfo.uniformLocations.viewMatrix, false, viewMatrix);
gl.uniformMatrix4fv(State.programInfo.uniformLocations.projectionMatrix, false, projectionMatrix);
State.ext.drawArraysInstancedANGLE(gl.TRIANGLES, 0, State.vertexBuffer.data.length / 3, 100 * 100);
resetDivisorAngles();
}
Does resulting code actually work?
Unfortunatelly no 😢 The issue is that we render the skybox inisde the cube which is smaller than our terrain, but we can fix it with a single change in skybox vertex shader
attribute vec3 position;
varying vec3 vTexCoord;
uniform mat4 projectionMatrix;
uniform mat4 viewMatrix;
void main() {
vTexCoord = position;
- gl_Position = projectionMatrix * viewMatrix * vec4(position, 1);
+ gl_Position = projectionMatrix * viewMatrix * vec4(position, 0.01);
}
By changing the 4th argument, we'll scale our skybox by 100 times (the magic of homogeneous coordinates).
After this change the world looks ok, until we try to look at the farthest "edge" of our world cube. Skybox isn't rendered there 😢
This happens because of the zFar argument passed to projection matrix
const projectionMatrix = mat4.create();
mat4.lookAt(viewMatrix, [0, 0, 0], [0, 0, -1], [0, 1, 0]);
- mat4.perspective(projectionMatrix, (Math.PI / 360) * 90, canvas.width / canvas.height, 0.01, 100);
+ mat4.perspective(projectionMatrix, (Math.PI / 360) * 90, canvas.width / canvas.height, 0.01, 142);
gl.viewport(0, 0, canvas.width, canvas.height);
The distance to the farthest edge is Math.sqrt(size ** 2 + size ** 2), which is 141.4213562373095, so we can just pass 142
That's it!
Thanks for reading, see you tomorrow 👋
This is a series of blog posts related to WebGL. New post will be available every day
Join mailing list to get new posts right to your inbox
Built with
![]()
Day 25. Mipmaps
This is a series of blog posts related to WebGL. New post will be available every day
Join mailing list to get new posts right to your inbox
Built with
![]()
Hey 👋
Welcome to WebGL month
Today we're going to learn one more webgl concept which might improve the quality of the final rendered image
First we need to discuss how color is being read from texture.
Let say we have a 1024x1024 image, but render only a 512x512 area on canvas. So each pixel in resulting image represents 4 pixels in original texture.
Here's where gl.texParameteri(gl.TEXTURE_2D, gl.TEXTURE_MIN_FILTER, filter) plays some role
There are several algorithms on how to read a color from the texture
-
gl.LINEAR- this one will read 4 pixels of original image and blend colors of 4 pixels to calculate final pixel color -
gl.NEARETSwill just take the closest coordinate of the pixel from original image and use this color. While being more performant, this method has a lower quality
Both methods has it's caveats, especially when the size of area which need to be painted with texture is much smaller than original texture
There is a special technique which allows to improve the quality and performance of rendering when dealing with textures. This special textures are called [mipmaps] – pre-calculated sequences of images, where each next image has a progressively smaller resolution. So when fragment shader reads a color from a texture, it takes the closest texture in size, and reads a color from it.
In WebGL 1.0 mipmaps can only be generated for textures of "power-of-2" size (256x256, 512x512, 1024x1024 etc.)
And that's how mipmap will look like for our dirt cube

Don't worry, you don't need to generate such a sequence for all your textures, this could be done automatically if your texture is a size of power of 2
📄 src/minecraft-terrain.js
const State = {};
+ /**
+ *
+ * @param {WebGLRenderingContext} gl
+ */
export async function prepare(gl) {
const vShader = gl.createShader(gl.VERTEX_SHADER);
const fShader = gl.createShader(gl.FRAGMENT_SHADER);
await loadImage(textureSource).then((image) => {
const texture = createTexture(gl);
setImage(gl, texture, image);
+
+ gl.generateMipmap(gl.TEXTURE_2D);
});
setupAttributes(gl);
And in order to make GPU read a pixel color from mipmap, we need to specify TEXTURE_MIN_FILTER.
📄 src/minecraft-terrain.js
setImage(gl, texture, image);
gl.generateMipmap(gl.TEXTURE_2D);
+ gl.texParameteri(gl.TEXTURE_2D, gl.TEXTURE_MIN_FILTER, gl.NEAREST_MIPMAP_LINEAR);
});
setupAttributes(gl);
NEAREST_MIPMAP_LINEAR will choose the closest size mipmap and interpolate 4 pixels to get resulting color
That's it for today!
Thanks for reading, see you tomorrow 👋
Join mailing list to get new posts right to your inbox
Built with
![]()
Day 26. Rendering to texture
This is a series of blog posts related to WebGL. New post will be available every day
Join mailing list to get new posts right to your inbox
Built with
![]()
Hey 👋 Welcome to WebGL month.
In one of our previous tutorials we've build some simple image filters, like "black and white", "sepia", etc. Can we apply this "post effects" not only to an existing image, but to the whole 3d scene we're rendering?
Yes, we can! However we'll still need a texture to process, so we need to render our scene not to a canvas, but to a texture first
As we know from the very first tutorial, canvas is just a buffer of pixel colors (4 integers, r, g, b, a) There's also a depth buffer (for Z coordinate of each pixel)
So the idea is to make webgl render to some different "buffer" instead of canvas.
There's a special type of buffer, called framebuffer which can be treated as a render target
To create a framebuffer we need to call gl.createFramebuffer
📄 src/minecraft.js
mat4.fromTranslation(cameraFocusPointMatrix, cameraFocusPoint);
+ const framebuffer = gl.createFramebuffer();
+
function render() {
mat4.translate(cameraFocusPointMatrix, cameraFocusPointMatrix, [0, 0, -30]);
mat4.rotateY(cameraFocusPointMatrix, cameraFocusPointMatrix, Math.PI / 360);
Framebuffer itself is not a storage, but rather a set of references to "attachments" (color, depth)
To render colors we'll need a texture
📄 src/minecraft.js
const framebuffer = gl.createFramebuffer();
+ const texture = gl.createTexture();
+
+ gl.bindTexture(gl.TEXTURE_2D, texture);
+ gl.texImage2D(gl.TEXTURE_2D, 0, gl.RGBA, canvas.width, canvas.height, 0, gl.RGBA, gl.UNSIGNED_BYTE, null);
+
+ gl.texParameteri(gl.TEXTURE_2D, gl.TEXTURE_MIN_FILTER, gl.LINEAR);
+ gl.texParameteri(gl.TEXTURE_2D, gl.TEXTURE_WRAP_S, gl.CLAMP_TO_EDGE);
+ gl.texParameteri(gl.TEXTURE_2D, gl.TEXTURE_WRAP_T, gl.CLAMP_TO_EDGE);
+
function render() {
mat4.translate(cameraFocusPointMatrix, cameraFocusPointMatrix, [0, 0, -30]);
mat4.rotateY(cameraFocusPointMatrix, cameraFocusPointMatrix, Math.PI / 360);
Now we need to bind a framebuffer and setup a color attachment
📄 src/minecraft.js
gl.texParameteri(gl.TEXTURE_2D, gl.TEXTURE_WRAP_S, gl.CLAMP_TO_EDGE);
gl.texParameteri(gl.TEXTURE_2D, gl.TEXTURE_WRAP_T, gl.CLAMP_TO_EDGE);
+ gl.bindFramebuffer(gl.FRAMEBUFFER, framebuffer);
+ gl.framebufferTexture2D(gl.FRAMEBUFFER, gl.COLOR_ATTACHMENT0, gl.TEXTURE_2D, texture, 0);
+
function render() {
mat4.translate(cameraFocusPointMatrix, cameraFocusPointMatrix, [0, 0, -30]);
mat4.rotateY(cameraFocusPointMatrix, cameraFocusPointMatrix, Math.PI / 360);
Now our canvas is white. Did we break something? No – everything is fine, but our scene is now rendered to a texture instead of canvas
Now we need to render from texture to canvas
Vertex shader is very simple, we just need to render a canvas-size rectangle, so we can pass vertex positions from js without any transformations
📄 src/shaders/filter.v.glsl
attribute vec2 position;
void main() {
gl_Position = vec4(position, 0, 1);
}
Fragment shader needs a texture to read a color from and resolution to transform pixel coordinates to texture coordinates
📄 src/shaders/filter.f.glsl
precision mediump float;
uniform sampler2D texture;
uniform vec2 resolution;
void main() {
gl_FragColor = texture2D(texture, gl_FragCoord.xy / resolution);
}
Now we need to go through a program setup routine
📄 src/minecraft.js
import { prepare as prepareSkybox, render as renderSkybox } from './skybox';
import { prepare as prepareTerrain, render as renderTerrain } from './minecraft-terrain';
+ import vShaderSource from './shaders/filter.v.glsl';
+ import fShaderSource from './shaders/filter.f.glsl';
+ import { setupShaderInput, compileShader } from './gl-helpers';
+ import { GLBuffer } from './GLBuffer';
+ import { createRect } from './shape-helpers';
+
const canvas = document.querySelector('canvas');
const gl = canvas.getContext('webgl');
gl.bindFramebuffer(gl.FRAMEBUFFER, framebuffer);
gl.framebufferTexture2D(gl.FRAMEBUFFER, gl.COLOR_ATTACHMENT0, gl.TEXTURE_2D, texture, 0);
+ const vShader = gl.createShader(gl.VERTEX_SHADER);
+ const fShader = gl.createShader(gl.FRAGMENT_SHADER);
+
+ compileShader(gl, vShader, vShaderSource);
+ compileShader(gl, fShader, fShaderSource);
+
+ const program = gl.createProgram();
+
+ gl.attachShader(program, vShader);
+ gl.attachShader(program, fShader);
+
+ gl.linkProgram(program);
+ gl.useProgram(program);
+
+ const vertexPositionBuffer = new GLBuffer(
+ gl,
+ gl.ARRAY_BUFFER,
+ new Float32Array([...createRect(-1, -1, 2, 2)]),
+ gl.STATIC_DRAW
+ );
+
+ const indexBuffer = new GLBuffer(gl, gl.ELEMENT_ARRAY_BUFFER, new Uint8Array([0, 1, 2, 1, 2, 3]), gl.STATIC_DRAW);
+
+ const programInfo = setupShaderInput(gl, program, vShaderSource, fShaderSource);
+
+ vertexPositionBuffer.bind(gl);
+ gl.vertexAttribPointer(programInfo.attributeLocations.position, 2, gl.FLOAT, false, 0, 0);
+
+ gl.uniform2f(programInfo.uniformLocations.resolution, canvas.width, canvas.height);
+
function render() {
mat4.translate(cameraFocusPointMatrix, cameraFocusPointMatrix, [0, 0, -30]);
mat4.rotateY(cameraFocusPointMatrix, cameraFocusPointMatrix, Math.PI / 360);
In the beginning of each frame we need to bind a framebuffer to tell webgl to render to a texture
📄 src/minecraft.js
gl.uniform2f(programInfo.uniformLocations.resolution, canvas.width, canvas.height);
function render() {
+ gl.bindFramebuffer(gl.FRAMEBUFFER, framebuffer);
+
mat4.translate(cameraFocusPointMatrix, cameraFocusPointMatrix, [0, 0, -30]);
mat4.rotateY(cameraFocusPointMatrix, cameraFocusPointMatrix, Math.PI / 360);
mat4.translate(cameraFocusPointMatrix, cameraFocusPointMatrix, [0, 0, 30]);
and after we rendered the scene to texture, we need to use our new program
📄 src/minecraft.js
renderSkybox(gl, viewMatrix, projectionMatrix);
renderTerrain(gl, viewMatrix, projectionMatrix);
+ gl.useProgram(program);
+
requestAnimationFrame(render);
}
Setup program attributes and uniforms
📄 src/minecraft.js
gl.useProgram(program);
+ vertexPositionBuffer.bind(gl);
+ gl.vertexAttribPointer(programInfo.attributeLocations.position, 2, gl.FLOAT, false, 0, 0);
+
+ gl.uniform2f(programInfo.uniformLocations.resolution, canvas.width, canvas.height);
+
requestAnimationFrame(render);
}
Bind null framebuffer (this will make webgl render to canvas)
📄 src/minecraft.js
gl.uniform2f(programInfo.uniformLocations.resolution, canvas.width, canvas.height);
+ gl.bindFramebuffer(gl.FRAMEBUFFER, null);
+
requestAnimationFrame(render);
}
Bind texture to use it as a source of color data
📄 src/minecraft.js
gl.uniform2f(programInfo.uniformLocations.resolution, canvas.width, canvas.height);
gl.bindFramebuffer(gl.FRAMEBUFFER, null);
+ gl.bindTexture(gl.TEXTURE_2D, texture);
requestAnimationFrame(render);
}
And issue a draw call
📄 src/minecraft.js
gl.bindFramebuffer(gl.FRAMEBUFFER, null);
gl.bindTexture(gl.TEXTURE_2D, texture);
+ gl.drawElements(gl.TRIANGLES, indexBuffer.data.length, gl.UNSIGNED_BYTE, 0);
+
requestAnimationFrame(render);
}
Since we're binding different texture after we render terrain and skybox, we need to re-bind textures in terrain and skybox programs
📄 src/minecraft-terrain.js
await loadImage(textureSource).then((image) => {
const texture = createTexture(gl);
+ State.texture = texture;
+
setImage(gl, texture, image);
gl.generateMipmap(gl.TEXTURE_2D);
setupAttributes(gl);
+ gl.bindTexture(gl.TEXTURE_2D, State.texture);
+
gl.uniformMatrix4fv(State.programInfo.uniformLocations.viewMatrix, false, viewMatrix);
gl.uniformMatrix4fv(State.programInfo.uniformLocations.projectionMatrix, false, projectionMatrix);
📄 src/skybox.js
export function render(gl, viewMatrix, projectionMatrix) {
gl.useProgram(State.program);
+ gl.bindTexture(gl.TEXTURE_CUBE_MAP, State.texture);
+
gl.uniformMatrix4fv(State.programInfo.uniformLocations.viewMatrix, false, viewMatrix);
gl.uniformMatrix4fv(State.programInfo.uniformLocations.projectionMatrix, false, projectionMatrix);
We need to create a depth buffer. Depth buffer is a render buffer (object which contains a data which came from fragmnt shader output)
📄 src/minecraft.js
gl.bindFramebuffer(gl.FRAMEBUFFER, framebuffer);
gl.framebufferTexture2D(gl.FRAMEBUFFER, gl.COLOR_ATTACHMENT0, gl.TEXTURE_2D, texture, 0);
+ const depthBuffer = gl.createRenderbuffer();
+ gl.bindRenderbuffer(gl.RENDERBUFFER, depthBuffer);
+
const vShader = gl.createShader(gl.VERTEX_SHADER);
const fShader = gl.createShader(gl.FRAGMENT_SHADER);
and setup renderbuffer to store depth info
📄 src/minecraft.js
const depthBuffer = gl.createRenderbuffer();
gl.bindRenderbuffer(gl.RENDERBUFFER, depthBuffer);
+ gl.renderbufferStorage(gl.RENDERBUFFER, gl.DEPTH_COMPONENT16, canvas.width, canvas.height);
+ gl.framebufferRenderbuffer(gl.FRAMEBUFFER, gl.DEPTH_ATTACHMENT, gl.RENDERBUFFER, depthBuffer);
+
const vShader = gl.createShader(gl.VERTEX_SHADER);
const fShader = gl.createShader(gl.FRAGMENT_SHADER);
Now scene looks better, but only for a single frame, others seem to be drawn on top of previous. This happens because texture is n't cleared before next draw call
We need to call a gl.clear to clear the texture (clears currently bound framebuffer). This method accepts a bitmask which tells webgl which buffers to clear. We need to clear both color and depth buffer, so the mask is gl.COLOR_BUFFER_BIT | gl.DEPTH_BUFFER_BIT
📄 src/minecraft.js
function render() {
gl.bindFramebuffer(gl.FRAMEBUFFER, framebuffer);
+ gl.clear(gl.COLOR_BUFFER_BIT | gl.DEPTH_BUFFER_BIT);
+
mat4.translate(cameraFocusPointMatrix, cameraFocusPointMatrix, [0, 0, -30]);
mat4.rotateY(cameraFocusPointMatrix, cameraFocusPointMatrix, Math.PI / 360);
mat4.translate(cameraFocusPointMatrix, cameraFocusPointMatrix, [0, 0, 30]);
NOTE: This also should be done before rendering to canvas if
preserveDrawingBuffercontext argument is set to true
Now we can reuse our filter function from previous tutorial to make the whole scene black and white
📄 src/shaders/filter.f.glsl
uniform sampler2D texture;
uniform vec2 resolution;
+ vec4 blackAndWhite(vec4 color) {
+ return vec4(vec3(1.0, 1.0, 1.0) * (color.r + color.g + color.b) / 3.0, color.a);
+ }
+
void main() {
- gl_FragColor = texture2D(texture, gl_FragCoord.xy / resolution);
+ gl_FragColor = blackAndWhite(texture2D(texture, gl_FragCoord.xy / resolution));
}
That's it!
Offscreen rendering (rendering to texture) might be used to apply different "post" effects like blur, water on camera, etc. We'll learn another useful usecase of offscreen rendering tomorrow
Thanks for reading! 👋
Join mailing list to get new posts right to your inbox
Built with
![]()
Day 27. Click detection. Part I
This is a series of blog posts related to WebGL. New post will be available every day
Join mailing list to get new posts right to your inbox
Built with
![]()
Hey 👋
Yesterday we've learned how to render to a texture. This is a nice ability to make some nice effects after the scene was completely rendered, but we can get advantage of offscreen rendering for something else.
One important thing in interactive 3D is click detection. While it may be done with javascript, it involves some complex math. Instead we can:
- assign a unique solid color to each object
- render scene to a texture
- read pixel color under cursor
- match color with an object
Since we'll need another framebuffer, let's create a helper class
📄 src/RenderBuffer.js
export class RenderBuffer {
constructor(gl) {
this.framebuffer = gl.createFramebuffer();
this.texture = gl.createTexture();
}
}
Setup framebuffer and color texture
📄 src/RenderBuffer.js
constructor(gl) {
this.framebuffer = gl.createFramebuffer();
this.texture = gl.createTexture();
+
+ gl.bindTexture(gl.TEXTURE_2D, this.texture);
+ gl.texImage2D(gl.TEXTURE_2D, 0, gl.RGBA, gl.canvas.width, gl.canvas.height, 0, gl.RGBA, gl.UNSIGNED_BYTE, null);
+
+ gl.texParameteri(gl.TEXTURE_2D, gl.TEXTURE_MIN_FILTER, gl.LINEAR);
+ gl.texParameteri(gl.TEXTURE_2D, gl.TEXTURE_WRAP_S, gl.CLAMP_TO_EDGE);
+ gl.texParameteri(gl.TEXTURE_2D, gl.TEXTURE_WRAP_T, gl.CLAMP_TO_EDGE);
+
+ gl.bindFramebuffer(gl.FRAMEBUFFER, this.framebuffer);
+ gl.framebufferTexture2D(gl.FRAMEBUFFER, gl.COLOR_ATTACHMENT0, gl.TEXTURE_2D, this.texture, 0);
}
}
Setup depth buffer
📄 src/RenderBuffer.js
gl.bindFramebuffer(gl.FRAMEBUFFER, this.framebuffer);
gl.framebufferTexture2D(gl.FRAMEBUFFER, gl.COLOR_ATTACHMENT0, gl.TEXTURE_2D, this.texture, 0);
+
+ this.depthBuffer = gl.createRenderbuffer();
+ gl.bindRenderbuffer(gl.RENDERBUFFER, this.depthBuffer);
+
+ gl.renderbufferStorage(gl.RENDERBUFFER, gl.DEPTH_COMPONENT16, gl.canvas.width, gl.canvas.height);
+ gl.framebufferRenderbuffer(gl.FRAMEBUFFER, gl.DEPTH_ATTACHMENT, gl.RENDERBUFFER, this.depthBuffer);
}
}
Implement bind method
📄 src/RenderBuffer.js
gl.renderbufferStorage(gl.RENDERBUFFER, gl.DEPTH_COMPONENT16, gl.canvas.width, gl.canvas.height);
gl.framebufferRenderbuffer(gl.FRAMEBUFFER, gl.DEPTH_ATTACHMENT, gl.RENDERBUFFER, this.depthBuffer);
}
+
+ bind(gl) {
+ gl.bindFramebuffer(gl.FRAMEBUFFER, this.framebuffer);
+ }
}
and clear
📄 src/RenderBuffer.js
bind(gl) {
gl.bindFramebuffer(gl.FRAMEBUFFER, this.framebuffer);
}
+
+ clear(gl) {
+ this.bind(gl);
+ gl.clear(gl.COLOR_BUFFER_BIT | gl.DEPTH_BUFFER_BIT);
+ }
}
Use new helper class
📄 src/minecraft.js
import { setupShaderInput, compileShader } from './gl-helpers';
import { GLBuffer } from './GLBuffer';
import { createRect } from './shape-helpers';
+ import { RenderBuffer } from './RenderBuffer';
const canvas = document.querySelector('canvas');
const gl = canvas.getContext('webgl');
mat4.fromTranslation(cameraFocusPointMatrix, cameraFocusPoint);
- const framebuffer = gl.createFramebuffer();
-
- const texture = gl.createTexture();
-
- gl.bindTexture(gl.TEXTURE_2D, texture);
- gl.texImage2D(gl.TEXTURE_2D, 0, gl.RGBA, canvas.width, canvas.height, 0, gl.RGBA, gl.UNSIGNED_BYTE, null);
-
- gl.texParameteri(gl.TEXTURE_2D, gl.TEXTURE_MIN_FILTER, gl.LINEAR);
- gl.texParameteri(gl.TEXTURE_2D, gl.TEXTURE_WRAP_S, gl.CLAMP_TO_EDGE);
- gl.texParameteri(gl.TEXTURE_2D, gl.TEXTURE_WRAP_T, gl.CLAMP_TO_EDGE);
-
- gl.bindFramebuffer(gl.FRAMEBUFFER, framebuffer);
- gl.framebufferTexture2D(gl.FRAMEBUFFER, gl.COLOR_ATTACHMENT0, gl.TEXTURE_2D, texture, 0);
-
- const depthBuffer = gl.createRenderbuffer();
- gl.bindRenderbuffer(gl.RENDERBUFFER, depthBuffer);
-
- gl.renderbufferStorage(gl.RENDERBUFFER, gl.DEPTH_COMPONENT16, canvas.width, canvas.height);
- gl.framebufferRenderbuffer(gl.FRAMEBUFFER, gl.DEPTH_ATTACHMENT, gl.RENDERBUFFER, depthBuffer);
+ const offscreenRenderBuffer = new RenderBuffer(gl);
const vShader = gl.createShader(gl.VERTEX_SHADER);
const fShader = gl.createShader(gl.FRAGMENT_SHADER);
gl.uniform2f(programInfo.uniformLocations.resolution, canvas.width, canvas.height);
function render() {
- gl.bindFramebuffer(gl.FRAMEBUFFER, framebuffer);
-
- gl.clear(gl.COLOR_BUFFER_BIT | gl.DEPTH_BUFFER_BIT);
+ offscreenRenderBuffer.clear(gl);
mat4.translate(cameraFocusPointMatrix, cameraFocusPointMatrix, [0, 0, -30]);
mat4.rotateY(cameraFocusPointMatrix, cameraFocusPointMatrix, Math.PI / 360);
gl.uniform2f(programInfo.uniformLocations.resolution, canvas.width, canvas.height);
gl.bindFramebuffer(gl.FRAMEBUFFER, null);
- gl.bindTexture(gl.TEXTURE_2D, texture);
+ gl.bindTexture(gl.TEXTURE_2D, offscreenRenderBuffer.texture);
gl.drawElements(gl.TRIANGLES, indexBuffer.data.length, gl.UNSIGNED_BYTE, 0);
Instead of passing the whole unique color of the object, which is a vec3, we can pass only object index
📄 src/shaders/3d-textured.v.glsl
attribute vec3 position;
attribute vec2 texCoord;
attribute mat4 modelMatrix;
+ attribute float index;
uniform mat4 viewMatrix;
uniform mat4 projectionMatrix;
and convert this float to a color right in the shader
📄 src/shaders/3d-textured.v.glsl
varying vec2 vTexCoord;
+ vec3 encodeObject(float id) {
+ int b = int(mod(id, 255.0));
+ int r = int(id) / 255 / 255;
+ int g = (int(id) - b - r * 255 * 255) / 255;
+ return vec3(r, g, b) / 255.0;
+ }
+
void main() {
gl_Position = projectionMatrix * viewMatrix * modelMatrix * vec4(position, 1.0);
Now we need to pass the color to a fragment shader via varying
📄 src/shaders/3d-textured.f.glsl
uniform sampler2D texture;
varying vec2 vTexCoord;
+ varying vec3 vColor;
void main() {
gl_FragColor = texture2D(texture, vTexCoord * vec2(1, -1) + vec2(0, 1));
📄 src/shaders/3d-textured.v.glsl
uniform mat4 projectionMatrix;
varying vec2 vTexCoord;
+ varying vec3 vColor;
vec3 encodeObject(float id) {
int b = int(mod(id, 255.0));
gl_Position = projectionMatrix * viewMatrix * modelMatrix * vec4(position, 1.0);
vTexCoord = texCoord;
+ vColor = encodeObject(index);
}
We also need to specify what do we want to render: textured object or colored, so let's use a uniform for it
📄 src/shaders/3d-textured.f.glsl
varying vec2 vTexCoord;
varying vec3 vColor;
+ uniform float renderIndices;
+
void main() {
gl_FragColor = texture2D(texture, vTexCoord * vec2(1, -1) + vec2(0, 1));
+
+ if (renderIndices == 1.0) {
+ gl_FragColor.rgb = vColor;
+ }
}
Now let's create indices array
📄 src/minecraft-terrain.js
State.modelMatrix = mat4.create();
State.rotationMatrix = mat4.create();
+ const indices = new Float32Array(100 * 100);
+
let cubeIndex = 0;
for (let i = -50; i < 50; i++) {
Fill it with data and setup a GLBuffer
📄 src/minecraft-terrain.js
matrices[cubeIndex * 4 * 4 + index] = value;
});
+ indices[cubeIndex] = cubeIndex;
+
cubeIndex++;
}
}
State.matricesBuffer = new GLBuffer(gl, gl.ARRAY_BUFFER, matrices, gl.STATIC_DRAW);
+ State.indexBuffer = new GLBuffer(gl, gl.ARRAY_BUFFER, indices, gl.STATIC_DRAW);
State.offset = 4 * 4; // 4 floats 4 bytes each
State.stride = State.offset * 4; // 4 rows of 4 floats
Since we have a new attribute, we need to update setupAttribute and resetDivisorAngles functions
📄 src/minecraft-terrain.js
State.ext.vertexAttribDivisorANGLE(State.programInfo.attributeLocations.modelMatrix + i, 1);
}
+
+ State.indexBuffer.bind(gl);
+ gl.vertexAttribPointer(State.programInfo.attributeLocations.index, 1, gl.FLOAT, false, 0, 0);
+ State.ext.vertexAttribDivisorANGLE(State.programInfo.attributeLocations.index, 1);
}
function resetDivisorAngles() {
for (let i = 0; i < 4; i++) {
State.ext.vertexAttribDivisorANGLE(State.programInfo.attributeLocations.modelMatrix + i, 0);
}
+
+ State.ext.vertexAttribDivisorANGLE(State.programInfo.attributeLocations.index, 0);
}
export function render(gl, viewMatrix, projectionMatrix) {
And finally we need another argument of a render function to distinguish between "render modes" (either textured cubes or colored)
📄 src/minecraft-terrain.js
State.ext.vertexAttribDivisorANGLE(State.programInfo.attributeLocations.index, 0);
}
- export function render(gl, viewMatrix, projectionMatrix) {
+ export function render(gl, viewMatrix, projectionMatrix, renderIndices) {
gl.useProgram(State.program);
setupAttributes(gl);
gl.uniformMatrix4fv(State.programInfo.uniformLocations.viewMatrix, false, viewMatrix);
gl.uniformMatrix4fv(State.programInfo.uniformLocations.projectionMatrix, false, projectionMatrix);
+ if (renderIndices) {
+ gl.uniform1f(State.programInfo.uniformLocations.renderIndices, 1);
+ } else {
+ gl.uniform1f(State.programInfo.uniformLocations.renderIndices, 0);
+ }
+
State.ext.drawArraysInstancedANGLE(gl.TRIANGLES, 0, State.vertexBuffer.data.length / 3, 100 * 100);
resetDivisorAngles();
Now we need another render buffer to render colored cubes to
📄 src/minecraft.js
mat4.fromTranslation(cameraFocusPointMatrix, cameraFocusPoint);
const offscreenRenderBuffer = new RenderBuffer(gl);
+ const coloredCubesRenderBuffer = new RenderBuffer(gl);
const vShader = gl.createShader(gl.VERTEX_SHADER);
const fShader = gl.createShader(gl.FRAGMENT_SHADER);
Now let's add a click listeneer
📄 src/minecraft.js
requestAnimationFrame(render);
}
+ document.body.addEventListener('click', () => {
+ coloredCubesRenderBuffer.bind(gl);
+ });
+
(async () => {
await prepareSkybox(gl);
await prepareTerrain(gl);
and render colored cubes to a texture each time user clicks on a canvas
📄 src/minecraft.js
document.body.addEventListener('click', () => {
coloredCubesRenderBuffer.bind(gl);
+
+ renderTerrain(gl, viewMatrix, projectionMatrix, true);
});
(async () => {
Now we need a storage to read pixel colors to
📄 src/minecraft.js
coloredCubesRenderBuffer.bind(gl);
renderTerrain(gl, viewMatrix, projectionMatrix, true);
+
+ const pixels = new Uint8Array(canvas.width * canvas.height * 4);
});
(async () => {
and actually read pixel colors
📄 src/minecraft.js
renderTerrain(gl, viewMatrix, projectionMatrix, true);
const pixels = new Uint8Array(canvas.width * canvas.height * 4);
+ gl.readPixels(0, 0, canvas.width, canvas.height, gl.RGBA, gl.UNSIGNED_BYTE, pixels);
});
(async () => {
That's it, we now have the whole scene rendered to an offscreen texture, where each object has a unique color. We'll continue click detection tomorrow
Thanks for reading! 👋
Join mailing list to get new posts right to your inbox
Built with
![]()
Day 28. Click detection. Part II
This is a series of blog posts related to WebGL. New post will be available every day
Join mailing list to get new posts right to your inbox
Built with
![]()
Hey 👋
Welcome to WebGL month
Yesterday we've rendered our minecraft terrain to a offscreen texture, where each object is encoded into a specific color and learned how to read pixel colors from the texture back to JS. Now let's decode this color to an object index and highlight selected cube
gl.readPixels fills the Uint8Array with pixel colors startig from the bottom left corner. We need to convert client coordinates to the pixels coordinate in the array. Don't forget the pixel ration, since our offscreen framebuffer takes it into account, and event coordinates don't.
📄 src/minecraft.js
requestAnimationFrame(render);
}
- document.body.addEventListener('click', () => {
+ document.body.addEventListener('click', (e) => {
coloredCubesRenderBuffer.bind(gl);
renderTerrain(gl, viewMatrix, projectionMatrix, true);
const pixels = new Uint8Array(canvas.width * canvas.height * 4);
gl.readPixels(0, 0, canvas.width, canvas.height, gl.RGBA, gl.UNSIGNED_BYTE, pixels);
+
+ const x = e.clientX * devicePixelRatio;
+ const y = (canvas.offsetHeight - e.clientY) * devicePixelRatio;
});
(async () => {
We need to skip y rows (y * canvas.width) multiplied by 4 (4 integers per pixel)
📄 src/minecraft.js
const x = e.clientX * devicePixelRatio;
const y = (canvas.offsetHeight - e.clientY) * devicePixelRatio;
+
+ const rowsToSkip = y * canvas.width * 4;
});
(async () => {
Horizontal coordinate is x * 4 (coordinate multiplied by number of integers per pixel)
📄 src/minecraft.js
const y = (canvas.offsetHeight - e.clientY) * devicePixelRatio;
const rowsToSkip = y * canvas.width * 4;
+ const col = x * 4;
});
(async () => {
So the final index of pixel is rowsToSkip + col
📄 src/minecraft.js
const rowsToSkip = y * canvas.width * 4;
const col = x * 4;
+
+ const pixelIndex = rowsToSkip + col;
});
(async () => {
Now we need to read each pixel color component
📄 src/minecraft.js
const col = x * 4;
const pixelIndex = rowsToSkip + col;
+
+ const r = pixels[pixelIndex];
+ const g = pixels[pixelIndex + 1];
+ const b = pixels[pixelIndex + 2];
+ const a = pixels[pixelIndex + 3];
});
(async () => {
Now we need to convert back to integer from r g b
📄 src/minecraft.js
requestAnimationFrame(render);
}
+ function rgbToInt(r, g, b) {
+ return b + g * 255 + r * 255 ** 2;
+ }
+
document.body.addEventListener('click', (e) => {
coloredCubesRenderBuffer.bind(gl);
Let's drop camera rotation code to make scene static
📄 src/minecraft.js
function render() {
offscreenRenderBuffer.clear(gl);
- mat4.translate(cameraFocusPointMatrix, cameraFocusPointMatrix, [0, 0, -30]);
- mat4.rotateY(cameraFocusPointMatrix, cameraFocusPointMatrix, Math.PI / 360);
- mat4.translate(cameraFocusPointMatrix, cameraFocusPointMatrix, [0, 0, 30]);
-
- mat4.getTranslation(cameraFocusPoint, cameraFocusPointMatrix);
-
mat4.lookAt(viewMatrix, cameraPosition, cameraFocusPoint, [0, 1, 0]);
renderSkybox(gl, viewMatrix, projectionMatrix);
const g = pixels[pixelIndex + 1];
const b = pixels[pixelIndex + 2];
const a = pixels[pixelIndex + 3];
+
+ const index = rgbToInt(r, g, b);
+
+ console.log(index);
});
(async () => {
and update initial camera position to see the scene better
📄 src/minecraft.js
gl.viewport(0, 0, canvas.width, canvas.height);
- const cameraPosition = [0, 5, 0];
- const cameraFocusPoint = vec3.fromValues(0, 0, 30);
+ const cameraPosition = [0, 10, 0];
+ const cameraFocusPoint = vec3.fromValues(30, 0, 30);
const cameraFocusPointMatrix = mat4.create();
mat4.fromTranslation(cameraFocusPointMatrix, cameraFocusPoint);
Next let's pass selected color index into vertex shader as varying
📄 src/shaders/3d-textured.v.glsl
uniform mat4 viewMatrix;
uniform mat4 projectionMatrix;
+ uniform float selectedObjectIndex;
varying vec2 vTexCoord;
varying vec3 vColor;
And multiply object color if its index matches selected object index
📄 src/shaders/3d-textured.f.glsl
varying vec3 vColor;
uniform float renderIndices;
+ varying vec4 vColorMultiplier;
void main() {
- gl_FragColor = texture2D(texture, vTexCoord * vec2(1, -1) + vec2(0, 1));
+ gl_FragColor = texture2D(texture, vTexCoord * vec2(1, -1) + vec2(0, 1)) * vColorMultiplier;
if (renderIndices == 1.0) {
gl_FragColor.rgb = vColor;
📄 src/shaders/3d-textured.v.glsl
varying vec2 vTexCoord;
varying vec3 vColor;
+ varying vec4 vColorMultiplier;
vec3 encodeObject(float id) {
int b = int(mod(id, 255.0));
vTexCoord = texCoord;
vColor = encodeObject(index);
+
+ if (selectedObjectIndex == index) {
+ vColorMultiplier = vec4(1.5, 1.5, 1.5, 1.0);
+ } else {
+ vColorMultiplier = vec4(1.0, 1.0, 1.0, 1.0);
+ }
}
and reflect shader changes in js
📄 src/minecraft-terrain.js
State.ext.vertexAttribDivisorANGLE(State.programInfo.attributeLocations.index, 0);
}
- export function render(gl, viewMatrix, projectionMatrix, renderIndices) {
+ export function render(gl, viewMatrix, projectionMatrix, renderIndices, selectedObjectIndex) {
gl.useProgram(State.program);
setupAttributes(gl);
gl.uniformMatrix4fv(State.programInfo.uniformLocations.viewMatrix, false, viewMatrix);
gl.uniformMatrix4fv(State.programInfo.uniformLocations.projectionMatrix, false, projectionMatrix);
+ gl.uniform1f(State.programInfo.uniformLocations.selectedObjectIndex, selectedObjectIndex);
+
if (renderIndices) {
gl.uniform1f(State.programInfo.uniformLocations.renderIndices, 1);
} else {
📄 src/minecraft.js
gl.uniform2f(programInfo.uniformLocations.resolution, canvas.width, canvas.height);
+ let selectedObjectIndex = -1;
+
function render() {
offscreenRenderBuffer.clear(gl);
mat4.lookAt(viewMatrix, cameraPosition, cameraFocusPoint, [0, 1, 0]);
renderSkybox(gl, viewMatrix, projectionMatrix);
- renderTerrain(gl, viewMatrix, projectionMatrix);
+ renderTerrain(gl, viewMatrix, projectionMatrix, false, selectedObjectIndex);
gl.useProgram(program);
const index = rgbToInt(r, g, b);
- console.log(index);
+ selectedObjectIndex = index;
});
(async () => {
That's it! We now know selected object index, so that we can perform JS operations as well as visual feedback!
Thanks for reading!
Join mailing list to get new posts right to your inbox
Built with
![]()
Day 29. Fog
This is a series of blog posts related to WebGL. New post will be available every day
Join mailing list to get new posts right to your inbox
Built with
![]()
Hey 👋
Welcome to WebGL month
Today we're going to improve our 3D minecraft terrain scene with fog
Basically we need to "lighten" the color of far cubes (calculate distance between camera and cube vertex)
To calculate relative distance between camera position and some point, we need to multiply position by view and model matrices. Since we also need the same resulting matrix together with projection matrix, let's just extract it to a variable
📄 src/shaders/3d-textured.v.glsl
}
void main() {
- gl_Position = projectionMatrix * viewMatrix * modelMatrix * vec4(position, 1.0);
+ mat4 modelView = viewMatrix * modelMatrix;
+
+ gl_Position = projectionMatrix * modelView * vec4(position, 1.0);
vTexCoord = texCoord;
vColor = encodeObject(index);
Since our camera looks in a negative direction of Z axis, we need to get z coordinate of resulting vertex position
📄 src/shaders/3d-textured.v.glsl
gl_Position = projectionMatrix * modelView * vec4(position, 1.0);
+ float depth = (modelView * vec4(position, 1.0)).z;
+
vTexCoord = texCoord;
vColor = encodeObject(index);
But this value will be negative, while we need a positive value, so let's just negate it
📄 src/shaders/3d-textured.v.glsl
gl_Position = projectionMatrix * modelView * vec4(position, 1.0);
- float depth = (modelView * vec4(position, 1.0)).z;
+ float depth = -(modelView * vec4(position, 1.0)).z;
vTexCoord = texCoord;
vColor = encodeObject(index);
We can't use depth directly, since we need a value in [0..1] range. Also it'd be nice to have a smooth "gradient" like fog. We can apply glsl smoothstep function to calcuate the final amount of fog. This function interpolates a value in range of lowerBound and upperBound. Max depth of our camera is 142
mat4.perspective(
projectionMatrix,
(Math.PI / 360) * 90,
canvas.width / canvas.height,
0.01,
142 // <- zFar
);
So the max value of depth should be < 142 in order to see any fog at all (object farther than 142 won't be visible at all). Let's use 60..100 range.
One more thing to take into account is that we don't want to see the object completely white, so let's multiply the final amount by 0.9
We'll need the final value of fogAmount in fragment shader, so this should be a varying
📄 src/shaders/3d-textured.v.glsl
varying vec2 vTexCoord;
varying vec3 vColor;
varying vec4 vColorMultiplier;
+ varying float vFogAmount;
vec3 encodeObject(float id) {
int b = int(mod(id, 255.0));
gl_Position = projectionMatrix * modelView * vec4(position, 1.0);
float depth = -(modelView * vec4(position, 1.0)).z;
+ vFogAmount = smoothstep(60.0, 100.0, depth) * 0.9;
vTexCoord = texCoord;
vColor = encodeObject(index);
Let's define this varying in fragment shader
📄 src/shaders/3d-textured.f.glsl
uniform float renderIndices;
varying vec4 vColorMultiplier;
+ varying float vFogAmount;
void main() {
gl_FragColor = texture2D(texture, vTexCoord * vec2(1, -1) + vec2(0, 1)) * vColorMultiplier;
Now let's define a color of the fog (white). We can also pass this color to a uniform, but let's keep things simple
📄 src/shaders/3d-textured.f.glsl
void main() {
gl_FragColor = texture2D(texture, vTexCoord * vec2(1, -1) + vec2(0, 1)) * vColorMultiplier;
+ vec3 fogColor = vec3(1.0, 1.0, 1.0);
+
if (renderIndices == 1.0) {
gl_FragColor.rgb = vColor;
}
and finally we need to mix original color of the pixel with the fog. We can use glsl mix
📄 src/shaders/3d-textured.f.glsl
gl_FragColor = texture2D(texture, vTexCoord * vec2(1, -1) + vec2(0, 1)) * vColorMultiplier;
vec3 fogColor = vec3(1.0, 1.0, 1.0);
+ gl_FragColor.rgb = mix(gl_FragColor.rgb, fogColor, vFogAmount);
if (renderIndices == 1.0) {
gl_FragColor.rgb = vColor;
That's it, our scene is now "foggy". To implement the same effect, but "at night", we just need to change fog color to black.
Thanks for reading!
Join mailing list to get new posts right to your inbox
Built with
![]()
Day 30. Text rendering in WebGL
This is a series of blog posts related to WebGL. New post will be available every day
Join mailing list to get new posts right to your inbox
Built with
![]()
Hey 👋
Welcome to WebGL month.
In previuos tutorials we were focused on rendering 2d and 3d shapes, but never rendered text, which is important part of any application.
In this article we'll review possible ways of text rendering.
HTML overlay
The most obvoius and simple solution would be to render text with HTML and place it above the webgl canvas, but this will only work for 2D scenes, 3D stuff will require some calculations to calculate text position and css transforms
Canvas as texture
Other technique might be applied in a wider range of cases. It requires several steps
- create another canvas
- get 2d context (
canvas.getContext('2d')) - render text with
fillTextorstrokeText - use this canvas as webgl texture with correct texture coordinates
Since the texture is a rasterized image, it will loose the quality when you'll come "closer" to the object
Glyphs texture
Each font is actually a set of "glyphs" – each symbol is rendered in a signle image
A | B | C | D | E | F | G |
---------------------------
H | I | J | K | L | M | N |
...
Each letter will have it's own "properties", like width (i is thiner than W), height (o vs L) etc.
These properties will affect how to build rectangles, containing each letter
Typically aside of texture you'll need to have a javascript object describing all these properties and coordinates in original texture image
const font = {
textureSize: {
width: 512,
height: 512,
},
height: 32,
glyphs: {
a: { x: 0, y: 0, height: 32, width: 16 },
b: { x: 16, y: 0, height: 32, width: 14 },
},
// ...
};
and to render some text you'll need something like this
function getRects(text, sizeMultiplier) {
let prevLetterX = 0;
const rects = text.split('').map((symbol) => {
const glyph = font.glyphs[symbol];
return {
x: prevLetterX,
y: font.height - glyph.height,
width: glyph.width * sizeMultiplier,
height: glyph.height * sizeMultiplier,
texCoords: glyph,
};
});
}
Later this "rects" will be used to generate attributes data
import { createRect } from './gl-helpers';
function generateBuffers(rects) {
const attributeBuffers = {
position: [],
texCoords: [],
};
rects.forEach((rect, index) => {
attributeBuffers.position.push(...createRect(rect.x, rect.y, rect.width, rect.height)),
attributeBuffers.texCoords.push(
...createRect(rect.texCoords.x, rect.texCoords.y, rect.texCoords.width, rect.texCoords.height)
);
});
return attributeBuffers;
}
There's a gl-render-text package which can render texture based fonts
Font triangulation
Since webgl is capable of drawing triangles, one more obvious solution would be to break each letter into triangles This seem to be a very complex task 😢
Luckily – there's a fontpath-gl package, which does exactly this
Signed distance field font
Another technique for rendering text in OpenGL/WebGL
Find more info here
Join mailing list to get new posts right to your inbox
Built with
![]()
Day 31. WebGL Month summary
Built with
![]()
Hey 👋
Welcome to the last day of WebGL month. This article won't cover any new topics, but rather summarize previous 30 days
Previuos tutorials:
Day 1. Intro
This article doesn't cover any WebGL topics, but rather explains what WebGL does under the hood. TL;DR: it calculates colors of each pixel it has to draw
Day 2. Shaders and points
Introduction to WebGL API and GLSL shaders with the simpliest possible primitive type – point
Day 3. Shader uniforms, lines and triangles
This article covers more ways of passing data to shaders and uses more complex primitives to render
Day 4. Shader varying
Passing data from vertex to fragment shader with varyings
Day 5. Interleaved buffers
Alternative ways of storing and passing vertex data to shaders
Day 6. Indexed buffer
A technique which helps reduce number of duplicate vertices
Day 7. Cleanup and tooling
WebGL is fun, but it requires a bit of tooling when your project grows. Luckily we have awesome tools like webpack
Day 8. Textures
Intro to textures
Day 9. Image filters
Taking advantage of fragment shader to implement simple image "filters" (inverse, black and white, sepia)
Day 10. Multiple textures
How to use multiple textures in a single webgl program
Day 11. Reducing WebGL boilerplate
Implementation of some utility classes and functions to reduce WebGL boilerplate
Day 12. Highdpi displays and WebGL viewport
How to handle retina displays with canvas and use webgl viewport
Day 13. Simple animation
All previous examples where static images, this article will add some motion to the scene
Day 14. Intro to 3D
Theory of 3D compuatations required for 3D rendering. No code
Day 15. Rendering a cube
3D theory applied on practice to render 3D cube
Day 16. Depth buffer. Cube faces colors
This article contains fixes for previous example and adds more colors
Day 17. OBJ format
Implementing simple parser for OBJ format
Day 18. Flat shading
Implementation of flat shading
Day 19. Rendering multiple objects
A typical 3D scene consists of multiple objects, this tutorial will teach you how to render more than 1 object
Day 20. Rendering a minecraft dirt cube
Texturing 3D object with Blender and WebGL
Day 21. Rendering a minecraft terrain
We've learned how to render multiple objects. How to render 10000 of objects?
Day 22. Reducing number of webgl calls by 5000 times
Previous example worked, but wasn't really performance. This article explains instancing (a technique which helps to improve performance when rendering a large amount of same objects)
Day 23. Skynox
Adding "environment" to the scene
Day 24. Combining terrain and skybox
How to use multiple WebGL programs together
Day 25. Mipmaps
A technique which improves performance of shaders reading data from textures
Day 26. Rendering to texture
Rendering to texture allows to apply some "post-effects" and might be used for a variety of use-cases
Day 27. Click detection. Part I
Day 28. Click detection. Part II
Detecting object under the cursor might seem a tough task, but it might be done without complex 3d math in JS
Day 29. Fog
Improving scene with fog
Day 30. Text rendering in WebGL
An overview of text rendering techniques in WebGL
Useful links
I've started working with WebGL only a year and a half ago. My WebGL journey started with an awesome resource – https://webglfundamentals.org/
One more important thing to understand: WebGL is just a wrapper of OpenGL, so almost everything from OpenGL tutorials might be used in WebGL as well: https://learnopengl.com/
Exploring more glsl stuff: https://thebookofshaders.com/
Codepen for shaders: https://www.shadertoy.com/
Getting started with WebGL tutorial on MDN
Thanks!
Thanks for joining WebGL month. Hope this articles helped you learn WebGL! 😉 Feel free to submit questions, suggestions, improvements to github repo, get in touch with me via email or twitter