Gender classifier with Tensorflow
Training a Neural Network from scratch suffers two main problems. First, a very large, classified input dataset is needed so that the Neural Network can learn the different features it needs for the classificatoin. Training a Model from scratch needs tousands of classified, high quality training data. Often, such data has to be classified by hand first, so that the Artificial Intelligence can learn from the handmand classification. Second, designing a Neural Network that fits the needs is hard and complicated since the Networks acts as a blackbox. Highly specialized knowledge is needed in order to correctly design such a Network. Third, training a Neural Network needs a lot of time and resources. Even on a modern GPU and with an efficient Network design, training the Network can easily take days if not weeks. Finally, in order to create a highly efficient and reliable Network, one has to tweak the network parameters again and again, which always leads to a (complete) retraining of the network - implying yet more consumption of time and resources.
This repo is a demonstration of how we can train a neural network to live-classify male and female faces using tensorflow and only 50 input images, some unclassified datasets from the internet, 2 days of time and no time-investment other than writing code and waiting for the training to finish - meaning with no hand-classifying of images.
We are going to use Haarcascade and OpenCV to detect faces in a live webcam input stream. Then, we will retrain an inception v3 Artificial Neural Network to classify Male and Female faces. As training data, we are going to scrape some images from Bing Images search. Afterwards, we will use this slow inception v3 model to classify a big dataset of about 15'000 face images automatically, which we will then use to train a much faster Neural Network which will enhance the performance of the live classifier significantly.
For this project, we will mainly rely on Tensorflow and OpenCV. All relevant libraries and online resources are linked and credited in the appendix.
Let's get started!
1.) Camera input stream
First of all, we need to feed the input stream of our webcam to our python script. After installing openCV with pip via
pip install opencv-python, connecting to a webcam and displaying the live image feed is done in just a few lines of code.
import cv2

# Initialize the camera (use bigger indices if you use multiple cameras)
cap = cv2.VideoCapture(0)
# Set the video resolution to half of the possible max resolution for better performance
cap.set(3, 1920 / 2)
cap.set(4, 1080 / 2)

while True:
    # Read frame from camera stream and convert it to greyscale
    ret, img = cap.read()
    gray = cv2.cvtColor(img, cv2.COLOR_BGR2GRAY)

    # Show image in cv2 window
    cv2.imshow("image", img)
    # Break if input key equals "ESC"
    k = cv2.waitKey(30) & 0xff
    if k == 27:
        break
When we run our python script, a little window will pop up containing the live video stream from our webcam. In the "while True" loop, we have access to the current frame stored either colored in the "img" variable or as greyscale in the "gray" variable. We will use the greyscale version later on when we classify faces.
cv2 frames are casual multidimensional numpy arrays, so we can directly manipulate them by either applying mathematical functions or using one of the many built-in OpenCV methods.
2.) Cascade Face Detection
Now that we have our input stream set up, we want to do some face detection. While we could train an ANN for that purpose as well, we will rely on Haar Cascade instead. This has two main reasons: First, I want to apply Machine Learning only on problems that are very hard to solve using classical algorithms. But face detection using Haar cascade is very efficient and quiet acurate, so I will rely on existing algorithms to solve new problems instead. Second, the goal of this repo is to not manually create and classify datasets, since this is quiet booring and unchallenging work. Instead, we will use algorithms that do the work for us for everything, since I prefer coding an algorithm for 10 hours over manually cutting out faces out of images for 5 hours, just to train a Machine Learning model.
Haar cascade algorithms are a form of machine learning as well, but they do not use Neural Networks. The underlaying principle of haar cascade was proposed by Paul Viola and Michael Jones in their very interstring paper "Rapid object dete3ction using a boosted cascade of simple features" is easy to understand yet geniously efficient and smart.
The haar cascade algorithms tries to identify simple features in grayscaled images. Such a simple feature can be edges, lines or rectangles. An edge is described as a sharp change in contrast from bright to dark in either horizontal or vertical direction. So whenever the haar cascade algorithm sees a square of pixels which follows that property, it marks them them as an edge feature. The whole subset of the image is scanned for edges, lines and rectangles.
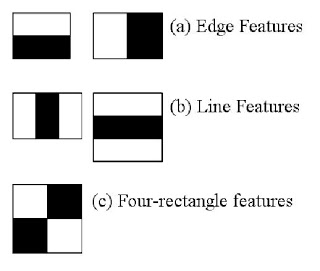
Figure 1: Haar cascade features. Copyright: OpenCV.org
The haar cascade algorithms choses a first subset of the image with a certain size and identifies all these simple features. For a face detecing algorithm, haar cascade identifies over 200 features. One such feature may be a line between the eyebrow and the eye itself, another one a sharp contrast between arround the iris. Finally, he compares the features he identified with a model which contains such feature-descriptions of faces. When the features he identified match to a certain degree with the models description of the optimal features, the haar cascade algorithm marks the subset he is currently scanning as a "face".
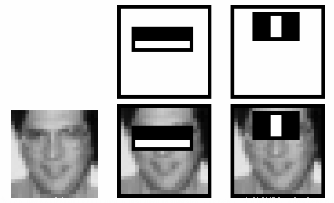
Figure 2: Face detection. Copyright: OpenCV.org
The subareas are chosen of different sizes and at all possible different positions, to match faces of at any scale. Note that haar cascade is by no means limited to face detection, even though it might be the biggest field it is applied to. There are cascades for many different objects like eyes, number plates, chairs, animals and many more. All of them base on the principle of identifying simple features and combining them to match high-level objects.

Figure 3: Demonstration of haar cascade face detection. Copyright: Adam Harvey
The haar cascade we will use for our purpose is the Frontal face default cascade which you can download directly from the OpenCV github repository. Note that even though the cascades are free to use, they fall under the license of the Intel Corporation.
First, we write a small method that lets us download the haar cascade for facial recognition from the github repository manually. The python code for that is quite simple:
# Downloading haarcascade feature set from github
def __downloadCascade():
    print("Downloading haarcascade for face detection")
    url = "https://github.com/opencv/opencv/raw/master/data/haarcascades/haarcascade_frontalface_default.xml"
    folder = "./cascade/"
    local_filename = folder + url.split('/')[-1]
    # Check if already exists on users disk
    if not os.path.exists(folder):
        os.makedirs(folder)
    # Stream download dataset to lcoal disk
    r = requests.get(url, stream=True)
    with open(local_filename, 'wb') as f:
        for chunk in r.iter_content(chunk_size=1024):
            if chunk:
                f.write(chunk)
We use os to create a folder called "cascade" in our working directory, then we use requests to write the filestream on our lokal disk.
Next, we use this downloaded cascade classifier to detect a face in the the webcam camera frames.
def liveFaceDetection(self):

    # Initialize the cascade classifier for detecting faces
    face_cascade = cv2.CascadeClassifier("./face_cascade/haarcascade_frontalface_default.xml")

    # Initialize the camera (use bigger indices if you use multiple cameras)
    cap = cv2.VideoCapture(0)
    # Set the video resolution to half of the possible max resolution for better performance
    cap.set(3, 1920 / 2)
    cap.set(4, 1080 / 2)

    # Standard text that is displayed above recognized face
    exceptional_frames = 100
    while True:
        print(exceptional_frames)
        # Read frame from camera stream and convert it to greyscale
        ret, img = cap.read()
        gray = cv2.cvtColor(img, cv2.COLOR_BGR2GRAY)

        # Detect faces using cascade face detection
        faces = face_cascade.detectMultiScale(gray, 1.3, 5)

        # Loop through detected faces and set new face rectangle positions
        for (x, y, w, h) in faces:
            color = (0, 255, 0)
            startpoint = (x, y)
            endpoint = (x + w, y + h)
            exceptional_frames = 0
            # Draw face rectangle on image frame
            cv2.rectangle(img, startpoint, endpoint, color, 2)

        # Show image in cv2 window
        cv2.imshow("image", img)
        # Break if input key equals "ESC"
        k = cv2.waitKey(30) & 0xff
        if k == 27:
            break
        exceptional_frames += 1
Figure 4: Demonstration of Haar cascade Face detection. Copyright: SRF
We use OpenCV again to import the classification model. After converting the input image to Grayscale, we detect all the faces at multiple scales and save the coordinages (x and y coordiantes, height and width of the detected face) into a list which we later draw on top of the frame. Each time we detect a face, we reset the exceptional_frames timer, which keeps track for how many frames we have not identified a face yet. If we did not identify a face for over 15 Frames, which is roughtly corresponding to half a second, we reset the rectangle we have drawn arround the face. This is done to prevent flickering: A blink of the eyes is sometimes enough for the cascade classifier to loose the face, so we make use of the fact that most of the times, faces won't just dissapear, so even thought we might have lost a face, we keep the rectangle at its place for half a second. When we have found a face again in this time, we adjust the rectangle position accordingly. If we do not refind the face again, we remove the rectangle by setting its position to be just one pixel at the top left corner of the image.
3.) Searching and downloading Images
Okay, the next step would be to download images that show male and female faces. We will use these images to later train our inception v3 model. Of course we could just go and perform a Google Images search manually and then download the first X images that seem to fullfill our needs - but why would we do anything manually that we could also code in python? Let's write a short script that performs a Bing Images search (yep, Bing. I could not manage to use Google Images, since both serach engines do actually not want us to scrape their search result, but Google is too smart for me. Could not figure out how to trick them - but only took me 2 minutes for Bing) and download the first X images for us.
Since this task is quiet decoupled from our actual ANN training, I decided to write a quick library for the Bing Image Search part and upload it to PyPi. You can find the repository here and the link to PyPi here.
Let me just very quickly explain you how BingImages works. When you monitor your network activity while performing a bing images serach, you may notice that they make an asynchronous call to their REST API, which then responds with a HTML site containing a list image-links. With simply faking the REST-Call and matching the response pattern, I was able to extract the links and download them to the local disk. With BingImages, all this is done with one line of code:
from BingImages import BingImages

BingImages.download(BingImages("Male Face", count=30, person="portrait").get(), "./Males")
Figure 5: Demonstrating the background of BingImages.
Now that we can easily download images, we write a new method which downloads and renames the images for us.
# Downloads resource images with the specified terms
def __resourceDownloader(self, count=300):
    for person in self.__persons:
        print("--Downloading Resources for '{}'".format(person))
        folder = "./tmp/downloaded_images/" + person
        # Fetch links from Bing Images and download images
        BingImages.download(BingImages(person + " face", count=count, person="portrait").get(), folder)
        counter = 0
        # Rename the files accordingly
        for filename in os.listdir(folder):
            filepath = folder + "/" + filename
            _, file_extension = os.path.splitext(filepath)
            # Remove files that are of wrong type or too small
            if file_extension.lower() not in [".jpg", ".jpeg"] or os.path.getsize(filepath) < 1024*128: # File not jpeg smaller than 128kb
                os.remove(filepath)
                continue
            tries = 0
            # Rename all other files with fitting schema "img_X.jpg"
            while(tries < 1000000):
                try:
                    os.rename(filepath, folder + "/" + "image_" + str(counter) + ".jpg")
                    break
                # Catch error that a file may exist already with a certain name
                except FileExistsError:
                    tries += 1
                    counter += 1
                    pass
            counter += 1
After we have downloaded the images, we filter out all images with the wrong file extention or too low quality (size too small). Then, we rename the images to follow the naming pattern img_X.jpg.
4.) Prepare images for Training
Now that we have some images for the classification, we need to make sure the Neural Network is trained on exactly the same data that he shall later recognize. That is: The face of human, and only the face. The images we downloaded mostly consist of the head, hair, and most of the times even clothing of humans - but we do not want that. We only want it to train on the face, otherwise we run into the danger of training the Network to recognize long hair or colorful clothes. Since we later cut out the face in the webcam and classify it using our pretrained model, we want to train our model with only the part of the face that the cascade classifier will see.
Therefore, let's write a method that takes our downloaded dataset and cuts out all the faces, which are then sorted into a new folder that we use to train our network.
First, we write a method that takes an input images and returns the images of the faces in that particular image.
# Detects face in cv2 image via haarcascade
def __faceDetector(self, img):
    face_cascade = cv2.CascadeClassifier("./face_cascade/haarcascade_frontalface_default.xml")
    gray = cv2.cvtColor(img, cv2.COLOR_BGR2GRAY)
    faces = face_cascade.detectMultiScale(gray, 1.3, 5)
    faceCuts = []
    for (x, y, w, h) in faces:
        # Faces are recognized with x-y (top-left point) and width-height
        faceCuts.append(img[y:y + h, x:x + w])
    # Returny images (numpy array) of detected faces
    return faceCuts
This is very similar to what we have already done in the Webcam input stream to detect the faces there, with the only difference that we now just add the faces to a facecut list which we later return.
# Cut faces of
def __cutFaces(self):
    print("--Cutting out faces")
    i = 0

    # Loop through folders, cut out face and save face into training_images directory
    for person in self.__persons:
        folder = "./tmp/downloaded_images/" + person
        facefolder = "./training_images/" + person
        if not os.path.exists(facefolder):
            os.makedirs(facefolder)
        for file in os.listdir(folder):
            image = cv2.imread(folder + "/" + file)
            # Detecting Faces
            faces = self.__faceDetector(image)
            for face in faces:
                # Saving the image of the face to the disk
                cv2.imwrite(facefolder + "/face_{}.jpg".format(i), face)
                i += 1
Now, simply loop over the images, detect the faces via our previously written method and save them to the disk into a new folder. The training data is not perfect, but let's see whether it gets the job done.


Figure 6: The face training data for Males & Females. Copyright: Various, but certainly not me.
5.) Retraining inception v3 model
When we think about training a Neural Network, we have datasets with millions of training data in mind, models that we have to train from scratch to best fit our needs. The downside is that such training needs thousands of input data, days of training and weeks of tweaking before it produces a good quality output.
On the other side, there are pretrained networks like "ImageNet" or "Inception V3", models built, tweaked and trained by research teams from Google Brain with a nearly infinte amount of resources and training data. Such models are able to precisely classify images from tousands of classes and the models were tweaked by the best Artificial Intelligence expertes to produce the highest output possible.
Figure 7: Inception V3 Model by Google Brain. Copyright: Medium
What if we could take such an advanced model and retrain it to classify our classes for us? Well, this is exactly what Transfer learning is all about. As you know, Neural Networks are structured into layers of Neurons. While the first layers identify abstract information, later layers are capable of recongizing higher level features like If you are not familiar with Neural Networks and layer, I highly recommend you checkout my other Repository about "Introduction to Deep Dreaming"
When we retrain an existing model, we remove the last few layers, capable of recognizing the highest-level features, and retrain the layers with our own input data. We can recycle the knowledge of most of the layers that recognize abstract features, which we would need in most of the cases anyway to train our model accurately. This allows us to train with very few training data, since the Neural Network only has to recalibrate the last few neurons, so how to identify a Male/Female face out of the abstract features it already learned.
There is an amazing paper written by Maxime Oquab et. al. called "Learning and Transferring Mid-Level Image Representations using Convolutional Neural Networks". It explains the learning transfer quiet on point, which is why I am going to cite the corresponding paragraph here:
"The CNN architecture contains more than 60 million parameters. Directly learning so many parameters from only a few thousand training images is problematic. The key idea of this work is that the internal layers of the CNN can act as a generic extractor of mid-level image representation, which can be pre-trained on one dataset (the source task, here InceptionV3) and then re-used on other target tasks (here Face classification), as illustrated in Figure 8. However, this is difficult as the labels and the distribution of images (type of objects, typical viewpoints, imaging conditions, etc.) in the source and target datasets can be very different. To address these challenges we (i) design an architecture that explicitly remaps the class labels between the source and target tasks, and (ii) develop training and test procedures, inspired by sliding window detectors, that explicitly deal with different distributions of object sizes, locations and scene clutter in source and target tasks."
Source: Maxime Oquab et. al.: "Learning and Transferring Mid-Level Image Representations using Convolutional Neural Networks"
 *
*
Figure 8: Retraining a Neural Network. Copyright: "Learning and Transferring Mid-Level Image Representations using Convolutional Neural Networks"
Let's write a method that calls the retrain.py on our training image folder to classify a new tensorflow model.
os.system("retrain.py " +
    "--tf/training_data/bottleneck_dir=bottlenecks" +
    "--model_dir=tf/training_data/inception" +
    "--summaries_dir=tf/training_data/summaries/basic " +
    "--output_graph=tf/training_output/retrained_graph.pb " +
    "--output_labels=tf/training_output/retrained_labels.txt " +
    "--image_dir=training_images " +
    "--how_many_training_steps=4000")
The script can take thirty minutes or more to complete, depending on the speed of your machine. The first phase analyzes all the images on disk and calculates the bottleneck values for each of them. 'Bottleneck' refers to the layer just before the final output layer that actually does the classification.
Once the bottleneck calculatoins are complete, the actual training of the top layer of the network begins. You'll see a series of step outputs, each one showing training accuracy, validation accuracy, and the cross entropy. The training accuracy shows what percent of the images used in the current training batch were labeled with the correct class. The validation accuracy is the precision on a randomly-selected group of images from a different set. The key difference is that the training accuracy is based on images that the network has been able to learn from so the network can overfit to the noise in the training data. A true measure of the performance of the network is to measure its performance on a data set not contained in the training data -- this is measured by the validation accuracy. If the train accuracy is high but the validation accuracy remains low, that means the network is overfitting and memorizing particular features in the training images that aren't helpful more generally. Cross entropy is a loss function which gives a glimpse into how well the learning process is progressing. The training's objective is to make the loss as small as possible, so you can tell if the learning is working by keeping an eye on whether the loss keeps trending downwards, ignoring the short-term noise.
6.) Applying face classifier on live camera feed
After a few minutes, our Neural Network is retrained successfully. Now we need to write a method that makes use of this trained network to actually classify images for us. For this purpose, we rewrite a script offered by Tensorflow themselves to classify an input image.
# @Param filename: Path to the file that you want to classify
# @Param graph: Path to the retrained inception v3 Graph
# @Param label: Path to the labels.txt file from the retraining process
def classify(filename, graph, label):
    model_file = graph
    file_name = filename
    label_file = label
    input_height = 299
    input_width = 299
    input_mean = 0
    input_std = 255

    # Name of the final output tensor layer
    output_layer = "final_result"
    input_layer = "Placeholder"

    # Load graph and tensors
    graph = load_graph(model_file)
    t = read_tensor_from_image_file(
        file_name,
        input_height=input_height,
        input_width=input_width,
        input_mean=input_mean,
        input_std=input_std)

    input_name = "import/" + input_layer
    output_name = "import/" + output_layer
    input_operation = graph.get_operation_by_name(input_name)
    output_operation = graph.get_operation_by_name(output_name)

    # Open up a new tensorflow session and run it on the input
    with tf.Session(graph=graph) as sess:
        results = sess.run(output_operation.outputs[0], {
            input_operation.outputs[0]: t
        })
    results = np.squeeze(results)

    # Sort the output predictions by prediction accuracy
    top_k = results.argsort()[-5:][::-1]
    labels = load_labels(label_file)

    result = []
    for i in top_k:
        result.append((labels[i], results[i]))

    # Return sorted result tuples
    return result
Classifying a face is not as simple as saving it to the disk and then calling the "classify" function.
prediction = classify(filename, "./tf/training_output/retrained_graph.pb", "./tf/training_output/retrained_labels.txt")Now let's extend the LiveClassify method to not just detect a face, but also classify it.
    def liveDetect(self):
        filename = "./tmp/face.jpg"

        # Inner function for thread to parallel process image classification according to trained model
        def classifyFace():
            print("Classifying Face")
            prediction = classify(filename, "./tf/training_output/retrained_graph.pb", "./tf/training_output/retrained_labels.txt")
            nonlocal text
            text = prediction[0][0]
            print("Finished classifying with text: " + text)

        # Initialize the cascade classifier for detecting faces
        face_cascade = cv2.CascadeClassifier("./face_cascade/haarcascade_frontalface_default.xml")

        # Initialize the camera (use bigger indices if you use multiple cameras)
        cap = cv2.VideoCapture(0)
        # Set the video resolution to half of the possible max resolution for better performance
        cap.set(3, 1920 / 2)
        cap.set(4, 1080 / 2)

        # Standard text that is displayed above recognized face
        text = "unknown face"
        exceptional_frames = 100
        startpoint = (0, 0)
        endpoint = (0, 0)
        color = (0, 0, 255) # Red
        while True:
            print(exceptional_frames)
            # Read frame from camera stream and convert it to greyscale
            ret, img = cap.read()
            gray = cv2.cvtColor(img, cv2.COLOR_BGR2GRAY)

            # Detect faces using cascade face detection
            faces = face_cascade.detectMultiScale(gray, 1.3, 5)

            # Loop through detected faces and set new face rectangle positions
            for (x, y, w, h) in faces:
                color = (0, 0, 255)
                if not text == "unknown face":
                    color = (0, 255, 0)
                startpoint = (x, y)
                endpoint = (x + w, y + h)
                face = (img[y:y + h, x:x + w])
                # Only reclassify if face was lost for at least half a second (15 Frames at 30 FPS)
                if exceptional_frames > 15:
                    # Save detected face and start thread to classify it using tensorflow model
                    cv2.imwrite(filename, face)
                    threading._start_new_thread(classifyFace, ())
                exceptional_frames = 0

            # Face lost for too long, reset properties
            if exceptional_frames == 15:
                print("Exceeded exceptional frames limit")
                text = "unknown face"
                startpoint = (0, 0)
                endpoint = (1, 1)

            # Draw face rectangle and text on image frame
            cv2.rectangle(img, startpoint, endpoint, color, 2)
            textpos = (startpoint[0], startpoint[1] - 7)
            cv2.putText(img, text, textpos, 1, 1.5, color, 2)
            # Show image in cv2 window
            cv2.imshow("image", img)
            # Break if input key equals "ESC"
            k = cv2.waitKey(30) & 0xff
            if k == 27:
                break
            exceptional_frames += 1
Most of the code is the same as before, but we added a text over the face-rectangle in which we write the prediction of our neural network classifier. Whenever a face is lost and redetected after half a second, we start a new thread in which we detect the face. Then, we read out the best prediction and set the text over the face-rectangle accordingly.
7.) Fastening our Classification
The only problem we have with this solution is that the tensorflow model we use, called inception v3, is quiet slow. It takes roughtly 2 seconds to classify the face, which is still quiet performant, but not enought for a live image detection. We therefore need to find a way to speed up our network - and the best way to do this is by training a new Neural Network called MobileNet, also created by google but made to be as fast as possible, with help of our other, slower Network.
You may ask yourself why we did not retrain the MobileNet Network in the first place. The biggest problem of the MobileNet Network is the amount of input images we need for a good classification, since it has a smaller overhead compared to the inception v3 model. This means we retrain a larger set of layers, making the network smaller and faster, but creating the need for more input images for an accurate classification.
With the bing images downloader, we could never reach such a high quantity of training images, since the quality of the search results starts to drop significantly after the first few hundret (or with bing even dozen) search results.
What we CAN find online are larg datasets of images that we can download for free - images of persons, faces and many other. The problem with these sets is that they are not classified for our needs: When we download a large set of face-images, images of Males and Females are all mixed up. We can then either dig through them by hand and split males from females - or we do it the smart way and use our slow but reliable inception v3 model for this task!
8.) Fetching big datasets from the Internet
To train the MobileNet network, we need a pretty large dataset. Preferably, a few thousand images per category. To achieve this, we let our script automatically download a few big datasets from the internet which we will then classify.
One of the biggest open source datasets I could find is the Labeled Faces in the Wild dataset. It contains of roughtly 13 000 greyscale images of faces of different celebrities, including Roger Federer, Michelle Obama or even Osama Bin Laden. Another good collection of images is offered by Stirling and can be downloaded here. Now let's write a script again to download, unpack and sort all these images - 15 000+ in total.
def __downloadLFW(self):
    print("Downloading LFW Face Dataset for face detection")
    # Links to all dataset archives
    urls = [
        "http://pics.psych.stir.ac.uk/zips/Aberdeen.zip",
        "http://pics.psych.stir.ac.uk/zips/Iranian.zip",
        "http://pics.psych.stir.ac.uk/zips/pain.zip",
        "http://pics.psych.stir.ac.uk/zips/utrecht.zip",
        "https://www.openu.ac.il/home/hassner/data/lfwa/lfwa.tar.gz"
    ]
    folder = "./lfw_dataset/tmp/"
    # Download all datasets
    for url in urls:
        print("Start downloading {}".format(url))
        local_filename = folder + url.split('/')[-1]
        file_extention = local_filename[local_filename.rfind(".")+1:]
        # Skip if archive already exists
        if not os.path.exists(local_filename):
            print("File extention: {}".format(file_extention))
            if not os.path.exists(folder):
                os.makedirs(folder)
            # Open up download strem to file
            r = requests.get(url, stream=True)
            with open(local_filename, 'wb') as f:
                for chunk in r.iter_content(chunk_size=1024):
                    if chunk:
                        f.write(chunk)
            print("Download complete. Entzipping now")
            # Unpack zips
            if file_extention == "zip":
                print("Unzipping file {}".format(local_filename))
                zippedFile = zipfile.ZipFile(local_filename, 'r')
                zippedFile.extractall(folder)
                zippedFile.close()
            # Unpack tars
            else:
                print("Untarring file {}".format(local_filename))
                tarredFile = tarfile.open(local_filename, "r:gz")
                tarredFile.extractall(folder)
                tarredFile.close()
        else:
            print("Dataset already exists. Skipping it.")
    print("Finished all downloads. Reordering data")
    i = 0
    data_folder = "./lfw_dataset/images/"
    # Refresh folder if already existent
    try:
        shutil.rmtree(data_folder)
    except FileNotFoundError:
        pass
    os.makedirs(data_folder)
    # Copy all files to new location with correct naming schema
    for root, dirs, files in os.walk("./lfw_dataset/tmp/"):
        for file in files:
            filename = os.path.join(root, file)
            _, file_extension = os.path.splitext(filename)
            if file_extension.lower() == ".jpg" and not os.path.exists(data_folder + "img_{}.jpg".format(i)):
                print("Copy file: {} to img_{}.jpg".format(filename, i))
                shutil.copyfile(filename, data_folder + "img_{}.jpg".format(i))
                i += 1
    print("Done setting up the dataset")
After we downloaded the archives, we unzip them and copy all files to a new location with a given naming scheme of img_X.jpg.

Figure 9: Sample from the LFW Datset. Copyright: University of Massachusetts
9.) Classify datasets using inception v3 model
The next step is to cut out the faces of the images, classify them and moving them yet to another location.
# Train a faster mobile neural network with the intelligence of the inception v3 model
def fastenNetwork(self, newDataset=True):
    print("Fastening Network")
    lfw_folder = "./lfw_dataset/images"
    # Download datasets
    self.__downloadLFW()
    bigdata_folder = "training_images_bigdata"
    # Creates big data folder for saving faces if not existent
    if not os.path.exists(bigdata_folder):
        os.makedirs(bigdata_folder)
    i = 0
    models = {}
    for person in self.__persons:
        models[person.lower()] = 0
    # Train a new dataset if requested, use the existing images otherwise
    if newDataset:
        print("Classifying new images from LFW Dataset")
        for folder in self.__persons:
            if not os.path.exists(bigdata_folder + "/" + folder):
                os.makedirs(bigdata_folder + "/" + folder)
        # Loop over all the files
        for file in os.listdir(lfw_folder):
            print("Processing {}".format(lfw_folder + "/" + file))
            image = cv2.imread(lfw_folder + "/" + file)
            # Detect faces
            faces = self.__faceDetector(image)
            for face in faces:
                # Save face temporarily for the classifier
                cv2.imwrite(bigdata_folder + "/tmpface.jpg", face)
                # Classify face
                predictions = classify(bigdata_folder + "/tmpface.jpg", "./tf/training_output/retrained_graph.pb", "./tf/training_output/retrained_labels.txt")
                # Save image to the classified class if certainty is above 60%, skip image otherwise
                if predictions[0][1] > .6:
                    cv2.imwrite(bigdata_folder + "/" + predictions[0][0] + "/img_{}.jpg".format(i), face)
                    i += 1
                    models[predictions[0][0]] += 1
                    print("Current prediction status: ", models)
We loop through all the images, detect their faces using haar cascade, then classify the image. If the image prediction is good enought, save it to the corresponding folder. This process takes roughtly 30h to process.

Figure 10: Cut out faces from the LFW Datset. Copyright: University of Massachusetts
10.) Retraining Faster MobileNet Model
Now we just call the retrain.py script again, but this time with different parameters. We overwrite the old model since our new one is going to be preciser and faster anyways.
print("--Training model")
os.system("retrain.py --tf/training_data/bottleneck_dir=bottlenecks " +
    "--model_dir=tf/training_data/inception " +
    "--summaries_dir=tf/training_data/summaries/basic " +
    "--output_graph=tf/training_output/retrained_graph.pb " +
    "--output_labels=tf/training_output/retrained_labels.txt " +
    "--image_dir=training_images_bigdata " +
    "--how_many_training_steps=4000 " +
    "--tfhub_module https://tfhub.dev/google/imagenet/mobilenet_v1_100_224/feature_vector/1 " + # Which architecture to use
    "--validation_batch_size=-1 " +
    "--learning_rate=0.0001 " +
    "--random_brightness=30")
After roughtly two days, the model has finished its training and is ready to be classified.
11.) Final Live tests with faster MobileNet Model
Now let's test the new MobileNet model with our live classification. In theory, the classification process should now be extremely fast and take under half a second to finish on a CPU, way under 1/30 of a second on a GPU.
And indeed, classifying a face only takes a very short amount of time and after a few frames, the face is already classified. There are some difficulties the trained model faced. First, the training data was quiet asymmetric with about 25% Women and 75% men, which makes the model predict man wich much higher accuracy than women. Further, median age of the people shown in the training set was arround 30 to 40 years, which makes the Neural Network look for features like wrinkles or uneven skin for identifying men - which is why often young men are mistakenly identified as women since they have face properties that are closer to women of middle age then to men of middle age.

Figure 11: Live classification of faces. Copyright: SRF.
Final Thoughts
With the help of Tensorflow, we could achieve building a fast and reliable live classifier without having to manually create a dataset of input images at all. Our code could easily be reused and be trained on other facial features as well: wrinkles, age, long/short hair, glasses and many more - as long as the training features are found in one of the datasets we automatically download. The algorithm starts with just two words and manages to do all the work on it's own: From initially getting a few reliable base-training images, to training the inception-v3 model, to downloading a bigger dataset, preparing it to make it a reliable input dataset for MobileNet network, then finally retraining a faster MobileNet network and fastly classifying from a live input stream.
To further improve the algorithm, we could try to fine-tune the training parameters (iterations, training steps) or make the initial set of images more reliable. Without double checking the initial training set, we run into the danger of having images as trianing images that do not directly describe our features. This is due to the Bing image search engine: When searching for a "Female Face", we get drawings of female faces very high in the result feed, making us train the network for
License
MIT License
Copyright (c) 2018 Joel Barmettler
Permission is hereby granted, free of charge, to any person obtaining a copy of this software and associated documentation files (the "Software"), to deal in the Software without restriction, including without limitation the rights to use, copy, modify, merge, publish, distribute, sublicense, and/or sell copies of the Software, and to permit persons to whom the Software is furnished to do so, subject to the following conditions:
The above copyright notice and this permission notice shall be included in all copies or substantial portions of the Software.
THE SOFTWARE IS PROVIDED "AS IS", WITHOUT WARRANTY OF ANY KIND, EXPRESS OR IMPLIED, INCLUDING BUT NOT LIMITED TO THE WARRANTIES OF MERCHANTABILITY, FITNESS FOR A PARTICULAR PURPOSE AND NONINFRINGEMENT. IN NO EVENT SHALL THE AUTHORS OR COPYRIGHT HOLDERS BE LIABLE FOR ANY CLAIM, DAMAGES OR OTHER LIABILITY, WHETHER IN AN ACTION OF CONTRACT, TORT OR OTHERWISE, ARISING FROM, OUT OF OR IN CONNECTION WITH THE SOFTWARE OR THE USE OR OTHER DEALINGS IN THE SOFTWARE.
Hire us: Software Entwickler in Zürich!