modesttree / Projeny
Labels
Projects that are alternatives of or similar to Projeny

Project and Package Manager for Unity3D

Introduction
The purpose of Projeny is to allow your Unity3D project to easily scale in size without heavily impacting development time.
Projeny allows you to:
- Share any Unity assets (code, scenes, prefabs, etc.) across multiple different Unity projects without copy and pasting
- Instantly switch between platforms
- Easily upgrade or downgrade installed asset store packages
- Optimize compile time of your project by getting Unity to only recompile the code that changes most often
- Split up your project into discrete packages, so that you can manage the dependencies between each, instead of having one giant Unity project of inter-related files
- Declare dependencies between packages, so that you always get the packages that you need without needing to hunt down missing libraries or broken links
- Generate a more intelligent Visual Studio solution than the Unity default, using package dependencies to create csproj dependencies
See below for details on how Projeny achieves all these features.
This project is open source. If you're interested in helping, great! There's still a number of features we'd like to support eventually (in particular we need help with supporting OSX).
NOTE: Projeny requires Unity3D 5.3.1 or higher, since it makes use of the -buildTarget command line switch is only fixed in 5.3.1
Table Of Contents
- Installation
- Overview
- Advantages of Using Projeny
- Usage Details
- Appendix
- Release Notes
- License
Installation
You can either run Projeny directly from source (requires python) or simply download the latest binary. Note that Projeny is currently only supported on Windows (with an OSX version planned for future releases).
-
From Binary
- Go to the releases section and download the latest ProjenyInstaller.exe
- Note that after installation completes, you will need to add the [Install Directory]/Bin directory to your windows path.
-
From Source
- Clone this repo to a place on your hard drive
- Make sure python 3.x is installed and that you have also installed the following:
- pyyaml (to install run
pip install pyyaml) - python for windows extensions (download here for your version of python)
- pyyaml (to install run
- Open UnityPlugin/Projeny.sln in Visual Studio
- Build in Release Mode
- Add the Projeny/Source/bin folder to your windows path
Overview
Projeny works by composing your Unity3D projects entirely out of 'directory links' (aka windows junctions aka symbolic links).
This is best shown with an example. After installing Projeny, download the sample project from the releases page and extract it to a new folder on your hard drive. The folder structure should appear like this:
- Projeny.yaml
- UnityPackages
- AllMovers
- CommonShapeMover
- CubeMover
- SphereMover
- UnityProjects
- ProjenyProject.yaml
- AllMovers
- ProjenyProject.yaml
- ProjectSettings
- CubeMover
- ProjenyProject.yaml
- ProjectSettings
- SphereMover
- ProjenyProject.yaml
- ProjectSettings
Each folder in the UnityProjects directory represents an actual Unity3D project. Note that they each have the familiar ProjectSettings directory but they do not yet have an Assets directory. This is because these projects have not been initialized yet by Projeny. You'll also notice a file named Projeny.yaml at the root of the folder structure. This is a simple text file that is used to specify configuration settings for Projeny.
To initialize these Unity projects we must run Projeny from the command line. Open up command prompt or powershell and navigate to the root directory (the same directory where you will find Projeny.yaml). Then execute prj --init. If the prj command is not found, check that it has been added to your windows PATH variable, as mentioned in the install instructions. All this command does is initialize some of the the directory links for these projects.
If we look at our project folders again, we see that a bunch of new folders appear to have been added. Let's look at the CubeMover project in particular:
- UnityProjects
- CubeMover
- ProjectSettings
- CubeMover-Windows
- Assets
- CubeMover
- Plugins
- CommonShapeMover
- Projeny
- ProjectSettings
- Assets
- CubeMover
The CubeMover-Windows folder is new, and now has the familiar Assets directory. It also contains a bunch of folders within it such as CubeMover, CommonShapeMover, etc.
To actually run our project, open the CubeMover-Windows folder in Unity and then open the scene at CubeMover/CubeMain. After running it you should see the cube move around while changing colors.
So where did all these files come from? The answer is 'directory links' (aka windows junctions aka symbolic links). All of these new folders are not really folders in themselves but instead they are simply links to existing folders somewhere else.
In fact, if you're using source control, the entire CubeMover-Windows directory should be excluded from it (by using a .gitignore file, a .svnignore, .p4ignore, or whatever ignore method applies to the source control you're using). If you're using subversion or git, this will happen automatically when you initialize your project (otherwise, you will have to make sure to add the ignore files yourself).
We do this because the contents of the CubeMover-Windows folder does not itself contain any real content. It simply contains temporary files generated by Unity (such as the Library folder) and directory links to other directories that actually do contain content.
The directories containing the actual content can be found in the UnityPackages directory. This is where you will find the CubeMover and CommonShapeMover folders that we see linked to underneath the assets directory.
But how does Projeny know which packages to use for the CubeMover project? For this it reads from a configuration text file, which can be found at CubeMover/ProjenyProject.yaml. Details on this file are covered in another section below. This file can be changed by hand, but most of the time however you can use Projeny's built-in Unity plugin to manipulate this file instead. You can try this by opening the CubeMover project in Unity, then clicking the menu item Projeny -> Package Manager.... This window will be be explained in more detail in the following sections.
Advantages of Using Projeny
Ok so why are we doing this? Why go to the trouble of creating this seemingly complex directory structure of for every project? What's wrong with the standard way that Unity is designed?
We do this because it has many advantages over standard Unity development:
1 - Shared files between projects
By using directory links, you can have multiple Unity projects all using the same package folders, without needing to copy and paste each package per project. You can change a file such as a prefab or a C# file, and that change will be applied to all other projects that are using it as well
Previously, the best way to share code between different Unity projects was to put the code into a DLL and then output that DLL to all the Unity Projects that you want to use it in. This works ok but has a number of gotchas that make this approach difficult to do correctly.
Want to re-use some common utility code/prefabs in several different games? Just have multiple Unity projects for each game all using the same utility packages directly.
Want to just test one part of your game without needing to fire up the entire project? Just create another Unity project and reference only the parts of the game you want to test.
To see this in action, do the following: (Note: this assumes you have already run prj --init as described above)
- Open Unity then open the project at
UnityProjects/SphereMover/SphereMover-Windows - Open another copy of Unity then open the project at
UnityProjects/CubeMover/CubeMover-Windows - Open the scene named
SphereMainin the first Unity and the sceneCubeMainin the second Unity - If you run them you should see the shapes move and change colors
- The script used here to move both the Sphere and the Cube is the same, and can be found in the shared package
CommonShapeMover. - As a further example, open up the Unity project at
UnityProjects/AllMovers/AllMovers-Windows - Run the scene
AllMovers - You should see both the cube and sphere in the same scene
- This works because these three projects all have some shared packages. Note that this allows sharing code as well prefabs (ie. the cube and the sphere prefabs), scenes, etc.
2 - Package Organization and Asset Store Integration
Projeny allows you to much more easily manage many different Unity packages that you've created yourself, but also those packages that you've installed through the asset store.
You can build up a big collection of packages that you've purchased through the asset store and added to your UnityPackages directory, and then easily include or exclude those by simply selecting or not selecting them for each project. Projeny can also be used to easily upgrade/downgrade installed asset store packages all through a simple interface within Unity. See this section for more details on managing asset store packages through Projeny.
3 - Near instant platform switching
You might be wondering why the projects that you've been dealing with are all marked with the suffix '-Windows'. Or why there are multiple ProjectSettings folders that appear after you run the --init command as described above (One underneath CubeMover and another underneath CubeMover-Windows)
The reason for this is to allow Projeny to create entirely separate Unity project directories for each platform. This allows us to jump instantly from one platform to another without needing to wait for Unity to process all the assets.
In the examples above, we have only initialized the windows Unity project CubeMover-Windows but we can also create CubeMover-iOS, CubeMover-Android, etc. by opening these platforms for this project.
When that occurs, Projeny will create a directory link to the main ProjectSettings directory so that we can have all these different platform-specific projects use the same Unity project settings.
To see this in action, open up the CubeMover project in Unity then select the menu item Projeny -> Change Platform -> iOS. The first time you do this will take longer since Unity has to process the files but any subsequent times should be nearly instant, since it should be no different from simply opening another project.
4 - Compile time optimization
Unity compiles your project in multiple passes. The first pass compiles all C# files that are in the Plugins/ directory and the second pass compiles all other C# files. If Unity does not detect any changes in the Plugins/ directory then Unity will skip this first pass and only execute the second pass. (Note: This is a bit of a simplification - see here for full details)
We can take advantage of this by always putting all stable packages (such as those obtained through asset store) into the Plugins folder and putting the packages that we change frequently directly underneath the Assets folder.
And because we are using directory links, and the entire CubeMover-Windows folder is ignored by source control, changing the location of these directory links is trivial. You can modify this directory structure multiple times per day based on what you're working on, by simply using changing a few things in the Projeny Package Manager window.
To see this in action, open up the AllMovers-Windows project.
By default, the assets folder should appear as follows:
- AllMovers
- CommonShapeMover
- CubeMover
- Plugins
- Projeny
- SphereMover
If we are only working within the AllMovers project, there is no reason we need to be recompiling CommonShapeMover, CubeMover, and SphereMover projects every time a script changes. So these projects can be moved to be underneath the Plugins folder.
To do this, open up the package manager by clicking on the menu item Projeny -> Package Manager.... You should see something like this:

If you click on the Edit button you should see the ProjenyProject.yaml file associated with this project. This file contains all projeny configuration settings for your project. You can edit this file by hand, or use the GUI provided by the Package Manager window as shown above.
Now, drag the CommonShapeMover, CubeMover, and SphereMover projects to the Plugins folder, so that it looks like this:
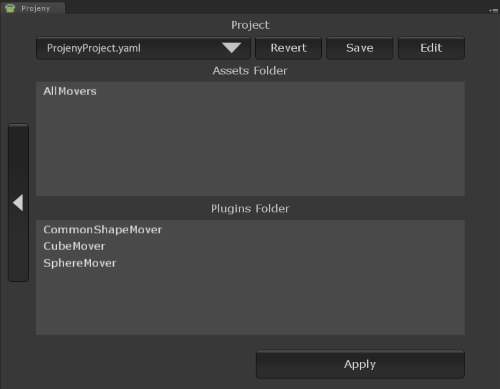
Then click the "Update Directories" button. This will update the ProjenyProject.yaml file and also update the directory links in our project to match. After Unity refreshes, if you look at the Assets tab, it should now appear how we want:
- AllMovers
- Plugins
- CommonShapeMover
- CubeMover
- Projeny
- SphereMover
Now we can continue coding within the AllMovers project and benefit from faster compile times.
5 - Platform specific package folders
Unity 5 adds some helpful features, including the ability to enable/disable a DLL based on platform. If you add a DLL to your project then click on it you get a bunch of checkboxes in the inspector that allow you to choose which platform this DLL is for. Projeny allows you to do something similar except for all assets and directories.
This is possible because when Projeny generates your Unity project, it can choose a different set of package folders to include based on the current platform, since each platform has its own Unity project directory generated for it.
One example use for this is if you had a large Resources folder that contained a lot of data for a specific platform. Since Unity always includes the contents of the Resources folders for builds, this would cause your platform specific files inside Resources to be included on other platforms for no reason. Using Projeny, you can simply move the Resources folder to a platform specific package to address this problem
This can also make things easier when it comes to code. You can have entire package folders be platform specific, then you no longer need to add #ifdef's around entire files to avoid the compile errors on other platforms.
For more details on how to use this feature, see the section on package configuration.
6 - Dependency Management of Packages
When adding a package to the UnityPackages directory, you can also specify the packages that this package depends on. Then, when Projeny is generating your Unity project directory, it can automatically figure out which packages you need.
This is very powerful, because often when working on a new project you want to just be able to ask for package X, and you don't want to have to think about what other packages this package requires.
To see this in action, open up the AllMovers-Windows project again. Then open the package manager by clicking Projeny -> Package Manager.... In the Project section, try deleting the projects CommonShapeMover, CubeMover, and SphereMover. You can do this by either clicking them and hitting delete, or right clicking and selecting Remove. The package manager should then look like this:

Then hit "Update Directories". If you then look at the Assets tab, you should see the following directory structure:
- AllMovers
- Plugins
- CommonShapeMover
- CubeMover
- Projeny
- SphereMover
So the question is, why were the SphereMover, CommonShapeMover, and CubeMover packages added even when not specified in the ProjenyProject.yaml file?
The reason for this is that the AllMovers package has its own list dependencies separate from the project.
To see this, click the arrow on the far left side in the Package Manager window. This will change the view to show the full list of packages that are available for use in your project, in addition to the previous screen that showed the current ProjenyProject.yaml configuration settings.
Now, right click on the AllMovers package in the Packages list and select Edit ProjenyPackage.yaml, as shown here:

This will open up the file at UnityPackages/AllMovers/ProjenyPackage.yaml. It should appear as follows:
Dependencies:
    - CubeMover
    - SphereMover
This tells Projeny that whenever the AllMovers package is added to a project, the SphereMover and CubeMover packages should be added as well. Once Projeny processes the ProjenyPackage.yaml file for the AllMovers project, it will then look at the ProjenyPackage.yaml for the CubeMover and the SphereMover projects, and then repeat again for those dependencies, etc. (The CubeMover and SphereMover packages are what contain the reference to CommonShapeMover).
7 - More intelligent Visual Studio Solution generation
Projeny can also take advantage of the dependency information between packages to generate a better Visual Studio project.
To see this in action, open up the AllMovers-Windows project, and then click the menu item Projeny -> Package Manager.... Then click on the arrow button on the right until you reach this screen:

Click the Open Solution button. By default this will open the solution using the default program, but you can also set this explicitly in the Projeny.yaml by setting a value for VisualStudioIdePath like below:
PathVars:
    UnityPackagesDir: '[ConfigDir]/UnityPackages'
    UnityProjectsDir: '[ConfigDir]/UnityProjects'
    LogPath: '[ConfigDir]/PrjLog.txt'
    VisualStudioIdePath: 'C:/Program Files (x86)/Microsoft Visual Studio 12.0/Common7/IDE/devenv.exe'
After opening the solution, you should see two C# projects. One named "AssetsFolder" that contains all C# files under the Assets/ folder and one named "PluginsFolder" that contains all C# files underneath the Plugins/ folder. So far, this is the same as the solution that Unity produces when it generates its visual studio solution.
Go back to the Package manager and drag the following projects over:

Now, if you hit Update Solution, and go back to Visual Studio you should see the following:

As you can see, every package that you drag to the list on the right in the Package Manager will have a C# project created for it. You'll also notice that the AssetsFolder has disappeared. This is because Projeny did not find any files left over to place in it, so it didn't bother to create the project. But, since we did not drag over the CommonShapeMover project, the PluginsFolder project has remained.
This can be helpful for code organization but more importantly, this allows you to design dependencies on a module level. In normal Unity projects, every code file could potentially make use of any other code file in your entire project. For small projects this is not an issue, however, as your project scales in size it is helpful to be able to design code at a module level and avoid having your project devolve into a Big ball of mud.
For example, it is common to build up a library of re-usable utility functions that you can use in multiple Unity projects, such as a math library. For these cases, it would be important to avoid using game-specific code from within your math library, because then your math library would be strongly coupled to your game and you wouldn't be able to use it in other projects. If you compile using the Projeny generated solution file, this would not be a problem, since it would guarantee these dependencies remain intact, even though Unity itself would allow them.
If you want to use the Projeny-generated visual studio solution as your primary editor, you can also set up Unity to use it by default. You can do this by doing the following:
- Open Unity and go to
Edit -> Preferences -> External Tools - Click the dropdown next to
External Script Editor - Click Browse
- Navigate to the install directory of Projeny (by default this is at
C:\Program Files (x86)\Projeny) and selectBin/PrjOpenInVisualStudio.bat(note that you may have to selectAllFilesin the bottom right dropdown) - Next to
External Script Editor Argstype"$(File)" "$(Line)"
Now, when you double click a C# script or an error message in the Unity console it should open the file in the Projeny generated solution. Note that in this case you will have to set a value for VisualStudioIdePath as described above.
Note the following:
- The contents of the
Visual Studio Solutionlist in the Package Manager are saved toProjenyProject.yaml. If you click the edit button from Package Manager after following the steps above you can see this. - The C# project dependencies are generated based on the dependencies that are declared for the package in a
ProjenyPackage.yamlfile, as described in the previous section. (you can see this by clickingReferences -> Add Referencethen looking atSolution -> Projectsfrom within Visual Studio) - The solution file is generated and saved at
UnityProjects/AllMovers-Windows.sln. Not to be confused withUnityProjects/AllMovers-Windows/AllMovers-Windows.slnwhich is (usually) the path to the solution generated by Unity - The solution file and all csproj files are fully generated, and therefore you should not change any settings on them, such as preprocessor defines, output paths, etc. Any change that you make here will be over-written next time you update the solution. Also, note that if you're using source control, the csproj files and solution file will be ignored since the entire Unity
Assetsdirectory is ignored. You can however, use Visual Studio to create/remove files without an issue, since these files will be added again next time Projeny updates it. - The DLL's generated by this custom solution are not used at all, just like the DLL's generated by the normal Unity-generated solution are not used at all . Unity still has to recompile all the code itself, even if we've already compiled it using the custom solution.
- The generated solution file is platform specific, since each platform contains different preprocessor defines. This is good to be aware of because it means you will have to exit visual studio and re-open the solution when changing platforms.
- You can also add regular expressions to the project list. You can do this within the package manager by right clicking on empty space inside the Visual Studio Solution list then selecting
Add As Regex.... For example, to create a Visual Studio project for every package, add a regex with value.*. Note that the rules for this regular expression are the same as those used in the python programming language (more details here)
Managing Asset Store Assets / Releases
If you open the menu item Projeny -> Package Manager and click the left arrow all the way to the left, you should see something similar to the following:

This is the list of "releases". A "Release" refers to an external collection of assets, often with an associated version number. In most cases, these refer to items that you've downloaded through the asset store but they can also be retrieved from other sources (such as a local folder on your hard drive or a remote file server).
By default, Projeny will scan your asset store cache to populate this list, so you will likely see some familiar assets listed here.
As an example, choose one of these assets and drag it into the Packages list on the right. I'm going to choose Asset Store Tools. After Projeny finishes creating the new package you should see something like the following:

You'll notice that the name of the package does not necessarily correspond exactly to the name of the release. This is because by default, Projeny will use the extracted folder name as the package name. This is necessary in some cases because some assets might require a specific folder name. Note that you can rename the package to whatever you want after adding it (through right click menu) if the default name is not ideal.
You'll also notice that the actual release name is displayed in green. Every time you install a release, Projeny adds a file named ProjenyInstall.yaml to the new package folder. This file contains information about where the package came from, what version it is, etc. This file is how Projeny is able to recognize which packages have a corresponding release. Note that in many cases there is none, and the package was simply created from scratch (eg. AllMovers, CubeMover, etc.)
This file is also what Projeny uses to detect when you are upgrading or downgrading a package. For example, if I now drag in Asset Store Tools again, but this time I choose version "4.0.5", you will get the following popup:

This same popup will be displayed when downgrading a package as well. This can be very useful, because you do not have to be afraid of upgrading and potentially introducing new issues to your project. You can rest assured that the previous versions will remain in the Releases list in case you ever need to downgrade (which isn't possible using the asset store)
Note also that after you add the release as a package, you will also have to add it to your project, to actually have it appear in Unity.
Also note that since this list is generated from your asset store cache, in order to have new asset store items listed here you will have to purchase them through the asset store and then download them. After download completes you can then immediately cancel the import popup. After that, you can hit the refresh button underneath the Releases list to have your newly purchases asset ready for use.
For information on defining your own "release source", for use in addition to the asset store cache (for example by using a local folder on your hard drive or a remote file server) see this section
Using Multiple Package Folders
Up until now we've assumed that there is one definitive folder for all the packages that are available for inclusion in your unity projects. However, this is configurable, so if you want, you can define multiple locations to pull packages from. This can be especially useful if you want to define a project-specific package and you do not want to add clutter up the shared UnityPackages directory.
To see this in action, download the sample project and then open up the All-Movers project (by either opening up the UnityProjects\AllMovers\AllMovers-Windows directory within unity or running prj --project AllMovers --openUnity / prj -p am -ou from the command line)
Then open up the Package Manager through the menu item Projeny -> Package Manager. In the Packages panel, you should see a dropdown that allows you to select where to get the package list from as shown in this screenshot:

Select the dropdown and choose the option for [ProjectRoot]\Packages. By default this will display an empty list of packages. Right click in the list and choose New Package, then enter the name Test. You should then see the following:

Now, right click again in the list and choose Show Root Folder In Explorer. This will open up the directory at UnityProjects/AllMovers/Packages.
The list of package folders locations that appears in this drop down is configured on a per-project basis and can be found in the ProjenyProject.yaml files. The sample project is set up with two locations. One for the common UnityPackages folder and one directly underneath the root folder for each project.
To see where this is set, open up the file ProjenyProject.yaml at UnityProjects/ProjenyProject.yaml. The settings in this file will automatically be applied to all projects, in addition to the settings that are inside UnityProjects/AllMovers/ProjenyProject.yaml. This file should appear as follows:
PackageFolders:
    - '[SharedUnityPackagesDir]'
    - '[ProjectRoot]/Packages'
This list should contain the same values as what you see in the dropdown within the Package Manager GUI.
Sharing Project Settings
In addition to sharing packages between unity projects, you can also share project settings. Project settings include all the values that you see when you open up any menu item inside Edit -> Project Settings within Unity. This can be useful if you want to create a duplicate of a project with a slightly different set of packages.
To see this in action, download the sample project and then open up the All-Movers project (by either opening up the UnityProjects\AllMovers\AllMovers-Windows directory within unity or running prj --project AllMovers --openUnity / prj -p am -ou from the command line)
Then, select the menu item Projeny -> Change Project -> New. This should display the following popup:

Make sure to check the "Share Project Settings" checkbox which is unchecked by default. Give it the name Test.
After clicking Submit, your new project should be initialized and then opened in Unity. Now, if you change a project settings from the Edit -> Project Settings menu it will apply to both the AllMovers and your newly created Test project.
Like all project settings, this is configured within the ProjenyProject.yaml file. If you open this up by either clicking the Edit button within the Package Manager or simply opening up UnityProjects/Test/ProjenyProject.yaml you should see the following:
ProjectSettingsPath: '[ProjectRoot]/../AllMovers/ProjectSettings'
Note that since we haven't added any packages yet to our new project, there isn't a line for AssetsFolder and PluginsFolder yet.
"Gotchas" With Directory Links
-
Moving package folders around within Unity directly
- You are free to move files and directories around within Unity using Unity's "Project" tab, however, you should be careful not to move any package directories themselves. Otherwise, you could end up with duplicate files the next time you get projeny to update your directory links.
-
Copying and pasting projects doesn't work
- If you copy and paste your entire directory structure to another location on your hard drive, the directory links will become empty folders in the new location. To address this issue, after copying and pasting your files, run
prj -cla --initon the new location. All this does is clears all the generated files (-cla) and then initializes all the directory links for all projects (--init).
- If you copy and paste your entire directory structure to another location on your hard drive, the directory links will become empty folders in the new location. To address this issue, after copying and pasting your files, run
-
If you are using git for source control, you should be careful when using
git clean- Running
git clean -dfshould work as expected, but if you rungit clean -xdfyou could lose some data. This is becausegit cleanfollows directory links. So if it tries to delete the generated files underneath yourUnityProjectsdirectory, this will also delete some files within theUnityPackagesdirectory. Runninggit clean -dfwill not have this problem because yourUnityProjectsfolders should be ignored by git already andgit cleanwill only delete ignored files if you also supply the-xoption. If you do need to include the-xoption, then we recommend you runprj -clafirst, which will ensure that all generated files have been cleared first.
- Running
-
Unlike when using
git clean, deleting folders with Windows Explorer is safe.- If you delete different unity projects underneath your
UnityProjectsdirectory when using Windows Explorer, this should not delete any files withinUnityPackages(unlike when usinggit clean). This is because when Windows Explorer encounters directory links, it just removes the reference rather than recursing into it.
- If you delete different unity projects underneath your
-
After opening your project for the first time (or when adding new packages) Unity will show the following warning:
[Asset] is a symbolic link. Using symlinks in Unity projects may cause your project to become corrupted if you create multiple references to the same asset, use recursive symlinks or use symlinks to share assets between projects used with different versions of Unity. Make sure you know what you are doing.However, we are not doing any of the things that Unity warns about here so this warning can be ignored.
Frequently Asked Questions
-
How do I create a new package?
-
Method 1 - Using the Package Manager
- Click the menu item
Projeny -> Package Manager - Go to the Packages section by pressing the arrow button the left
- Click the "New" button or right click and select
New Package - Enter name for your package
- Add your package to your project by dragging it to either
AssetsorPluginson the right - (optional) Add a
ProjenyPackage.yamlfile to your new package folder. See here for details.
- Click the menu item
-
Method 2 - Manually
- Go to the
UnityPackagesdirectory - Create a new folder with the name of your package
- Done. You can now refer to this package by its folder name in
ProjenyPackage.yamlorProjenyProject.yamlfiles - (optional) Add a
ProjenyPackage.yamlfile to your new package folder. See here for details.
- Go to the
-
-
How do I create a new project?
-
Method 1 - Within Unity
- Click the menu item
Projeny -> Change Project -> New... - Enter the name for your new project, and choose whether you want to duplicate the project settings or not with the checkbox
- After the new project loads, open the Package Manager again to add packages, etc.
- Done
- (optional) Add a
ProjenyProject.yamlfile to your new project folder. See here for details.
- Click the menu item
-
- Enter command prompt / powershell at the same directory where your
Projeny.yamlfile is - Execute
prj --project MyNewProject --createProject(or the shortened formprj -p MyNewProject -cpr) - Done. You can now open [ProjectName]-Windows directory in Unity.
- (optional) Add a
ProjenyProject.yamlfile to your new project folder. See here for details.
- Enter command prompt / powershell at the same directory where your
-
-
How do I start an entirely new set of Projeny-based packages/projects from scratch?
-
Method 1 - Command line
- Open command prompt / powershell at the directory where you want to create your new projects/packages.
- Run
prj --createConfig(or the shorthandprj -cc) - It will also create a new file named
Projeny.yamlwith some basic defaults (see here for details on this file) - This will set up your new config as follows:
- Projects will reside in a folder named
UnityProjects - Packages will reside in a folder named
UnityPackages. Each project will also have the option for local packages atUnityProjects/PROJECT_NAME/Packages
- Projects will reside in a folder named
- After this, you will probably want to create a project
-
Method 1 - Manually
-
Create a new directory that will be the root for your project
-
Create a file named
Projeny.yamlat this directory with the following contents:PathVars: UnityProjectsDir: '[ConfigDir]/UnityProjects' LogPath: '[ConfigDir]/PrjLog.txt'
-
Create a new directory named
UnityProjects -
Done
-
After this, you will probably want to create a project
-
-
-
How do I import Unity's Standard Assets?
Unity's Standard Assets actually makes for a good example of using Projeny, since all the standard asset packages depend on each other in some ways.
For Unity version 5.3.4, we have extracted all the Standard Assets into their own Projeny packages, and also declared the proper dependencies for each using ProjenyPackage.yaml files. This can be downloaded as StandardAssets-Unity5.3.4.zip from the releases page. To use, you can extract StandardAssets-Unity5.3.4.zip into your UnityPackages folder and drag whichever Standard Assets package you need into your project via the projeny gui
Projeny.yaml reference
The Projeny.yaml file contains general settings for Projeny, including the location of tools such as Unity, where to place the log output, etc.
Note that like all configuration files in Projeny, Projeny.yaml is defined using the YAML standard.
When running Projeny from the command line using the prj command, it will load all configuration files from the following locations
[Current directory]/Projeny.yaml-
[User Home Directory]/Projeny.yaml- For example, if your user account name is John:C:/Users/John/Projeny.yaml
Typically, you would have configuration files in both of these locations. The configuration file in your home directory is particularly useful for defining the paths to the tools that Projeny sometimes runs, such as Visual Studio and Unity.
If you follow the instructions to create a new Projeny-based set of projects, you will find that a default Projeny.yaml file is created with the following contents:
PathVars:
    UnityProjectsDir: '[ConfigDir]/UnityProjects'
    LogPath: '[ConfigDir]/PrjLog.txt'
This is the absolute minimum config that is required for Projeny. (Actually, you don't strictly need LogPath defined, but it is useful if you want detailed error information. Every time you run the prj command in the directory with this Projeny.yaml, the PrjLog.txt file will be updated with more detailed information)
Here is the full list of configuration settings. Note that you don't need to include most of these, since they have reasonable defaults, but they are listed here for reference. Note: Comments can be added by prefixing your line with a # character.
# If you use the command line a lot, it can be useful to define an
# alias for the common projects you are changing. These are taken
# from the demo project.  Running `prj -p am` is then the same as
# running `prj -p AllMovers`
ProjectAliases:
    am: AllMovers
    cm: CubeMover
    sm: SphereMover

# The given project here will be used by the `prj` command line
# tool whenever the `-p` option is not included
DefaultProject: AllMovers

# This is a collection of paths that are used by projeny
# You can also define your own variables here and use them in any of the config files
# Note also that you can use environment variables here the same way eg: [SOME_ENVIRONMENT_VARIABLE]
PathVars:
    # This setting is required
    # This will determine where projeny looks for the unity projects
    UnityProjectsDir: '[ConfigDir]/UnityProjects'

    # This setting is necessary for many different Projeny operations
    # so that Projeny knows how to run Unity. By default it will
    # guess the following path
    UnityExePath: 'C:/Program Files/Unity/Editor/Unity.exe'

    # This value is used when using the command line options `-b` or
    # `bf` or `bcs` (see command line reference section for details on these)
    # It is used to build visual studio solution files
    # By default it will assume the following path unless you specify it yourself
    MsBuildExePath: 'C:/Windows/Microsoft.NET/Framework/v4.0.30319/msbuild.exe'

    # This value is required when UseDevenv setting (see below) is set to true
    VisualStudioCommandLinePath: 'C:/Program Files (x86)/Microsoft Visual Studio 12.0/Common7/IDE/devenv.com'

    # This value is required for the button "Open Solution" in package manager,
    # or the equivalent command line option `prj -ocs`
    VisualStudioIdePath: 'C:/Program Files (x86)/Microsoft Visual Studio 12.0/Common7/IDE/devenv.exe'

    # This value will determine where the `prj` command outputs
    # detailed logging information
    LogPath: '[ConfigDir]/PrjLog.txt'

Console:
    # If you're using a console that supports multiple colors, set
    # this to true so that warnings are yellow, errors are red, etc.
    UseColors: False

# Custom release sources can also be specified in `Projeny.yaml` if
# you want the Releases list to contain more than just items from the asset store cache
ReleaseSources:
    - LocalFolder:
        Path: 'C:/MyUnityPackages'

    # Note that you can specify multiple local folders
    - LocalFolder:
        Path: 'G:/NetworkSharedUnityPackages'

    # Note that you can specify multiple file servers
    - FileServer:
        ManifestUrl: 'http://localhost:8092/ProjenyReleaseManifest.txt'

Compilation:
    # This value is used when using the command line options `-b` or `bf`
    # or `bcs` (see command line reference section for details on these)
    # By default, Projeny will use MsBuild (using the MsBuildExePath
    # defined above) to build the visual studio solution. However, some
    # people may prefer to use devenv.exe instead, since unlike msbuild
    # this is guaranteed to produce identical behaviour to building using
    # the Visual Studio GUI.  So if you want to use devenv.exe instead,
    # set this to true and then make sure to specify the path variable
    # 'VisualStudioCommandLinePath' as well in the PathVars section above
    UseDevenv: False

SolutionGeneration:
    # This will be used in the "DefaultNamespace" field for generated visual studio projects
    RootNamespace: MyCompanyName

Unity:
    # Include this option to default new projects to use 64 bit windows for their builds rather
    # than 32 bit
    Win64IsDefault: True
ProjenyProject.yaml reference
In most cases you can edit the ProjenyProject.yaml file using the Package Manager from within Unity. However, the Package Manager GUI does not include everything (for example, solution folders cannot be configured from the package manager)
Note that like all configuration files in Projeny, ProjenyProject.yaml is defined using the YAML standard.
Note that you can define multiple ProjenyProject.yaml files, with the result that they will all be applied to the project. There are 4 places that Projeny looks for this file. For example, given a project named Foo, these locations are as follows:
UnityProjects/Foo/ProjenyProject.yamlUnityProjects/Foo/ProjenyProjectCustom.yamlUnityProjects/ProjenyProject.yamlUnityProjects/ProjenyProjectCustom.yaml
These all follow the same format. (3) and (4) are automatically used by all projects, so it's a good place to put in packages that you want to include everywhere.
(2) and (4) should be ignored by source control and are a convenient place to add user-specific packages. For example, different developers on the same project might have different preferences for certain unity plugins, such as a custom unity console, a popup window to help switch between scenes, etc. So the ProjenyProjectCustom.yaml files can be used for this purpose, to add packages on an individual basis.
The format of ProjenyProject.yaml is as follows:
AssetsFolder:
    - {PackageName}
    - {PackageName}

PluginsFolder:
    - {PackageName}
    - {PackageName}
    - {PackageName}

SolutionProjects:
    - {PackageName}
    - /{PackageNamePattern}
    - /{PackageNamePattern}
    - {PackageName}

SolutionFolders:
    {FolderName}: /{PackageNamePattern}
    {FolderName}: /{PackageNamePattern}

PackageFolders:
    - {DirectoryPath}
    - {DirectoryPath}

TargetPlatforms:
    - Windows
    - WebPlayer
    - Android
    - WebGL
    - OSX
    - Linux
    - iOS
    - UWP
Where:
-
{PackageName}represents the name of a directory that is in one of thePackageFoldersdirectories -
{PackageNamePattern}represents a python regular expression that is used to match one more packages in theUnityPackagesdirectory
Note the following:
- Packages that are listed underneath the
AssetsFoldercategory will be placed directly underneath theAssets/directory of your project - Packages that are listed underneath the
PluginsFoldercategory will be placed directly underneath theAssets/Pluginsdirectory of your project - All packages underneath the
SolutionProjectscategory will have their own .csproj file generated, when runningProject -> Update C# Projector when hitting theUpdate Solutionbutton within the package manager- Note that you can also use a regular expression instead of explicitly listing the full package name. For example, if you want to create a C# project for every package in your project add the line
/.*which will match everything
- Note that you can also use a regular expression instead of explicitly listing the full package name. For example, if you want to create a C# project for every package in your project add the line
- You can also optionally add folders to the generated solution, to organize related projects together. Each folder has one regex pattern that is used to filter the full list of projects, and must also be prefixed with a forward slash
- All the regexes used in the package files follows the regex rules defined for python (more details here)
ProjenyPackage.yaml reference
Note that like all configuration files in Projeny, ProjenyPackage.yaml is defined using the YAML standard. Unlike project settings, there is no GUI for package settings so you have to hand-edit the ProjenyPackage.yaml files.
In most cases your ProjenyPackage.yaml will simply list the other packages that this package depends on. It will look like this:
Dependencies:
    - CubeMover
    - SphereMover
This is taken from the demo project (at UnityPackages/AllMovers/ProjenyPackage.yaml).
Note that this file is optional. When not added to your package, your package will just be assumed to have zero dependencies.
There are a number of other options here for less common cases. The full format of the ProjenyPackage.yaml is as follows:
Dependencies:
    - {PackageName}
    - {PackageName}
    - {PackageName}

Extras:
    - {PackageName}
    - {PackageName}

FolderType: {FolderType}

Platforms:
    - {PlatformName}
    - {PlatformName}
    - {PlatformName}

ForcePluginsDirectory: {True/False}
ForceAssetsDirectory: {True/False}
Notes:
-
{PackageName}represents the name of a directory that is below yourUnityPackagesdirectory. - Any packages that are listed under
DependenciesorExtraswill always be added to every project that includes this package- The only difference between Dependencies and Extras is that Projeny will create a csproj dependency for packages under Dependencies whereas it will not for those packages under Extras. Most of the time you will want to only add to Dependencies, however in some rare cases it can be useful to use Extras. For example, if you have split out a bunch of unit tests for your package into its own separate package, and you want to always include those with your package, you would add them to the Extras list. You would not want to add them under Dependencies because this would create a circular dependency and Projeny will display an error.
- By default, Projeny will assume that your package is applicable to all platforms. However, if the
Platformslist is set, Projeny will skip this package for all platforms except those listed, so your package directory will only be linked to in the Unity Projects for those platforms.{PlatformName}can be one of the following:- Windows
- WebPlayer
- Android
- WebGL
- OSX
- Linux
- iOS
- UWP
- When
ForcePluginsDirectoryis set, this will require that the package always be placed atAssets/Plugins/PackageName.- This exists because some packages have hard-coded paths that require that the package be at a specific location
-
ForceAssetsDirectorybehaves similarly, and will ensure the package will always be placed atAssets/PackageName. -
FolderTypecan be set to any of the following:- Normal
- This is the default when this setting is unspecified
- StreamingAssets
- Package will be placed at
Assets/StreamingAssets/YourPackageName - This has special meaning to Unity - see here for details
- Package will be placed at
- WebGL
- Package will be placed at
Assets/Plugins/WebGL - This has special meaning to Unity - see here for details
- Package will be placed at
- AndroidProject
- Package will be placed at
Assets/Plugins/Android - This has special meaning to Unity - see here for details
- Package will be placed at
- AndroidLibraries
- Package will be placed at
Assets/Plugins/Android/libs - This has special meaning to Unity - see here for details
- Package will be placed at
- iOS
- Package will be placed at
Assets/Plugins/ios - This has special meaning to Unity - see here for details
- Package will be placed at
- Normal
Custom Release Sources
A mentioned in the above section, the list of releases is usually just a list of your asset store purchases, however it supports other sources as well.
Every source is ultimately just a collection of Unity packages. This is also what Unity stores in the asset store cache, so even in that case, it is just a list of Unity packages.
For example, to add a new local folder source, open up one of your Projeny config files (Projeny.yaml) and include the following:
ReleaseSources:
    - LocalFolder:
        Path: 'C:/MyLocalFolderSource'
One convenient place that you might want to put this is in the system wide Projeny config, which can be found in your user home directory at C:/Users/[Your User Name]/Projeny.yaml. This is convenient because these releases will then be available for any Unity project that you create through Projeny on your computer.
Now, if you copy and paste .unitypackage files into this folder, and click the Refresh button in the Package Manager (accessed within Unity through the menu at Projeny -> Package Manager) then these .unitypackage files will be displayed in the Releases list.
Note that you can add multiple local folder sources using different paths, including those on a network share.
Note also that you can specify the version for your custom unitypackage file by using the following naming convention: [email protected]. In this case, it will load it as version "1.2". This naming convention is only necessary for custom unitypackage files that you create yourself. Any unitypackage files that you download through the asset store will have this version information embedded into it.
Sharing a release source over a network can be very useful when working in an office environment that has its own LAN. Your organization can build up a big collection of "releases" that anyone in the organization can have access to.
If you don't want to use a network share for this, you can also define a FileServer release source, which is declared using a URL. You can then run a static web site that can serve out the Unity packages to anyone on the network.
First, you have to host a static web site that simply contains a flat list of .unitypackage files. Then you need to run PrjUpdateReleaseManifest [directory] with the path to the directory you want to scan (or simply . for current directory). This will result in a file being created in this same directory called ProjenyReleaseManifest.txt. The PrjUpdateReleaseManifest also includes a command line option to 'watch' the directory indefinitely, so you can just upload files there and the manifest will automatically be updated.
After setting up your file server you can declare it as a release source in one of your Projeny.yaml as follows:
ReleaseSources:
    - FileServer:
        ManifestUrl: 'http://mysharedserver/ProjenyReleaseManifest.txt'
Command Line Reference
Almost all operations in Projeny can be executed within Unity using the Projeny menu or the Package Manager. However, not all (for eg: building the Visual Studio solution). It can also be useful to be able to drive it from the command line for use with continous integration servers or whatever build pipeline you are using at your organization.
What follows is the full list of command line parameters that you can pass to the Prj command. Note that you can pass any combination of these and Prj will execute them in a reasonable order.
-
--openDocumentation/-d- Opens up the documentation page that you are reading
-
--project/-p- Selects the project to use for whatever other parameters are given
- Note that if there is only one project then this option can be omitted
- For example, if you run
prj -p AllMovers -ulthis will update all the directory links for theAllMoversproject (using the default platform which is windows). - Valid values are the names of the directories underneath the
UnityProjectsdirectory.- You can view the full list of projects by running the
-lpcommand - You can also pass in one of the project aliases defined in your
ProjenyProject.yamlfile, to avoid typing the full name every time
- You can view the full list of projects by running the
-
--platform/-pl- Selects the platform to use for whatever other parameters are given
- Note that if this parameter is not supplied Projeny will assume windows
- Valid values are the following:
-
win- Windows -
webp- Webplayer -
webgl- WebGL -
and- Android -
osx- Mac -
ios- iOS for use with iPhone or iPad -
lin- Linux -
uwp- Universal Windows Platform
-
- For example, if you run
prj -p AllMovers -pl ios -ulthis will update all the directory links within theAllMovers-iOSdirectory.
-
--updateLinks/-ul- Updates all the directory links for the given project and platform.
- Projeny will read the
Project.yamlfile associated with the given project, then calculate all the packages that it needs to include. For each package, it will then create a directory link (aka windows junction aka symbolic link) inside either theAssets/directory or theAssets/Pluginsdirectory - Note that in order to run this command you must specify a project (or set a default project in
Projeny.yaml) and also optionally set a platform (otherwise it will assume windows)
-
--listProjects/-lp- Lists the names of all the directories that are underneath the
UnityProjectsdirectory, along with the alias for each if one is defined.
- Lists the names of all the directories that are underneath the
-
--updateCustomSolution/-ucs- Generates .csproj files and a .sln file based on the configuration set in the Project.yaml for the given project and given platform
- See here for more details on this feature.
- Note that in some cases you will want to run
-uusat the same time or before executing this command. This is not necessary all the time but is necessary whenever you add DLL's to your project, add/remove a define in player settings, etc. Also, if-uushas not been run at least once this command will fail - Note that in order to run this command you must specify a project (or set a default project in
Projeny.yaml) and also optionally set a platform (otherwise it will assume windows)
-
--updateUnitySolution/-uus- Runs Unity.exe to generate the standard MonoDevelop solution, so that it can be used by the
-ucscommand. This is equivalent to opening Unity and running the menu itemAssets -> Open C# Project(except without actually opening visual studio/monodevelop)
- Runs Unity.exe to generate the standard MonoDevelop solution, so that it can be used by the
-
--verbose/-vand--veryVerbose/-vv- These parameters can control how verbose the logging output is to the console.
-vwill output some extra detail in places and-vvwill output absolutely everything (including the contents of the Unity editor log, visual studio, etc.)
- These parameters can control how verbose the logging output is to the console.
-
--buildCustomSolution/-b- Builds the custom solution
- Note: Will either use the
VisualStudioCommandLinePathor theMsBuildExePathsettings inProjeny.yamlto run the build, depending on the value ofUseDevenv. See here for details. - This command will fail if the custom solution has not been generated yet using the
-ucscommand - Note that in order to run this command you must specify a project (or set a default project in
Projeny.yaml) and also optionally set a platform (otherwise it will assume windows)
-
--buildFull/-bf- This command is equivalent to the following:
prj -ul -uus -ucs -b- In other words, it will update the links for the given project/platform, update the custom solution, then build the custom solution
- See these other commands for details
- Note that in order to run this command you must specify a project (or set a default project in
Projeny.yaml) and also optionally set a platform (otherwise it will assume windows)
- This command is equivalent to the following:
-
--openUnity/-ou- Opens Unity for the given project/platform
- Note that in order to run this command you must specify a project (or set a default project in
Projeny.yaml) and also optionally set a platform (otherwise it will assume windows)
-
--openCustomSolution/-ocs- Opens the custom solution for the given project/platform using visual studio
- Note that this command will require that you set your
VisualStudioIdePathinProjeny.yaml - This command will also fail if the custom solution has not been generated yet using the
-ucscommand - Note that in order to run this command you must specify a project (or set a default project in
Projeny.yaml) and also optionally set a platform (otherwise it will assume windows)
-
--clearProjectGeneratedFiles/-clp- Deletes all the generates files/directories for the given project. Note that this will not delete any real content, it will only remove some directory links and some temporary files generated by Unity.
- This command is sometimes useful if you want to do a full reset of your project, which you can do by running
prj -clp -bf. This will delete all generated files for the given project and then re-generate them again and build the visual studio solution. - Note that in order to run this command you must specify a project (or set a default project in
Projeny.yaml)
-
--clearAllProjectGeneratedFiles/-cla- This is similar to the
-clpcommand except this will be executed for every project in yourUnityProjectsdirectory
- This is similar to the
-
--deleteAllLinks/-dal- Removes all directory links in all projects. This is the reverse of the
-incommand
- Removes all directory links in all projects. This is the reverse of the
-
--init/-in- This is equivalent to running the
-ulcommand on all the projects that are underneath theUnityProjectsdirectory
- This is equivalent to running the
-
--deleteProject/-dpr- Deletes the given project from the from
UnityProjectsdirectory
- Deletes the given project from the from
-
--suppressPrompts/-sp- If unset, confirmation prompts will be displayed for important operations.
-
--createProject/-cpr- Creates a new directory in the
UnityProjectsdirectory, adds a defaultProjenyProject.yamlfile, and sets up directory links
- Creates a new directory in the
-
--configPath/-cfg- The path to the main
ProjenyProject.yamlconfig file. If unspecified, it will be assumed to exist at[CurrentDirectory]/ProjenyProject.yaml
- The path to the main
-
--listPackages/-lpa- Lists all the directories found in the
UnityPackagesdirectory
- Lists all the directories found in the
-
--deletePackage/-dpa- Deletes the directory at
UnityPackages/xwhere x is the given value
- Deletes the directory at
-
--installRelease/-ins- Searches all release sources for the given release with given version
-
--listReleases/-lr- Lists all releases found from all release sources
-
--editProjectYaml/-epy- Opens up the
ProjenyProject.yamlfor the given project
- Opens up the
-
--createPackage/-cpa- Creates a new folder underneath the
UnityPackagesdirectory with the given name
- Creates a new folder underneath the
Appendix
A. "Gotchas" with using external assemblies:
- You cannot really use Unity preprocessor defines inside your DLL (eg:
UNITY_WEBPLAYER,UNITY_5_3, etc.) unless you create separate DLL's for each platform. This is helped somewhat by Unity 5.3, which allows you to indicate which platforms to use a given DLL in. - There are some known limitations of using external assemblies for code - in particular, any MonoBehaviour with a custom base class will not be allowed to be added to a game object.
- Unity is not aware of the location of each MonoBehaviour. You cannot for example, double click on a MonoBehaviour to open up the source file for it.
Release Notes
0.3 (February, 2016)
- Better error handling and error output
- Added ability to share project settings folders across multiple projects
- Added support for multiple packages directories. This is particularly useful to define project-specific packages.
- Added support for special handling of prebuilt projects that produce assemblies (however this is undocumented currently)
- Bug fixes
0.2 (January, 2015)
- Added GUI for package management within Unity, also added a lot more documentation
0.1 (December, 2015)
- Initial release
License
The MIT License (MIT)

Copyright (c) 2010-2015 Modest Tree Media  http://www.modesttree.com

Permission is hereby granted, free of charge, to any person obtaining a copy
of this software and associated documentation files (the "Software"), to deal
in the Software without restriction, including without limitation the rights
to use, copy, modify, merge, publish, distribute, sublicense, and/or sell
copies of the Software, and to permit persons to whom the Software is
furnished to do so, subject to the following conditions:

The above copyright notice and this permission notice shall be included in all
copies or substantial portions of the Software.

THE SOFTWARE IS PROVIDED "AS IS", WITHOUT WARRANTY OF ANY KIND, EXPRESS OR
IMPLIED, INCLUDING BUT NOT LIMITED TO THE WARRANTIES OF MERCHANTABILITY,
FITNESS FOR A PARTICULAR PURPOSE AND NONINFRINGEMENT. IN NO EVENT SHALL THE
AUTHORS OR COPYRIGHT HOLDERS BE LIABLE FOR ANY CLAIM, DAMAGES OR OTHER
LIABILITY, WHETHER IN AN ACTION OF CONTRACT, TORT OR OTHERWISE, ARISING FROM,
OUT OF OR IN CONNECTION WITH THE SOFTWARE OR THE USE OR OTHER DEALINGS IN THE
SOFTWARE.