twostraws / Shaderkit
Programming Languages
Projects that are alternatives of or similar to Shaderkit
![]()
![]()
![]()
![]()
![]()
![]()
ShaderKit is an open-source collection of fragment shaders designed for use in SpriteKit games. The shaders are designed to be easy to read and understand, even for relative beginners, so you’ll find each line of code is rephrased in plain English as well as an overall explanation of the algorithm used at the top of each file.
If you’re already comfortable with shaders then please download one or more that interest you and get going. If not, most of the the remainder of this README acts as a primer for using shaders in SpriteKit.
See it in action
TL;DR
If you use SpriteKit, you can add special effects from ShaderKit to add water ripples, spinning black holes, flashing lights, embossing, noise, gradients, and more – all done on the GPU for maximum speed.
Credits
ShaderKit was made by Paul Hudson, who writes free Swift tutorials over at Hacking with Swift. It’s available under the MIT license, which permits commercial use, modification, distribution, and private use.
What are shaders?
Fragment shaders are tiny programs that operate on individual elements of a sprite’s texture. They are sometimes called “pixel shaders” – it’s not a wholly accurate name, but it does make them easier to understand.
Effectively, a fragment shader gets run on every pixel in a texture, and can transform that pixel however it wants. That might sound slow, but it isn’t – all the fragment shaders here run at 60fps on iPhone 6 and newer, and 120fps on iPad Pro.
The transformation process can recolor the pixel however it wants. Users can customize the process by passing fixed values in to the shader (known as “uniforms”) and by assigning values to nodes that use the shader (known as “attributes”). SpriteKit also provides a few built-in values for us to work with, such as the texture co-ordinate for the pixel being modified and the current time.
How are they written?
Shaders are written in OpenGL ES 2.0 shading language (GLSL), which is a simple, fast, and extremely efficient C-like language that is optimized for high-performance GPU operations. When you activate a shader in your app, it gets loaded and compiled at runtime, and in doing so should be optimized for whatever device the user has.
In each shader you’ll find a main() function, which is run when the shader activates. This must at some point assign a value to the pre-defined variable gl_FragColor, which represents the final color that will be used to draw the pixel.
GLSL comes with a wide variety of built-in data types and functions, many of which operate on more than one data types. The data types are nice and simple:
-
bool: a boolean, i.e. true or false. -
float: a floating-point number. GLSL lets you request various precisions, but this isn’t used in ShaderKit.floatnumbers must be written using a decimal place – 1 is considered an integer, whereas1.or1.0will be considered afloat. -
vec2: a two-component floating-point array. It’s used to hold things like X and Y co-ordinates or width and height. -
vec3: a three-component floating-point array. It’s used to hold things like RGB values. -
vec4: a four-component floating-point array. It’s used to hold things like RGBA values. -
voidis used to mark themain()function as not returning a value.
Shaders commonly move fluidly between float, vec2, vec3, and vec4 as needed. For example, if you create a vec4 from a float then the number will just get repeated for each component in the vector. You’ll also frequently see code to create a vec4 by using a vec3 for the first three values (usually RGB) and specifying a fourth value as a float.
Here are the functions used in ShaderKit:
-
cos()calculates the cosine of a value in radians. The cosine will always fall between -1 and 1. If you providecos()with a vector (e.g.vec3) it will calculate the cosine of each component in the vector and return a vector of the same size containing the results. -
distance()calculates the distance between two values. For example, if you provide it with a pairvec2you’ll get the length of the vector created by subtracting one from the other. This always returns a single number no matter what data type you give it. -
dot()calculates the dot product of two values. This means multiplying each component of the first value by the respective component in the second value, then adding the result. -
floor()rounds a number down to its nearest integer. If you pass it a vector this will be done for each component. -
fract()returns the fractional component of a value. For example,fract(12.5)is 0.5. If you pass this a vector then the operation will be performed component-wise, and a new vector will be returning containing the results. -
min()is used to find the lower of two values. If you pass vectors this is done component-wise, meaning that the resulting vector will evaluate each component in the vector and place the lowest in the resulting vector. -
max()is used to find the higher of two values. If you pass vectors this is done component-wise, meaning that the resulting vector will evaluate each component in the vector and place the highest in the resulting vector. -
mix()smooth interpolates between two values based on a third value that’s specified between 0 and 1, providing a linear curve. -
mod()is the modulus function, and calculates remainder after integer division. For example, 10 divides into 3 a total of three times, with remainder 1, so 10 modulo 3 is 1. -
pow()calculates one value raised to the power of another, for examplepow(2.0, 3.0)evaluates to 2.0 * 2.0 * 2.0, giving 8.0. As well as operating on afloat,pow()can also calculate component-wise exponents – it raises the first item in the first vector to the power of the first item in the second vector, and so on. -
sin()calculates the sine of a value in radians. The sine will always fall between -1 and 1. If you providesin()with a vector (e.g.vec3) it will calculate the sine of each component in the vector and return a vector of the same size containing the results. -
smoothstep()interpolates between two values based on a third value that’s specified between 0 and 1, providing an S-curve shape. That is, the interpolation starts slow (values near 0.0), picks up speed (values near 0.5), then slows down towards the end (values near 1.0). -
texture2D()provides the color value of a texture at a specific location. This is most commonly used to read the current pixel’s color. (Technically this reads texels, but it’s easier to think about pixels while you’re learning.)
There is one further special function worth mentioning, which is SKDefaultShading(). This provides the default color SpriteKit was planning to render for the current fragment.
Attributes and uniforms
Many shaders can operate without any special input from the user – it can manipulate the color data it was sent by SpriteKit, then send back new data.
However, often you’ll want to customize the way shaders work, a bit like passing in parameters to a function. Shaders are a little more complicated because these values need to be uploaded to the GPU, but the principle is the same.
ShaderKit uses two approaches for customizing shader behavior: uniforms and attributes. They are very similar, but the difference is that uniforms are attached to shaders and attributes are attached to nodes.
Almost everything is declared as a uniform in ShaderKit. So, if you want to customize the colors for your gradient, the strength of your water rippling, or the size of your interlacing lines, these are all specified as uniforms.
However, one thing is consistently specified as an attribute, which is node size. Some shaders (see below) require the size of the node they are operating on, and although this could be specified as a uniform it would stop you from using the same shader on multiple nodes. So, instead it’s specified as an attribute: each sprite tells the shader how big it is, and that value combines with the uniforms inside the shader to produce the final result.
By convention, uniform names start with “u” and attribute names start with “a”. So, when you see “u_strength” you know it’s a uniform, and when you see “a_size” you know it’s an attribute.
Please note note: there is a performance cost to uploading uniform and attribute data to the GPU. As a result, you should only specify values that are actually used inside the shader.
This repository also contains ShaderKitExtensions.swift. This adds a handful of convenience initializers for setting uniforms and attributes from common types: CGSize, CGPoint, and SKColor. (NB: SKColor is either UIColor or NSColor depending on whether you’re using iOS/tvOS/watchOS or macOS.)
Although these extensions aren’t required, they will make it significantly easier to use the shaders provided here – you should add ShaderKitExtensions.swift to your own project alongside whichever shaders you want.
One of these extensions adds a new initializer for SKShader that loads a shader file into a string then creates an SKShader from that string, and assigns any uniforms or attribute settings. This is helpful while debugging, because shaders loaded from strings get debug information printed inside Xcode, so if you modify a shader incorrectly Xcode will help you understand the problem.
All Swift code examples below use this initializer.
As stated above, the only attribute you need to specify in any of the ShaderKit shaders is the sprite’s size. This is only required in some shaders (see below), and with ShaderKitExtension.swift is done like this:
yourSprite.setValue(SKAttributeValue(size: yourSprite.size), forAttribute: "a_size")
Built-in values
SpriteKit provides several built-in values that are useful when building shaders:
-
u_texture: the texture that is being rendered. You can read individual color values from this. -
u_time: how much time has elapsed in the game. -
v_tex_coord: the position of the current pixel in the texture. These are normalized to the bottom-left corner, meaning that (0.0, 0.0) is the bottom-left corner and (1.0, 1.0) is the top-right corner. -
v_color_mix: the color of the node being rendered.
Reading the shaders
All the shaders in ShaderKit were specifically written for readability. Specifically, they:
- All start with a brief comment outlining what each shader does.
- List all input attributes and uniforms (where they are used), along with ranges and a suggested starting point.
- An explanation of the algorithm used.
- Detailed line-by-line English translations of what the code means.
The combination of what the code does (the interlinear comments) and what the code means (the algorithm introduction) should hopefully make these shaders comprehensible to everyone.
One small note: you will commonly see the final fragment color multiplied both by the original color’s alpha and the alpha value of v_color_mix. The former ensures the new color takes into account the alpha value of the original, which keeps edges smooth; the latter ensures the new color takes into account the alpha of the whole node, so that it can be faded in or out smoothly.
Shaders included in ShaderKit
ShaderKit provides a selection of shaders, most of which allow some customization using uniforms. Some shaders are merely variations of others, provided separately to avoid too much of a performance hit.
Checkerboard
Renders a checkerboard with user-defined row/column count and colors.
Parameters:
- Uniform:
u_rows, how many rows to generate. Should be at least 1. - Uniform:
u_cols, how many columns to generate. Should be at least 1. - Uniform:
u_first_color, anSKColorto use for half of the squares. - Uniform:
u_second_color, anSKColorto use for the other half of the squares.
Example code:
func createCheckerboard() -> SKShader {
    let uniforms: [SKUniform] = [
        SKUniform(name: "u_rows", float: 12),
        SKUniform(name: "u_cols", float: 12),
        SKUniform(name: "u_first_color", color: .white),
        SKUniform(name: "u_second_color", color: .black),
    ]

    return SKShader(fromFile: "SHKCheckerboard", uniforms: uniforms)
}
Circle Wave
Renders a circular pulsating wave effect. This comes in four variants:
- Circle Wave generates a fixed-color wave while ignoring existing pixel colors.
- Circle Wave (Blended) generates a fixed-color wave while blending with existing pixel colors.
- Circle Wave Rainbow generates a fluctuating-color wave while ignoring existing pixel colors.
- Circle Wave Rainbow (Blended) generates a fluctuating-color wave while blending with existing pixel colors.
Parameters for Circle Wave and Circle Wave Blended:
- Uniform:
u_speed, how fast the wave should travel. Ranges from -2 to 2 work best, where negative numbers cause waves to come inwards; try starting with 1. - Uniform:
u_brightness, how bright the colors should be. Ranges from 0 to 5 work best; try starting with 0.5 and experiment. - Uniform:
u_strength, how intense the waves should be. Ranges from 0.02 to 5 work best; try starting with 2. - Uniform:
u_density, how large each wave should be. Ranges from 20 to 500 work best; try starting with 100. - Uniform:
u_center, aCGPointrepresenting the center of the gradient, where 0.5/0.5 is dead center - Uniform:
u_color, the SKColor to use. Use darker colors to create a less intense core.
Parameters for Circle Wave Rainbow and Circle Wave Rainbow Blended:
- Uniform:
u_speed, how fast the wave should travel. Ranges from -2 to 2 work best, where negative numbers cause waves to come inwards; try starting with 1. - Uniform:
u_brightness, how bright the colors should be. Ranges from 0 to 5 work best; try starting with 0.5 and experiment. - Uniform:
u_strength, how intense the waves should be. Ranges from 0.02 to 5 work best; try starting with 2. - Uniform:
u_density, how large each wave should be. Ranges from 20 to 500 work best; try starting with 100. - Uniform:
u_center, aCGPointrepresenting the center of the gradient, where 0.5/0.5 is dead center - Uniform:
u_red, how much red to apply to the colors. Specify 0 to 1 to apply that amount of red, or use any negative number (e.g. -1) to have the amount of red fluctuate.
Example code:
func createCircleWave() -> SKShader {
    let uniforms: [SKUniform] = [
        SKUniform(name: "u_speed", float: 1),
        SKUniform(name: "u_brightness", float: 0.5),
        SKUniform(name: "u_strength", float: 2),
        SKUniform(name: "u_density", float: 100),
        SKUniform(name: "u_center", point: CGPoint(x: 0.68, y: 0.33)),
        SKUniform(name: "u_color", color: UIColor(red: 0, green: 0.5, blue: 0, alpha: 1))
    ]

    return SKShader(fromFile: "SHKCircleWave", uniforms: uniforms)
}

func createCircleWaveRainbowBlended() -> SKShader {
    let uniforms: [SKUniform] = [
        SKUniform(name: "u_speed", float: 1),
        SKUniform(name: "u_brightness", float: 0.5),
        SKUniform(name: "u_strength", float: 2),
        SKUniform(name: "u_density", float: 100),
        SKUniform(name: "u_center", point: CGPoint(x: 0.68, y: 0.33)),
        SKUniform(name: "u_red", float: -1)
    ]

    return SKShader(fromFile: "SHKCircleWaveRainbowBlended", uniforms: uniforms)
}
Color Alpha
Colors all clear pixels in the node.
Parameters:
- Uniform:
u_color, theSKColorto use.
Example code:
func createColorAlpha() -> SKShader {
    let uniforms: [SKUniform] = [
        SKUniform(name: "u_color", color: .green)
    ]

    return SKShader(fromFile: "SHKColorAlpha", uniforms: uniforms)
}
Color Non-Alpha
Colors all clear pixels in the node.
Parameters:
- Uniform: u_color, the SKColor to use.
Example code:
func createColorNonAlpha() -> SKShader {
    let uniforms: [SKUniform] = [
        SKUniform(name: "u_color", color: .yellow)
    ]

    return SKShader(fromFile: "SHKColorNonAlpha", uniforms: uniforms)
}
Color Invert
Inverts all colors in a node while retaining transparency.
Parameters:
- None.
Example code:
func createColorInvert() -> SKShader {
    return SKShader(fromFile: "SHKColorInvert")
}
Colorize
Recolors a texture to a user color based on a strength value.
Parameters:
- Uniform:
u_color, theSKColorto use. This is multiplied with the original, meaning that blacks remain black. - Uniform:
u_strength, how much of the replacement color to apply. Specify a value between 0 (use original color) and 1 (use replacement color fully).
Example code:
func createColorize() -> SKShader {
    let uniforms: [SKUniform] = [
        SKUniform(name: "u_color", color: .green),
        SKUniform(name: "u_strength", float: 1)
    ]

    return SKShader(fromFile: "SHKColorize", uniforms: uniforms)
}
Desaturate
Desaturates the colors in a texture.
Parameters:
- Uniform:
u_strength, the amount to desaturate. Specify 0 (no desaturation) to 1 (full desaturation).
Example code:
func createDesaturate() -> SKShader {
    let uniforms: [SKUniform] = [
        SKUniform(name: "u_strength", float: 0.5),
    ]

    return SKShader(fromFile: "SHKDesaturate", uniforms: uniforms)
}
Emboss
Creates a 3D embossing effect. This comes in two variants:
- Emboss Color retains the original color values while adding 3D highlights and shadows.
- Emboss Gray uses a middle gray (RGB: 0.5) then adds 3D highlights and shadows on top.
Parameters:
- Attribute:
a_size, the size of the node. - Uniform:
u_strength, how much embossing to apply (ranges from 0 to 1 work best)
Example code:
func createColorEmboss() -> SKShader {
    let uniforms: [SKUniform] = [
        SKUniform(name: "u_strength", float: 1)
    ]

    let attributes = [
        SKAttribute(name: "a_size", type: .vectorFloat2)
    ]

    return SKShader(fromFile: "SHKEmbossColor", uniforms: uniforms, attributes: attributes)
}

func createGrayEmboss() -> SKShader {
    let uniforms: [SKUniform] = [
        SKUniform(name: "u_strength", float: 1)
    ]

    let attributes = [
        SKAttribute(name: "a_size", type: .vectorFloat2)
    ]

    return SKShader(fromFile: "SHKEmbossGray", uniforms: uniforms, attributes: attributes)
}
Infrared
Simulates an infrared camera by coloring brighter objects red and darker objects blue.
Parameters:
- None.
Example code:
func createInfrared() -> SKShader {
    return SKShader(fromFile: "SHKInfrared")
}
Interlace
Applies an interlacing effect where horizontal lines of original color are separated by lines of another color.
Parameters:
- Attribute:
a_size, the size of the node. - Uniform:
u_width, the width of the interlacing lines. Ranges of 1 to 4 work best; try starting with 1. - Uniform:
u_color, theSKColorto use for interlacing lines. Try starting with black. - Uniform:
u_strength, how much to blend interlaced lines withu_color. Specify 0 (not at all) up to 1 (fully).
Example code:
func createInterlace() -> SKShader {
    let uniforms: [SKUniform] = [
        SKUniform(name: "u_width", float: 2),
        SKUniform(name: "u_color", color: .black),
        SKUniform(name: "u_strength", float: 0.35),
    ]

    let attributes = [
        SKAttribute(name: "a_size", type: .vectorFloat2)
    ]

    return SKShader(fromFile: "SHKInterlace", uniforms: uniforms, attributes: attributes)
}
Light grid
Creates a grid of multi-colored flashing lights.
Parameters:
- Uniform:
u_density, how many rows and columns to create. A range of 1 to 50 works well; try starting with 8. - Uniform:
u_speed, how fast to make the lights vary their color. Higher values cause lights to flash faster and vary in color more. A range of 1 to 20 works well; try starting with 3. - Uniform:
u_group_size, how many lights to place in each group. A range of 1 to 8 works well depending on your density; starting with 1. - Uniform:
u_brightness, how bright to make the lights. A range of 0.2 to 10 works well; try starting with 3.
Example code:
func createLightGrid() -> SKShader {
    let uniforms: [SKUniform] = [
        SKUniform(name: "u_density", float: 8),
        SKUniform(name: "u_speed", float: 3),
        SKUniform(name: "u_group_size", float: 2),
        SKUniform(name: "u_brightness", float: 3),
    ]

    return SKShader(fromFile: "SHKLightGrid", uniforms: uniforms)
}
Linear gradient
Creates a linear gradient over the node. Either the start or the end color can be translucent to let original pixel colors come through.
Parameters:
- Uniform:
u_first_color, theSKColorto use at the top of the gradient - Uniform:
u_second_color, theSKColorto use at the bottom of the gradient
Example code:
func createLinearGradient() -> SKShader {
    let uniforms: [SKUniform] = [
        SKUniform(name: "u_first_color", color: .blue),
        SKUniform(name: "u_second_color", color: .clear)
    ]

    return SKShader(fromFile: "SHKLinearGradient", uniforms: uniforms)
}
Noise
Generates random pixels of different colors to simulate noise. This comes in four variants:
- Static Gray Noise generates grayscale noise that doesn’t move.
- Static Rainbow Noise generates multicolor noise that doesn’t move.
- Dynamic Gray Noise generates grayscale noise that is constantly changing.
- Dynamic Rainbow Noise generates multicolor noise that is constantly changing.
Parameters:
- None.
Example code:
func createStaticGrayNoise() -> SKShader {
    return SKShader(fromFile: "SHKStaticGrayNoise")
}

func createDynamicRainbowNoise() -> SKShader {
    return SKShader(fromFile: "SHKDynamicRainbowNoise")
}
Pixelate
Pixelates an image based on a strength provided by the user.
Parameters:
- Attribute:
a_size, the size of the node. - Uniform:
u_strength, how large each pixel block should be. Ranges from 2 to 50 work best; try starting with 5.
Example code:
func createPixelate() -> SKShader {
    let uniforms: [SKUniform] = [
        SKUniform(name: "u_strength", float: 8),
    ]

    let attributes = [
        SKAttribute(name: "a_size", type: .vectorFloat2)
    ]

    return SKShader(fromFile: "SHKPixelate", uniforms: uniforms, attributes: attributes)
}
Radial gradient
Creates a radial gradient over the node. Either the start or the end color can be translucent to let original pixel colors come through.
Parameters:
- Uniform:
u_first_color, the SKColor to use at the center of the gradient - Uniform:
u_second_color, the SKColor to use at the edge of the gradient - Uniform:
u_center, aCGPointrepresenting the center of the gradient, where 0.5/0.5 is dead center.
Example code:
func createRadialGradient() -> SKShader {
    let uniforms: [SKUniform] = [
        SKUniform(name: "u_first_color", color: .blue),
        SKUniform(name: "u_second_color", color: .clear),
        SKUniform(name: "u_center", point: CGPoint(x: 0.75, y: 0.25))
    ]

    return SKShader(fromFile: "SHKRadialGradient", uniforms: uniforms)
}
Scanlines
Applies scanlines and pixelation to the node, giving a retro television effect.
Parameters:
- Uniform:
u_width, vertical width of scanlines and width of pixelation. - Uniform:
u_brightness, brightness of scanlines, between 0 and 1.0. Higher values introduce overexposure. - Uniform:
u_color, blend color of scanlines.
Example code:
func createScanlines() -> SKShader {
    let uniforms: [SKUniform] = [
        SKUniform(name: "u_width", float: 4.0),
        SKUniform(name: "u_brightness", float: 0.75),
        SKUniform(name: "u_color", color: .white),
    ]

    let attributes = [
        SKAttribute(name: "a_size", type: .vectorFloat2)
    ]

    return SKShader(fromFile: "SHKScanlines", uniforms: uniforms, attributes: attributes)
}
Screen
Applies an interlacing effect where horizontal and vertical lines of original color are separated by lines of another color
Parameters:
- Attribute:
a_size, the size of the node. - Uniform:
u_width, the width of the interlacing lines. Ranges from 2 upwards work well. - Uniform:
u_color, theSKColorto use for interlacing lines. Try starting with black. - Uniform:
u_strength, how much to blend interlaced lines withu_color. Specify 0 (not at all) up to 1 (fully).
Example code:
func createScreen() -> SKShader {
    let uniforms: [SKUniform] = [
        SKUniform(name: "u_width", float: 2),
        SKUniform(name: "u_color", color: .clear),
        SKUniform(name: "u_strength", float: 1),
    ]

    let attributes = [
        SKAttribute(name: "a_size", type: .vectorFloat2)
    ]

    return SKShader(fromFile: "SHKScreen", uniforms: uniforms, attributes: attributes)
}
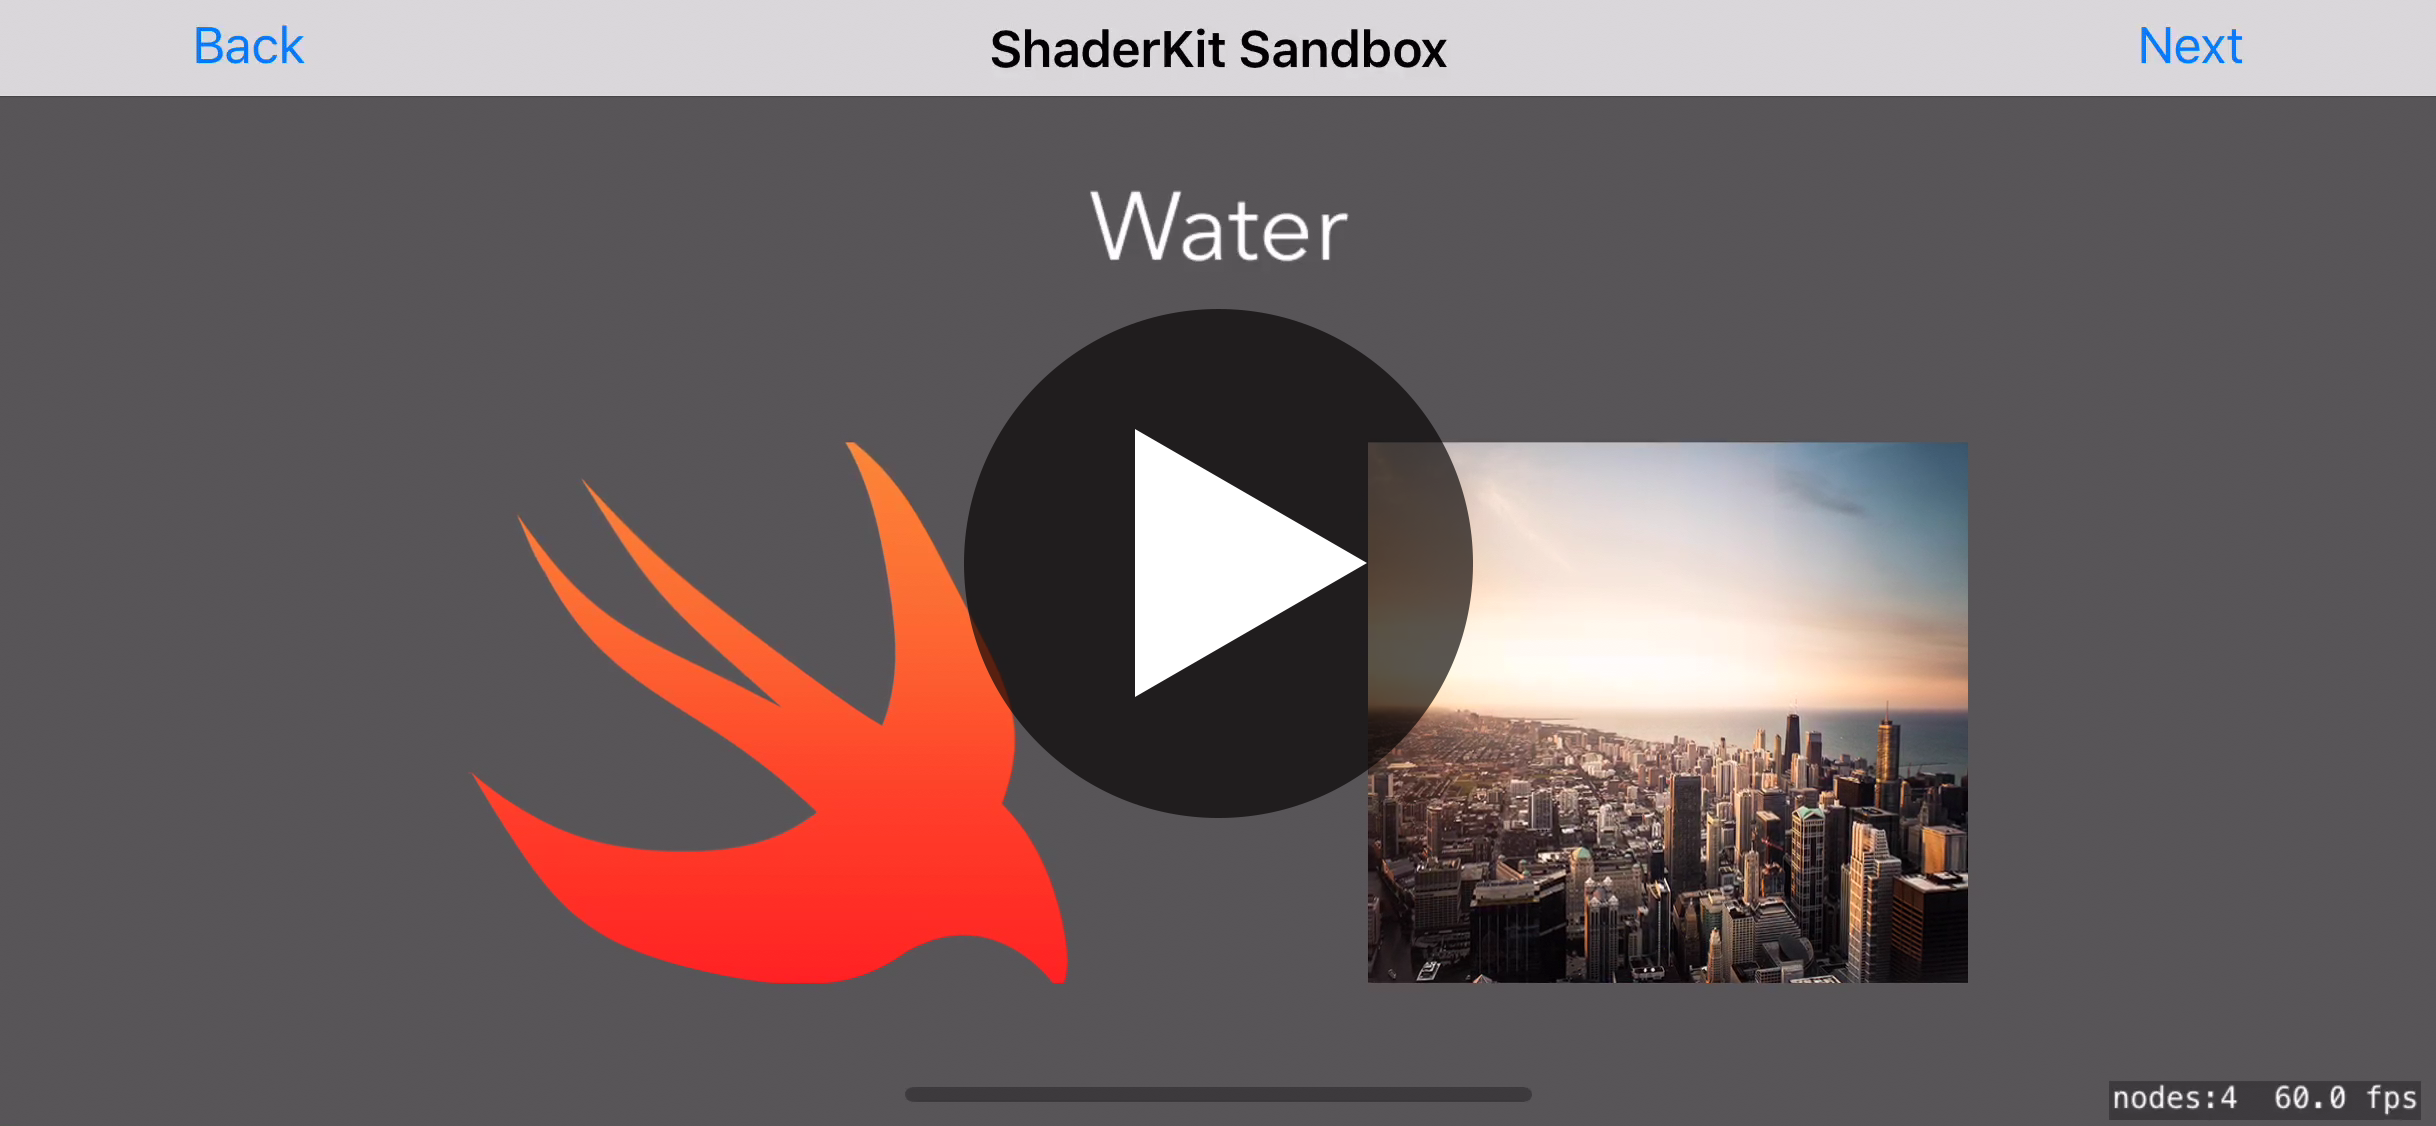
Water
Warps a textured node to create a water rippling effect. Note: this must be applied to something that has a texture.
Parameters:
- Uniform:
u_speed, how many fast to make the water ripple. Ranges from 0.5 to 10 work best; try starting with 3. - Uniform:
u_strength, how pronounced the rippling effect should be. Ranges from 1 to 5 work best; try starting with 3. - Uniform:
u_frequency, how often ripples should be created. Ranges from 5 to 25 work best; try starting with 10.
Example code:
func createWater() -> SKShader {
    let uniforms: [SKUniform] = [
        SKUniform(name: "u_speed", float: 3),
        SKUniform(name: "u_strength", float: 2.5),
        SKUniform(name: "u_frequency", float: 10)
    ]

    return SKShader(fromFile: "SHKWater", uniforms: uniforms)
}
ShaderKit Sandbox
Inside this repository are example SpriteKit projects for iOS and macOS that demonstrate each of the shaders with some example values – try running them if you’re curious how each of the shaders look or perform on your device.
If you’ve modified one of the shaders and want to see how it looks, the sandbox is the best place. If you tap or click the screen the test nodes will alternate between alpha 0 and alpha 1 so you can make sure your modifications blend correctly.
The iOS sandbox has been tested on iPhone 6, 6s, 7, and X, as well as iPad Pro. The macOS sandbox has been tested on a retina MacBook Pro using macOS 10.13.
Note: although each of these filters could be ported to any shader-supporting platform with little work, I’ve tested them specifically on iOS/macOS and SpriteKit.
Contributing
I made ShaderKit because not enough people know that shaders are powerful, easy ways to add special effects to your games. If you’d like to contribute your own shaders or modifications to existing shaders, that’s great! But first please read the following:
- ShaderKit has a strong emphasis on readability. Beginners should be able to read most of these shaders and have a good idea of how they work. If you want to make one of the shaders faster, please don’t do so at the expensive of readability.
- You must comment your code thoroughly. Shaders are often extremely terse, so please write in English above every line what the code does – a transliteration, if you will – and also provide a description of how it all works to produce the final result.
- All code must be licensed under the MIT license so it can benefit the most people.
License
MIT License.
Copyright (c) 2017 Paul Hudson
Permission is hereby granted, free of charge, to any person obtaining a copy of this software and associated documentation files (the "Software"), to deal in the Software without restriction, including without limitation the rights to use, copy, modify, merge, publish, distribute, sublicense, and/or sell copies of the Software, and to permit persons to whom the Software is furnished to do so, subject to the following conditions:
The above copyright notice and this permission notice shall be included in all copies or substantial portions of the Software.
THE SOFTWARE IS PROVIDED "AS IS", WITHOUT WARRANTY OF ANY KIND, EXPRESS OR IMPLIED, INCLUDING BUT NOT LIMITED TO THE WARRANTIES OF MERCHANTABILITY, FITNESS FOR A PARTICULAR PURPOSE AND NONINFRINGEMENT. IN NO EVENT SHALL THE AUTHORS OR COPYRIGHT HOLDERS BE LIABLE FOR ANY CLAIM, DAMAGES OR OTHER LIABILITY, WHETHER IN AN ACTION OF CONTRACT, TORT OR OTHERWISE, ARISING FROM, OUT OF OR IN CONNECTION WITH THE SOFTWARE OR THE USE OR OTHER DEALINGS IN THE SOFTWARE.