 Stream2segment

A Python library and command line application to download, process and visualize event-based seismic waveform segments, specifically designed to manage big volumes of data.
The key aspects with respect to widely-used similar applications is the use of a Relational database management system (RDBMS) to store downloaded data and metadata. The main advantages of this approach are:
-
Storage efficiency: no huge amount of files, no complex, virtually unusable directory structures. Moreover, a database prevents data and metatada inconsistency by design, and allows more easily to track what has already been downloaded in order to customize and improve further downloads
-
Simple Python objects representing stored data and relationships, easy to work with in any kind of custom code. For instance, a segment is represented by a
Segmentobject with its data, metadata and related objects easily accessible through its attributes, e.g.,segment.stream(),segment.maxgap_numsamples,segment.event.magnitude,segment.station.network,segment.channel.orientation_codeand so on. -
A powerful segments selection made even easier by means of a simplified syntax: map any attribute described above to a selection expression (e.g.
segment.event.magnitude: "[4, 5)") and with few lines you can compose complex database queries such as e.g., "get all downloaded segments within a given magnitude range, with well-formed data and no gaps, from broadband channels only and a given specific network"
Citation (Software):
Zaccarelli, Riccardo (2018): Stream2segment: a tool to download, process and visualize event-based seismic waveform data. V. 2.7.3. GFZ Data Services.
http://doi.org/10.5880/GFZ.2.4.2019.002
Citation (Research article):
Riccardo Zaccarelli, Dino Bindi, Angelo Strollo, Javier Quinteros and Fabrice Cotton. Stream2segment: An Open‐Source Tool for Downloading, Processing, and Visualizing Massive Event‐Based Seismic Waveform Datasets. Seismological Research Letters (2019)
https://doi.org/10.1785/0220180314
Usage
Stream2segment is a Python library and command line application available
after install via the command s2s on the terminal
(type s2s --help to show all subcommands).
A detailed documentation is available online in the
github wiki page, but
you can also simply start the program via the command init (
s2s init --help for details) which creates several fully documented
examples files that you can immediately start to configure and modify:
1 A download configuration file in YAML syntax. You can edit the file (all documentation is provided in the file as block comments) and start downloading waveform data and metadata with the corresponding command on the terminal:
s2s download -c <config_file> ...Note the path of the database used (where to store downlaoded segments) must be input in the config file. The supported database types are SQLite and Postgres: for massive downloads (as a rule of thumb: ≥ 1 million segments) we suggest to use Postgres. In any case, we strongly suggest running the program on computers with at least 16GB of RAM
2 A Jupyter notebook tutorial with examples for processing downloaded data, for user who prefer this approach instead of the processing module described below
3 A Python module with relative configuration in YAML syntax illustrating how to process or visualize downloaded data. You can edit the files (all documentation is provided in the files as block comments), e.g. select the segment of interest in the configuration file through powerful expressions, or modify the Python code according to your needs.
For processing data, the two files produce a tabular output in either CSV or HDF format. After you edited the code, you can start the processing in two ways:
-
By executing the Python module as script:
python <processing_module>(see section
if __name__ == "__main__"in the module) -
executed via the stream2segment
processcommand:s2s process -c <config_file> -p <processing_module> ...(type
s2s process --helpfor details)
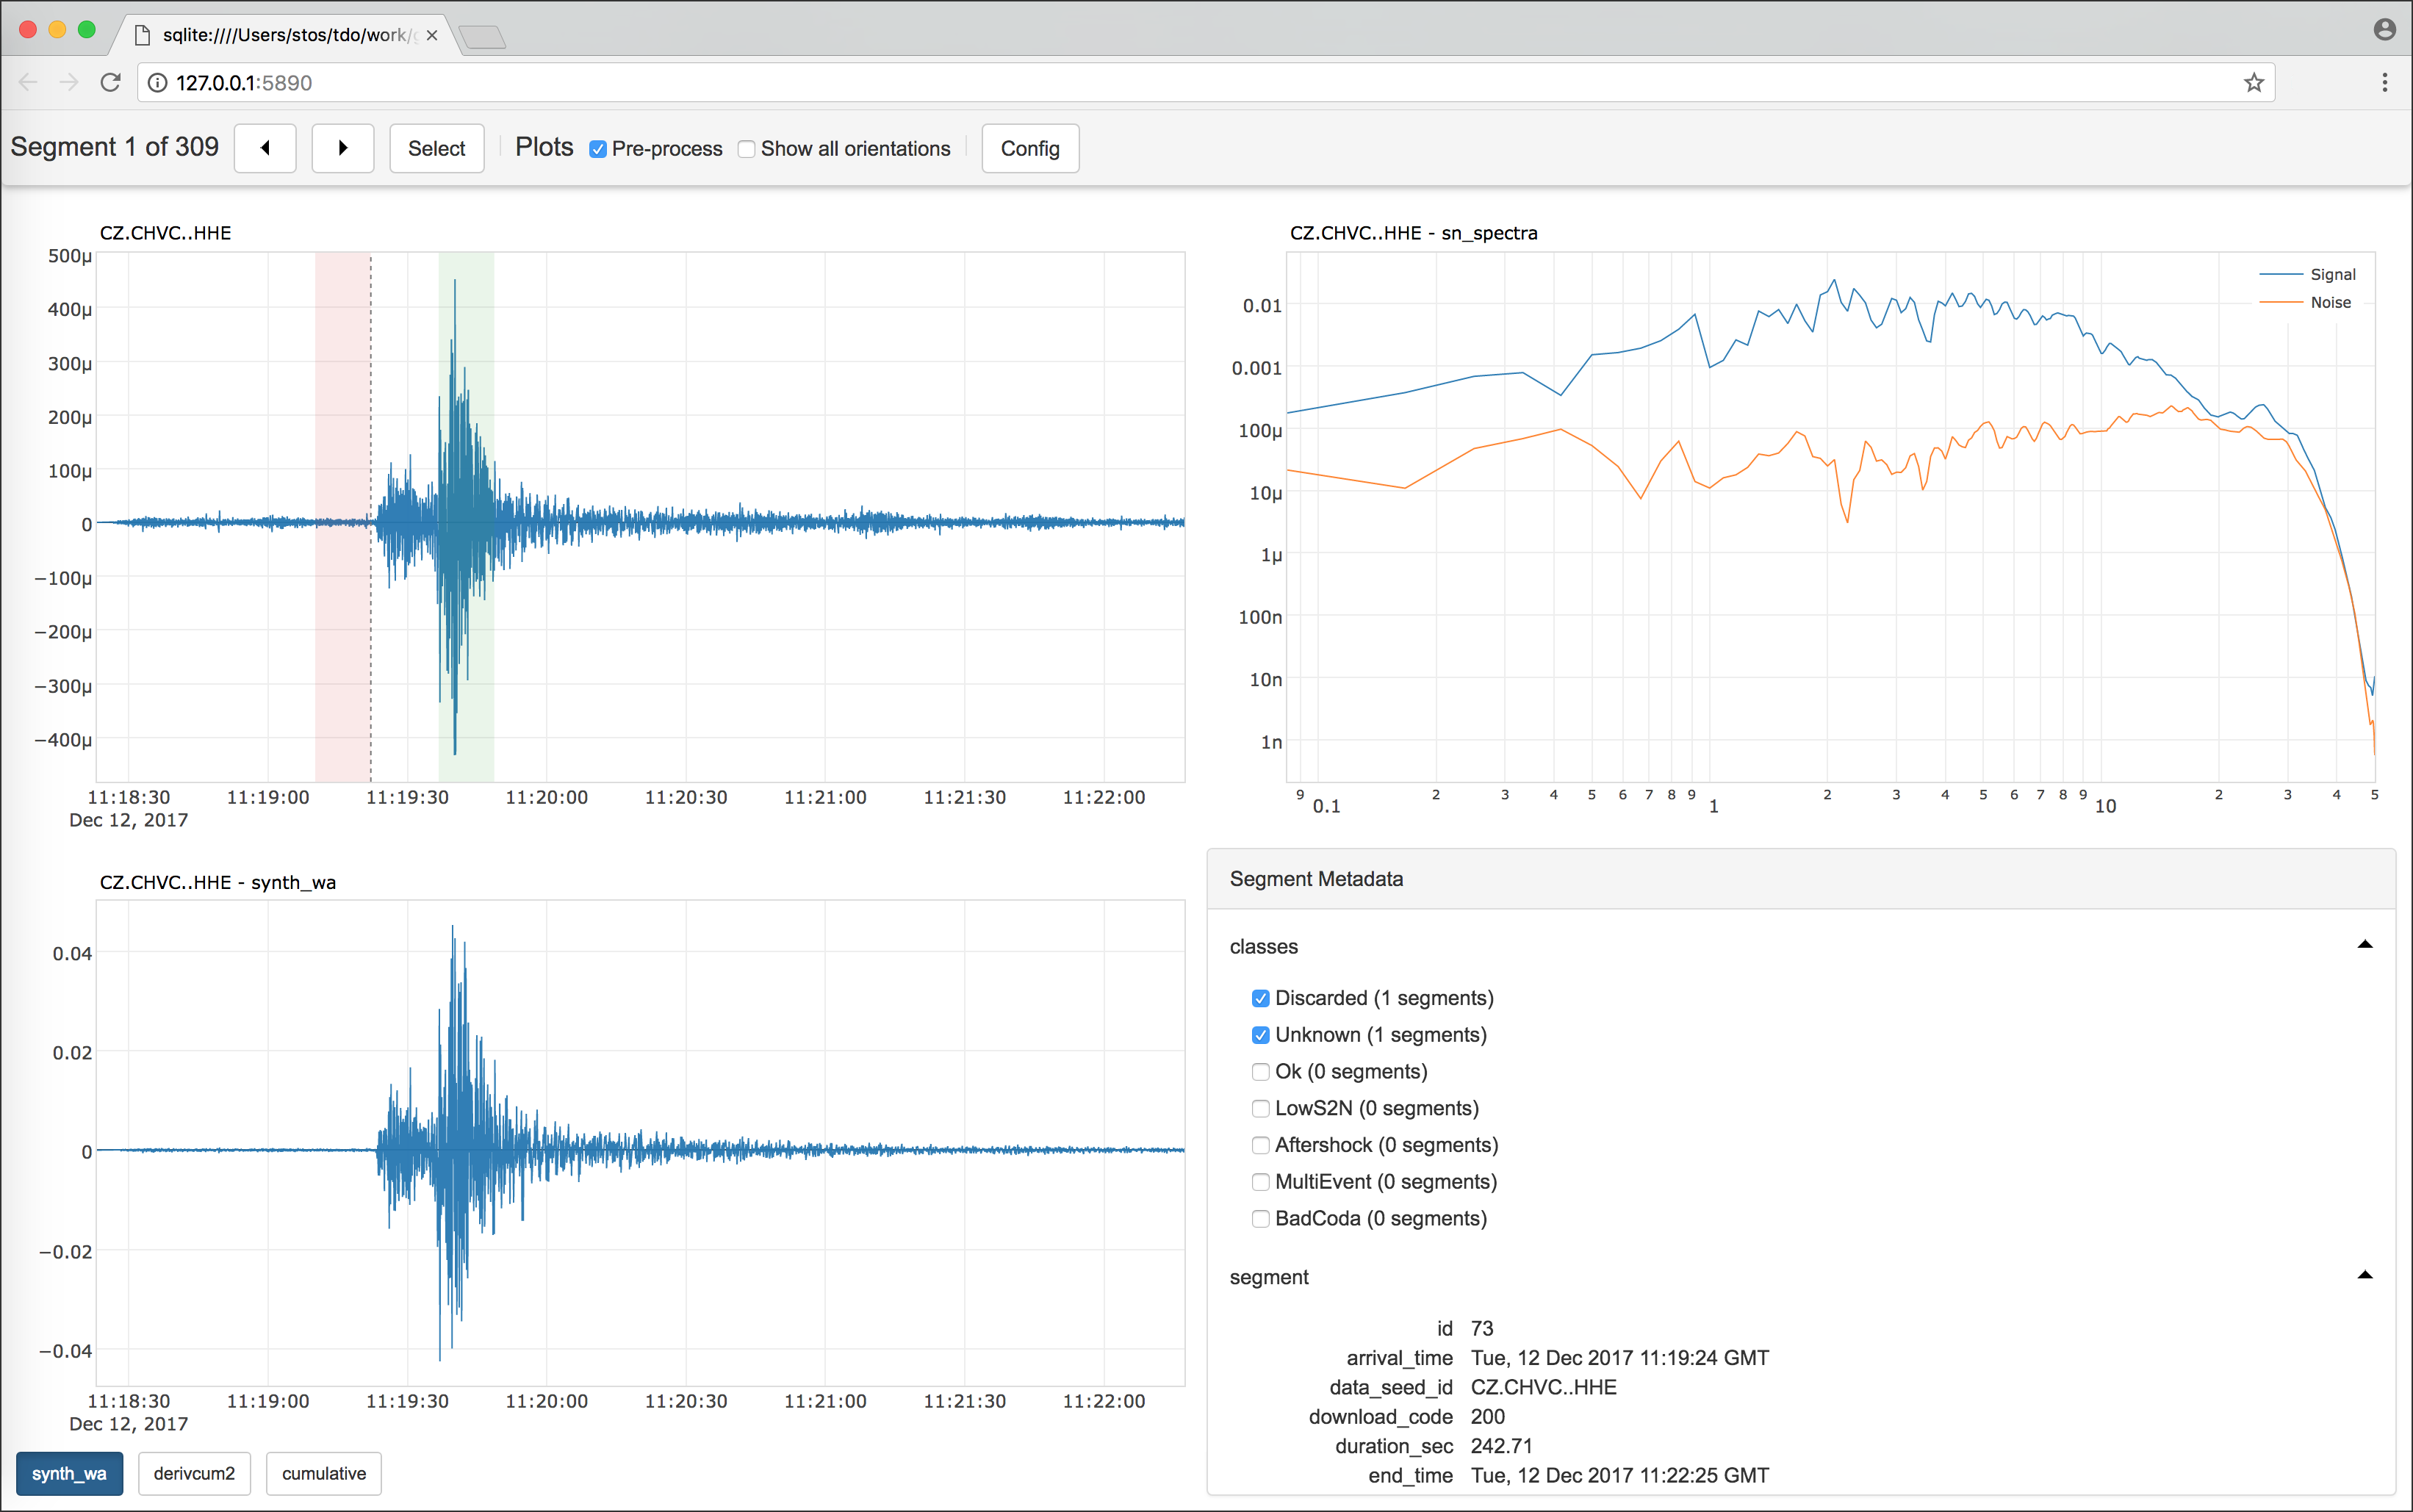
For visualizing data, the default example implements several custom plots to be visualized along with the default waveform data. You can start visualizing those plots in your browser as graphical user interface (GUI) via the corresponding command on the terminal:
s2s show -c <config_file> -p <processing_module> ...(s2s show can be run also without a custom module and config as arguments.
Type s2s show --help for details)
The GUI produced with the s2s show command |
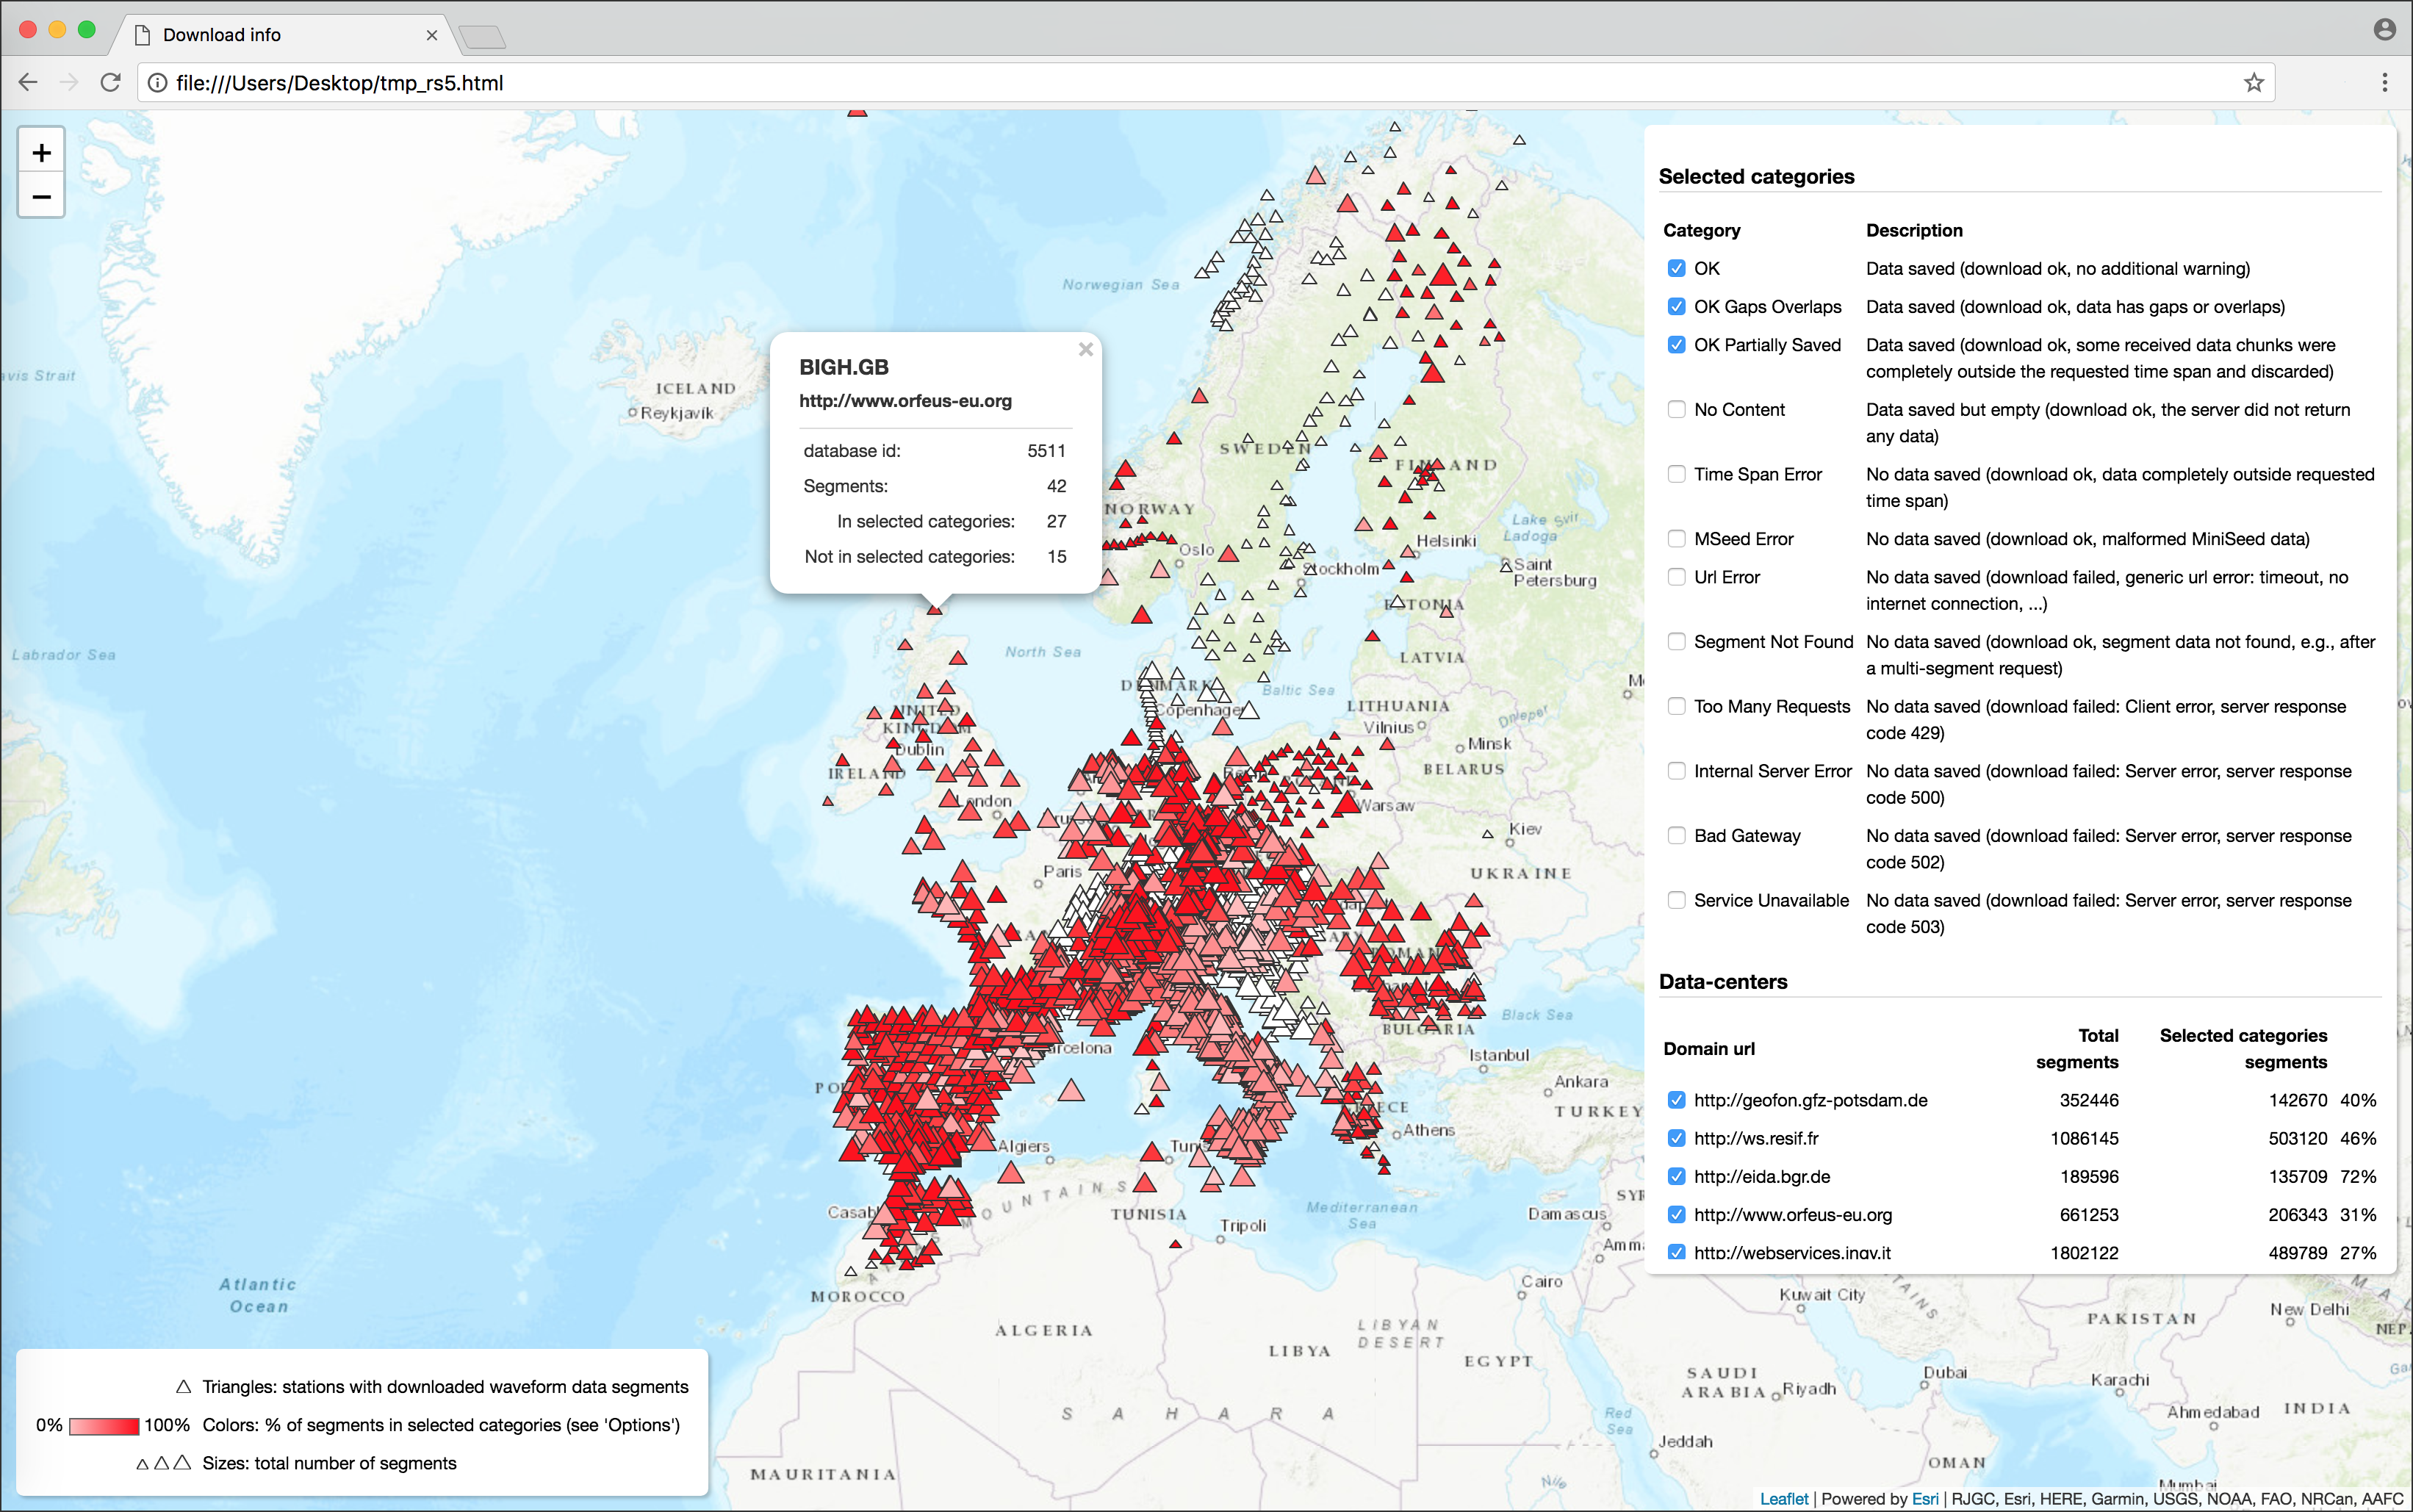
The dynamic HTML page produced with the s2s dl dstats command |
|---|---|
 |
 |
| (image linked from https://geofon.gfz-potsdam.de/software/stream2segment/) | (image linked from https://geofon.gfz-potsdam.de/software/stream2segment/) |
Installation
This program has been installed and tested on Ubuntu (14 and later) and macOS (El Capitan and later).
In case of installation problems, we suggest you to proceed in this order:
- Look at Installation Notes to check if the problem has already ben observed and a solution proposed
- Google for the solution (as always)
- Ask for help
Requirements (external software)
In this section we assume that you already have Python (3.5 or later) and the required database software. The latter should not needed if you use SQLite or if the database is already installed remotely, so basically you are concerned only if you need to download data locally (on your computer) on a Postgres database.
macOS
On MacOS (El Capitan and later) all required software is generally already preinstalled. We suggest you to go to the next step and look at the Installation Notes in case of problems (to install software on MacOS, we recommend to use brew).
Details
In few cases, on some computers we needed to run one or more of the following commands (it's up to you to run them now or later, only those really needed):
xcode-select --install
brew install openssl
brew install c-blosc
brew install git
Ubuntu
Ubuntu does not generally have all required packages pre-installed. The bare minimum
of the necessary packages can be installed with the apt-get command:
sudo apt-get install git python3-pip python3-dev # python 3
Details
In few cases, on some computers we needed to run one or more of the following commands (it's up to you to run them now or later, only those really needed):
Upgrade gcc first:
sudo apt-get update
sudo apt-get upgrade gcc
Then:
sudo apt-get update
sudo apt-get install libpng-dev libfreetype6-dev \
	build-essential gfortran libatlas-base-dev libxml2-dev libxslt-dev python-tk
Cloning repository
Git-clone (basically: download) this repository to a specific folder of your choice:
git clone https://github.com/rizac/stream2segment.git
and move into package folder:
cd stream2segment
Install and activate Python virtualenv
We strongly recommend to use Python virtual environment, because by isolating all Python packages we are about to install, we won't create conflicts with already installed packages.
Python (from version 3.3) has a built-in support for virtual environments - venv
(On Ubuntu, you might need to install it first
via sudo apt-get install python3-venv).
Make virtual environment in an stream2segment/env directory (env is a convention, but it's ignored by git commits so better keeping it. You can also use ".env" which makes it usually hidden in Ubuntu).
python3 -m venv ./env
To activate your virtual environment, type:
source env/bin/activate
or source env/bin/activate.csh (depending on your shell)
Activation needs to be done each time we will run the program. To check you are in the right env, type:
which pipand you should see it's pointing inside the env folder
Installation and activation with Anaconda (click to expand)
disclaimer: the lines below might be outdated. Please refer to the Conda documentation for details
Create a virtual environment for your project
- In the terminal client enter the following where yourenvname (like « env ») is the
name you want to call your environment, and replace x.x with the Python version you
wish to use. (To see a list of available Python versions first, type conda search
"^python$" and press enter.)
Conda create –n yourenvname python=x.x anaconda - Press « y » to proceed
Activate your virtual environment
$source activate env- To deactivate this environment, use
$source deactivate
Install Stream2segment
Important reminders before installing:
- From now on you are supposed to be in the stream2segment directory, (where you cloned the repository) with your Python virtualenv activated
- In case of errors, check the Installation notes below
Install required packages with tested versions listed in requirements.txt:
pip install --upgrade pip setuptools wheel && pip install -r ./requirements.txtInstall this package:
pip install -e .(optional) install jupyter:
pip install jupyterTroubleshooting / installation details (click to expand)
-
When using a requirements file, you can type
requirements.dev.txtinstead ofrequirements.txtif you want to install also test packages, e.g., you want to contribute to the code and/or run tests -
in older ObsPy version, numpy needs to be installed first. If you see an error like "you need to install numpy first", open "requirements.txt" and copy the line which starts with numpy. Supposing it's
numpy==0.1.12, then runpip install numpy==0.1.12before re-running thepip install ...command above -
When installing the program (
pip install -e .),-eis optional and makes the package editable, meaning that you can edit the repository and make all changes immediately available, without re-installing the package. This is useful when, e.g.,git pull-ing new versions frequently. -
in case of a message like
ERROR: No matching distribution found for <package_name>, try to skip the requirements file:pip install --upgrade pip setuptools wheel && pip install -e .This will install packages satisfying a minimum required version (listed in
setup.py), and not the exact version passing tests, lettingpiphandling the best version to use. You can choose this strategy in case of mismatching distributions, or while installing stream2segment in a virtual environment with already installed extra packages, if you want to avoid breaking existing code.
The program is now installed. To double check the program functionalities, we suggest to run tests (see below) and report the problem in case of failure. In any case, before reporting a problem remember to check first the Installation Notes
Runt tests
Stream2segment has been highly tested (current test coverage is above 90%) on Python version >= 3.5+. Although automatic continuous integration (CI) systems are not in place, we do our best to regularly tests under new Python and package versions. Remember that tests are time consuming (some minutes currently). Here some examples depending on your needs:
pytest -xvvv -W ignore ./tests/
pytest -xvvv -W ignore --dburl postgresql://<user>:<password>@localhost/<dbname> ./tests/
pytest -xvvv -W ignore --dburl postgresql://<user>:<password>@localhost/<dbname> --cov=./stream2segment --cov-report=html ./tests/
Where the options denote:
-x: stop at first error-vvv: increase verbosity,-W ignore: do not print Python warnings issued during tests. You can omit the-Woption to turn warnings on and inspect them, but consider that a lot of redundant messages will be printed: in case of test failure, it is hard to spot the relevant error message. Alternatively, try-W once- warn once per process - and-W module-warn once per calling module.--cov: track code coverage, to know how much code has been executed during tests, and--cov-report: type of report (if html, you will have to opend 'index.html' in the project directory 'htmlcov')--dburl: Additional database to use. The default database is an in-memory sqlite database (e.g., no file will be created), thus this option is basically for testing the program also on postgres. In the example, the postgres is installed locally (localhost) but it does not need to. Remember that a database with name<dbname>must be created first in postgres, and that the data in any given postgres database will be overwritten if not empty
Installation Notes:
-
(update January 2021) On MacOS (version 11.1, with Python 3.8 and 3.9):
-
if the installation fails with a lot of printout and you spot a "Failed building wheel for psycopg2", try to execute:
export LIBRARY_PATH=$LIBRARY_PATH:/usr/local/opt/openssl/lib/ && pip ./installme-dev(you might need to change the path of openssl below). Credits here and here)
-
If the error message is "Failed building wheel for tables", then
brew install c-bloscand re-runinstallme-devinstallation command (with theexportcommand above, if needed)
-
-
If you see (we experienced this while running tests, thus we can guess you should see it whenever accessing the program for the first time):
This system supports the C.UTF-8 locale which is recommended.
You might be able to resolve your issue by exporting the
following environment variables:

  export LC_ALL=C.UTF-8
  export LANG=C.UTF-8
Then edit your
~/.profile(or~/.bash_profileon Mac) and put the two lines starting with 'export', and executesource ~/.profile(source ~/.bash_profileon Mac) and re-execute the program. -
On Ubuntu 12.10, there might be problems with libxml (
version libxml2_2.9.0' not found). Move the file or create a link in the proper folder. The problem has been solved looking at http://phersung.blogspot.de/2013/06/how-to-compile-libxml2-for-lxml-python.html
All following issues should be solved by installing all dependencies as described in the section Prerequisites. If you did not install them, here the solutions to common problems you might have and that we collected from several Ubuntu installations:
-
For numpy installation problems (such as
Cannot compile 'Python.h') , the fix has been to update gcc and install python3-dev (python2.7-dev if you are using Python2.7, discouraged):sudo apt-get update sudo apt-get upgrade gcc sudo apt-get install python3-devFor details see here
-
For scipy problems,
build-essential gfortran libatlas-base-devare required for scipy. For details see here -
For lxml problems,
libxml2-dev libxslt-devare required. For details see here -
For matplotlib problems (matplotlib is not used by the program but from imported libraries),
libpng-dev libfreetype6-devare required. For details see here and here
Developer(s) notes:
Although PEP8 recommends 79 character length, the program used initially a 100 characters max line width, which is being reverted to 79 (you might see mixed lengths in the modules). It seems that among new features planned for Python 4 there is an increment to 89.5 characters. If true, we might stick to that in the future
Updating dependencies
In the absence of Continuous Integration in place, from times to times, it is necessary
to update the dependencies, to make pip install more likely to work (at least for
some time). The procedure is:
  pip install -e .
  pip freeze > ./requirements.tmp
  pip install -e ".[dev]"
  pip freeze > ./requirements.dev.tmp
Remember to comment the line of stream2segment
from each requirements (as it should be installed as argument of pip:
pip install <options> ., and not inside the requirements file).
Run tests (see above) with warnings on: fix what might go wrong, and eventually you can
replace the old requirements.txt and requirements.dev.txt with the .tmp file
created.
Updating wiki
Requirements (to be done once):
jupyterinstalled.- The git repository
stream2segment.wikiwhich you can clone from the stream2segment/wiki URL on the GitHub page. The repository must be cloned next to (on the same parent directory of) the stream2segment repository
The wiki is simply a git project composed of Markdown (.md) files, where
Home.md implements the landing page of the wiki on the browser, and thus
usually hosts the table of contents with links to other markdown files .md
in the directory. Currently, two of those .md files are generated from the
notebooks .ipynb inside stream2segment:
- ./resources/templates/
- Using-Stream2segment-in-your-Python-code.ipynb
- The-Segment-object.ipynb
To update one of those existing notebooks
-
Edit the notebook in stream2segment/resources/templates:
jupyter notebook stream2segment/resources/templatesExecute the whole notebook to update it, thengit pushas usual -
Create
.mdversions of the notebook for the wiki. From the stream2segment repository ascwd:F='Using-Stream2segment-in-your-Python-code';jupyter nbconvert --to markdown ./stream2segment/resources/templates/$F.ipynb --output-dir ../stream2segment.wiki
(repeat for every notebook file, e.g.
The-Segment-object. Note only the file name, no file extension needed) -
Commit and push to the stream2segment.wiki repo:
cd ../stream2segment.wiki, then as usualgit commitandgit push. One line command:(cd ../stream2segment.wiki && git commit -am 'updating wiki' && git push)
To add a new notebook
Create the notebook (jupyter notebook stream2segment/resources/templates).
Choose a meaningful file name: use upper case when needed, type hyphens '-'
instead of spaces: the file name will be used as title to show the page
online (replacing hyphens with spaces).
Once the notebook is created and executed:
-
(optional) If you want to include the notebook also as example in the
s2s initcommand, look atstream2segment/cli.py -
Make the notebook being executed during tests (see examples in
tests/misc/test_notebook.py) and run tests to check everything works. -
Make the notebook visible in the wiki by adding a reference to it (the notebook URL is the file name with no extension, I guess case insensitive). A reference can be added in several places:
- In the file
_Sidebar.md(in the wiki repository) which will show it in the sidebar on GitHub - In
Home.md - In some other notebook (see example in
Using-stream2segment-in-you-Python-code.ipynb). In this case, note that you might need to update also the referencing notebook (see points 2-3 above)
- In the file
-
Create the markdown file and commit to the wiki (see points 2-3 above under
To update one of those existing notebooks)