jhuckaby / Wperf
Programming Languages
Labels
Projects that are alternatives of or similar to Wperf
Table of Contents
Overview
WebPerf (wperf) is a simple command-line HTTP load tester utility, which can send repeated HTTP requests to a target URL or set of URLs. It provides detailed performance metrics, including a breakdown of all the HTTP request phases, and a histogram showing the elapsed time spread.
This is similar to the popular ApacheBench (ab) tool, but provides additional features like dynamic URL substitution, progress display with time remaining and live req/sec, a more detailed performance breakdown, and the ability to save configurations in JSON files.
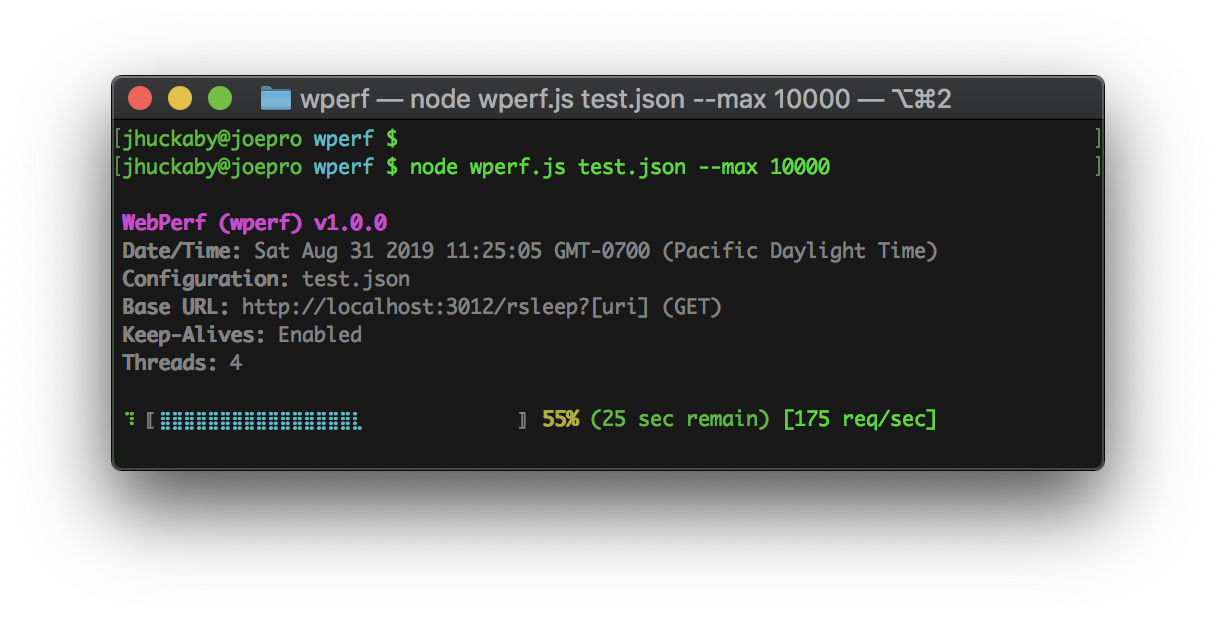
During a run, the script will display a graphical progress bar with estimated time remaining, and the current requests per second. You can also hit Ctrl+Z to output an in-progress report, and of course Ctrl+C to abort a run, which will render one final report before exiting.
Progress Display
Completed Output
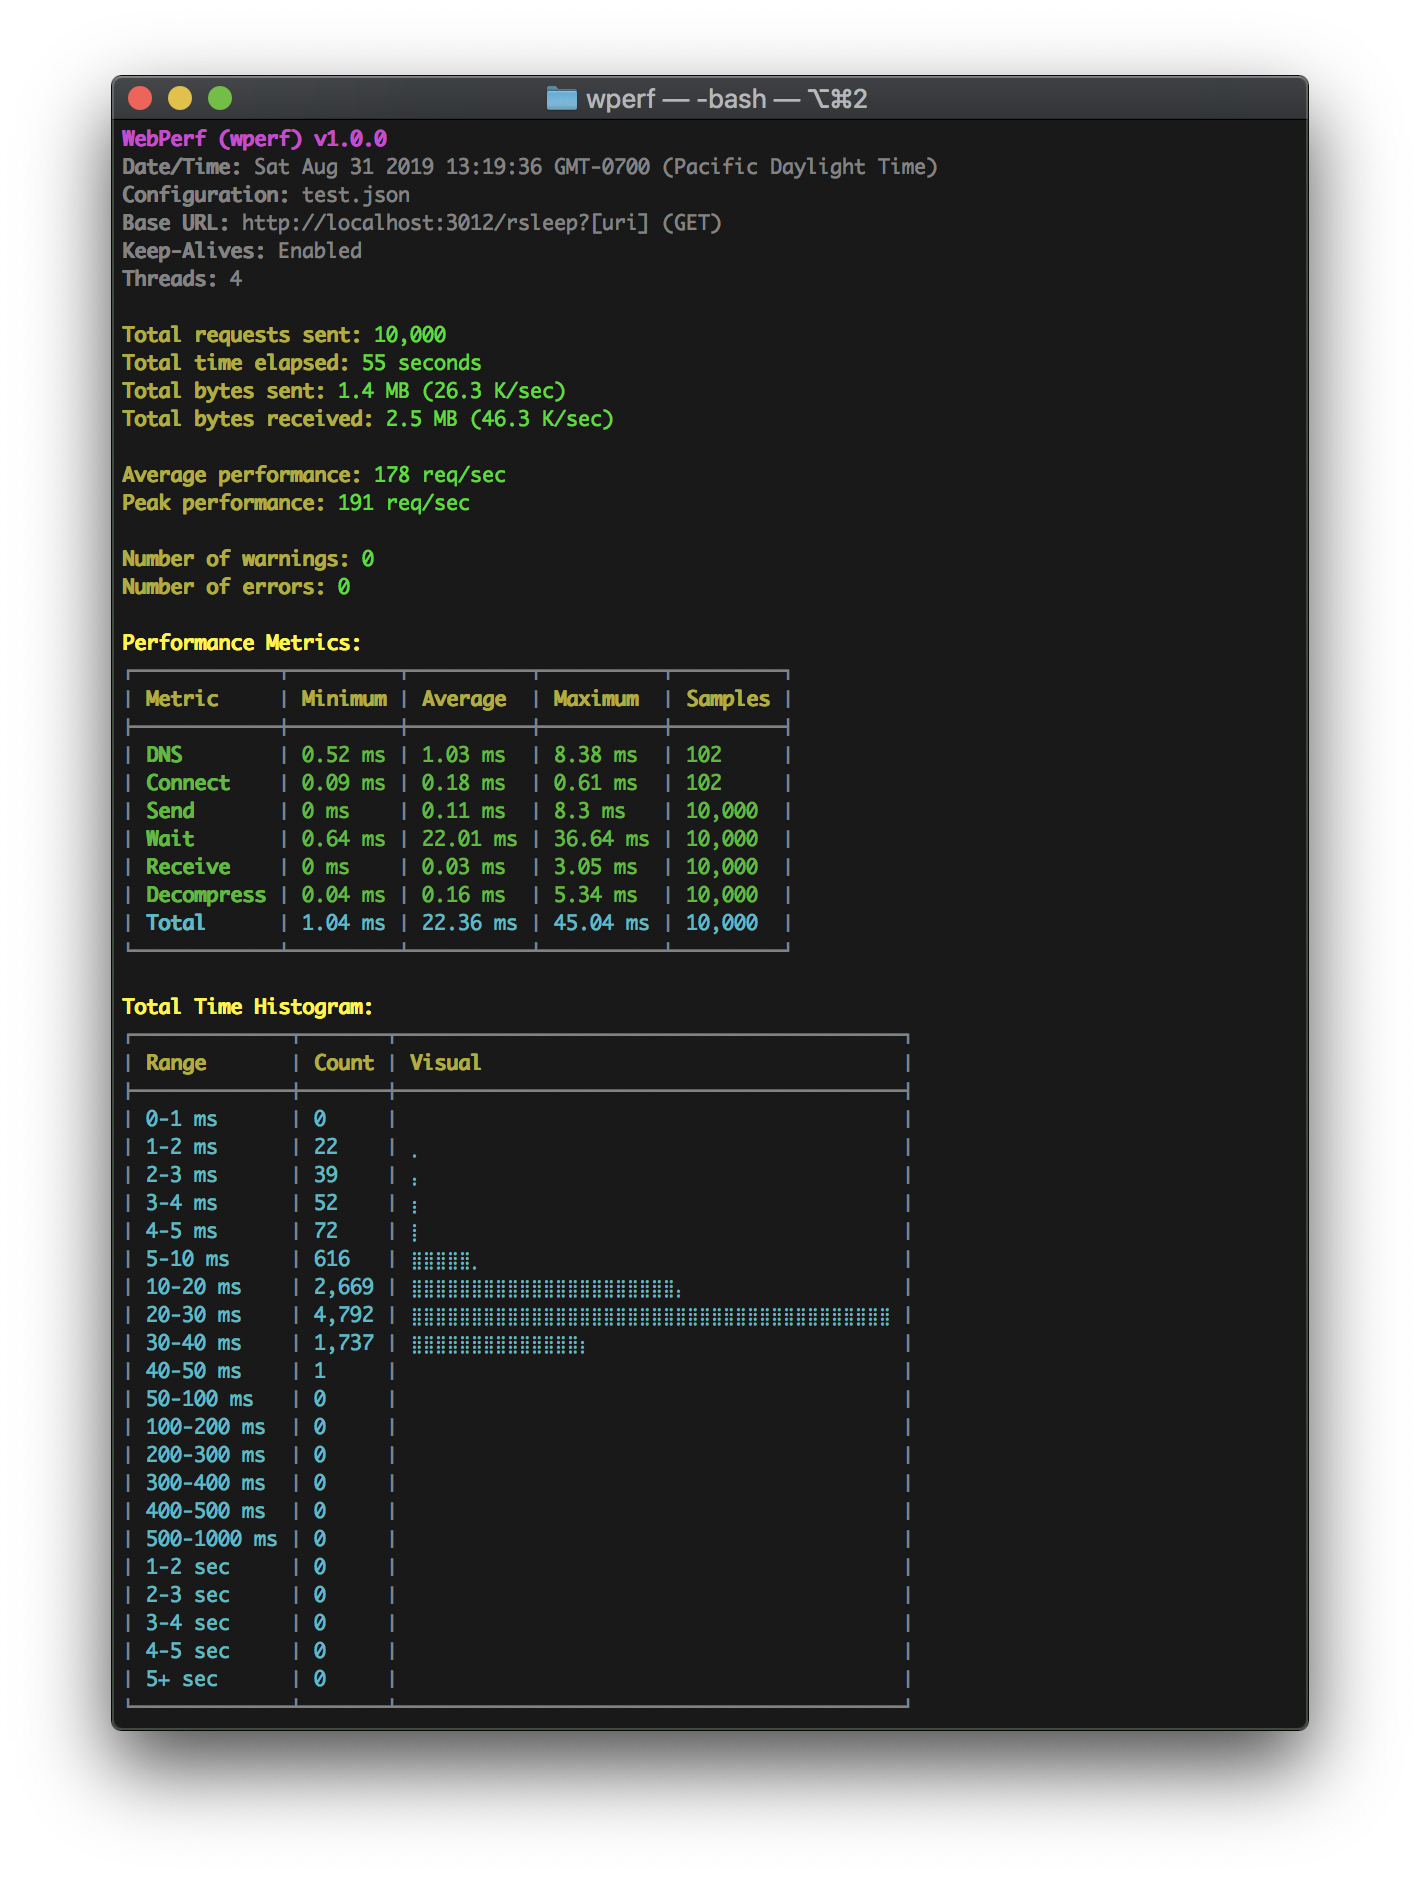
Notes:
- The "Samples" numbers may differ between metrics for things like Keep-Alives, which will reuse sockets and therefore require fewer DNS lookups and TCP connects.
- The "Decompress" metric is only applicable for encoded (compressed) server responses (i.e. Gzip, Deflate).
- The "Peak Performance" is the best performing second, which is only shown if the total time covered a full second.
- A "warning" is a request that took longer than a specified duration (default is 1 second).
- An "error is a bad HTTP response (outside of the 2xx or 3xx range) or DNS lookup / TCP connect failure.
Usage
Use npm to install the module as a command-line executable:
npm install -g wperf
Then call it using wperf and specify your URL and options on the command-line:
wperf URL [--OPTION1 --OPTION2 ...]
Example command:
wperf https://myserver.com/some/path --max 100 --threads 2 --keepalive
This would send an HTTP GET request to the specified URL 100 times using 2 threads, and utilizing HTTP Keep-Alives (i.e. reuse sockets for subsequent requests, if the target server supports it).
Alternatively, you can store all your configuration settings in a JSON file, and specify it as the first argument (see below for details on how to format the JSON file):
wperf my-load-test.json
You can also include command-line arguments after the configuration file which acts as overrides:
wperf my-load-test.json --verbose
Configuration Options
You can specify most configuration options on the command line (using the syntax --key value) or in a JSON configuration file as a top-level property. There are a few exceptions which are noted below.
url
Use the command-line --url or JSON url property to specify the URL to be requested. As a shortcut, the URL can be specified as the first argument to the command-line script, without the --url prefix. Example command-line:
wperf https://myserver.com/some/path
Example JSON configuration:
{
	"url": "https://myserver.com/some/path"
}
params
If you use a JSON configuration file, you can insert [placeholder] variables into your URL. These are expanded by looking in a params object in the JSON file, if provided. Further, each parameter may be an array of values, of which one is picked randomly per request. Example:
{
	"url": "https://myserver.com/some/path?food=[food]",
	"params": {
		"food": ["apple", "orange", "banana"]
	}
}
This would produce three different URLs, picked randomly for each request:
https://myserver.com/some/path?food=apple
https://myserver.com/some/path?food=orange
https://myserver.com/some/path?food=banana
You can nest parameters, meaning the values can themselves contain [placeholder] variables, which are further expanded until all are satisfied (up to 32 levels deep). Example of this:
{
	"url": "https://myserver.com[uri]",
	"params": {
		"uri": [
			"/some/path?&action=eat&food=[food]",
			"/some/other/path?&action=drink&beverage=[beverage]"
		],
		"food": ["apple", "orange", "banana"],
		"beverage": ["coke", "pepsi"]
	}
}
Here we have the full URI path substituted out as [uri], which may pick one of two values, one with a [food] and one with a [beverage] variable. This particular configuration would result in 5 total unique URLs.
If you just want to pick from a random list of URLs, simply set the url property to a string containing a single macro like [url], then list all your URLs like this:
{
	"url": "[url]",
	"params": {
		"url": [
			"http://server1.com/path/one",
			"http://server2.com/path/two",
			"http://server3.com/path/three"
		]
	}
}
If you simply want a random number on your URLs, you can use the [#-#] shortcut, which will pick a random integer within the specified range (inclusive). Example:
{
	"url": "https://myserver.com/some/path?&random=[0-99999]"
}
You can optionally store your parameters in their own JSON file. To use this feature, specify the file path using the --params command-line argument, or as a params string property in your configuration file. Example of the latter:
{
	"url": "https://myserver.com/some/path?food=[food]",
	"params": "my_params_file.json"
}
And then the contents of my_params_file.json would be:
{
	"food": ["apple", "orange", "banana"]
}
Here is an example of specifying the parameters file using the command line:
wperf https://myserver.com/some/path --params my_params_file.json
max
The max parameter specifies the total number of HTTP requests to send (regardless of threads). You can specify this on the command-line or in a configuration file. The default is 1. Example:
wperf https://myserver.com/some/path --max 100
Example JSON configuration:
{
	"url": "https://myserver.com/some/path",
	"max": 100
}
threads
The threads parameter specifies the number of "threads" (i.e. concurrent HTTP requests) to send. You can specify this on the command-line or in a configuration file. The default is 1. Example:
wperf https://myserver.com/some/path --max 100 --threads 4
Example JSON configuration:
{
	"url": "https://myserver.com/some/path",
	"max": 100,
	"threads": 4
}
keepalive
The keepalive parameter, when present on the command-line or set to true in your JSON configuration, enables HTTP Keep-Alives for all requests. This means that sockets will be reused whenever possible (if the target server supports it and doesn't close the socket itself). The default behavior is to disable Keep-Alives, and open a new socket for every request. Example use:
wperf https://myserver.com/some/path --max 100 --keepalive
Example JSON configuration:
{
	"url": "https://myserver.com/some/path",
	"max": 100,
	"keepalive": true
}
Of course, Keep-Alives only take effect if you send more than one request.
throttle
The throttle parameter allows you to set a maximum requests per second limit, which the script will always stay under, regardless of the number of threads. You can specify this on the command-line or in a configuration file. The default is unlimited. Example use:
wperf https://myserver.com/some/path --max 100 --throttle 10
Example JSON configuration:
{
	"url": "https://myserver.com/some/path",
	"max": 100,
	"throttle": 10
}
timeout
The timeout parameter allows you to specify a maximum time for requests in seconds, before they are aborted and considered an error. This is measured as the time to first byte, and is specified as seconds. You can set this on the command-line or in a configuration file. The default is 5 seconds. The value can be a floating point decimal (fractional seconds). Example use:
wperf https://myserver.com/some/path --timeout 2.5
Example JSON configuration:
{
	"url": "https://myserver.com/some/path",
	"timeout": 2.5
}
warn
The warn parameter allows you to specify a maximum time for requests in seconds, before they are logged as a warning. You can set this on the command-line or in a configuration file. The default is 1 second. The value can be a floating point decimal (fractional seconds). Example use:
wperf https://myserver.com/some/path --warn 0.5
Example JSON configuration:
{
	"url": "https://myserver.com/some/path",
	"warn": 0.5
}
Warnings are printed to STDERR, and contain a date/time stamp (local time), the request sequence number, the HTTP response code, and a JSON object containing the raw performance metrics (measured in milliseconds), along with the bytes sent & received, and the URL that was requested. Example:
[2019/08/31 16:46:20] Perf Warning: Req #1: HTTP 200 OK -- {"scale":1000,"perf":{"total":20.584,"dns":2.647,"send":0,"connect":0.477,"wait":13.68,"receive":1.102,"decompress":2.323},"counters":{"bytes_sent":151,"bytes_received":266},"url":"http://localhost:3012/rsleep?veg=celery"}
warnings
If you would prefer warnings in a more machine-readable format, you can have them logged to a file using newline delimited JSON format. To enable this, include the --warnings command-line argument followed by a log file path, or use the warnings configuration property. Example use:
wperf https://myserver.com/some/path --warn 0.5 --warnings /var/log/my-warning-log.ndjson
Example JSON configuration:
{
	"url": "https://myserver.com/some/path",
	"warn": 0.5,
	"warnings": "/var/log/my-warning-log.ndjson"
}
Here is an example warning log entry (the JSON has been pretty-printed for display purposes):
{
	"perf": {
		"total": 34.992,
		"dns": 2.324,
		"send": 0,
		"connect": 0.423,
		"wait": 29.014,
		"receive": 0.801,
		"decompress": 2.168
	},
	"counters": {
		"bytes_sent": 151,
		"bytes_received": 266
	},
	"url": "http://localhost:3012/rsleep?veg=celery",
	"code": 200,
	"status": "OK",
	"req_num": 1,
	"now": 1567295312,
	"date_time": "[2019/08/31 16:48:32]"
}
Here are descriptions of the properties:
| Property | Description |
|---|---|
perf |
This object contains the raw performance metrics for the request, which are all measured in milliseconds. See Performance Metrics for details. |
counters |
This object contains raw counters, including bytes_sent and bytes_received, which count the number of bytes sent and received for the request, respectively. |
url |
This is the URL that was requested. It is included because it may have been dynamically constructed with placeholder substitutions. |
code |
This is the HTTP response code sent back from the server. |
status |
This is the HTTP status line sent back from the server. |
req_num |
This is the request sequence number (from one to max). |
now |
This is the current date/time expressed as Epoch seconds. |
date_time |
This is the current date/time expressed as a string in the local timezone. |
fatal
The fatal parameter, when present on the command-line or set to true in your JSON configuration, will cause the first HTTP error response to abort the entire run. By default this is disabled, and the script continues after encountering errors. Example use:
wperf https://myserver.com/some/path --fatal
Example JSON configuration:
{
	"url": "https://myserver.com/some/path",
	"fatal": true
}
verbose
The verbose parameter, when present on the command-line or set to true in your JSON configuration, outputs information about every single request just as it completes. Example use:
wperf https://myserver.com/some/path --verbose
Example JSON configuration:
{
	"url": "https://myserver.com/some/path",
	"verbose": true
}
Verbose output looks like this:
[2019/08/31 16:42:54] Req #1: HTTP 200 OK -- {"scale":1000,"perf":{"total":24.139,"dns":2.044,"send":0,"connect":0.43,"wait":17.426,"receive":1.104,"decompress":2.802},"counters":{"bytes_sent":151,"bytes_received":266},"url":"http://localhost:3012/rsleep?veg=celery"}
[2019/08/31 16:42:54] Req #2: HTTP 200 OK -- {"scale":1000,"perf":{"total":25.454,"dns":1.872,"send":0,"connect":0.402,"wait":20.285,"receive":0.171,"decompress":2.683},"counters":{"bytes_sent":152,"bytes_received":266},"url":"http://localhost:3012/rsleep?color=green"}
[2019/08/31 16:42:54] Req #3: HTTP 200 OK -- {"scale":1000,"perf":{"total":35.035,"dns":2.317,"send":0,"connect":0.378,"wait":31.838,"receive":0.093,"decompress":0.393},"counters":{"bytes_sent":151,"bytes_received":266},"url":"http://localhost:3012/rsleep?veg=celery"}
[2019/08/31 16:42:54] Req #4: HTTP 200 OK -- {"scale":1000,"perf":{"total":40.736,"dns":6.997,"send":0,"connect":0.476,"wait":32.247,"receive":0.074,"decompress":0.943},"counters":{"bytes_sent":150,"bytes_received":266},"url":"http://localhost:3012/rsleep?color=red"}
[2019/08/31 16:42:54] Req #5: HTTP 200 OK -- {"scale":1000,"perf":{"total":10.893,"send":0.39,"wait":9.735,"receive":0.103,"decompress":0.641},"counters":{"bytes_sent":151,"bytes_received":264},"url":"http://localhost:3012/rsleep?veg=celery"}
Similar to the warn output, these lines contain a date/time stamp (local time), the request sequence number, the HTTP response code, and a JSON object containing the raw performance metrics (measured in milliseconds), along with the bytes sent & received, and the URL that was requested.
cache_dns
The cache_dns parameter, when present on the command-line or set to true in your JSON configuration, will cache the IP addresses from DNS lookups, so they only need to be requested once per unique domain name. Example use:
wperf https://myserver.com/some/path --cache_dns
Example JSON configuration:
{
	"url": "https://myserver.com/some/path",
	"cache_dns": true
}
auth
The auth parameter allows you to include HTTP Basic Authentication credentials (i.e. username and password). These should be delimited by a colon (:) character. You can set this on the command-line or in a configuration file. Example:
wperf https://myserver.com/some/path --auth "jsmith:12345"
Example JSON configuration:
{
	"url": "https://myserver.com/some/path",
	"auth": "jsmith:12345"
}
compress
By default, the request library supports compressed server responses (i.e. Gzip or Deflate content encoding), and announces support for these via the Accept-Encoding header. The compress property allows you to disable compression support in the request library. Specifically, disabling compression means that an Accept-Encoding: none header is sent with every request, informing the target server that the client doesn't support a compressed response. You can set this property to false on the command-line or in a configuration file. Example:
wperf https://myserver.com/some/path --compress false
Example JSON configuration:
{
	"url": "https://myserver.com/some/path",
	"compress": false
}
Note: It is really up to the target server whether this header is followed or not.
useragent
The useragent parameter allows you to specify a custom User-Agent request header. By default, this is set to Mozilla/5.0; wperf/1.0.0. You can set this property on the command-line or in a configuration file. Example:
wperf https://myserver.com/some/path --useragent "My Custom Agent v1.2.3"
Example JSON configuration:
{
	"url": "https://myserver.com/some/path",
	"useragent": "My Custom Agent v1.2.3"
}
follow
The follow parameter, when present on the command-line or set to true in your JSON configuration, will cause the HTTP request library to automatically follow redirects. That is, HTTP response codes in the 3xx range, with an accompanying Location response header. You can set this property on the command-line or in a configuration file. Example:
wperf https://myserver.com/some/path --follow
Example JSON configuration:
{
	"url": "https://myserver.com/some/path",
	"follow": true
}
Alternatively, you can set this parameter to a number value, which represents the total amount of redirects to follow for a given request. This can help prevent infinite redirect loops.
Note: The request library only tracks the performance metrics of the final request in the redirect chain.
retries
The retries parameter allows you to set a number of retries before an error is logged, and possibly fatal. The default is 0 retries. You can set this property on the command-line or in a configuration file. Example:
wperf https://myserver.com/some/path --retries 5
Example JSON configuration:
{
	"url": "https://myserver.com/some/path",
	"retries": 5
}
Note: If retries occur, the request library only tracks the performance metrics of the final request of each group.
insecure
By default, when HTTPS requests are made, the SSL certificate is verified using a Certificate Authority (CA). The insecure parameter, when present on the command-line or set to true in your JSON configuration, will cause the request library to bypass all SSL certificate verification. One potential use of this is for self-signed certificates. Example:
wperf https://myserver.com/some/path --insecure
Example JSON configuration:
{
	"url": "https://myserver.com/some/path",
	"insecure": true
}
headers
The headers parameter allows you to add custom HTTP headers to every request. These can be specified on the command-line using a h_ prefix followed by the header name, then the header value. You can repeat this for adding multiple headers. Example:
wperf https://myserver.com/some/path --h_Cookie "sessionid=1234567890;"
If using a JSON configuration file, you can instead use a headers object, with the header names specified as the keys within. Example:
{
	"url": "https://myserver.com/some/path",
	"headers": {
		"Cookie": "sessionid=1234567890;"
	}
}
The underlying request library also adds a few basic headers of its own, including Host, Connection, Accept-Encoding and User-Agent.
method
The method parameter allows you to set the HTTP method for all requests sent. By default this is GET, but you can set it to any of the standard values, i.e. GET, HEAD, POST, PUT and DELETE. You can set this property on the command-line or in a configuration file. Example:
wperf https://myserver.com/some/path --method HEAD
Example JSON configuration:
{
	"url": "https://myserver.com/some/path",
	"method": "HEAD"
}
data
If you select any of the HTTP methods that support a request body, e.g. POST, PUT or DELETE, you can specify the data in a number of different ways. By default, it is sent as application/x-www-form-urlencoded, and you can specify named parameters on the command-line using a d_ prefix like this:
wperf https://myserver.com/some/path --method POST --d_username jsmith --d_email [email protected]
This would serialize the two post parameters using standard form encoding, resulting in username=jsmith&email=jsmith%40aol.com. You can also specify these parameters in your JSON configuration file using the data property:
{
	"url": "https://myserver.com/some/path",
	"method": "POST",
	"data": {
		"username": "jsmith",
		"email": "[email protected]"
	}
}
Alternatively, you can specify the request body in "raw" format using the --data command-line argument (or data configuration property) by setting it to a string. This can be used to send a pure JSON post, for example:
wperf https://myserver.com/some/path --method POST --h_Content-Type application/json --data '{"username":"jsmith","email":"[email protected]"}'
Or similarly via configuration file:
{
	"url": "https://myserver.com/some/path",
	"method": "POST",
	"headers": {
		"Content-Type": "application/json"
	},
	"data": "{\"username\":\"jsmith\",\"email\":\"[email protected]\"}"
}
multipart
To send a "multipart" HTTP POST, which is designed more for larger parameters (also see files), include the --multipart parameter on the command-line, or set the multipart JSON configuration property to true. Example of this:
wperf https://myserver.com/some/path --method POST --multipart --d_username jsmith --d_email [email protected]
And in JSON configuration format:
{
	"url": "https://myserver.com/some/path",
	"method": "POST",
	"multipart": true,
	"data": {
		"username": "jsmith",
		"email": "[email protected]"
	}
}
files
If you are performing a multipart HTTP POST, you can upload actual files from the local filesystem. These can be specified on the command-line using the f_ prefix, or in a configuration file using a files object. Here are examples of each:
wperf https://myserver.com/some/path --method POST --multipart --f_file1 /path/to/my/file.jpg
Example JSON configuration:
{
	"url": "https://myserver.com/some/path",
	"method": "POST",
	"multipart": true,
	"files": {
		"file1": "/path/to/my/file.jpg"
	}
}
In this case the file is identified by the parameter name file1. The filename and content type are set automatically by the request library, based on the specified file path.
success_match
The success_match parameter allows you to specify a regular expression that must match against the server response content body in order for the request to be considered a success. You can set this property on the command-line or in a configuration file. Example:
wperf https://myserver.com/some/path --success_match "Operation was successful"
Example JSON configuration:
{
	"url": "https://myserver.com/some/path",
	"success_match": "Operation was successful"
}
error_match
The error_match parameter allows you to specify a regular expression that generates an error when it matches the server response content body. You can set this property on the command-line or in a configuration file. Example:
wperf https://myserver.com/some/path --error_match "Database failure"
Example JSON configuration:
{
	"url": "https://myserver.com/some/path",
	"error_match": "Database failure"
}
histo
Normally wperf outputs a histogram of the "Total Time" metric, which is the full HTTP request from beginning to end. However, you can customize this, and set it to generate multiple histograms of different HTTP metrics, including:
| Metric | Description |
|---|---|
dns |
Time to resolve the hostname to an IP address via DNS. This is omitted if cached, or you specify an IP on the URL. |
connect |
Time to connect to the remote socket (omitted if using Keep-Alives and reusing a host). |
send |
Time to send the request data (typically for POST / PUT). Also includes SSL handshake time (if HTTPS). |
wait |
Time spent waiting for the server response (after request is sent). |
receive |
Time spent downloading data from the server (after headers received). |
decompress |
Time taken to decompress the response (if encoded with Gzip or Deflate). |
total |
Total time of the entire HTTP transaction. |
To specify additional histograms, include the --histo argument on the command-line, set to a comma-separate list of any of the metrics defined above. Or you can use the special keyword all to generate histograms for all of them. Example:
wperf https://myserver.com/some/path --histo "dns,connect,receive"
If you are using a JSON configuration file, you can set the histo property to an array instead of a CSV string:
{
	"url": "https://myserver.com/some/path",
	"histo": ["dns", "connect", "receive"]
}
See this screenshot for an example histogram.
histo_ranges
By default, the histograms generated by wperf include metrics in the following time ranges:
- 0-1 ms
- 1-2 ms
- 2-3 ms
- 3-4 ms
- 4-5 ms
- 5-10 ms
- 10-20 ms
- 20-30 ms
- 30-40 ms
- 40-50 ms
- 50-100 ms
- 100-200 ms
- 200-300 ms
- 300-400 ms
- 400-500 ms
- 500-1000 ms
- 1-2 sec
- 2-3 sec
- 3-4 sec
- 4-5 sec
- 5+ sec
You can customize these lanes by specifying a histo_ranges key in your JSON configuration file. This should be set to an array of strings, and the format of the strings needs to match #-# ms, #+ ms, #-# sec or #+ sec. Example:
{
	"url": "https://myserver.com/some/path",
	"histo_ranges": [
		"0-1 ms",
		"1-2 ms",
		"2-3 ms",
		"3-4 ms",
		"4-5 ms",
		"5-10 ms",
		"10-20 ms",
		"20-30 ms",
		"30-40 ms",
		"40-50 ms",
		"50-100 ms",
		"100-200 ms",
		"200-300 ms",
		"300-400 ms",
		"400-500 ms",
		"500-1000 ms",
		"1-2 sec",
		"2-3 sec",
		"3-4 sec",
		"4-5 sec",
		"5+ sec"
	]
}
stats
If you would like wperf to output more machine-readable statistics, you can do so by adding the --stats command-line argument, or the stats configuration property. Example use:
wperf https://myserver.com/some/path --stats
Example JSON configuration:
{
	"url": "https://myserver.com/some/path",
	"stats": true
}
You can alternatively have the statistics appended to a file, instead of printed to the console. To do this, simply include the destination target filename after --stats on the command-line, or set the stats property to a filename in the JSON configuration file.
Example output (pretty-printed for display purposes):
{
	"current_sec": 1567391879,
	"count_sec": 39,
	"peak_sec": 61,
	"total_reqs": 100,
	"total_warnings": 0,
	"total_errors": 0,
	"bytes_sent": 58300,
	"bytes_received": 28900,
	"time_start": 1567391878.592,
	"total": {
		"min": 4.689,
		"max": 28.387,
		"total": 633.4549999999998,
		"count": 100,
		"avg": 6.334549999999998
	},
	"dns": {
		"min": 0.59,
		"max": 16.118,
		"total": 98.68200000000003,
		"count": 100,
		"avg": 0.9868200000000003
	},
	"connect": {
		"min": 0.177,
		"max": 0.934,
		"total": 22.475,
		"count": 100,
		"avg": 0.22475
	},
	"send": {
		"min": 0.967,
		"max": 1.873,
		"total": 110.59200000000003,
		"count": 100,
		"avg": 1.1059200000000002
	},
	"wait": {
		"min": 2.491,
		"max": 8.302,
		"total": 361.1120000000002,
		"count": 100,
		"avg": 3.611120000000002
	},
	"receive": {
		"min": 0.054,
		"max": 1.07,
		"total": 7.630000000000001,
		"count": 100,
		"avg": 0.0763
	},
	"decompress": {
		"min": 0.192,
		"max": 2.288,
		"total": 30.935,
		"count": 100,
		"avg": 0.30935
	}
}
Here are descriptions of the properties:
| Property | Description |
|---|---|
current_sec |
Date/time of the current second, expressed as Epoch seconds. |
count_sec |
The number of requests completed during the current second (used to compute req/sec). |
peak_sec |
The requests per second during the peak (best performing) second. |
total_reqs |
The total number of requests sent. |
total_warnings |
The total number of warnings received. |
total_errors |
The total number of errors received. |
bytes_sent |
The total number of bytes sent. |
bytes_received |
The total number of bytes received. |
time_start |
The date/time of when the run started, expressed as Epoch seconds. |
total |
Raw HTTP performance metrics for the total request time (see below). |
dns |
Raw HTTP performance metrics for the DNS lookup time (see below). |
connect |
Raw HTTP performance metrics for the TCP connect time (see below). |
send |
Raw HTTP performance metrics for the data send time (see below). |
wait |
Raw HTTP performance metrics for the request wait time (see below). |
receive |
Raw HTTP performance metrics for the data receive time (see below). |
decompress |
Raw HTTP performance metrics for the decompress time (see below). |
Each of the HTTP performance objects contain the following properties:
| Property | Description |
|---|---|
min |
The minimum time recorded for the metric, in milliseconds. |
max |
The maximum time recorded for the metric, in milliseconds. |
total |
The total of all time measurements added together (used to compute the average), in milliseconds. |
count |
The total number of samples recorded for the metric. |
avg |
The average time for the metric (total divided by count), in milliseconds. |
quiet
To suppress all wperf script output (with some exceptions -- see below), include the --quiet argument on the command-line, or set the quiet JSON configuration property to true. Example:
wperf https://myserver.com/some/path --quiet
Example JSON configuration:
{
	"url": "https://myserver.com/some/path",
	"quiet": true
}
This will cause all output to be suppressed, with these two exceptions:
- If the script detects that it is running on an actual terminal, vs. being called from a script or pipe, then the progress bar is displayed.
- If stats mode is activated, this busts through quiet mode (the assumption is, if you asked for stats, you want stats).
color
By default, wperf outputs its reports and tables using ANSI colors in your terminal. However, if for some reason you don't want color output, you can disable it by either setting the --color command-line argument to false, or setting the color JSON configuration property to false. Example:
wperf https://myserver.com/some/path --color false
Example JSON configuration:
{
	"url": "https://myserver.com/some/path",
	"color": false
}
wrapper (Advanced)
Note: This is an advanced feature, which requires Node.js programming knowledge.
wperf allows you to "wrap" (hook) the internal request cycle, to run your own Node.js function and perform actions before and/or after each request. Using this you can manipulate or generate your own URLs in code, and/or filter or change the HTTP responses as well. To do this, you will have to write your own Node.js script.
The feature is activated by the --wrapper command-line argument, or the wrapper JSON configuration property. Either way, it should be set to a filesystem path pointing at your Node.js script. Example:
wperf https://myserver.com/some/path --wrapper /path/to/my-request-wrapper.js
Example JSON configuration:
{
	"url": "https://myserver.com/some/path",
	"wrapper": "/path/to/my-request-wrapper.js"
}
Your Node.js script should export a class with the following definition:
module.exports = class RequestWrapper {

	constructor(request, args) {
		// class constructor, save request and args for later use
		this.request = request;
		this.args = args;
	}

	get(url, opts, callback) {
		// called for every `GET` request
		// callback expects (err, resp, data, perf)
		this.request.get( url, opts, callback );
	}

};
Wrapper Constructor
Your class constructor is passed exactly two arguments:
- A reference to the request library, which is an instance of pixl-request.
- The current configuration object (usually parsed command-line arguments, but may also include a parsed JSON configuration file).
It is recommended that you store both of these in your class for later use.
Wrapper Method Hook
For each HTTP request, your wrapper class is invoked by calling a method named after the current HTTP method, converted to lower-case. For example, if the current configuration is set to send HTTP GET requests, then your wrapper will need to have a get() method defined. For HTTP POST, you will need a post() method, and so on. In all cases, the function is passed 3 arguments:
- The current URL, which may have been dynamically generated using placeholder substitution variables.
- The current request options object (see http.request for all the properties you can set here).
- A callback function to fire when the request completes.
Upon the completion of each request, success or fail, the callback function expects four arguments:
- An Error object, if an error occurred (otherwise this should be falsey).
- The HTTP response object, which should be a http.ServerResponse object from Node.js.
- The HTTP response body, as a Buffer object.
- The performance metrics, which should be an instance of pixl-perf.
Related
-
pixl-request
- Underlying HTTP library used to send all requests and track detailed performance metrics.
-
pixl-cli
- Command-line library, used to generate the progress bar, time remaining and colored tables.
License (MIT)
The MIT License
Copyright (c) 2019 Joseph Huckaby.
Permission is hereby granted, free of charge, to any person obtaining a copy of this software and associated documentation files (the "Software"), to deal in the Software without restriction, including without limitation the rights to use, copy, modify, merge, publish, distribute, sublicense, and/or sell copies of the Software, and to permit persons to whom the Software is furnished to do so, subject to the following conditions:
The above copyright notice and this permission notice shall be included in all copies or substantial portions of the Software.
THE SOFTWARE IS PROVIDED "AS IS", WITHOUT WARRANTY OF ANY KIND, EXPRESS OR IMPLIED, INCLUDING BUT NOT LIMITED TO THE WARRANTIES OF MERCHANTABILITY, FITNESS FOR A PARTICULAR PURPOSE AND NONINFRINGEMENT. IN NO EVENT SHALL THE AUTHORS OR COPYRIGHT HOLDERS BE LIABLE FOR ANY CLAIM, DAMAGES OR OTHER LIABILITY, WHETHER IN AN ACTION OF CONTRACT, TORT OR OTHERWISE, ARISING FROM, OUT OF OR IN CONNECTION WITH THE SOFTWARE OR THE USE OR OTHER DEALINGS IN THE SOFTWARE.