ROS packages for Curio - a Sawppy Rover
This is a collection of ROS software packages to control a version of Roger Chen's Sawppy Rover.
These packages are intended to help get builders of Roger's Sawppy up and running on ROS while staying faithful to the original design using LX-16A servo motors. This presents some challenges with getting reliable odometry which we address with an encoder filter that identifies when the encoder position is outside its valid range.
Overview
There are a number of ROS packages to control the rover, visualise it in rviz, and simulate it in Gazebo.
ackermann_drive_controllera 6 wheel, 4 steering controller consistent with theros_controlframework.curio_basehardware drivers and a ROS base controller node subscribing togeometry_msgs/Twiston/cmd_vel.curio_bringupa set of launch files for bringing up the rover nodescurio_controlconfiguration and launch files using theros_controlframeworkcurio_descriptiona URDF / xacro model for the robot using STL files from the Sawppy CAD modelcurio_gazeboconfiguration and launch files for spawning the rover in Gazebo with ROS controlcurio_navigationconfiguration and launch files for the ROS navigation stack.curio_teleopa telep node for interpreting PWM signals from a RC unit and publishing to/cmd_velcurio_vizconfiguration and launch files for loading the robot model intorviz.
For more detail see the sections below.
Dependencies
You will need a working installation of ROS and Gazebo to use these packages. They have been built and tested on the following platforms / distributions:
macOS
- OSX 10.11.6
- ROS Melodic Morenia
- Gazebo version 9.6.0
Linux
- Ubuntu 18.04.03 LTS (Bionic Beaver)
- ROS Melodic Morenia
- Gazebo version 9.0.0
Raspberry Pi 4 (rover only - no simulation)
- Raspbian GNU/Linux 10 (buster)
- ROS Melodic Morenia (source build)
Python
These packages use ROS and Python 2.7. In addition to the Python packages required for a ROS desktop-full installation you will need the following:
For the serial communication with USB connected hardware devices:
For the machine learning classifier used in the encoder filter:
C++
For C++ serial communication we use:
To install:
cd ~/curio_ws/src
git clone https://github.com/wjwwood/serial.git
cd ~/curio_ws
catkin build
ROS
We use rosserial_arduino
to communicate with the Arduino controller. It is included in the
rosserial stack and available
from GitHub:
If you wish to use the navigation stack you will need a laser scanner
and a ROS driver for it. We use the rplidar driver:
As usual, clone the source into your catkin source folder ~/curio/src
and build with catkin build.
Curio
Firmware and custom messages for the rover are maintained in separate repositories:
curio_firmwareArduino firmware for the rovercurio_msgsROS messages for the rover.
Installation
Create and configure a workspace
Source your ROS installation:
source /opt/ros/melodic/setup.bashCreate a catkin workspace:
mkdir -p ~/curio_ws/src
cd ~/curio_ws
catkin init
Clone and build the packages
Clone the
curio,
curio_firmware
and
curio_msgs
packages into ~/curio_ws/src:
cd ~/curio_ws/src
git clone https://github.com/srmainwaring/curio.git
git clone https://github.com/srmainwaring/curio_firmware.git
git clone https://github.com/srmainwaring/curio_msgs.git
Build the packages from the curio_ws directory:
cd ~/curio_ws
catkin build
Source the build:
source devel/setup.bashHardware
Curio was constructed using off the shelf consumer electronics that require little or no modification (i.e. no custom boards):
- Arduino Mega 2560
- Raspberry Pi 4 4GB with 32GB SD card
- LewanSoul BusLinker LX-16A Bus Servo v2.4
- Graupner mz-12 RC transmitter and Falcon 12 receiver
- 4-49V DC to 1.5-35V DC voltage regulator
- 7.2V NiMh 5000mAh battery
- RPLidar A1 laser scanner
Follow the wiring instructions in the Curio firmware Readme to set up the connections between the Arduino, BusLinker board and the radio control receiver.
In the following we will assume that the rover has been configured to use the Arduino as the servo controller and radio control decoder. Note: this is a change from the previous version where the Python module communicated with the servo bus directly. The reason for the change is that the USB serial connection to the BusLinker board cannot provide updates on all servo positions fast enough for the encoder filter to work accurately.
Calibration
Encoder calibration
The encoder filter uses a decision tree classifier and regressor from scikit-learn.
The persistence approach supported natively in scikit-learn relies on
Python pickle, which may not be compatible across Python and package versions.
For this reason we have included the training data set and training routines
in the curio_base package so that you can create instances of the models
customised to your environment.
The labelled data and its corresponding dataset, and default instances
of a classifier and regressor are located in curio_base/data:
curio_base/data/lx16a_dataset.zip
curio_base/data/lx16a_labelled_data.zip
curio_base/data/lx16a_tree_classifier.joblib
curio_base/data/lx16a_tree_regressor.joblib
It is strongly recommended for security and compatibility that you create a new instance of the classifier and regressor:
roslaunch curio_base train_classifier.launch
roslaunch curio_base train_regressor.launch
which will overwrite the default classifier and regresssor instances included with the distribution. You will need to run this on the rover (and the desktop computer if you want to run the base controller from it while testing).
Odometry calibration
The parameters for the base controller are in the configuration
file curio_base/config/base_controller.yaml.
The parameters:
wheel_radius_multipliermid_wheel_lat_separation_multiplier
are used to tune the odometry. A value of 1.0 means no adjustment.
Using the given settings for the rovers wheel geometry we found the odometry linear measurement to be satisfactory. The angular measurement was underestimated by about a 1/4 revolution in every 8. To correct for this the wheel separation multiplier is set to 31/32 = 0.96875.
The reason for the adjustment can be explained as follows: when the rovers middle wheels are under load the rocker and bogie arms flex slighty, resulting in the wheels contact point with the gound moving from the centre of the wheel towards the inner edge. This reduces the effective lateral separation of the wheels and results in the rover turning in-place faster than it would otherwise.
Usage - Rover
curio_base
This package is used to control the rover. It contains a hardware interface
for the LX-16A servos and a base controller node that subscribes to ROS
geometry_msgs/Twist
messages published to the topic /cmd_vel.
Configuration
The base and arduino controllers are configured using the file
curio_base/config/base_controller.yaml.
The most important parameters to check are the serial id's assigned to
each servo, and to ensure that these are correct for your rover.
The default configuration uses the following assignment:
| Joint Name | Servo ID |
|---|---|
| Front Left Wheel | 11 |
| Mid Left Wheel | 12 |
| Back Left Wheel | 13 |
| Front Right Wheel | 21 |
| Mid Right Wheel | 22 |
| Back Right Wheel | 23 |
| Front Left Steer | 111 |
| Mid Left Steer | 121 |
| Mid Right Steer | 221 |
| Back Right Steer | 231 |
Test the hardware
The first step is to check that the arduino controller is working correctly. Place the rover on blocks and ensure all joints are able to turn freely.
You can check the USB serial device names using:
$ python -m serial.tools.list_ports -v
/dev/ttyACM0
    desc: ttyACM0
    hwid: USB VID:PID=2341:0042 SER=75830333238351806212 LOCATION=1-1.4:1.0
/dev/ttyAMA0
    desc: ttyAMA0
    hwid: fe201000.serial
2 ports found
You'll get different device names according to the operating system
and number of USB ports in use. In this example on a Raspberry Pi
we see the Arduino is on /dev/ttyACM0.
Test the arduino controller node
Start roscore:
roscoreIn a separate terminal launch the arduino controller:
roslaunch curio_base arduino_controller.launch port:=/dev/ttyACM0where you should substitute the correct port for the Arduino.
On linux you may get an error such as:
serial.serialutil.SerialException: [Errno 13] could not open port /dev/ttyACM0: [Errno 13] permission denied: '/dev/ttyACM0'to resolve this you need to add yourself to the dialout group:
sudo usermod -a -G dialout $USERthen try re-launching the arduino controller node.
If the node is running correctly you should see:
$ rosnode info /curio_arduino_controller
------------------------------------------------------------
Node [/curio_arduino_controller]
Publications:
 * /diagnostics [diagnostic_msgs/DiagnosticArray]
 * /radio/channels [curio_msgs/Channels]
 * /rosout [rosgraph_msgs/Log]
 * /servo/positions [curio_msgs/CurioServoPositions]
 * /servo/states [curio_msgs/CurioServoStates]

Subscriptions:
 * /servo/commands [unknown type]

Services:
 * /curio_arduino_controller/get_loggers
 * /curio_arduino_controller/set_logger_level


contacting node http://curio:40719/ ...
Pid: 2964
Connections:
 * topic: /rosout
    * to: /rosout
    * direction: outbound
    * transport: TCPROS
Test the base controller node
Launch the base controller:
roslaunch curio_base base_controller.launchInspecting the node you should see:
$ rosnode info /curio_base_controller
------------------------------------------------------------
Node [/curio_base_controller]
Publications:
 * /odom [nav_msgs/Odometry]
 * /rosout [rosgraph_msgs/Log]
 * /servo/commands [curio_msgs/CurioServoCommands]
 * /servo/encoders [curio_msgs/CurioServoEncoders]
 * /tf [tf2_msgs/TFMessage]

Subscriptions:
 * /cmd_vel [unknown type]
 * /servo/positions [curio_msgs/CurioServoPositions]

Services:
 * /curio_base_controller/get_loggers
 * /curio_base_controller/set_logger_level


contacting node http://curio:43269/ ...
Pid: 3249
Connections:
 * topic: /servo/commands
    * to: /curio_arduino_controller
    * direction: outbound
    * transport: TCPROS
 * topic: /rosout
    * to: /rosout
    * direction: outbound
    * transport: TCPROS
 * topic: /servo/positions
    * to: /curio_arduino_controller (http://curio:40719/)
    * direction: inbound
    * transport: TCPROS
Test the Ackermann steering
Start rqt_robot_steering
and send commands:
rosrun rqt_robot_steering rqt_robot_steeringYou should see the robot steering widget. Adjusting the linear velocity should cause the wheels to move forwards / backwards. Adjusting the angular velocity should cause the corner steering joints to rotate and the wheels turn.
Test the base failsafe node [optional]
When using an Arduino to communicate with the servo bus board there are situations when the controller can leave the servos in a runaway state if you use the Arduino IDE and bootloader to upload sketches:
- Arduino hardware reset
- Arduino watchdog timer reset
- rosserial error: 'Lost sync with device, restarting...'
The Arduino may fail to run the curio firmware after the reset (i.e. setup()) is not called). This happens when rosserial continues to publish data to the Arduino via USB serial after the reset (i.e. rosserial_arduino has registered one or more subscribers). rosserial does not stop transmitting data while it attempts to resync, and this seems to be confusing the Arduino so that it never moves on from its bootloader sequence.
As a result the servos are left powered on and running at whatever duty was last set in the Arduino control loop.
The failsafe node takes advantage of the fact that communication via the serial header on the Lewansoul BusLinker board appears to have priority over the USB-to-TTL circuit. As a result we are able to run a background process that attempts to stop the servos which is ignored under usual operating conditions. However as soon as the Arduino is reset and stops transmitting and receiving to the servo board, the failsafe becomes effective and stops the servos.
To use the failsafe node connect the micro USB to the Lewansoul BusLinker board in addition to the connection between the Arduino and the serial header:
roslaunch curio_base base_failsafe.launch port:=/dev/ttyUSB0where you will need to substitute the appropriate port for your configuration.
To test the failsafe follow the instructions above for testing the
Ackermann steering and set the rover to move forward at half speed.
When you press the reset button on the Arduino the drive servos
should stop immediately. If you are monitoring the topic
servos/positions you will notice the messages stop. The RX LED
on the Arduino will continue to flash, and the arduino_controller node
will report that it has lost sync and is attempting to restart. You will
need to restart the arduino_controller node to re-stablish the
connection.
If you upload the curio firmware without a bootloader using ICSP then the firmware should run immediately after reset, the initialisation sequence should stop the servos without requiring the failsafe, and rosserial should resync automatically.
curio_teleop
This package is used to control the robot using a radio control setup.
It depends on the rosserial libraries
and assumes that the curio_firmware package
has been used to program the Arduino controlling the RC receiver.
Usage - Visualisation
curio_viz
This package contains launch and rviz configuration files.
To view the rover in rviz and manually control the joints run:
roslaunch curio_viz view_model.launch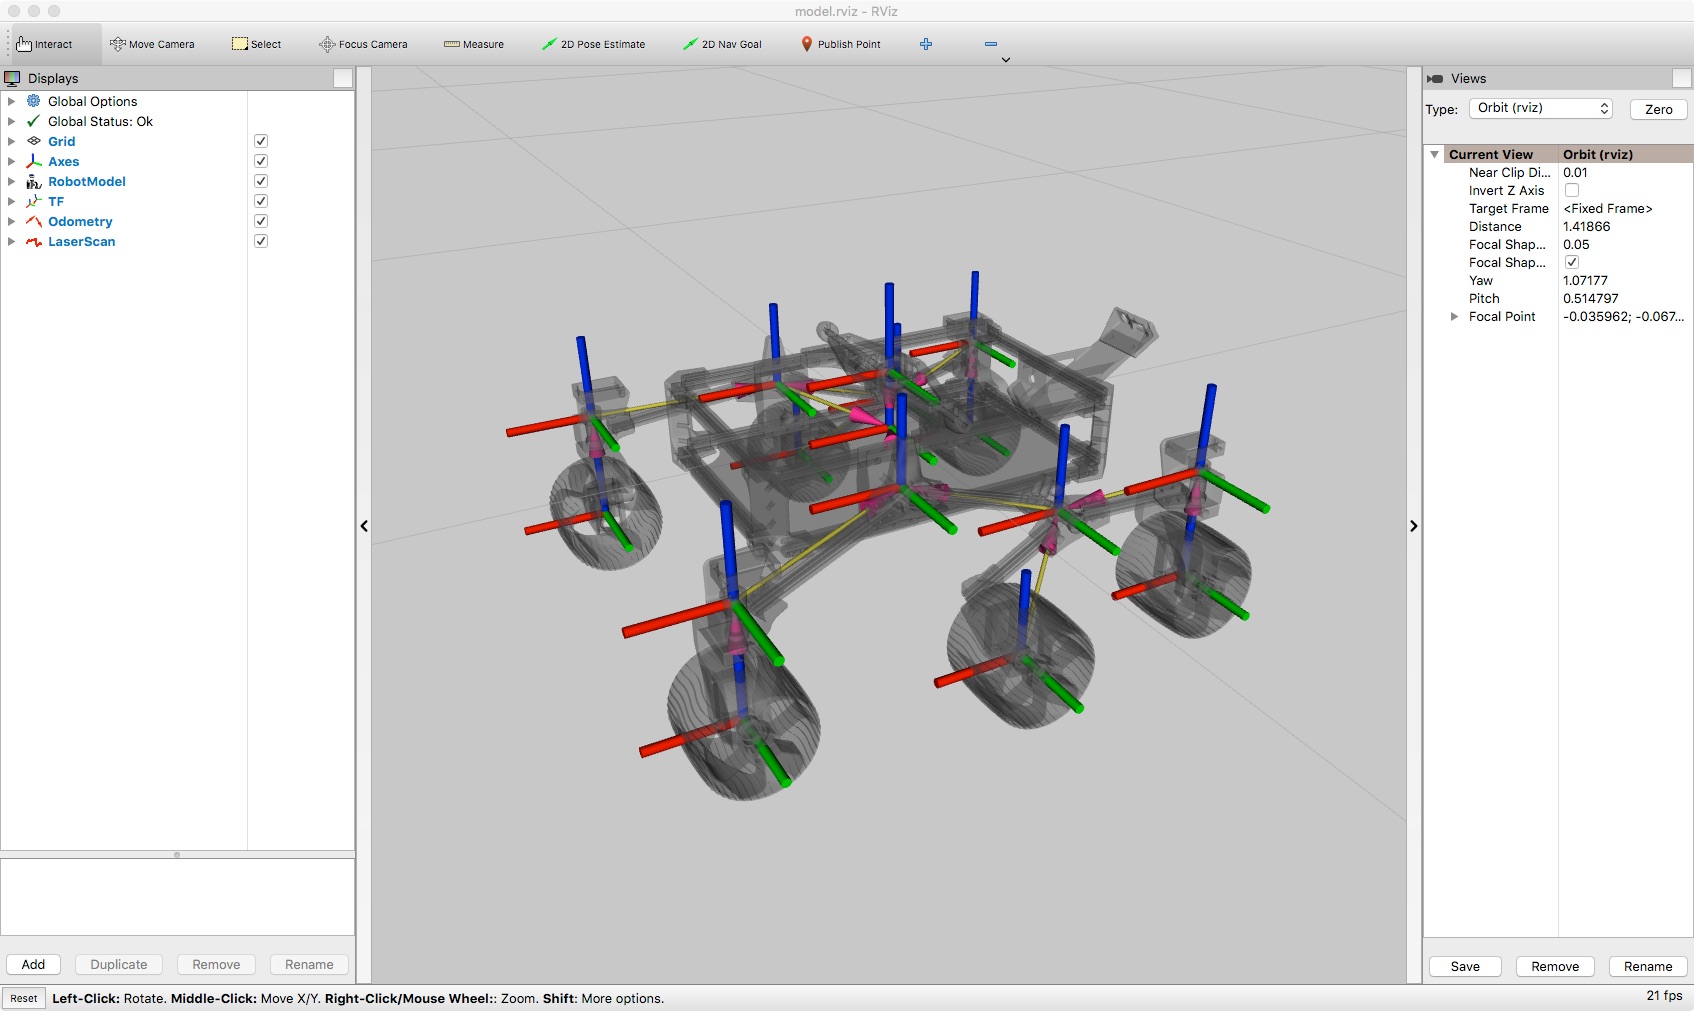
Usage - Simulation
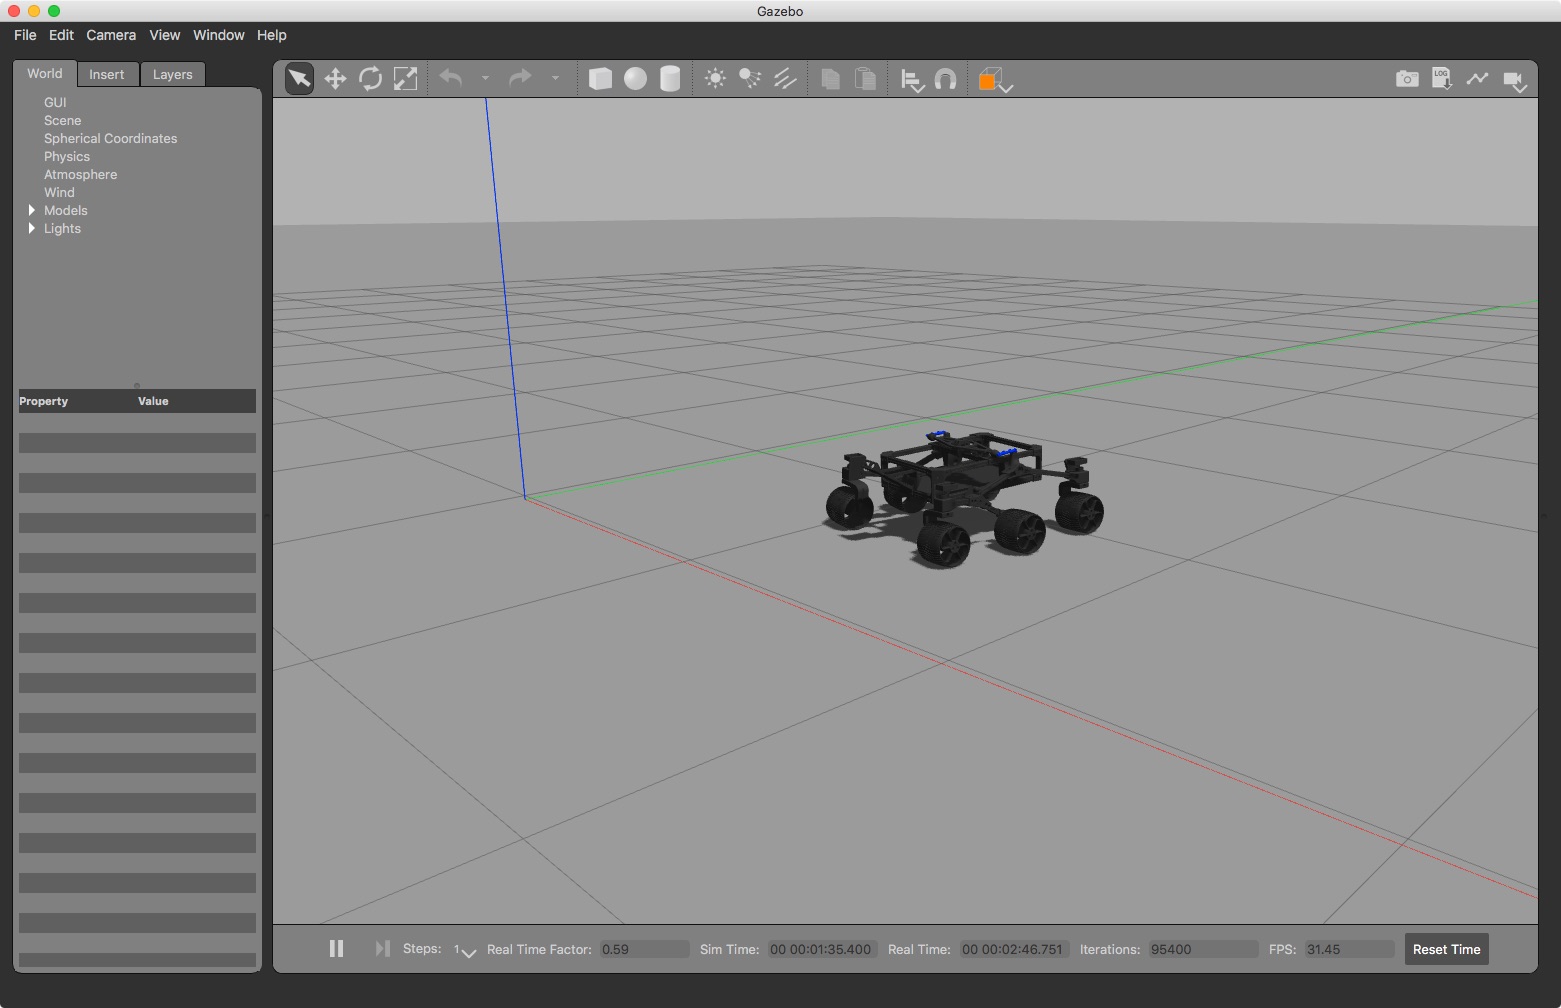
curio_gazebo
This package contains launch files for spawning the robot model into a Gazebo simulation.
The first places the rover in an empty world:
roslaunch curio_gazebo curio_empty_world.launchThe robot should appear on an empty ground plane in Gazebo with a
rqt_robot_steering
widget in a separate window.
You can simultaneously view the rover in rviz with:
roslaunch curio_viz view_robot.launch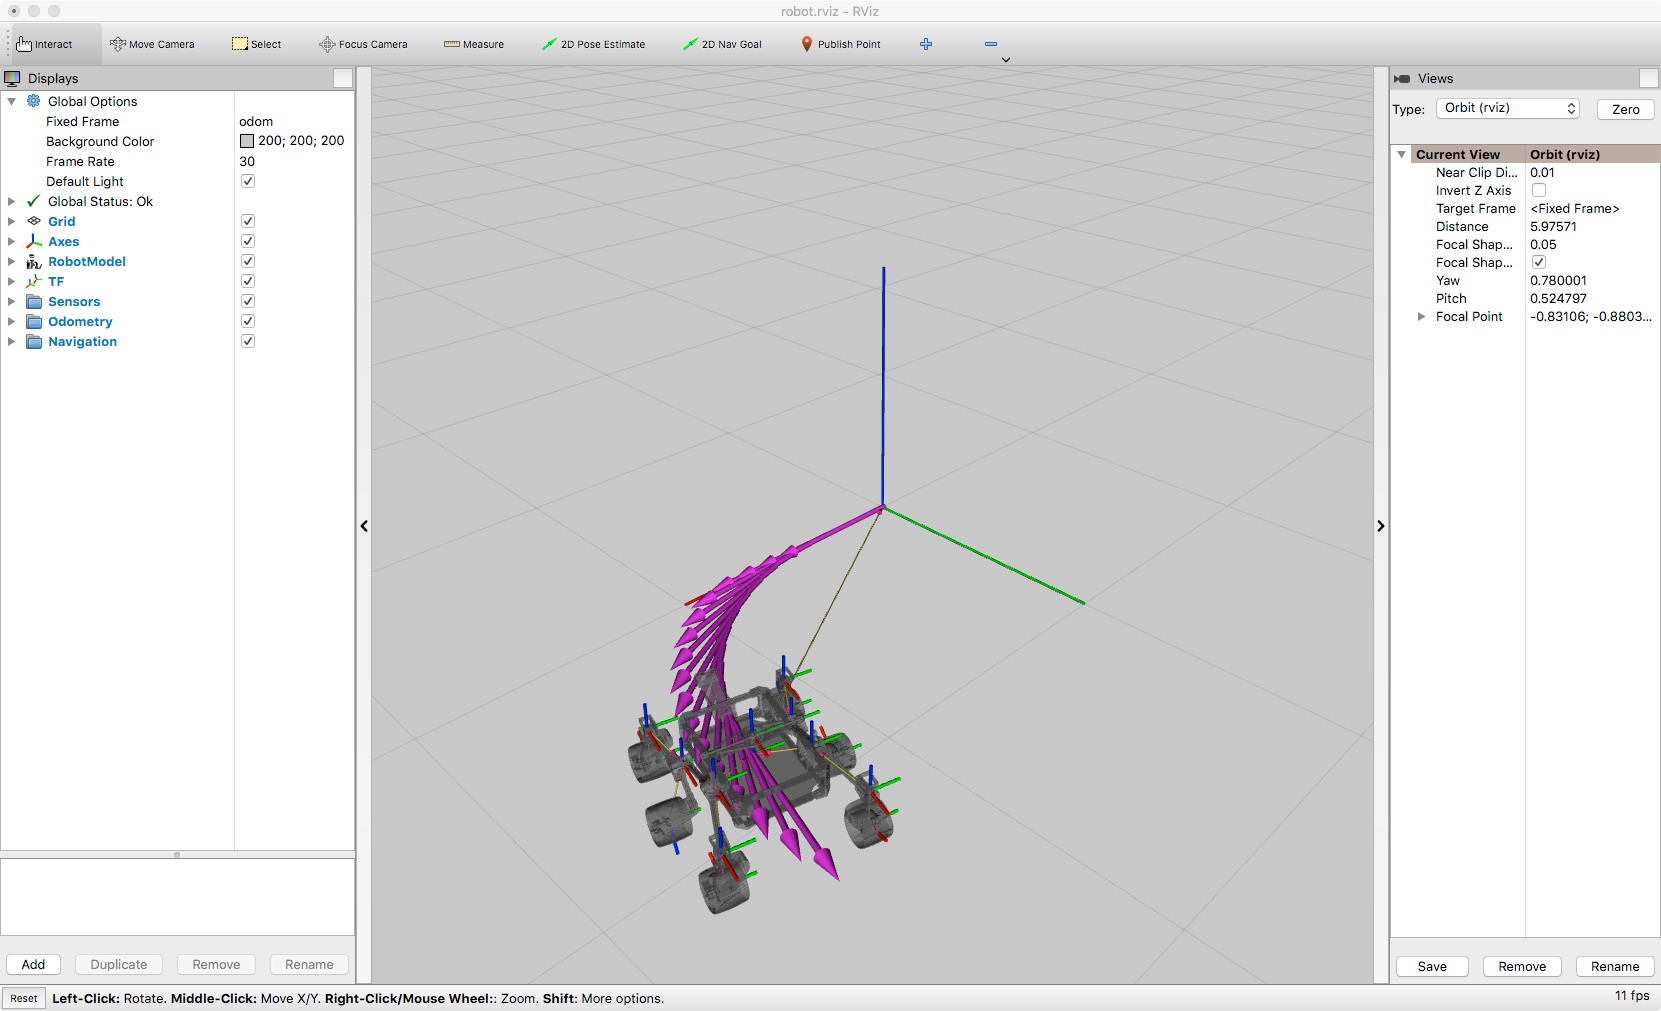
The robot is visualised in the /odom
frame and the joints will respond as the rover is moved in the simulation.
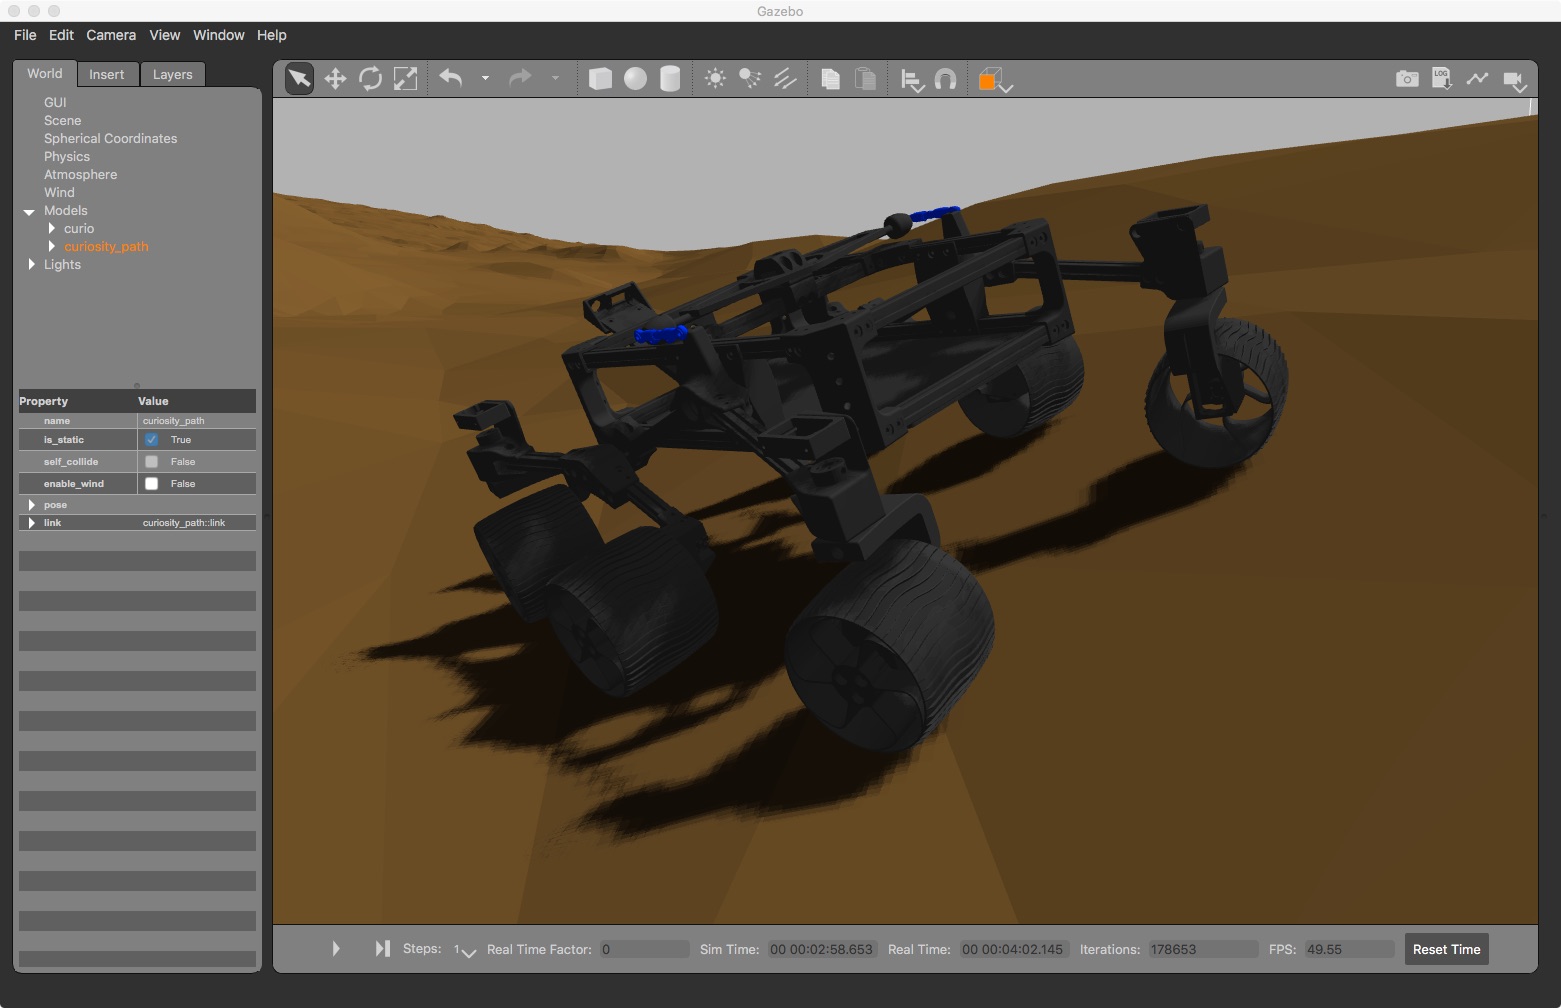
The second launch file:
roslaunch curio_gazebo curio_mars_world.launchplaces the rover in a Mars terrain model sourced from curiosity_mars_rover.
Usage - Navigation
curio_navigation
This package contains configuration and launch files for running the ROS navigation stack on the rover.
Currently we provide basic navigation support using the move_base
and amcl packages. For full details and tutorials please see the
ROS navigation tutorials.
The launch file curio_navigation/launch/move_base_no_map.launch and
associated configuration files are provided so you can observe the
cost map being created
in rviz while driving the rover around.
See the tutorial
"How to Build a Map Using Logged Data"
for more detail.
To create a map of the environment
-
If
roscoreisn't aready running, run roscore$ roscore -
Open a new terminal and start the simulation:
$ roslaunch curio_gazebo curio_shapes_world.launch -
Open a new terminal and start
rviz:$ roslaunch curio_viz view_robot.launch -
Open a new terminal and start gmapping:
$ rosrun gmapping slam_gmapping scan:=sensors/laser -
In the gazebo window, hit the "play" triangle
-
In the
rqt_robot_steeringwindow, drive the robot around till you are happy with the map displayed in rviz. -
In a new terminal, save the developed map:
$ rosrun map_server map_saver -f <map_name>
To navigate using an existing map of the environment
-
If
roscoreisn't aready running, run roscore$ roscore -
Open a new terminal and start the simulation:
$ roslaunch curio_navigation curio_navigation.launch map_file:=<map_name>.yaml -
In rviz, check to see that the AMCL 'Particle Cloud' surrounds the robot. If not, select '2D Pose Estimate' from the toolbar and click and drag on the map to give the pose estimator an initial estimate. The current sensor information is overlaid on the map in red to give you (and AMCL) a reference.
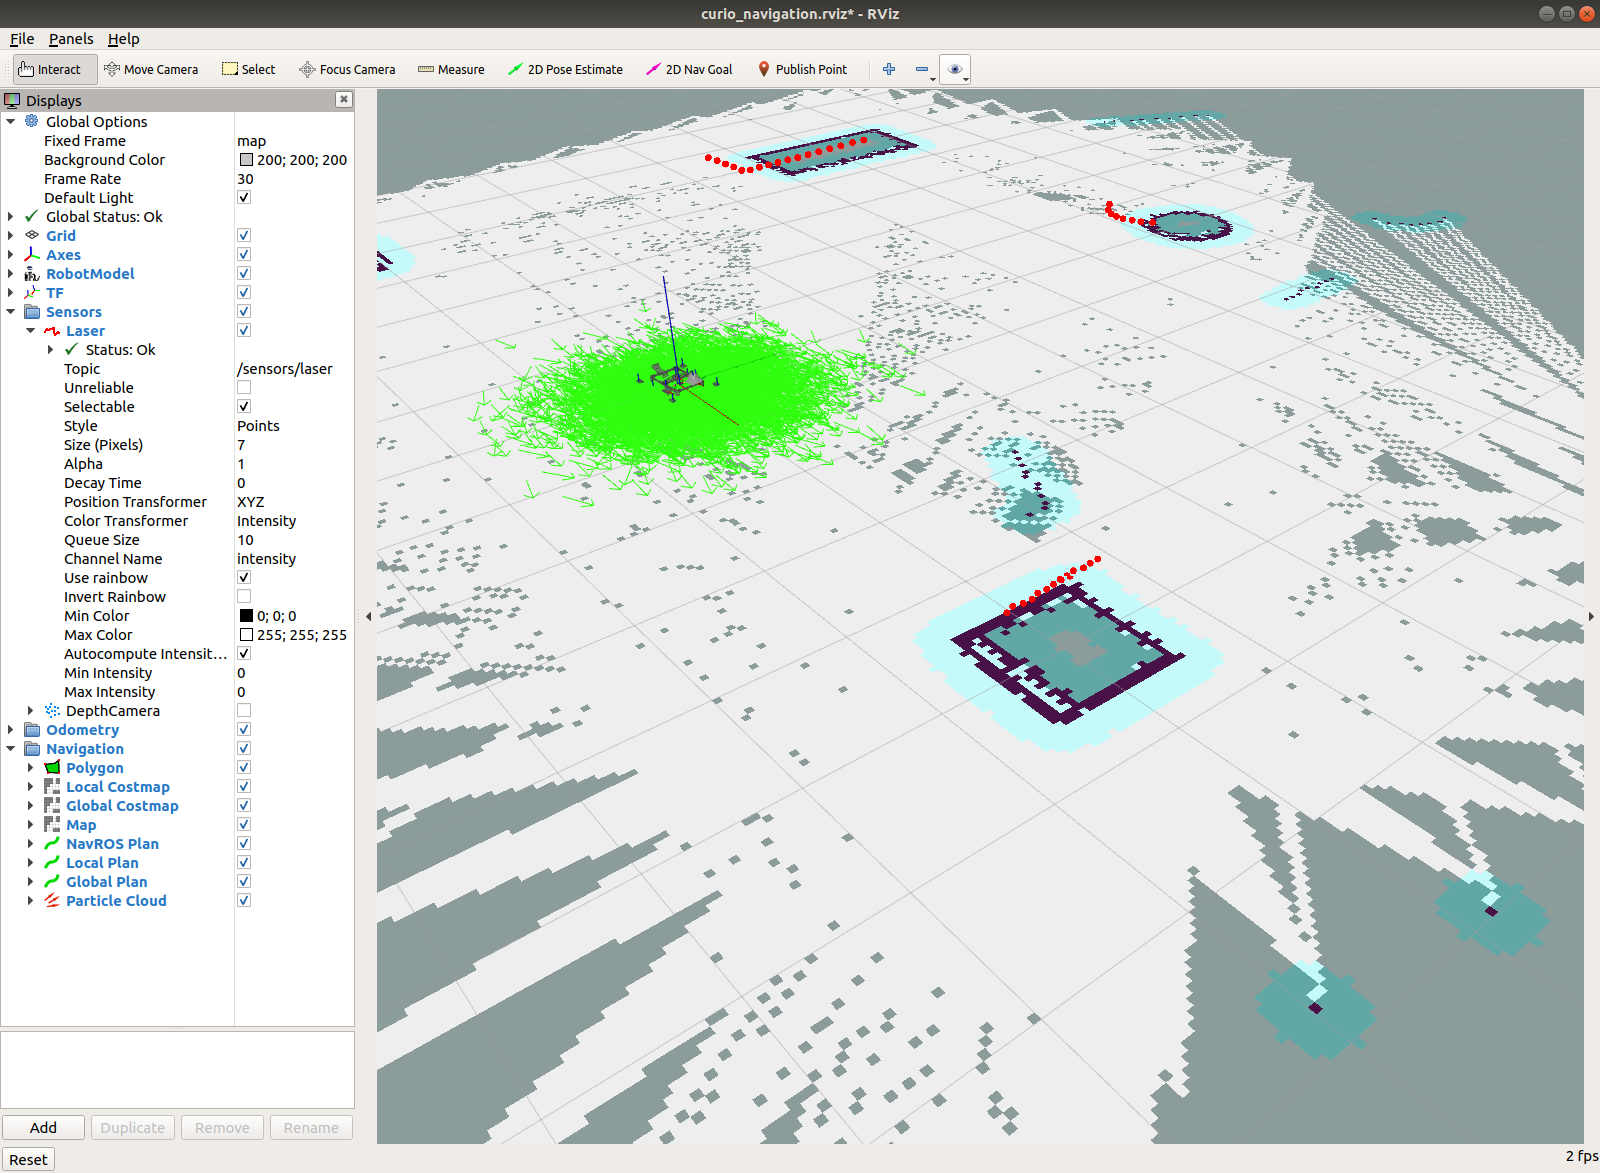
- In rviz, select
2D Nav Goalfrom the toolbar, then click and drag on the map to write that goal tomove_base_simple/goal. The rover should move to that location.
Other packages
ackermann_drive_controller
This package contains a controller plugin for a six wheel rover with four wheel Ackermann steering
that can be used in the ros_control framework. It was
adapted from the diff_drive_controller
from the ros_controllers library.
It is used in curio_gazebo to control the simulated rovers steering.
curio_bringup
This package contains launch files for bringing up the entire robot. Typically they configure and coordinate calling launch files from other packages in this distribution.
To bringup the robot in a single command:
roslaunch curio_bringup curio_robot.launch arduino_port:=/dev/ttyACM0 laser_scan_port:=/dev/ttyUSB0It will start the base controller, arduino controller, and the laser scanner.
curio_control
This package contains configuration and launch files for joint controllers such as
the ackermann_drive_controller. Not currently in use: curio_base will depend
on this package once support for the ros_control framework has been added to
the robot hardware abstraction layer.
curio_description
The curio_description package contains a URDF / xacro model of the rover with
<gazebo> extensions.
Note that the rocker-bogie differential cannot be fully modelled in URDF because it
induces closed loop kinematic chains. The SDF representation of the model does capture
the full kinematics so you will see additional links and joints in Gazebo
that are not present in rviz. These are the two turnbuckle linkages
with ball joints that connect the rocker assemblies to the differential beam.
Build Status
Develop Job Status
| Melodic | |
|---|---|
| curio_msgs |  |
| curio |  |
Release Job Status
| Melodic | |
|---|---|
| curio_msgs |  |
| curio |  |
License
This software is licensed under the BSD-3-Clause license found in the LICENSE file in the root directory of this source tree.
Acknowledgments
Many thanks to Roger Chen for publishing detailed plans and build instructions for his Sawppy Rover:
The JPL Open Source Rover project provided the inspiration for the Sawppy Rover and has helpful documentation on the Ackermann steering calculations:
- Open Source Rover Home
- Github
- Michael Cox, Eric Junkins, Olivia Lofaro. "Open Source Rover: Software Controls"
Miguel Angel Rodriguez and TheConstruct team for the curiosity_path
Gazebo terrain model:
The turnbuckle CAD file used in the rover description was authored by Carlos Rey and retrieved from GrabCAD:
S. Chitta, E. Marder-Eppstein, W. Meeussen, V. Pradeep, A. Rodríguez Tsouroukdissian, J. Bohren, D. Coleman, B. Magyar, G. Raiola, M. Lüdtke and E. Fernandez Perdomo
"ros_control: A generic and simple control framework for ROS",
The Journal of Open Source Software, 2017. (PDF). The ackermann_drive_steering controller borrows heavily
from the
diff_drive_controller
and the entire framework made the Gazebo integration much simpler.
There is a vast body of information that describes how to use ROS. In addition to the ROS and Gazebo tutorials, I have found the open source packages and manual for the Turtlebot 3 by Robotis and the Clearpath Husky very useful when trying to understand how to organsise and structure packages for a rover: