Self-Driving Car Steering Simulator
This is a Self-Driving Car steering simulator based on Sully Chen's model implementation of the NVIDIA End to End Learning for Self-Driving Cars (DAVE-2) paper.

How to run
-
To drive simply type the following command in while in the project directory (I have made the project using tensorflow such that there is no need to type
model.jsonin front of it):python drive.py -
To train type the following:
python train_on_game.pyIn order to train there need to be two metatdata(csv) files in the project folder:
driving_log.csv(used for training and validation)test_driving_log.csv(used for testing)
Model
The model has five convolutional layers, four fully connected layers and one output layer. It applies dropout in all of the fully connected layers. The following diagram from the NVIDIA paper illustrates the model.

| Convolutional Layers | |||
| Layer No. | Kernel Size | No. of Kernels | Stride |
| 1st | 5x5 | 24 | 2x2 |
| 2nd | 5x5 | 36 | 2x2 |
| 3rd | 5x5 | 48 | 2x2 |
| 4th | 3x3 | 64 | 1x1 |
| 5th | 3x3 | 64 | 1x1 |
| Fully Connected Layers | |||
| Layer No. | Width | ||
| 6th | 1164 | ||
| 7th | 100 | ||
| 8th | 50 | ||
| 9th | 10 | ||
| Output Layer | |||
| 10th | 1 Neuron followed by 2*atan(x) activation | ||
Augmentation
I applied Augmentation techniques in order to make my model generalize from track 1 to track 2. I used the following Augmentation techniques.
- Random image saturation variation.
def random_saturation_change(self,x):
    saturation_change = 0.4 + 1.2*random()
    x = np.array(x)
    x = cv2.cvtColor(x,cv2.COLOR_RGB2HSV)
    x[:,:,1] = x[:,:,1]*saturation_change
    return cv2.cvtColor(x,cv2.COLOR_HSV2RGB)
- Random image lightness variation.
def random_lightness_change(self,x):
      lightness_change = 0.4 + 1.2*random()
      x = np.array(x)
      x = cv2.cvtColor(x,cv2.COLOR_RGB2HLS)
      x[:,:,1] = x[:,:,1]*lightness_change
      return cv2.cvtColor(x,cv2.COLOR_HLS2RGB)
- Addition of random shadows to the image.
def random_shadow(self,x):
    x = cv2.cvtColor(x,cv2.COLOR_RGB2HSV)

    max_x = 200
    max_y = 66

    if(self.coin_flip()):
        i_1 = (0,0)
        i_2 = (0,max_y)
        i_3 = (random()*max_x,max_y)
        i_4 = (random()*max_x,0)
    else:
        i_1 = (random()*max_x,0)
        i_2 = (random()*max_x,max_y)
        i_3 = (max_x,max_y)
        i_4 = (max_x,0)

    vertices = np.array([[i_1,i_2,i_3,i_4]], dtype = np.int32)

    x = self.region_of_interest(x,vertices)

    x = cv2.cvtColor(x,cv2.COLOR_HSV2RGB)
    return x
- Random translation in the image.
Translations are added according to the following equation:


def random_translation(self,x,steer):
      x = np.array(x)
      rows,cols,rgb = x.shape

      rand_for_x = np.random.uniform()

      translate_y = -24 + np.random.uniform()*48
      translate_x = -30 + rand_for_x*60

      M = np.float32([[1,0,translate_x],[0,1,translate_y]])
return cv2.warpAffine(x,M,(cols,rows)), (steer+(rand_for_x-0.5)*0.4)![]()
- Also images are randomly flipped horizontally.
Data Generation
Images are picked from the metatdata provided driving_log.csv file and passed through the augmentor to get Training data.
The top 25 pixels of the image are ignored. as well as the bottom 25 ones in order to get rid of the front of the car from the images.
The following function is given the path to the image and the steering angle associated with that image. It loads the image, it randomly augments the image and steering and gives the output.
def get_image_and_steering(self,path,steering):
    image = scipy.misc.imresize(scipy.misc.imread(path)[25:135], [66, 200])

    if(self.coin_flip()):
        image = self.random_gamma_correction_rgb(image)

    if(self.coin_flip()):
        image = self.random_brightness_change_rgb(image)

    if(self.coin_flip()):
        image = self.random_saturation_change(image)

    if(self.coin_flip()):
        image = self.random_lightness_change(image)

    image = self.random_shadow(image)

    if(self.coin_flip()):
        image = self.random_blur(image)

    if(self.coin_flip()):
        image, steering = self.random_translation(image,steering)

    if(self.coin_flip()):
        image, steering = self.horizontal_flip_image(image,steering)

    return image/255.0, steering
A python generator is used in order to load the images into memory batch by batch and fed into the network.
Training
The model was trained on a dataset provided by Udacity. The dataset contain ~8000 examples of center, right and left camera images along with steering angles. I used 80% of this data for training and 20% for validation. I also generated some additional test data by driving around on track 1 of the Udacity Beta simulator.
Dataset Details:
For training I used the dataset provided by Udacity only. I didn't generate any additional data for training.
Before any modification the distribution of angles fir center images in the data was a follows.
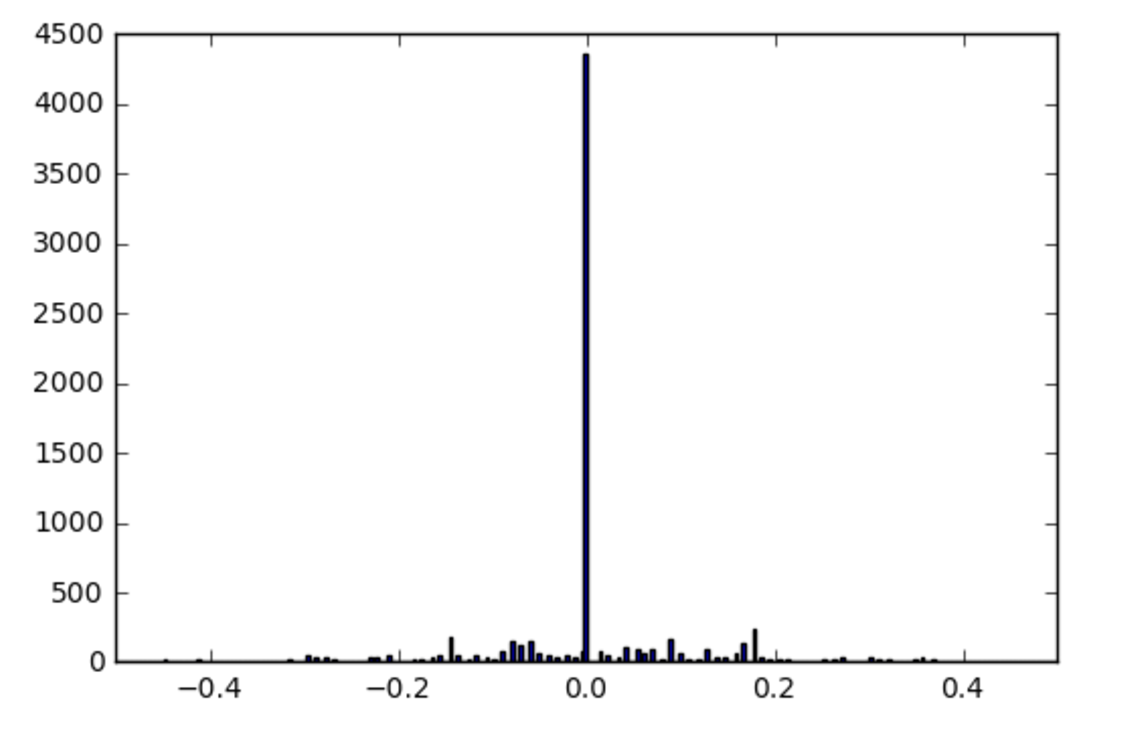 (The x-axis shows the angles and the y-axis shows their occurrence)
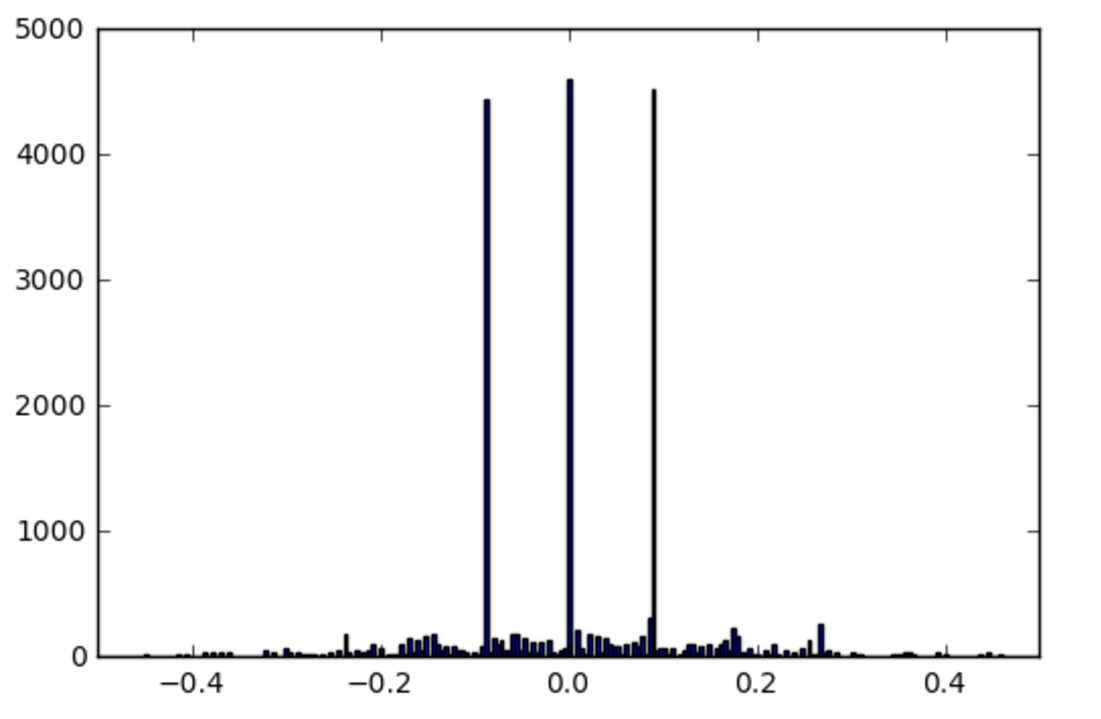
When I trained the network using such data alone the network went off track and wasn't able to drive properly. I then included the left and right images with various offsets such as 0.3, 0.2, but these values let to large shifts in the steering and the car would wear off track. 0.3 works OK when the training the network for few epochs but when the number of epochs is increased the vehicles starts to move in a zig-zag fashion across the road with more and more hard turns.
At the last moment I changed the offset to 0.09 and started getting better results. But as a result of this I had to multiply the angles I got times 3 while driving tin order to make proper turns.
Here are examples of the angles for center, left and right images.

Here is the distribution of angles after left and right offsets.
But after adding offset to the angles I still had to gather additional recovery data in order to make the car drive properly and perfectly. And, even after doing that the cars had no clue on track2.
So I read some articles online about image augmentation, especially the one by Vivek Yadav was very useful. I decided to add augmentation to my pipeline. So evey set of image and steering angle is augmented randomly in terms of gamma, saturation, translation, brightness, shadow, lightness e.t.c. This can be seen in the get_image_and_steering() in the data_handler class.
The width of my input to the Convolutional-Network is 200. I set the range of translation to be from -30 to +30 in the x-axis and from -5 to +5 in the y-axis. I didn't apply any offset to the angle for y-offset to image. For offsets to the image in x-axis I apply a linear offset to the angles ranging from -0.1 for -30 and +0.1 for +30. I came to this formula after lots of trail and error there is a great capacity for improvement in this regard.
  rand_for_x = random()

  translate_x = -30 + rand_for_x*60

  steer = steer+(rand_for_x-0.5)*0.2
So after applying these augmentations to the inputs of the network they looked like the following.

The distribution after applying the horizontal flipping and translation is as follows.

Reflections
Looking back, the model can be improved even further by applying a few small modifications
- Using ELU instead of RELU to improve convergence rates. (Suggested by Udacity reviewer)
- Adding better shadows to the model so it can work on track 2 in Fast, Simple, Good, Beautiful, Fantastic modes.
- Applying better offsets to the angels in order to get a better distribution of angles and avoid zig-zag behaviour
For testing I generated some additional data from the simulator.
After about 30 epochs the model started working on track1.
After 35 epochs the model works on both track 1 and track 2 with full throttle.
Documentation
trainer.py
class trainer# The class has a constructor and two functions
__init__(
self,
epochs = 10,
batch_size = 128,
validation_split = 0.2,
tune_model = True,
L2NormConst = 0.001,
left_and_right_images = False,
left_right_offset = 0.2,
root_path = '',
test_root_path ='',
stop_gradient_at_conv = False,
test_left_and_right_images = False
)- epochs: Number of epochs
- validation_split: The fraction of the data to use for validation_split
- tune_model: Should we tune the model or start from scratch.
- L2NormConst: The constant for amount of L2 regularization to apply.
- left_and_right_images: Should we include left and right images?
- left_right_offset: Amount of offset in angle for the left and right images.
- root_path: The root path of the image.
- test_root_path: The root path of the test images.
- stop_gradient_at_conv: Should we stop the gradient at the conv layers.
- test_left_and_right_images: Should we include left and right images during testing.
train(self) # Call this function to traintest(self) # Call this function to testsimulation_data.py
class data_handler__init__(
self,
validation_split = 0.2,
batch_size = 128,
left_and_right_images = False,
root_path = '',
left_right_offset = 0.2,
test_root_path = '',
test_left_and_right_images = False
):- validation_split: The fraction of the data to use for validation_split
- batch_size: Batch size of the data
- left_and_right_images: Should we include left and right images?
- root_path: The root path of the image.
- left_right_offset: Amount of offset in angle for the left and right images.
- test_root_path: The root path of the test images.
- test_left_and_right_images: Should we include left and right images during testing.
generate_train_batch(self) # training data generatorgenerate_validation_batch(self) # validation data generatorgenerate_test_batch(self) # test data generatorApps by Muddassir Ahmed:
- https://play.google.com/store/apps/details?id=com.muddassirkhan.quran_android
- https://play.google.com/store/apps/details?id=com.app.kitaabattawheed