SteffenReith / J1sc
Projects that are alternatives of or similar to J1sc
J1Sc - A simple reimplementation of the J1 CPU in Scala using Spinal HDL
How to build J1Sc and Swapforth
To build the J1Sc, you need first to create the VDHL / Verilog sources. The implementation is written by using Spinal HDL (https://github.com/SpinalHDL/SpinalHDL). Hence these sources are generated by a Scala program (Spinal HDL is a compelling Scala library that can be used to generate VHDL and Verilog code.
-
Install OpenJDK 8
-
Install a running Scala system and sbt
-
Clone the latest version of Spinal HDL (at least version 1.4.1) (see https://github.com/SpinalHDL/SpinalHDL)
-
Setup Spinal HDL (see http://spinalhdl.github.io/SpinalDoc/spinal_getting_started/)
-
Install gforth (e.g.
sudo apt-get install gforth) -
Change directory to the new clone of SpinalHDL and run
sbt publish-localinside -
Clone J1Sc (use
git clone --recurse-submodules https://github.com/SteffenReith/J1Sc.git) -
Change directory to J1Sc
-
Run
cd toolchain/forth && make && cd ../..to build the forth core system -
Build, load and install the tty0tty kernel module
A FORTH Shell/Terminal for J1Sc
Manfred Mahlow offers an excellent terminal for embedded FORTH systems, which supports linux on x86 and Raspberry/Raspbian. Besides 430CamelForth , 430eForth , 4e4th, AmForth, anyForth , Mecrisp , Mecrisp-Stellaris , noForth and STM8 eForth it also supports the J1Sc with Swapforth now (thank you Manfred!). This solution gives a much higher comfort than the original Python-based terminals from Swapforth. Hence, it is (strongly) suggested to use e4thcom instead the provided python-scripts. The python scripts are not very comfortable (you have been warned!) and reconnecting to your J1Sc doesn't work (at least for me).
Download the latest e4thcom (https://wiki.forth-ev.de/doku.php/en:projects:e4thcom) and install it according to the documentation (copy it to the installation directory) the e4thcom-plugin swapforth-j1sc.efc from support/e4thcom/. Version 0.8.2 works out of the box, because it has the swapforth-plugin in the distribution. Therefore, you don't have to copy swapforth-j1sc.efc!
Start enjoying e4thcom by the following command-line by e4thcom -d ttyUSB1 -b B115200 -t swapforth-j1sc. In case anything does not work, please check for the correct transmission rate (B115200 for the Nexys4 and B38400 for the simulation) and the serial device (e.g. /dev/tnt0 for the simulation). Make sure that the PATH-variable is set correctly and your J1Sc instance is connected to /dev/ttyUSB1 or modify the command-line accordingly to your situation.
The descriptions below show how to work with J1Sc without e4thcom. I give you advise not to do so because the shell scripts bin/confsX are unflexible and uncomfortable. Be warned!
Supported prototyping boards
J1Sc for a Digilent Nexys4 and Nexys4DDR board
-
We will build the J1Sc variant J1Nexys4X (either using the VHDL or the Verilog version) by
sbt run(select the Nexys4X configuration to be generated). The generated files can be found ingen/src/vhdl/J1Nexys4X.vhdandgen/src/verilog/J1Nexys4X.v. You needBoard_<BOARDNAME>.vhdandPLL.vhdinsrc/main/vhdl/archor the corresponding Verilog versions insrc/main/verilog/archas toplevel for synthesis. A Xilinx Vivado project fileJ1Sc.xprfor the VHDL version can be found invprj/vhdl/J1Scand the Verilog version is invprj/verilog/J1Sc. Note that J1Sc runs fine with a 100Mhz clock on a Nexys4 DDR from Digilent. Constraint files for the Nexys4 DDR can be found in/src/main/xilinx/nexys4ddrthe corresponding files for the Nexys4 can be found in/src/main/xilinx/nexys4. -
Next build J1Nexys4X (see
gen/src/vhdlorgen/src/verilog) which is the J1Sc variant used fo Neys4X boards. Send the .bit file to your FPGA/board (use eithersrc/main/vhdl/arch/Nexys4DDR/BoardNexys4DDR.vhdorsrc/main/verilog/arch/Nexys4DDR/BoardNexys4DDR.vas toplevel module) -
cd toolchain/forth -
Become root or set the permissions of your serial devices properly and run
bin/confsX, where X is the number of the used serial port. Hence X is 0 if/dev/ttyUSB0should be used. -
Press the reset button (default is the "CPU reset" button on the Nexys4 DDR). You should see something like:
Contacting... establishedLoaded 142 words -
Type
#include swapforth.fsto load the complete FORTH system -
Turn the leds on by
$ffff leds! -
Use the first RBG led by
5 10 10 rgbled! -
Have fun with a working FORTH system
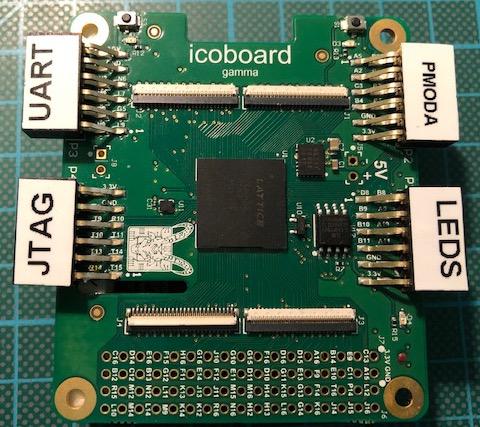
J1Sc for the icoBoard
At the moment only one hardware configuration is supported
- icoBoard Version 1.1
- icoUSBaseboard: FTDI Interfacebasis (first FTDI interface for programming the FPGA)
- Pmod USBUART (second FTDI interface for serial connection)
- Pmod 8LD (simply eight leds)
Attach the icoUSBBaseBoard to the icoBoard and connect the Pmods as shown here. Hence use PMod P1 for the leds and the upper row (!) of PMod P3 for the UART.
Clone and install the latest version of
-
yosys (clone https://github.com/cliffordwolf/yosys.git)
-
next-pnr (clone https://github.com/YosysHQ/nextpnr.git)
-
IceStorm (clone https://github.com/cliffordwolf/icestorm.git)
-
IcoTools (clone https://github.com/cliffordwolf/icotools.git)
Now change to the cloned directory of J1Sc
-
Build J1Ico by using the sbt build system. Type
sbt icoProgto generate a Verilog version of J1Sc for your IcoBoard, synthesize it, do a place & route and to download the bit-file finally. -
Become root or set the permissions of your serial devices properly and run
bin/confsX, where X is the number of the used serial port. Hence X is 0 if/dev/ttyUSB0should be used. -
Press the reset button (the button S1 near the PMod P2 is used by default). You should see something like:
Contacting... establishedLoaded 142 words -
Type
#include swapforth.fsto load the complete FORTH system -
Turn the leds on by
$ff leds! -
Have fun with a running FORTH system on your icoBoard!
At the moment, the tools can provide an implementation that is able to run at 40 MHz. This constraint will be checked during the sbt build. Hence stay tuned and read the log-files.
In principle, it is possible to use the IcoBoard together with a Raspberry PI to run J1Sc. In the case you do this, please send me (EMail: [email protected]) the needed steps, because I don´t have/use this configuration.
J1Sc for the iCEBoard
J1Sc has some preliminary support for the iCEBreaker FPGA board (see https://github.com/icebreaker-fpga). At the moment the UART, buttons, and LEDs can be used but it has not corresponded forth words for easily using them.
Clone and install the latest version of
-
yosys (clone https://github.com/cliffordwolf/yosys.git)
-
next-pnr (clone https://github.com/YosysHQ/nextpnr.git)
-
IceStorm (clone https://github.com/cliffordwolf/icestorm.git)
-
IcoTools (clone https://github.com/cliffordwolf/icotools.git)
Now change to the cloned directory of J1Sc and connect your board by USB
-
Build J1Ice by using the sbt build system. Type
sbt iceProgto generate a Verilog version of J1Sc for your iCEBreaker board, synthesize it, do a place & route and to download the bit-file finally. -
Become root or set the permissions of your serial devices properly and run
bin/confsX, where X is the number of the used serial port. Hence X is 0 if/dev/ttyUSB0should be used. -
Press the reset button (the button S1 near the PMod P2 is used by default). You should see something like:
Contacting... establishedLoaded 142 words -
Type
#include swapforth.fsto load the complete FORTH system -
Have fun with a running FORTH system on your iCEBoard!
At the moment, the tools can provide an implementation that can run at 18 MHz. This constraint will be checked during the sbt build. Hence stay tuned and read the log-files.
A Gatelevel simulation of J1Sc
The latest versions for SpinalHDL (you need at least version 1.1.2) offer a complete gate-level simulation of the generated designs. In the background, SpinalHDL uses Verilator as a simulation framework and hide all the C++ stuff by another Scala library called SpinalSim. Moreover, to connect the simulation to the host, a virtual null-modem cable is used. Hence
-
Clone and install the latest version of Verilator from http://git.veripool.org/git/verilator
-
Clone and install the latest version of tty0tty from https://github.com/SteffenReith/tty0tty.git. Load the kernel module by
insmod tty0tty.ko. To make the installation permanent, install the kernel module according to your distribution (for Ubuntu 16.04.3 LTScp tty0tty.ko /lib/modules/`uname -r`/kernel/drivers/miscanddepmod -a). Alternatively you can update the tty0tty submodule bygit submodule update --init --recursive. You can install the kernel-module by runningscripts/installTTY. You have to set the permission of/dev/tnt0and/dev/tnt1such that they are user read- and writeable. You can set the permissions of ´/dev/tnt0´ and ´/dev/tnt1´ by udev after every reboot automatically. For this see the udev-rule55-tty-tnt.rulesin the directorydoc/udev, modify it to your needs (e.g. the dialout group) and copy it e.g. to/etc/udev/rules.d. -
Go to your cloned J1Sc copy and type
cd toolchain/forth -
start a terminal by
bin/confhost -
open another shell window go to your copy of J1Sc and type
sbt test:runto compile and run the simulation. If everything went well a small gui with some LEDs and a reset button will occur (maybe you have to resize the window). -
Press the reset button. You should see something like:
Contacting... establishedLoaded 142 wordsin your terminal window. -
Type
#include swapforth.fsto load the complete FORTH system -
Turn the simulated LEDs on by
$ff leds! -
Have fun with a running FORTH on the simulated J1Sc!
Preliminary JTAG support
J1Sc offeres a simple and very restricted JTAG support at a very early stage. At the moment you can reset, stop and continue the CPU by corresponding JTAG-commands. Moreover, you can upload a memory-dump to the internal RAM. The corresponding scripts can be found in support/openocd/bin. All variants of J1Sc (including the gate-level simulation!) support this JTAG interface. Note that you need a special variant of OpenOCD for this. So clone and build
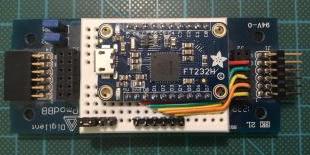
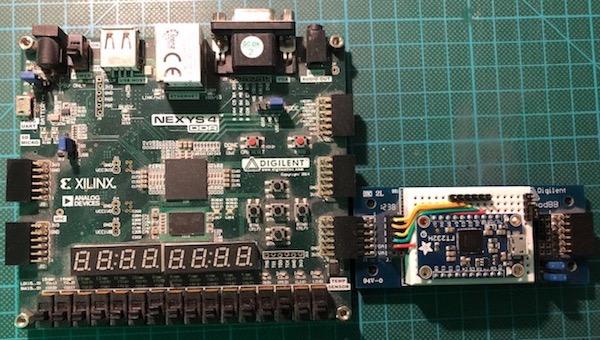
For the physical connection, I use a simple FT232H board from adafruit as shown below (I found it accidentally in my grab bag). Remember any similar FT232H adapter should work (please send email if you use another adapter) too.
In support/openocd/bin you will find some primitive OpenOCD scripts for programming, resetting, resuming and stalling your J1Sc:
progJ1, resetJ1, resumeJ1 and stallJ1
For the gatelevel simulation of J1Sc use
progJ1Sim, resetJ1Sim, resumeJ1Sim and stallJ1Sim
Wiring a JTAG-adapter to a Nexys4DDR
| JTAG signal | FT232H pin | Constraint | PMod |
|---|---|---|---|
| TCK | D0 | H16 | JB10 |
| TDI | D1 | G13 | JB9 |
| TDO | D2 | F13 | JB8 |
| TMS | D3 | E16 | JB1 |
The JTAG-implementation is at a very early state. Hence, I suggest that you don't rely on a correct function! This will be fixed in the future. Note that the JTAG-support is tested on a Nexys4DDR (and the simulation) only, but in principle, it should work for the IcoBoard and the iCEBreaker too! In the case that you use the JTAG on the IcoBoard or the Icebreaker: Please send an email and the needed patches!


